Configure ISE Posture over AnyConnect Remote Access VPN on FTD
Configure Posture over Remote Access VPN

1. The remote user uses Cisco Anyconnect for VPN access to the FTD.
2. The FTD sends a RADIUS Access-Request for that user to the ISE.
3. That request hits the policy named FTD-VPN-Posture-Unknown on the ISE. The ISE sends a RADIUS Access-Accept with three attributes:
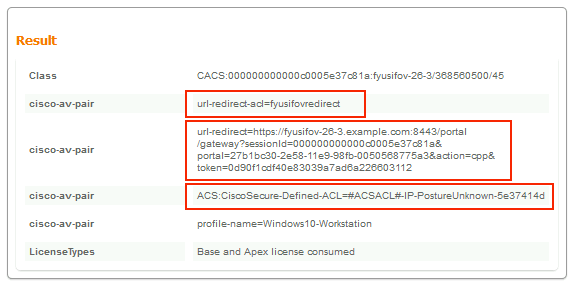
- cisco-av-pair = url-redirect-acl=fyusifovredirect – This is the Access Control List (ACL) name that is defined locally on the FTD, which decides the traffic that is redirected.
- cisco-av-pair = url-redirect=https://ip:port/portal/gateway?sessionId=SessionIdValue&portal=27b1bc30-2e58-11e9-98fb-0050568775a3&action=cpp – This is the URL to which the remote user is redirected.
- DACL = PERMIT_ALL_IPV4_TRAFFIC – downloadable ACL; This attribute is optional. In this scenario, all traffic is permitted in DACL)
4. If DACL is sent, RADIUS Access-Request/Access-Accept is exchanged in order to download content of the DACL
5. When the traffic from the VPN user matches the locally-defined ACL, it is redirected to ISE Client Provisioning Portal. ISE provisions AnyConnect Posture Module and Compliance Module.
6. After the agent is installed on the client machine, it automatically searches for ISE with probes. When ISE is detected successfully, posture requirements are checked on the endpoint. In this example, the agent checks for any installed anti-malware software. Then it sends a posture report to the ISE.
7. When ISE receives the posture report from the agent, ISE changes Posture Status for this session and triggers RADIUS CoA type Push with new attributes. This time, the posture status is known and another rule is hit.
- If the user is compliant, then a DACL name that permits full access is sent.
- If the user is non-compliant, then a DACL name that permits limited access is sent.
8. The FTD removes the redirection. FTD sends Access-Request in order to download DACL from the ISE. The specific DACL is attached to the VPN session.
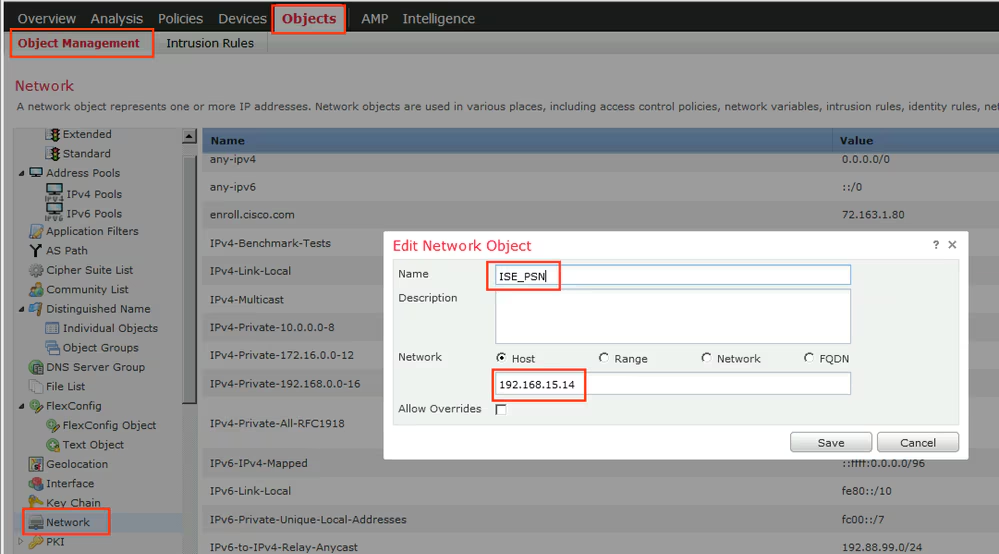
Step 1. Create Network Object Group for ISE and Remediation Servers (if any). Navigate to Objects > Object Management > Network.
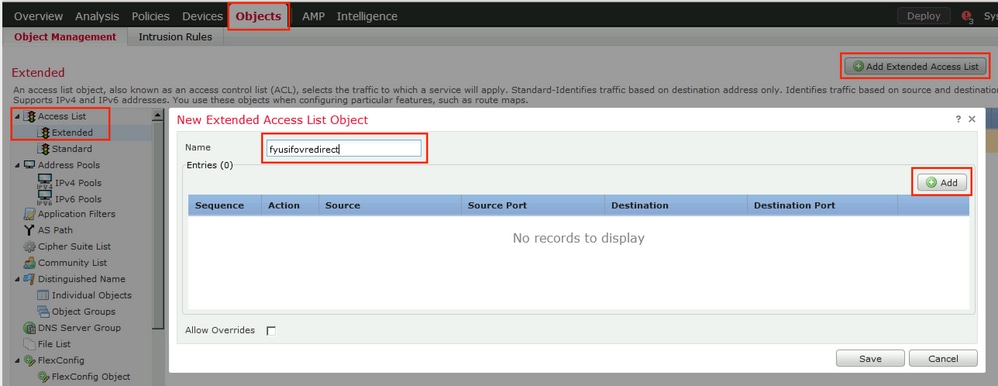
Step 2. Create Redirect ACL. Navigate to Objects > Object Management > Access List > Extended. Click Add Extended Access List and provide the name of Redirect ACL. This name must be the same as in the ISE authorization result.
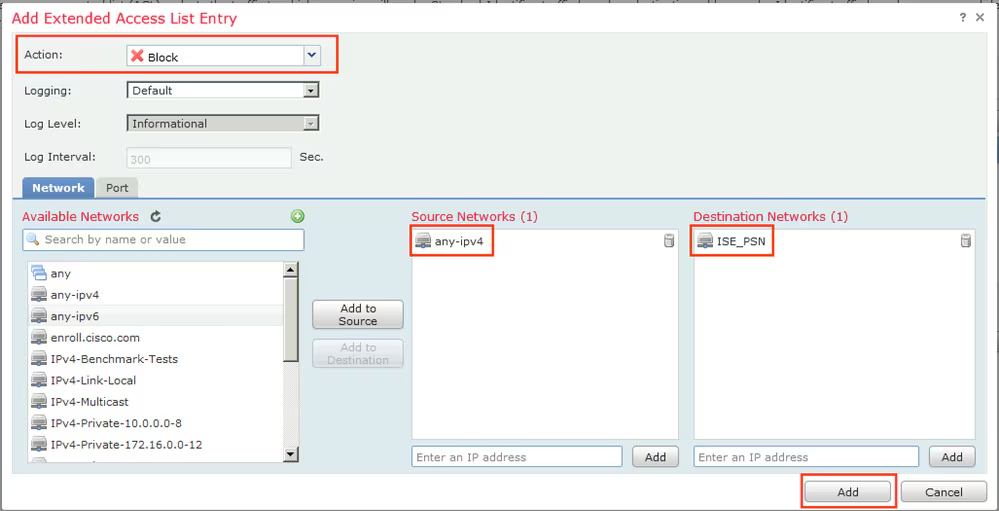
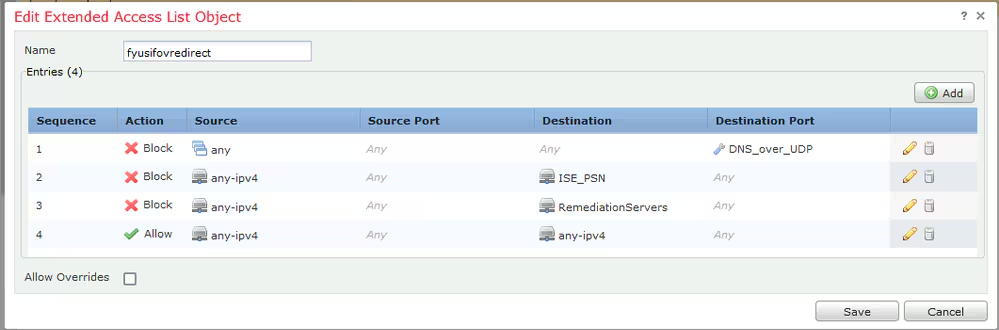
Step 3. Add Redirect ACL Entries. Click the Add button. Block traffic to DNS, ISE, and to the remediation servers to exclude them from redirection. Allow the rest of the traffic, this triggers redirection (ACL entries could be more specific if needed).
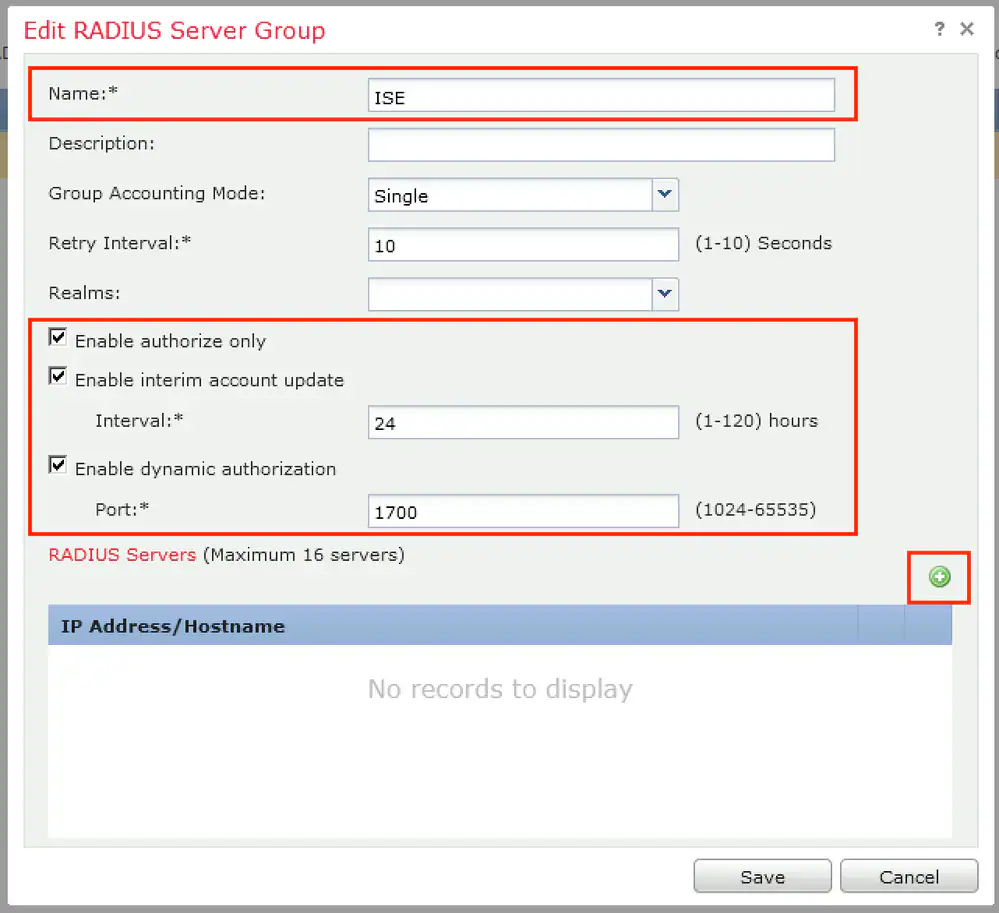
Step 4. Add ISE PSN node/nodes. Navigate to Objects > Object Management > RADIUS Server Group. Click Add RADIUS Server Group, then provide name, enable check all checkboxes and click the plus icon.
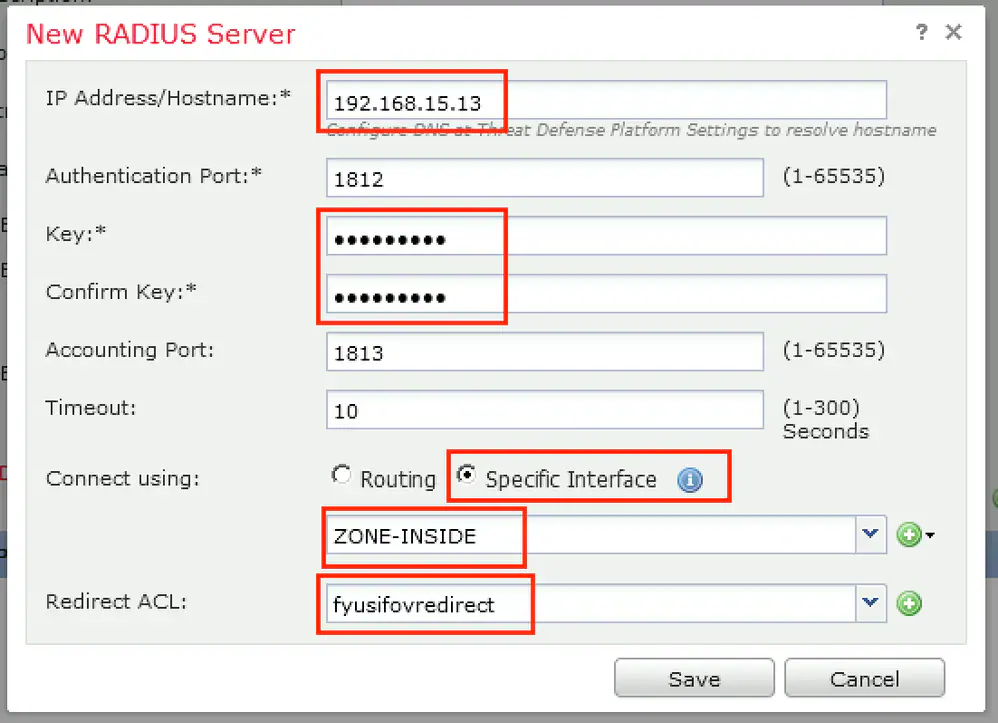
Step 5. In the opened window, provide ISE PSN IP address, RADIUS Key, select Specific Interface and select interface from which ISE is reachable (this interface is used as a source of RADIUS traffic) then select Redirect ACL which was configured previously.
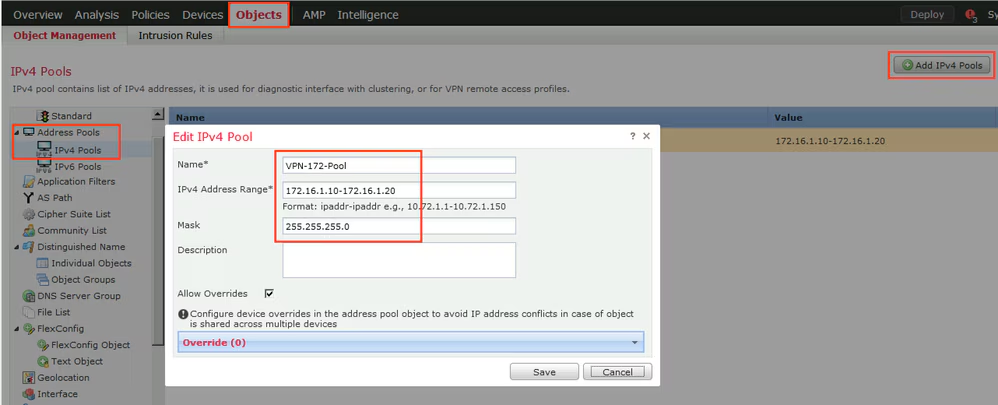
Step 6. Create Address Pool for VPN users. Navigate to Objects > Object Management > Address Pools > IPv4 Pools. Click Add IPv4 Pools and fill the in details.
Step 7. Create AnyConnect package. Navigate to Objects > Object Management > VPN > AnyConnect File. Click Add AnyConnect File, provide the package name, download the package from Cisco Software Download and select Anyconnect Client Image File Type.

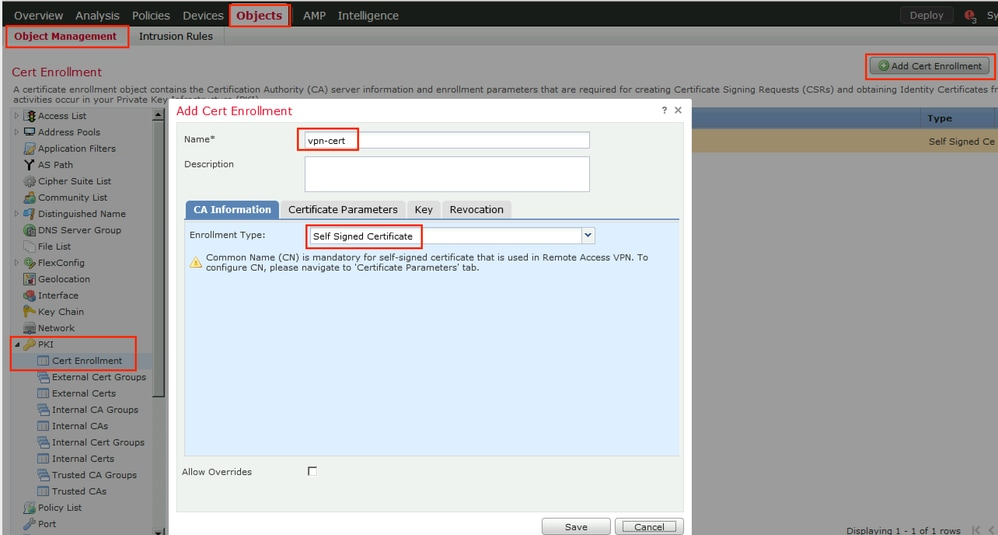
Step 8. Navigate to Certificate Objects > Object Management > PKI > Cert Enrollment. Click Add Cert Enrollment, provide name, choose Self Signed Certificate in Enrollment Type. Click the Certificate Parameters tab and provide CN.

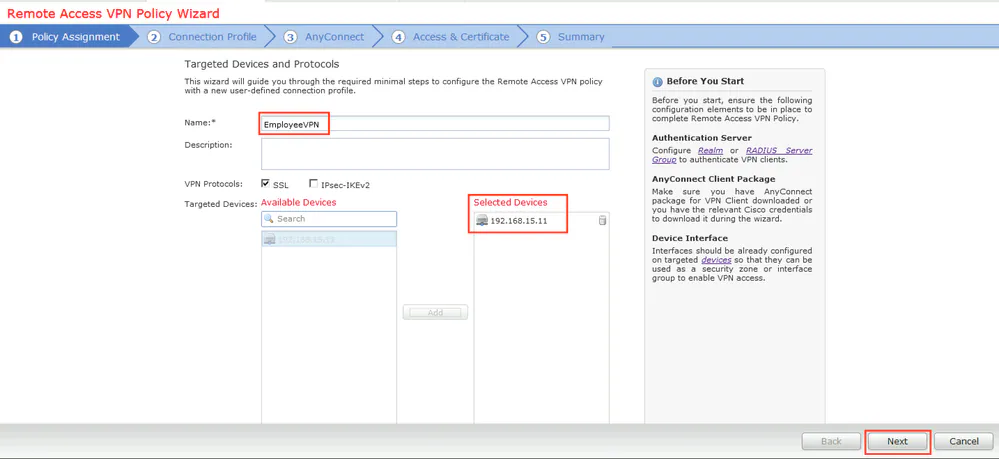
Step 9. Launch Remote Access VPN wizard. Navigate to Devices > VPN > Remote Access and click Add.

Step 10. Provide the name, check SSL as VPN Protocol, choose FTD which is used as VPN concentrator and click Next.
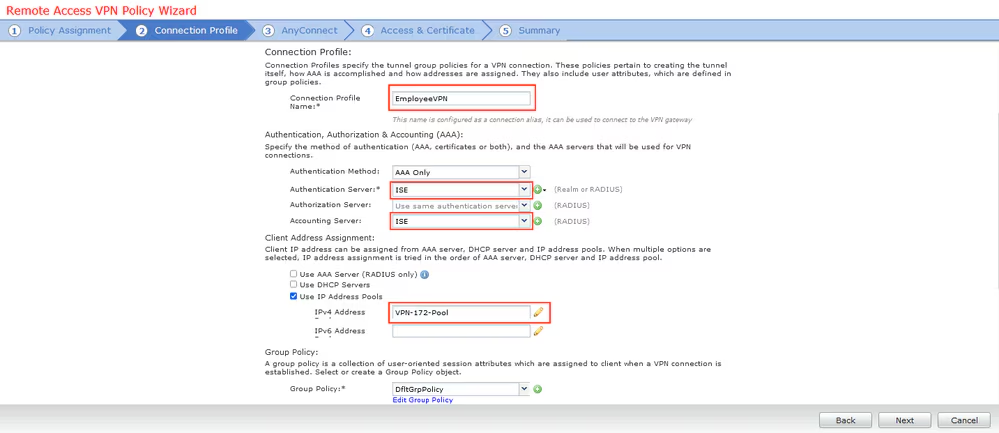
Step 11. Provide Connection Profile name, select Authentication/Accounting Servers, select the address pool which was configured previously and click Next.
Note: Do not select the authorization server. It triggers two Access Requests for a single user (once with the user password and the second time with password cisco).
Step 12. Select AnyConnect package that was configured previously and click Next.

Step 13. Select interface from which VPN traffic is expected, select Certificate Enrollment that was configured previously and click Next.

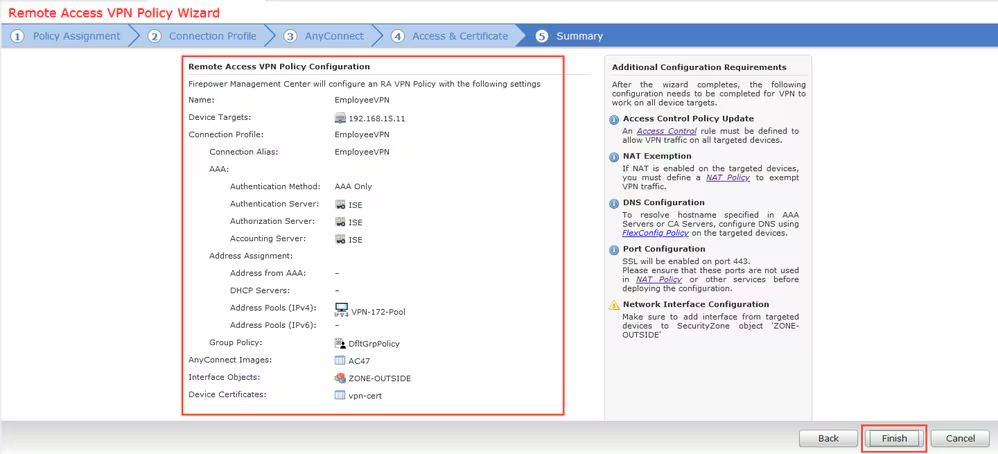
Step 14. Check the summary page and click Finish.
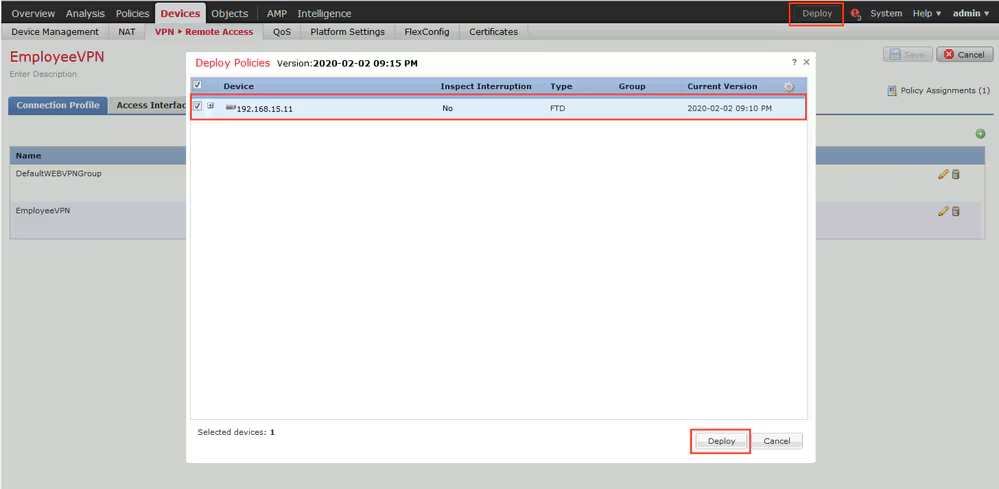
Step 15. Deploy configuration to FTD. Click Deploy and select FTD that is used as a VPN concentrator.
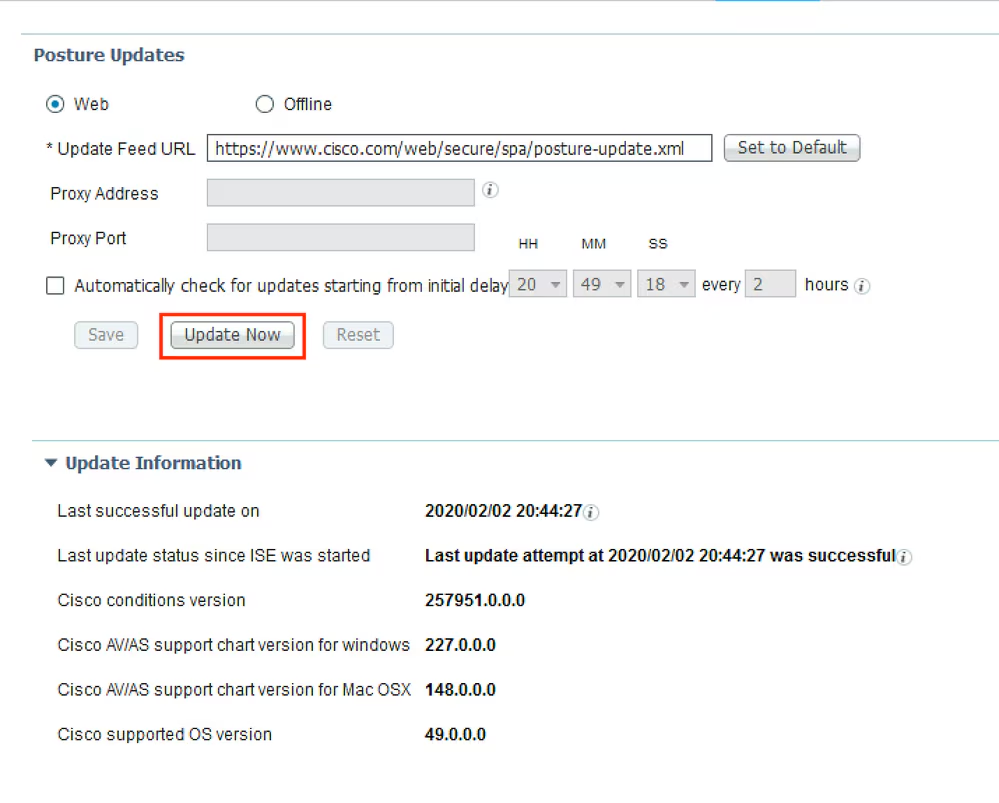
Step 1. Run Posture Updates. Navigate to Administration > System > Settings > Posture > Updates.
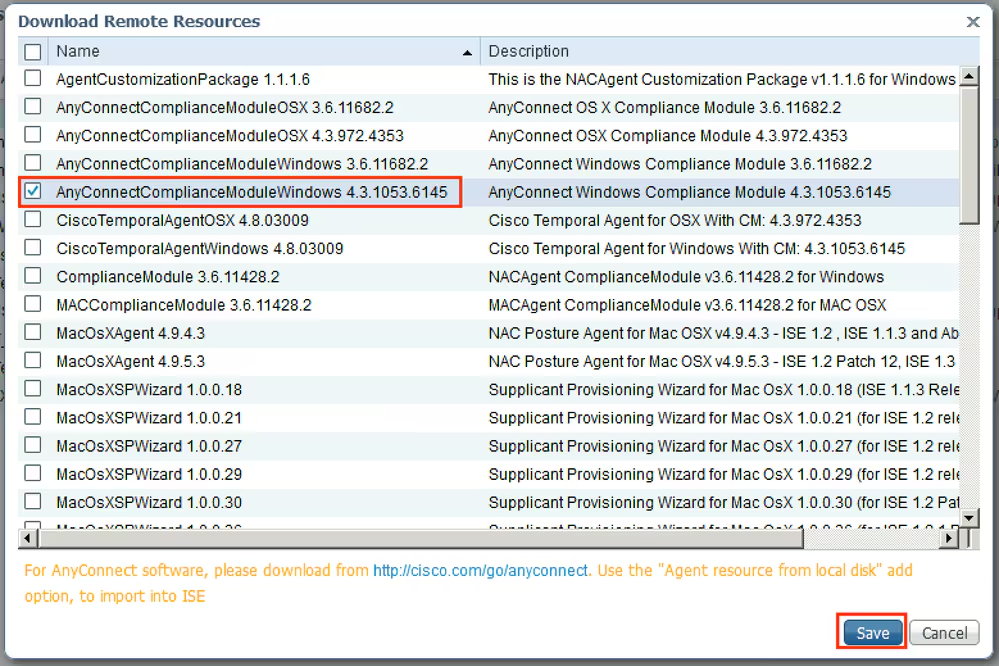
Step 2. Upload Compliance Module. Navigate to Policy > Policy Elements > Results > Client Provisioning > Resources. Click Add and select Agent resources from Cisco site
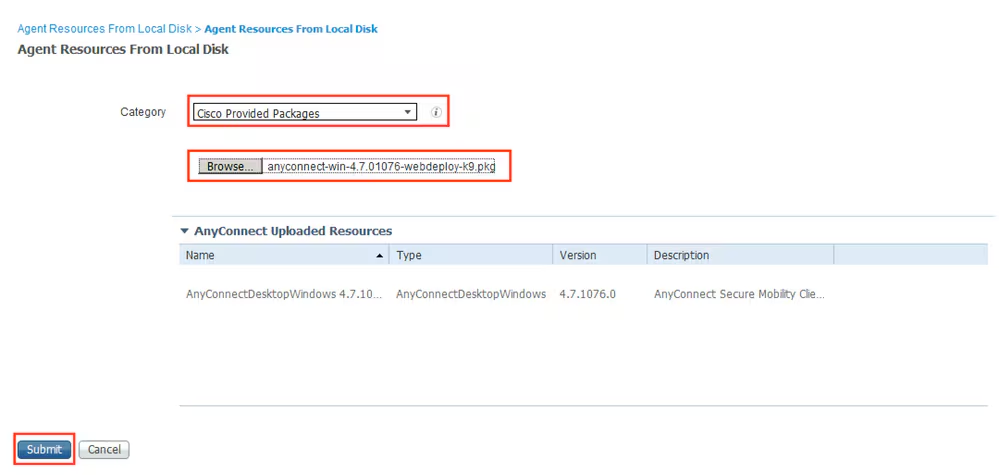
Step 3. Download AnyConnect from Cisco Software Download, then upload it to ISE. Navigate to Policy > Policy Elements > Results > Client Provisioning > Resources.
Click Add and select Agent Resources From Local Disk. Choose Cisco Provided Packages under Category, select AnyConnect package from local disk and click Submit.
Step 4. Create AnyConnect Posture Profile. Navigate to Policy > Policy Elements > Results > Client Provisioning > Resources.
Click Add and select AnyConnect Posture Profile. Fill in the name and Posture Protocol.
Under *Server name rules put * and put any dummy IP address under Discovery host.


Step 5. Navigate to Policy > Policy Elements > Results > Client Provisioning > Resources and create AnyConnect Configuration. Click Add and select AnyConnect Configuration. Select AnyConnect Package, provide Configuration Name, select Compliance Module, check Diagnostic and Reporting Tool, select Posture Profile and click Save.

Step 6. Navigate to Policy > Client Provisioning and create Client Provisioning Policy. Click Edit and then select Insert Rule Above, provide name, select OS, and choose AnyConnect Configuration that was created in the previous step.

Step 7. Create Posture Condition under Policy > Policy Elements > Conditions > Posture > Anti-Malware Condition. In this example, predefined “ANY_am_win_inst” is used.

Step 8. Navigate to Policy > Policy Elements > Results > Posture > Remediation Actions and create Posture Remediation. In this example, it is skipped. Remediation Action can be a Text Message.
Step 9. Navigate to Policy > Policy Elements > Results > Posture > Requirements and create Posture Requirements. Predefined requirement Any_AM_Installation_Win is used.

Step 10. Create Posture Policies under Policies > Posture. Default posture policy for any AntiMalware Check for Windows OS is used.

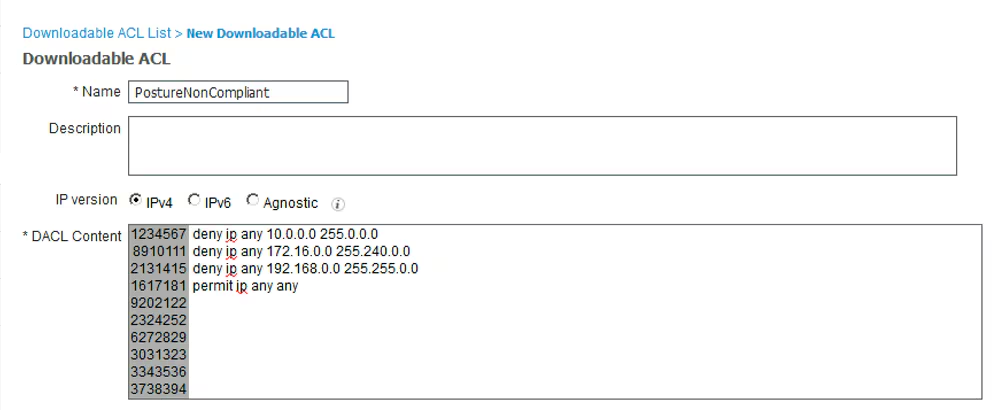
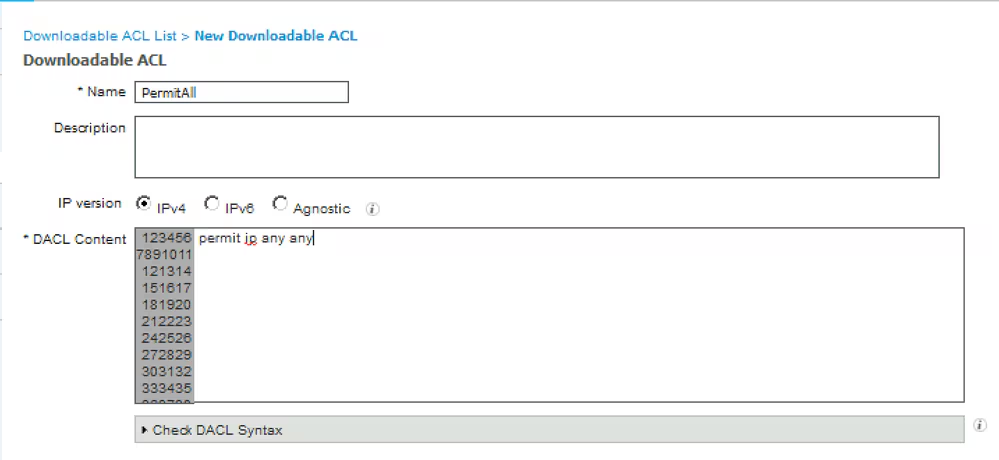
Step 11. Navigate to Policy > Policy Elements > Results > Authorization > Downlodable ACLS and create DACLs for different posture statuses.
In this example:
- Posture Unknown DACL – allows traffic to DNS, PSN and HTTP and HTTPS traffic.
- Posture NonCompliant DACL – denies access to Private Subnets and allow only internet traffic.
- Permit All DACL – allows all traffic for Posture Compliant Status.

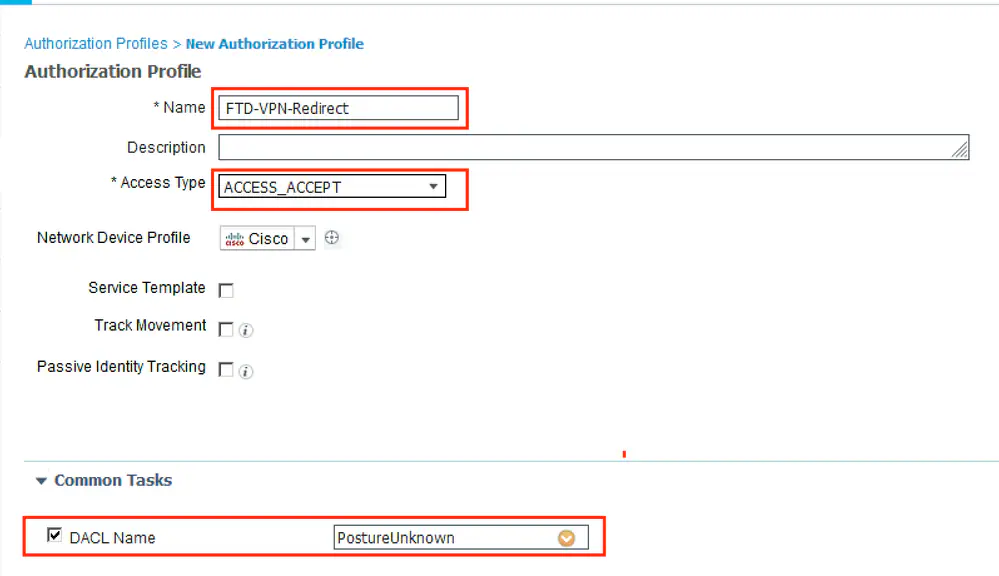
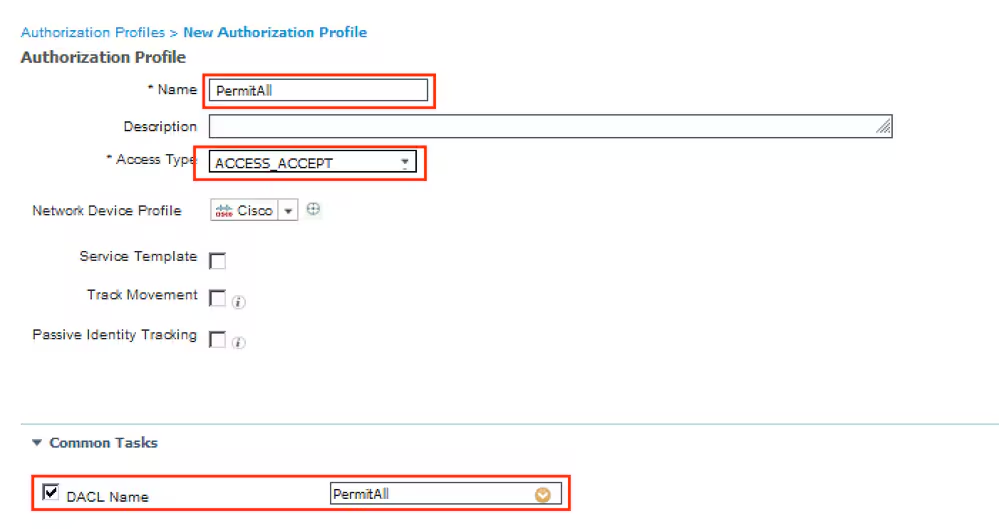
Step 12. Create three Authorization Profiles for Posture Unknown, Posture NonCompliant and Posture Compliant statuses. In order to do so, navigate to Policy > Policy Elements > Results > Authorization > Authorization Profiles. In the Posture Unknown profile, select Posture Unknown DACL, check Web Redirection, select Client Provisioning, provide Redirect ACL name (that is configured on FTD) and select the portal.


In the Posture NonCompliant profile, select DACL in order to limit access to the network.


In the Posture Compliant profile, select DACL in order to allow full access to the network.

Step 13. Create Authorization Policies under Policy > Policy Sets > Default > Authorization Policy. As condition Posture Status and VNP TunnelGroup Name is used.

Verify
Use this section in order to confirm that your configuration works properly.
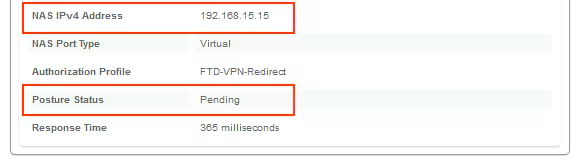
On ISE, the first verification step is RADIUS Live Log. Navigate to Operations > RADIUS Live Log. Here, user Alice is connected and the expected authorization policy is selected.
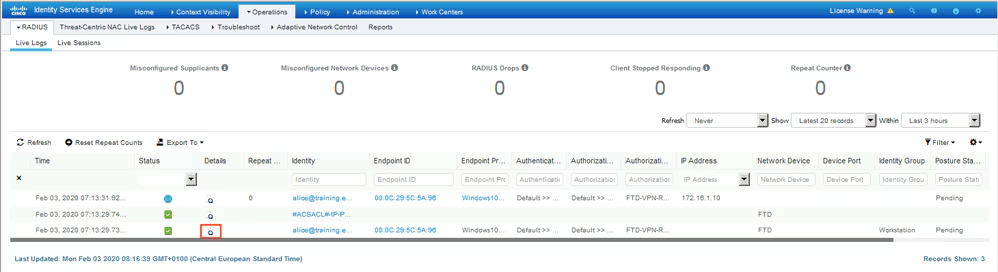
Authorization policy FTD-VPN-Posture-Unknown is matched and as result, FTD-VPN-Profile is sent to FTD.

Posture Status Pending.
The Result section shows which attributes are sent to FTD.
On FTD, in order to verify VPN connection, SSH to the box, execute system support diagnostic-cli and then show vpn-sessiondb detail anyconnect. From this output, verify that attributes sent from ISE are applied for this VPN session.
fyusifov-ftd-64# show vpn-sessiondb detail anyconnect

Session Type: AnyConnect Detailed

Username     : alice@training.example.com
Index        : 12
Assigned IP  : 172.16.1.10            Public IP    : 10.229.16.169
Protocol     : AnyConnect-Parent SSL-Tunnel DTLS-Tunnel
License      : AnyConnect Premium
Encryption   : AnyConnect-Parent: (1)none  SSL-Tunnel: (1)AES-GCM-256  DTLS-Tunnel: (1)AES256
Hashing      : AnyConnect-Parent: (1)none  SSL-Tunnel: (1)SHA384  DTLS-Tunnel: (1)SHA1
Bytes Tx     : 15326                  Bytes Rx     : 13362
Pkts Tx      : 10                     Pkts Rx      : 49
Pkts Tx Drop : 0                      Pkts Rx Drop : 0
Group Policy : DfltGrpPolicy          Tunnel Group : EmployeeVPN
Login Time   : 07:13:30 UTC Mon Feb 3 2020
Duration     : 0h:06m:43s
Inactivity   : 0h:00m:00s
VLAN Mapping : N/A                    VLAN         : none
Audt Sess ID : 000000000000c0005e37c81a
Security Grp : none                   Tunnel Zone  : 0

AnyConnect-Parent Tunnels: 1
SSL-Tunnel Tunnels: 1
DTLS-Tunnel Tunnels: 1

AnyConnect-Parent:
  Tunnel ID    : 12.1
  Public IP    : 10.229.16.169
  Encryption   : none                   Hashing      : none
  TCP Src Port : 56491                  TCP Dst Port : 443
  Auth Mode    : userPassword
  Idle Time Out: 30 Minutes             Idle TO Left : 23 Minutes
  Client OS    : win
  Client OS Ver: 10.0.18363
  Client Type  : AnyConnect
  Client Ver   : Cisco AnyConnect VPN Agent for Windows 4.7.01076
  Bytes Tx     : 7663                   Bytes Rx     : 0
  Pkts Tx      : 5                      Pkts Rx      : 0
  Pkts Tx Drop : 0                      Pkts Rx Drop : 0

SSL-Tunnel:
  Tunnel ID    : 12.2
  Assigned IP  : 172.16.1.10            Public IP    : 10.229.16.169
  Encryption   : AES-GCM-256            Hashing      : SHA384
  Ciphersuite  : ECDHE-RSA-AES256-GCM-SHA384
  Encapsulation: TLSv1.2                TCP Src Port : 56495
  TCP Dst Port : 443                    Auth Mode    : userPassword
  Idle Time Out: 30 Minutes             Idle TO Left : 23 Minutes
  Client OS    : Windows
  Client Type  : SSL VPN Client
  Client Ver   : Cisco AnyConnect VPN Agent for Windows 4.7.01076
  Bytes Tx     : 7663                   Bytes Rx     : 592
  Pkts Tx      : 5                      Pkts Rx      : 7
  Pkts Tx Drop : 0                      Pkts Rx Drop : 0
  Filter Name  : #ACSACL#-IP-PostureUnknown-5e37414d

DTLS-Tunnel:
  Tunnel ID    : 12.3
  Assigned IP  : 172.16.1.10            Public IP    : 10.229.16.169
  Encryption   : AES256                 Hashing      : SHA1
  Ciphersuite  : DHE-RSA-AES256-SHA
  Encapsulation: DTLSv1.0               UDP Src Port : 59396
  UDP Dst Port : 443                    Auth Mode    : userPassword
  Idle Time Out: 30 Minutes             Idle TO Left : 29 Minutes
  Client OS    : Windows
  Client Type  : DTLS VPN Client
  Client Ver   : Cisco AnyConnect VPN Agent for Windows 4.7.01076
  Bytes Tx     : 0                      Bytes Rx     : 12770
  Pkts Tx      : 0                      Pkts Rx      : 42
  Pkts Tx Drop : 0                      Pkts Rx Drop : 0
  Filter Name  : #ACSACL#-IP-PostureUnknown-5e37414d

ISE Posture:
  Redirect URL : https://fyusifov-26-3.example.com:8443/portal/gateway?sessionId=000000000000c0005e37c81a&portal=27b1bc...
  Redirect ACL : fyusifovredirect
Client Provisioning policies can be verified. Navigate to Operations > Reports > Endpoints and Users > Client Provisioning.

Posture Report sent from AnyConnect can be checked. Navigate to Operations > Reports > Endpoints and Users > Posture Assessment by Endpoint.

In order to see more details on the posture report, click Details.


After the report is received on ISE, posture status is updated. In this example, posture status is compliant and CoA Push is triggered with a new set of attributes.

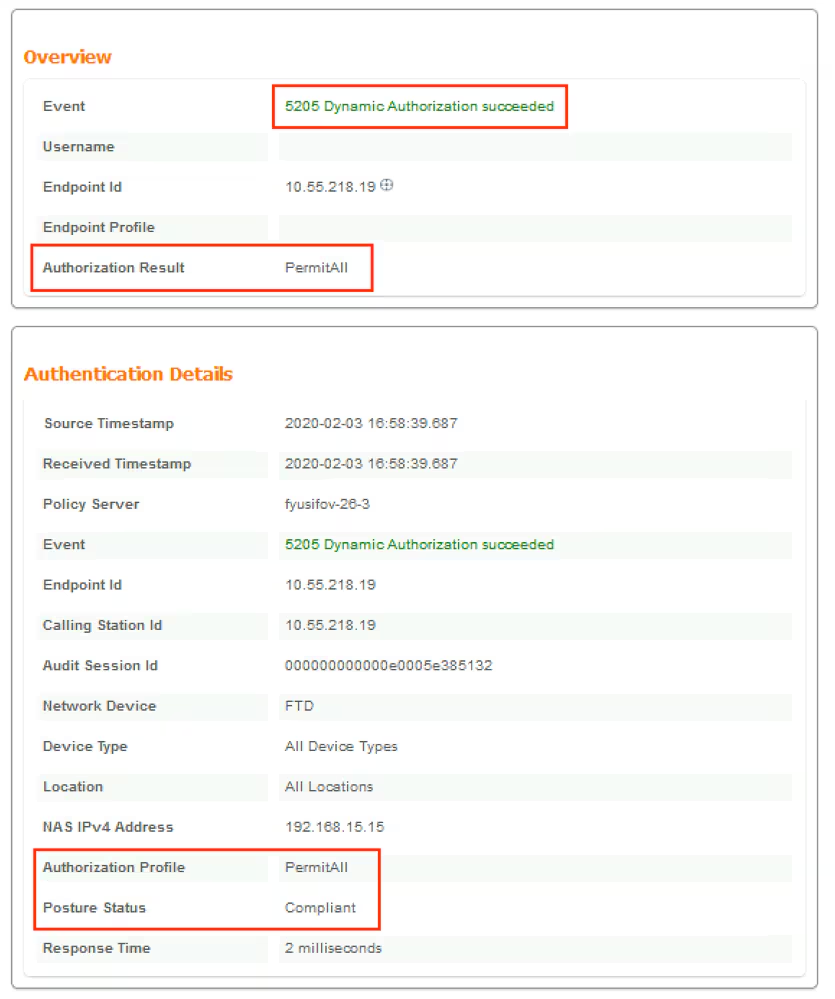

Verify on FTD that new Redirect ACL and Redirect URL are removed for VPN session and PermitAll DACL is applied.
fyusifov-ftd-64# show vpn-sessiondb detail anyconnect

Session Type: AnyConnect Detailed

Username     : alice@training.example.com
Index        : 14
Assigned IP  : 172.16.1.10            Public IP    : 10.55.218.19
Protocol     : AnyConnect-Parent SSL-Tunnel DTLS-Tunnel
License      : AnyConnect Premium
Encryption   : AnyConnect-Parent: (1)none  SSL-Tunnel: (1)AES-GCM-256  DTLS-Tunnel: (1)AES256
Hashing      : AnyConnect-Parent: (1)none  SSL-Tunnel: (1)SHA384  DTLS-Tunnel: (1)SHA1
Bytes Tx     : 53990                  Bytes Rx     : 23808
Pkts Tx      : 73                     Pkts Rx      : 120
Pkts Tx Drop : 0                      Pkts Rx Drop : 0
Group Policy : DfltGrpPolicy          Tunnel Group : EmployeeVPN
Login Time   : 16:58:26 UTC Mon Feb 3 2020
Duration     : 0h:02m:24s
Inactivity   : 0h:00m:00s
VLAN Mapping : N/A                    VLAN         : none
Audt Sess ID : 000000000000e0005e385132
Security Grp : none                   Tunnel Zone  : 0

AnyConnect-Parent Tunnels: 1
SSL-Tunnel Tunnels: 1
DTLS-Tunnel Tunnels: 1

AnyConnect-Parent:
  Tunnel ID    : 14.1
  Public IP    : 10.55.218.19
  Encryption   : none                   Hashing      : none
  TCP Src Port : 51965                  TCP Dst Port : 443
  Auth Mode    : userPassword
  Idle Time Out: 30 Minutes             Idle TO Left : 27 Minutes
  Client OS    : win
  Client OS Ver: 10.0.18363
  Client Type  : AnyConnect
  Client Ver   : Cisco AnyConnect VPN Agent for Windows 4.7.01076
  Bytes Tx     : 7663                   Bytes Rx     : 0
  Pkts Tx      : 5                      Pkts Rx      : 0
  Pkts Tx Drop : 0                      Pkts Rx Drop : 0

SSL-Tunnel:
  Tunnel ID    : 14.2
  Assigned IP  : 172.16.1.10            Public IP    : 10.55.218.19
  Encryption   : AES-GCM-256            Hashing      : SHA384
  Ciphersuite  : ECDHE-RSA-AES256-GCM-SHA384
  Encapsulation: TLSv1.2                TCP Src Port : 51970
  TCP Dst Port : 443                    Auth Mode    : userPassword
  Idle Time Out: 30 Minutes             Idle TO Left : 27 Minutes
  Client OS    : Windows
  Client Type  : SSL VPN Client
  Client Ver   : Cisco AnyConnect VPN Agent for Windows 4.7.01076
  Bytes Tx     : 7715                   Bytes Rx     : 10157
  Pkts Tx      : 6                      Pkts Rx      : 33
  Pkts Tx Drop : 0                      Pkts Rx Drop : 0
  Filter Name  : #ACSACL#-IP-PermitAll-5e384dc0

DTLS-Tunnel:
  Tunnel ID    : 14.3
  Assigned IP  : 172.16.1.10            Public IP    : 10.55.218.19
  Encryption   : AES256                 Hashing      : SHA1
  Ciphersuite  : DHE-RSA-AES256-SHA
  Encapsulation: DTLSv1.0               UDP Src Port : 51536
  UDP Dst Port : 443                    Auth Mode    : userPassword
  Idle Time Out: 30 Minutes             Idle TO Left : 28 Minutes
  Client OS    : Windows
  Client Type  : DTLS VPN Client
  Client Ver   : Cisco AnyConnect VPN Agent for Windows 4.7.01076
  Bytes Tx     : 38612                  Bytes Rx     : 13651
  Pkts Tx      : 62                     Pkts Rx      : 87
  Pkts Tx Drop : 0                      Pkts Rx Drop : 0
  Filter Name  : #ACSACL#-IP-PermitAll-5e384dc0
Troubleshoot
Spilt Tunnel
One of the common issues, when there is a spit tunnel is configured. In this example, default Group Policy is used, which tunnels all traffic. In case if only specific traffic is tunnelled, then AnyConnect probes (enroll.cisco.com and discovery host) must go through the tunnel in addition to traffic to ISE and other internal resources.
In order to check the tunnel policy on FMC, first, check which Group Policy is used for VPN connection. Navigate to Devices > VPN Remote Access.

Then, navigate to Objects > Object Management > VPN > Group Policy and click on Group Policy configured for VPN.

- Identity NAT
Another common issue, when VPN users’ return traffic gets translated with the use of incorrect NAT entry. In order to fix this issue, Identity NAT must be created in an appropriate order.
First, check NAT rules for this device. Navigate to Devices > NAT and then click Add Rule to create a new rule.

In the opened window, under the Interface Objects tab, select Security Zones. In this example, NAT entry is created from ZONE-INSIDE to ZONE-OUTSIDE.

Under the Translation tab, select original and translated packet details. As it is Identity NAT, source and destination are kept unchanged:

Under the Advanced tab, check checkboxes as shown in this image:
