ThousandEyes Enterprise Agent
How to install a ThousandEyes Enterprise Agent on a Cisco Catalyst 9000-series switch with Docker
The Cisco IOS XE 16.12.1 release introduced native Docker container hosted on internal flash (in case of no SSD)
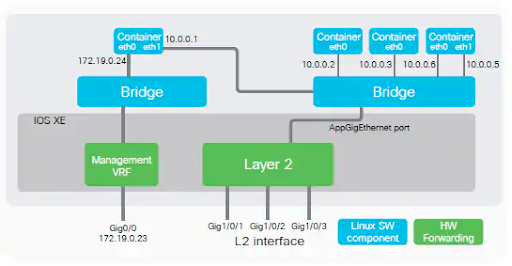
Containers connects into the management interface’s network using an internal bridge and also connects to data ports using another seperate internal bridge
Downloading Docker Image
Download the Docker image from the ThousandEyes dashboard and copy it to your Cisco switch using SCP, FTP, TFTP, or USB storage.
If the switch has internet access, download the image directly onto the switch. Download the package from the ThousandEyes downloads site.
Log in to the ThousandEyes platform using a login belonging to the account group that will be associated with the appliance.
Go to Network & App Synthetics > Agent Settings and click Add New Enterprise Agent.
Download the .tar file with the ThousandEyes appliance for Catalyst 9000-series switches.
Use SCP, FTP, TFTP, or USB storage to copy the signed Docker image to the switch’s flash: directory.
copy scp://thousandeyes@10.100.21.239/thousandeyes-enterprise-agent-4.4.2.cisco.tar flash:Run a checksum (md5) command to verify that the package transfer was successful. The md5 output should match 14b88bfc3ec75a2ff4414d8f39106a29:
catalyst#verify /md5 flash:thousandeyes-enterprise-agent-4.4.2.cisco.tar
-----------------------------------------------------------
verify /md5 (flash:thousandeyes-enterprise-agent-4.4.2.cisco.tar) = 14b88bfc3ec75a2ff4414d8f39106a29
Installing the Docker Container
Enable the IOx framework on the switch:
Enter configuration commands, one per line. End with CNTL/Z.
catalyst(config)#iox
catalyst(config)#end
Wait until all the services are running:
catalyst#show iox-service
IOx Infrastructure Summary:
---------------------------
IOx service (CAF) 1.11.0.5 : Running
IOx service (HA) : Running
IOx service (IOxman) : Running
IOx service (Sec storage) : Not Running
Libvirtd 1.3.4 : Running
Dockerd 18.03.0 : Running
Application DB Sync Info : Available
Sync Status : DisabledRun the install command:
catalyst#app-hosting install appid <app-name> package flash:thousandeyes-enterprise-agent-4.4.2.cisco.tarSpecify your desired app name and the location of the image file you want to use. In this example, we use thousandeyes_enterprise_agent.
Downloading image directly from ThousandEyes
catalyst#app-hosting install appid <app-name> package https://downloads.thousandeyes.com/enterprise-agent/thousandeyes-enterprise-agent-4.4.2.cisco.tarYour application should now be installed. You can check on it by running the following:
catalyst#sh app-hosting list
App id State
thousandeyes_enterprise_agent DEPLOYED
Configuring the Docker Container
Configure a single virtual network interface card (vNIC) for the appliance
Docker container supports both static IP assignment (Guest IP address) or dynamic IP address
Verify that the front panel data port is running, with Layer-2 VLAN allowed from uplink:
catalyst(config)#interface GigabitEthernet1/0/13
catalyst(config-if)#description Uplink MGMT
catalyst(config-if)#switchport access vlan 21
Verify that the Layer-2 VLAN is created:
catalyst(config)#vlan 21Configure the AppGigabitEthernet port to allow Layer-2 VLAN:
catalyst(config)#interface AppGigabitEthernet1/0/1
catalyst(config-if)#switchport trunk allowed vlan 21,22,23,24
catalyst(config-if)#switchport mode trunk
Configure the application, either with a static IP or with DHCP IP.
Configuration with Static IP and Gateway
Use a guest IP address to assign a static IP address. In this example, assign 10.100.21.222/24, under VLAN 21 and use Google resolver:
catalyst(config)#app-hosting appid thousandeyes_enterprise_agent
catalyst(config-app-hosting)#app-vnic AppGigabitEthernet trunk
catalyst(config-config-app-hosting-trunk)#vlan 21 guest-interface 0
catalyst(config-config-app-hosting-vlan-access-ip)#guest-ipaddress 10.100.21.222 netmask 255.255.255.0
catalyst(config-config-app-hosting-vlan-access-ip)#exit
catalyst(config-config-app-hosting-trunk)#exit
catalyst(config-app-hosting)#app-default-gateway 10.100.21.1 guest-interface 0
catalyst(config-app-hosting)#name-server0 8.8.8.8
catalyst(config-app-hosting)#name-server1 8.8.4.4
Setup run options
Next, set up the required Docker run options to specify account token. If you want to specify a hostname other than the switch’s name, do this here as well:
catalyst(config-app-hosting)#app-resource docker
catalyst(config-app-hosting-docker)#prepend-pkg-opts
catalyst(config-app-hosting-docker)#run-opts 1 "-e TEAGENT_ACCOUNT_TOKEN=<Token>"
catalyst(config-app-hosting-docker)#run-opts 2 "--hostname Cisco-Docker"
catalyst(config-app-hosting-docker)#exit
catalyst(config-app-hosting)#start
catalyst(config-app-hosting)#end
Configuration with DHCP IP
Use wr mem to ensure that your configuration changes have persisted across reboots:
catalyst#wr mem
Building configuration…
[OK]
Verifying That the Docker Container Is Running
With the (config-app-hosting)#start command, the Docker container should have been started and should be running.
Verify this by running the following:
catalyst# sh app-hosting list
App id                                   State
---------------------------------------------------------
thousandeyes_enterprise_agent            RUNNING
Verify the Docker container’s details:
catalyst#show app-hosting detail appid thousandeyes_enterprise_agent
App id : thousandeyes_enterprise_agent
Owner : iox
State : RUNNING
Application
Type : docker
Name : ThousandEyes Enterprise Agent
Version : 4.4.2
Description :
Author : ThousandEyes <support@thousandeyes.com>
Path : flash:thousandeyes-enterprise-agent-4.4.2.cisco.tar
URL Path :
Activated profile name : custom
Resource reservation
Memory : 500 MB
Disk : 1 MB
CPU : 1850 units
VCPU : 1
Attached devices
Type Name Alias
---------------------------------------------
serial/shell iox_console_shell serial0
serial/aux iox_console_aux serial1
serial/syslog iox_syslog serial2
serial/trace iox_trace serial3
Network interfaces
---------------------------------------
eth0:
MAC address : 52:54:dd:d:38:3d
Network name : mgmt-bridge-v21
Docker
------
Run-time information
Command :
Entry-point : /sbin/my_init
Run options in use : -e TEAGENT_ACCOUNT_TOKEN=TOKEN_NOT_SET
--hostname=$(SYSTEM_NAME) --cap-add=NET_ADMIN --mount
type=tmpfs,destination=/var/log/agent,tmpfs-size=140m --mount
type=tmpfs,destination=/var/lib/te-agent/data,tmpfs-size=200m -v
$(APP_DATA)/data:/var/lib/te-agent -e TEAGENT_PROXY_TYPE=DIRECT -e
TEAGENT_PROXY_LOCATION= -e TEAGENT_PROXY_USER= -e
TEAGENT_PROXY_AUTH_TYPE= -e TEAGENT_PROXY_PASS= -e
TEAGENT_PROXY_BYPASS_LIST= -e TEAGENT_KDC_USER= -e TEAGENT_KDC_PASS=
-e TEAGENT_KDC_REALM= -e TEAGENT_KDC_HOST= -e TEAGENT_KDC_PORT=88 -e
TEAGENT_KERBEROS_WHITELIST= -e TEAGENT_KERBEROS_RDNS=1 -e PROXY_APT=
-e APT_PROXY_USER= -e APT_PROXY_PASS= -e APT_PROXY_LOCATION= -e
TEAGENT_AUTO_UPDATES=1 -e
TEAGENT_ACCOUNT_TOKEN=nfhjzm8e8ikg07d4n31wcsws9bakcloh --hostname
Cisco-Docker
Package run options : -e TEAGENT_ACCOUNT_TOKEN=TOKEN_NOT_SET
--hostname=$(SYSTEM_NAME) --cap-add=NET_ADMIN --mount
type=tmpfs,destination=/var/log/agent,tmpfs-size=140m --mount
type=tmpfs,destination=/var/lib/te-agent/data,tmpfs-size=200m -v
$(APP_DATA)/data:/var/lib/te-agent -e TEAGENT_PROXY_TYPE=DIRECT -e
TEAGENT_PROXY_LOCATION= -e TEAGENT_PROXY_USER= -e
TEAGENT_PROXY_AUTH_TYPE= -e TEAGENT_PROXY_PASS= -e
TEAGENT_PROXY_BYPASS_LIST= -e TEAGENT_KDC_USER= -e TEAGENT_KDC_PASS=
-e TEAGENT_KDC_REALM= -e TEAGENT_KDC_HOST= -e TEAGENT_KDC_PORT=88 -e
TEAGENT_KERBEROS_WHITELIST= -e TEAGENT_KERBEROS_RDNS=1 -e PROXY_APT=
-e APT_PROXY_USER= -e APT_PROXY_PASS= -e APT_PROXY_LOCATION= -e
TEAGENT_AUTO_UPDATES=1
Application health information
Status : 0
Last probe error :
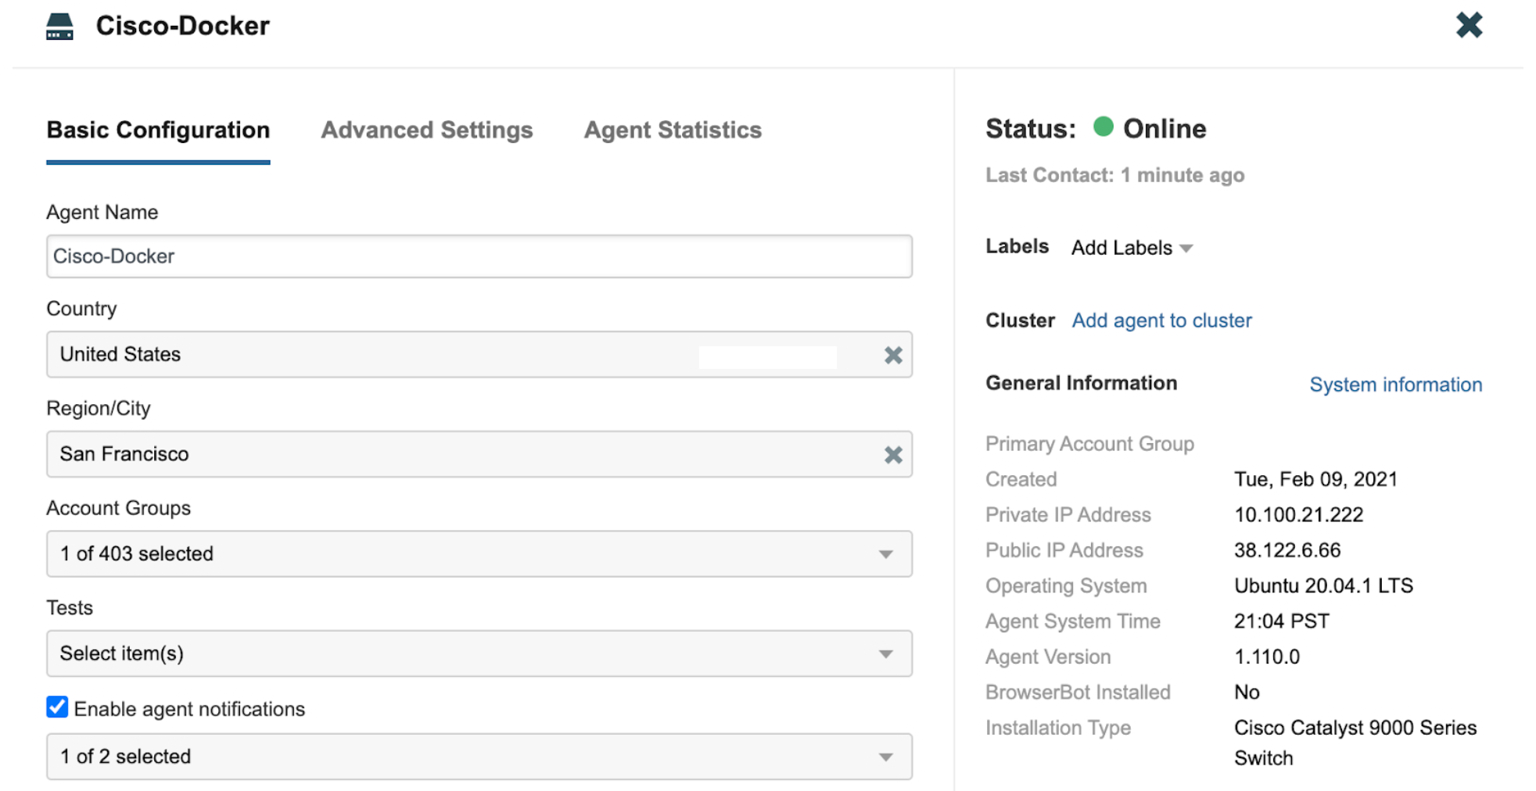
Last probe output :In the ThousandEyes platform, go to Network & App Synthetics > Agent Settings and verify the Docker container’s IP address:
Assigning the Agent to Tests
Now that you have installed, configured, and started your Docker-based agent, you can create tests and assign them to be run by your new agent
Modify the Docker Container
Stopping the application:
catalyst# app-hosting stop appid thousandeyes_enterprise_agent
thousandeyes_enterprise_agent stopped successfully
Current state is: STOPPED
De-activate the application:
catalyst# app-hosting deactivate appid thousandeyes_enterprise_agent
thousandeyes_enterprise_agent deactivated successfully
Current state is: DEPLOYED
Modify the Docker options, and exit three times:
catalyst(config)#app-hosting appid thousandeyes_enterprise_agent
catalyst(config-app-hosting)#app-resource docker
catalyst(config-app-hosting-docker)#prepend-pkg-opts
catalyst(config-app-hosting-docker)#<run-opts command>
catalyst(config-app-hosting-docker)#exit
catalyst(config-app-hosting)#exit
catalyst(config)#exit
Reactivate the application, and confirm that it’s activated:
catalyst# app-hosting activate appid thousandeyes_enterprise_agent
thousandeyes_enterprise_agent activated successfully
Current state is: ACTIVATED
Start the application, and confirm that it is running:
catalyst# app-hosting start appid thousandeyes_enterprise_agent
thousandeyes_enterprise_agent started successfully
Current state is: RUNNING
How do I connect to the agent shell for Cisco agents?
catalyst#app-hosting connect appid {application name} session
#
Once inside the agent shell, you can refer to the agent log for any further troubleshooting:
# tail /var/log/agent/te-agent.logIf connection or DNS resolution errors are found in the log file, your agent cannot connect to the ThousandEyes platform. Check your app-vnic configuration and make sure the agent IP can reach the internet.