⊹ ISE Posture ⊹
Configure ISE Posture over AnyConnect Remote Access VPN on FTD
Configure Posture over Remote Access VPN

1. The remote user uses Cisco Anyconnect for VPN access to the FTD.
2. The FTD sends a RADIUS Access-Request for that user to the ISE.
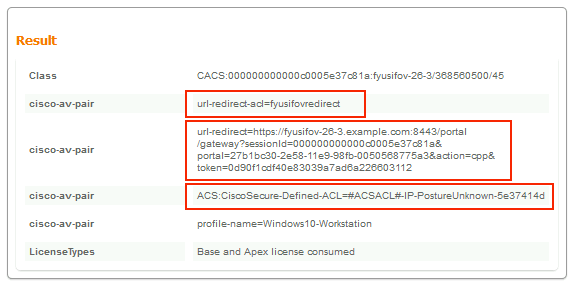
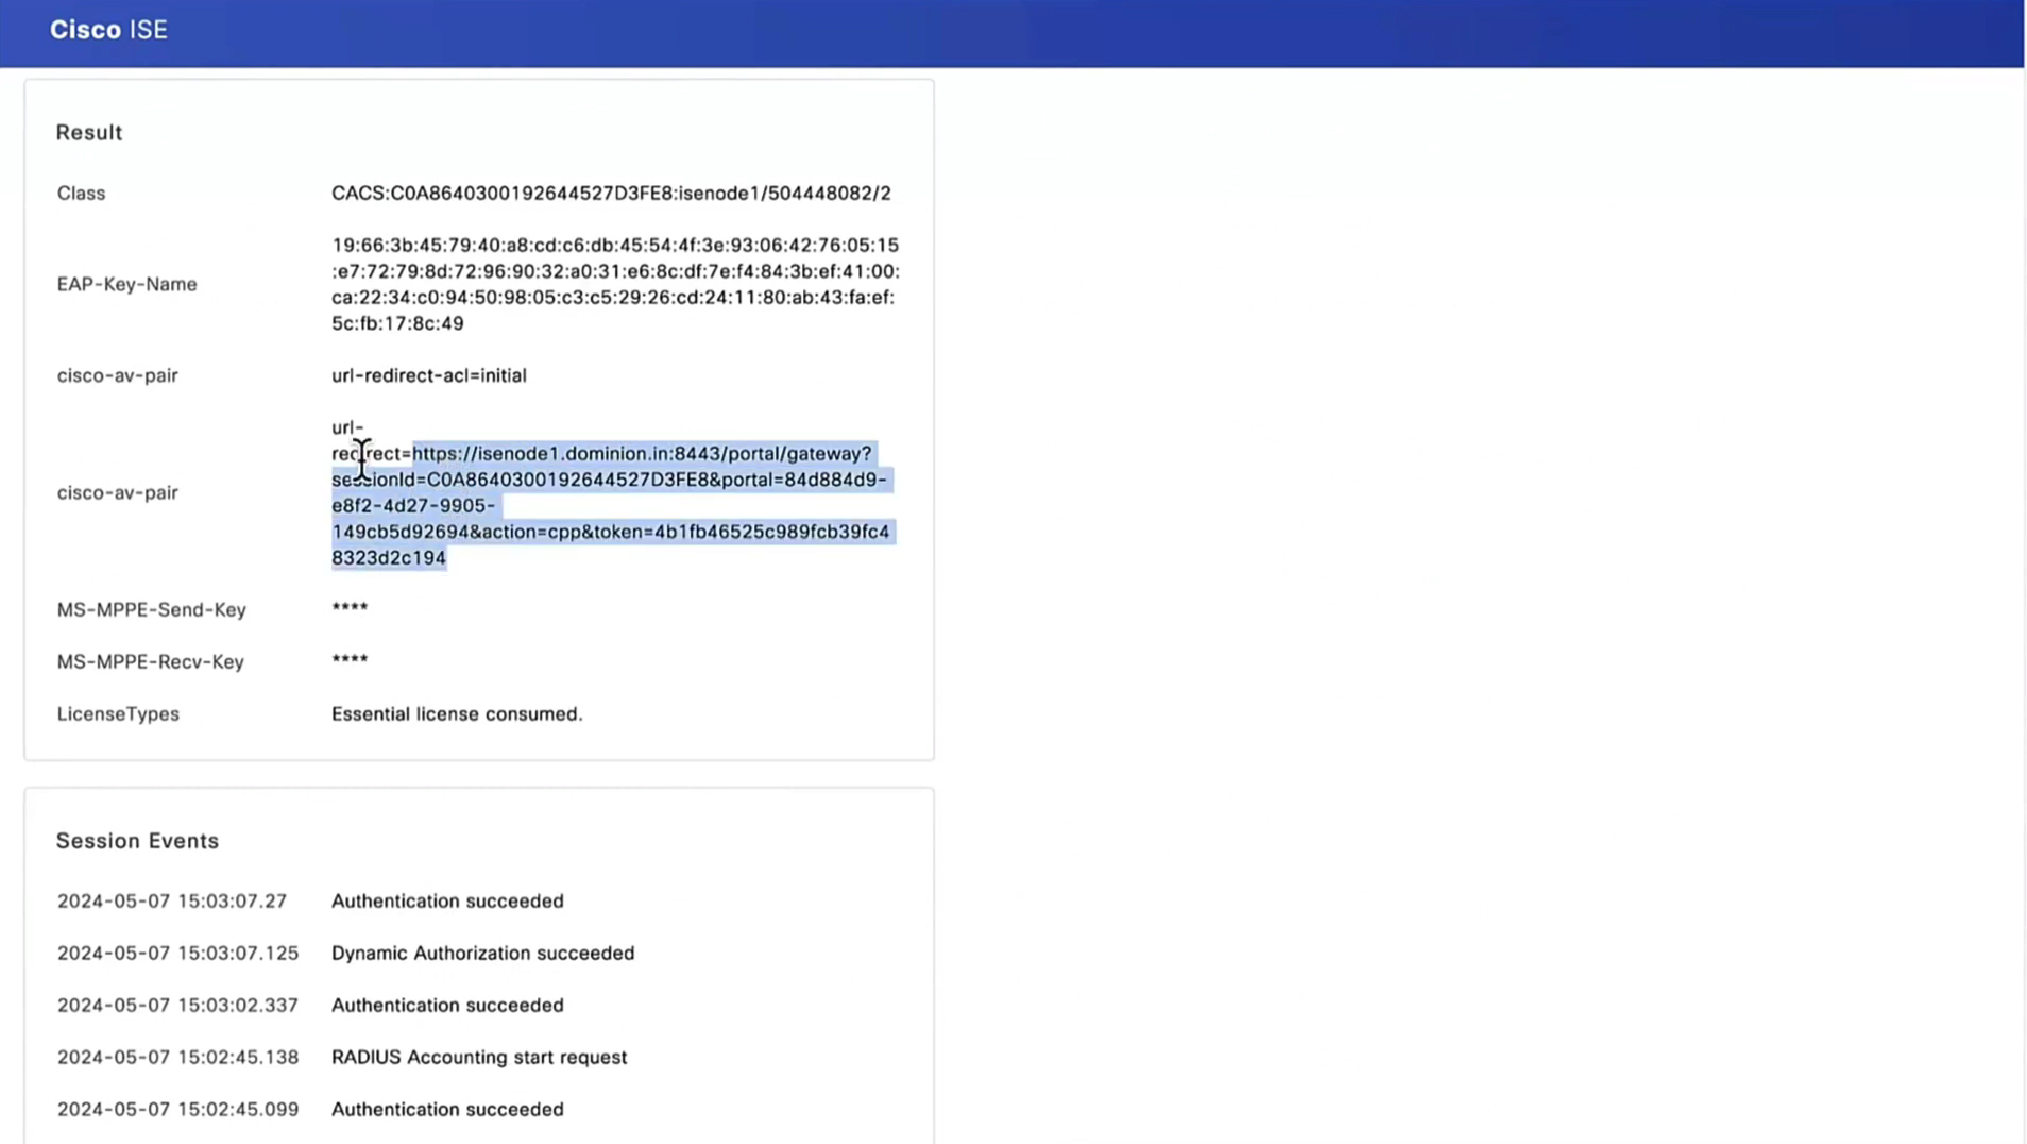
3. That request hits the policy named FTD-VPN-Posture-Unknown on the ISE. The ISE sends a RADIUS Access-Accept with three attributes:
- cisco-av-pair = url-redirect-acl=fyusifovredirect – This is the Access Control List (ACL) name that is defined locally on the FTD, which decides the traffic that is redirected.
- cisco-av-pair = url-redirect=https://ip:port/portal/gateway?sessionId=SessionIdValue&portal=27b1bc30-2e58-11e9-98fb-0050568775a3&action=cpp – This is the URL to which the remote user is redirected.
- DACL = PERMIT_ALL_IPV4_TRAFFIC – downloadable ACL; This attribute is optional. In this scenario, all traffic is permitted in DACL)
4. If DACL is sent, RADIUS Access-Request/Access-Accept is exchanged in order to download content of the DACL
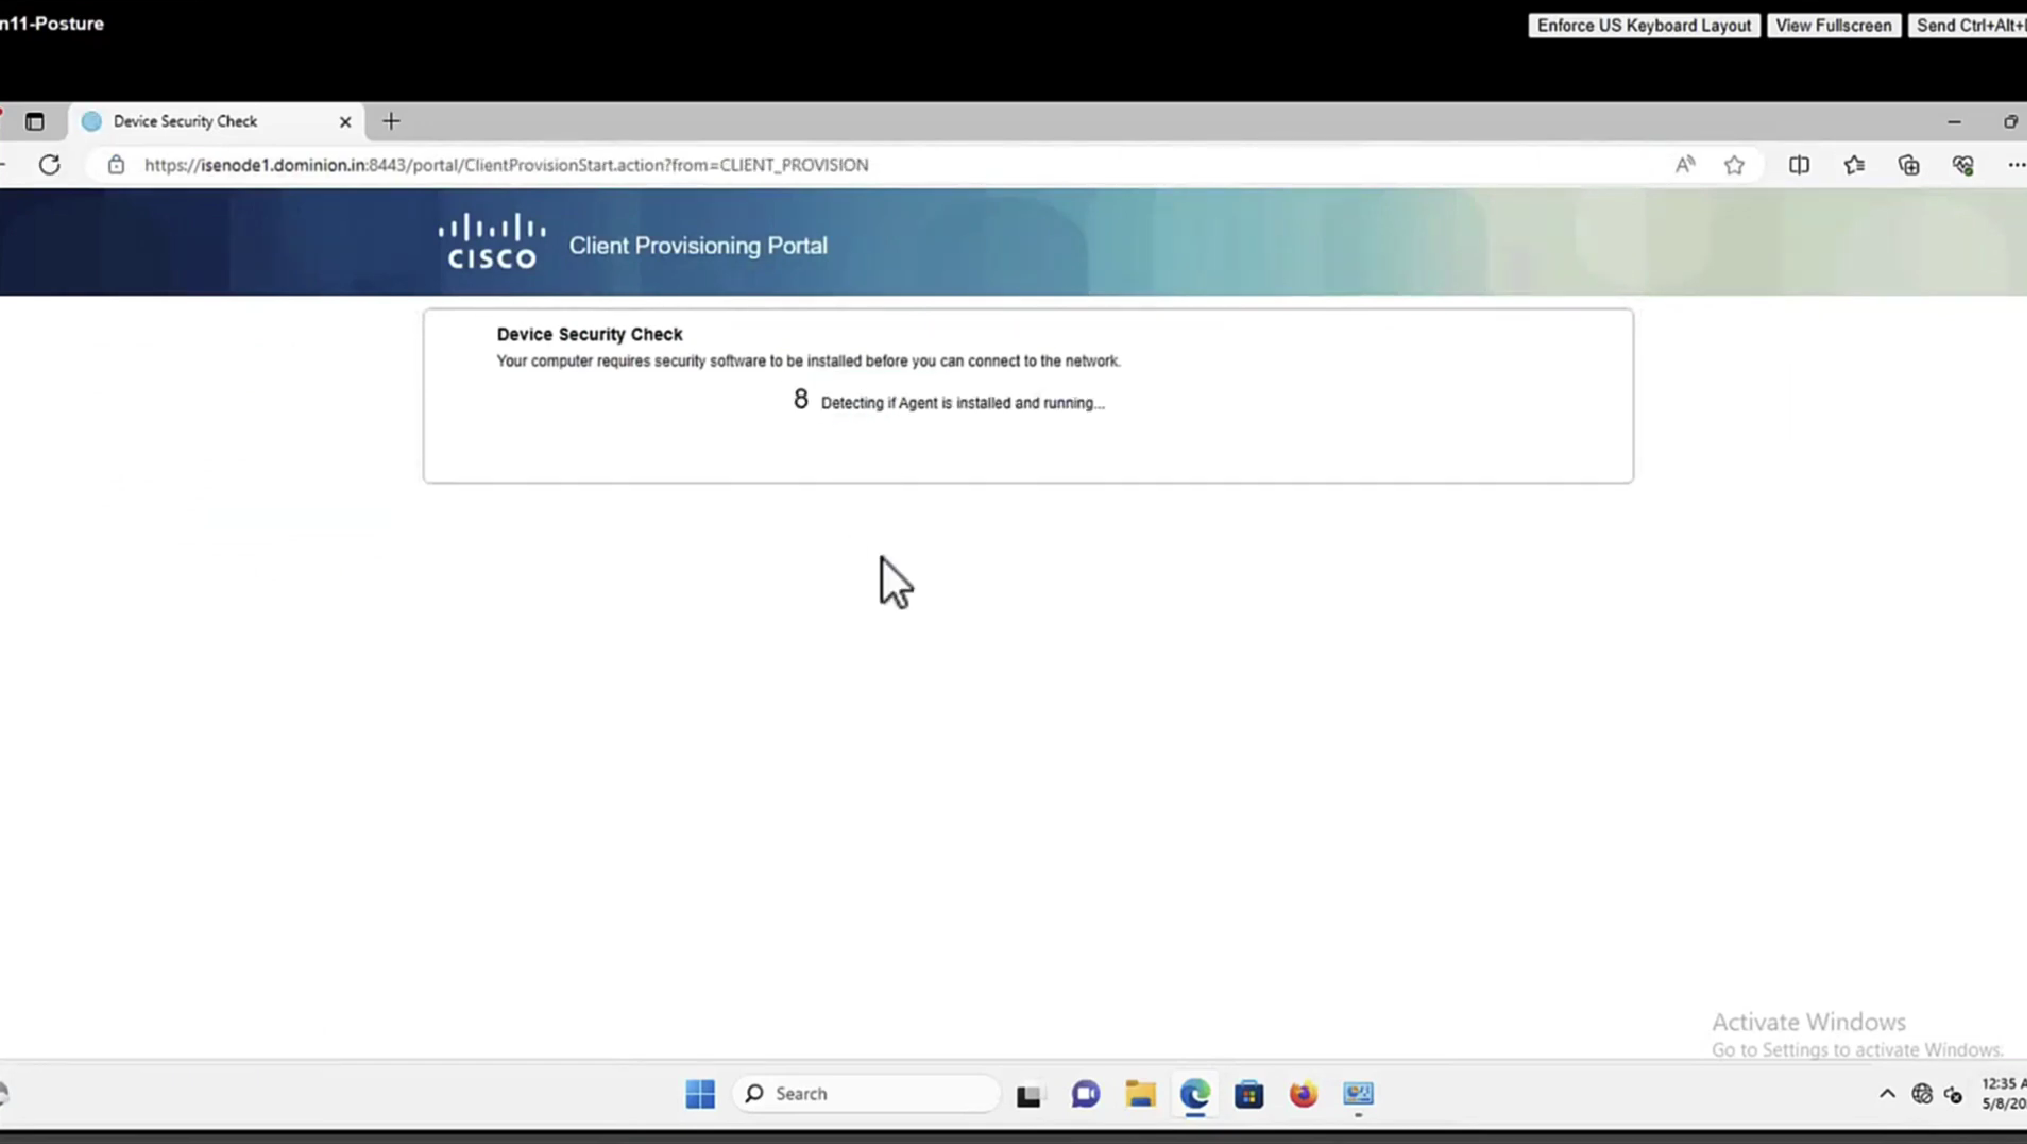
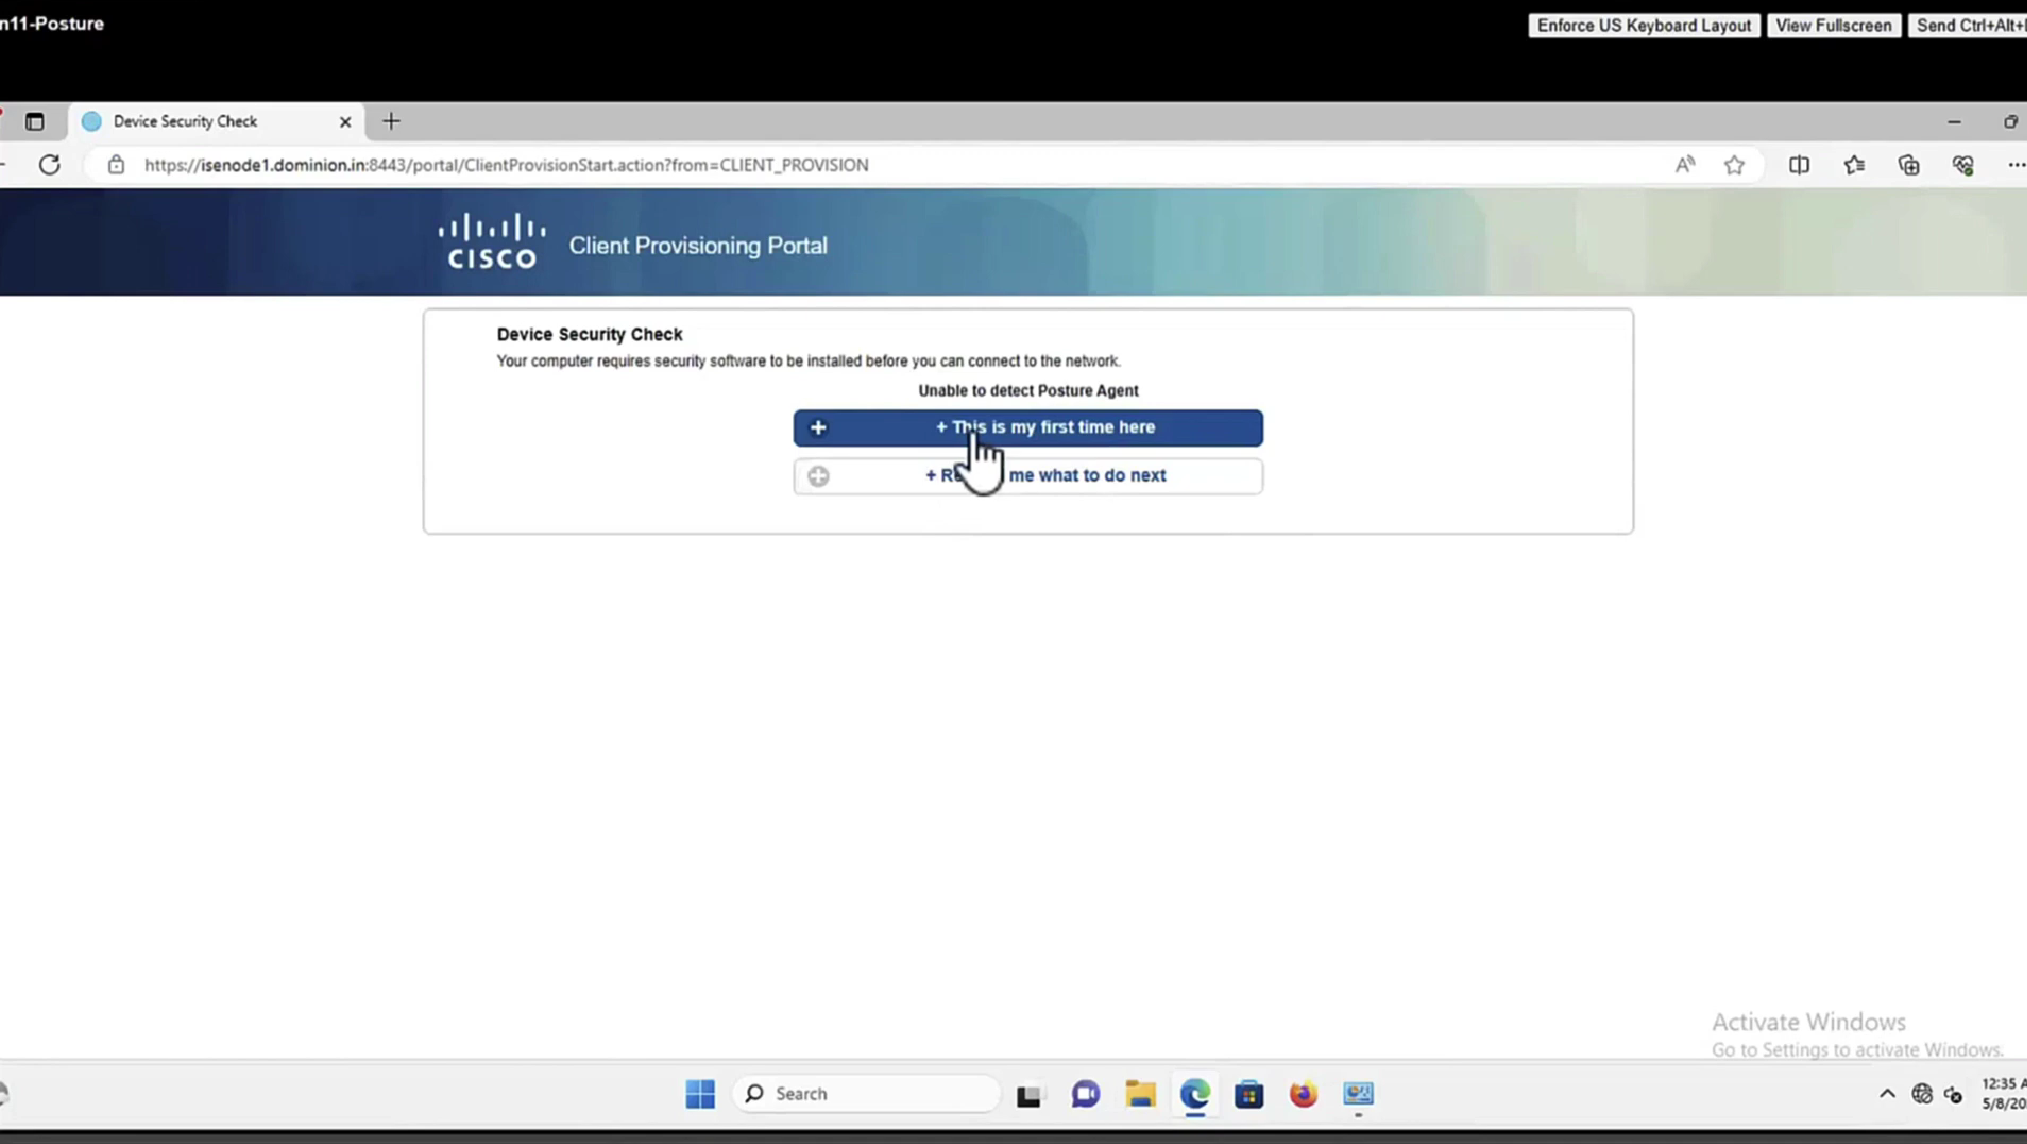
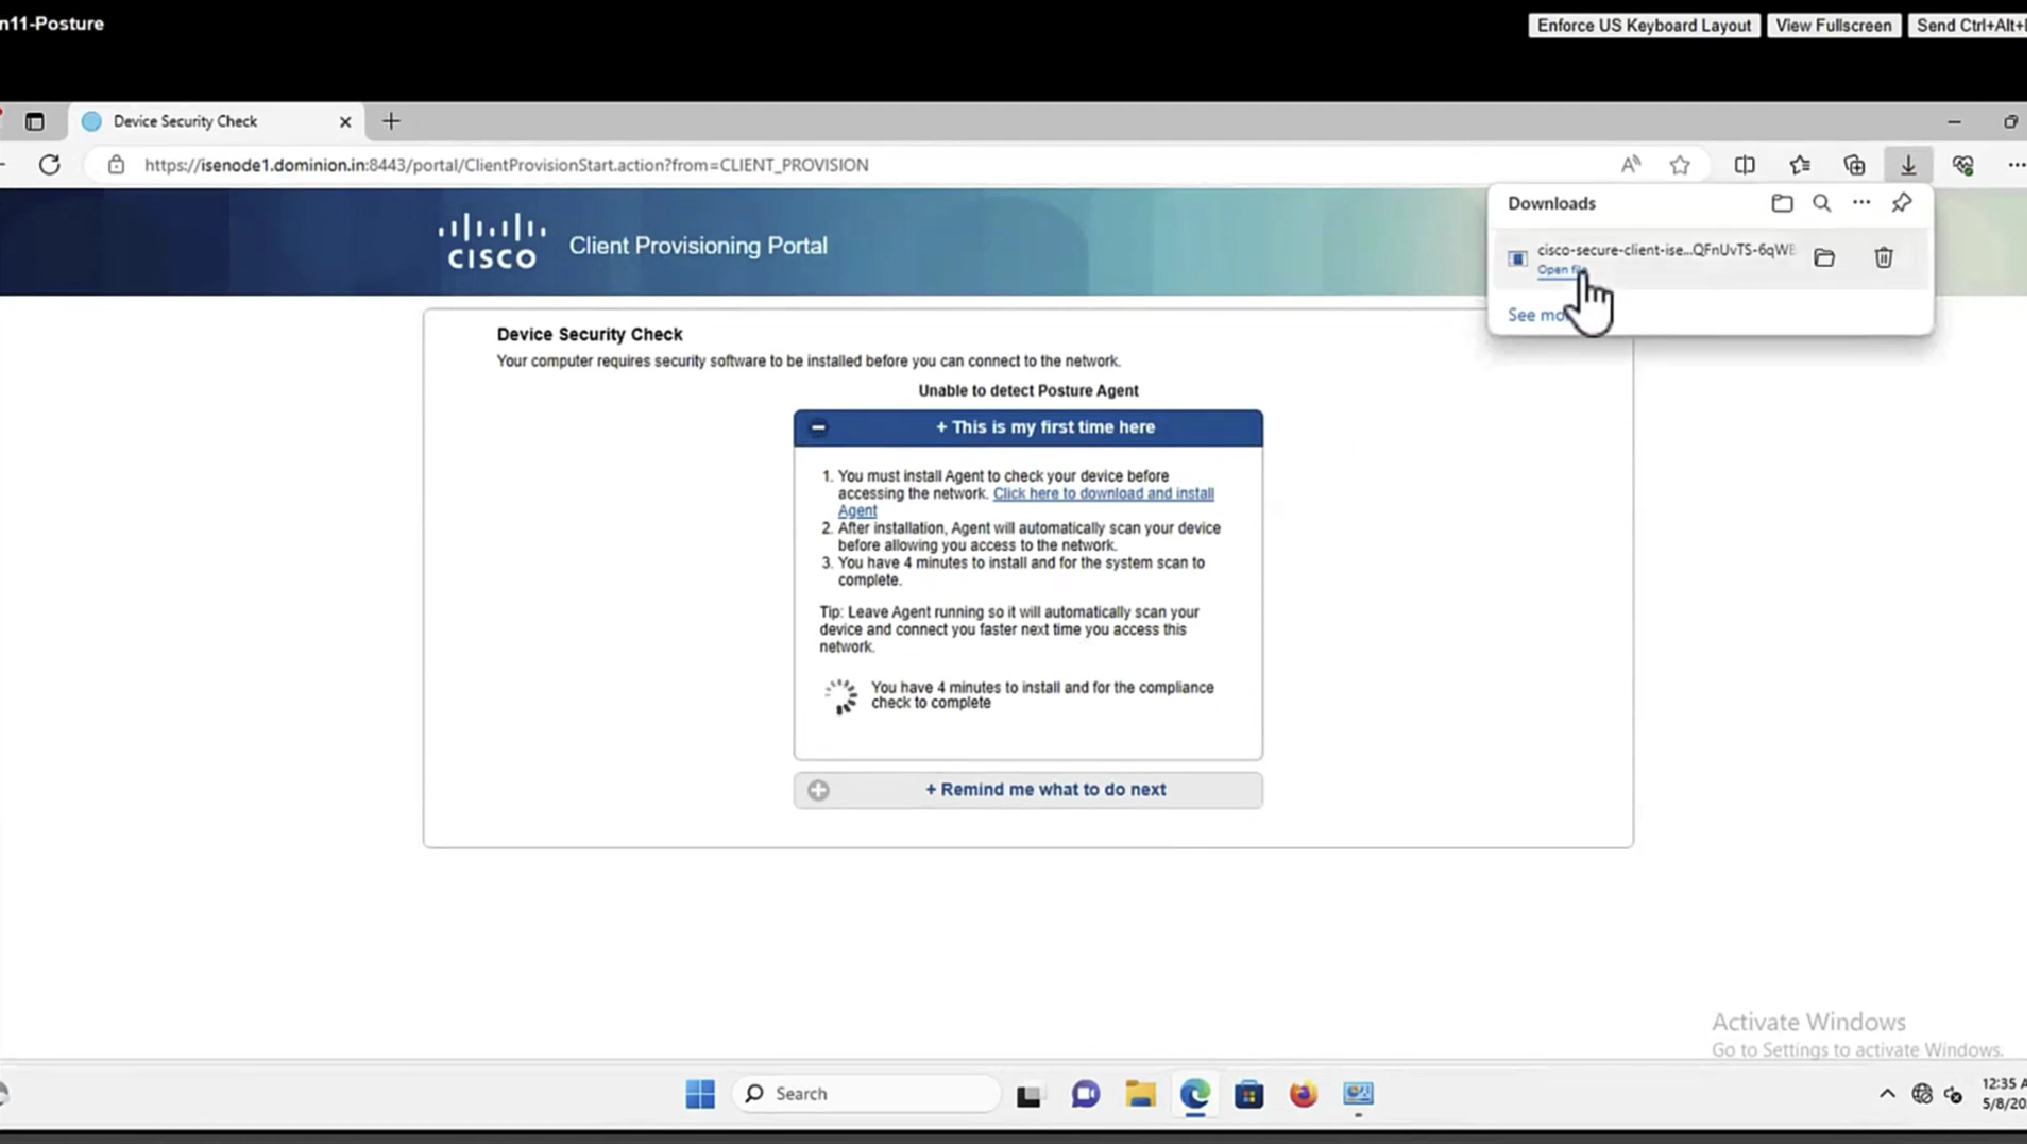
5. When the traffic from the VPN user matches the locally-defined ACL, it is redirected to ISE Client Provisioning Portal. ISE provisions AnyConnect Posture Module and Compliance Module.
6. After the agent is installed on the client machine, it automatically searches for ISE with probes. When ISE is detected successfully, posture requirements are checked on the endpoint. In this example, the agent checks for any installed anti-malware software. Then it sends a posture report to the ISE.
7. When ISE receives the posture report from the agent, ISE changes Posture Status for this session and triggers RADIUS CoA type Push with new attributes. This time, the posture status is known and another rule is hit.
- If the user is compliant, then a DACL name that permits full access is sent.
- If the user is non-compliant, then a DACL name that permits limited access is sent.
8. The FTD removes the redirection. FTD sends Access-Request in order to download DACL from the ISE. The specific DACL is attached to the VPN session.
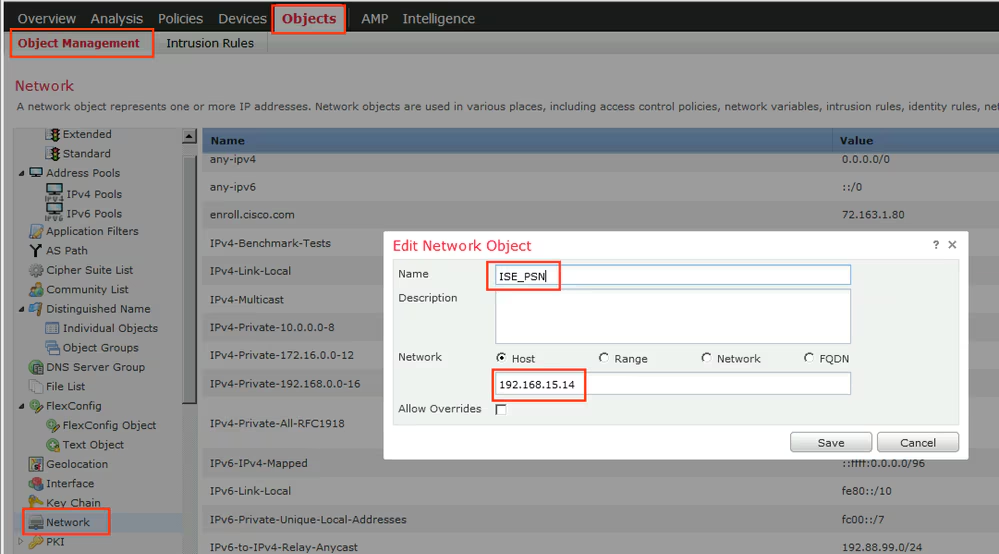
Step 1. Create Network Object Group for ISE and Remediation Servers (if any). Navigate to Objects > Object Management > Network.
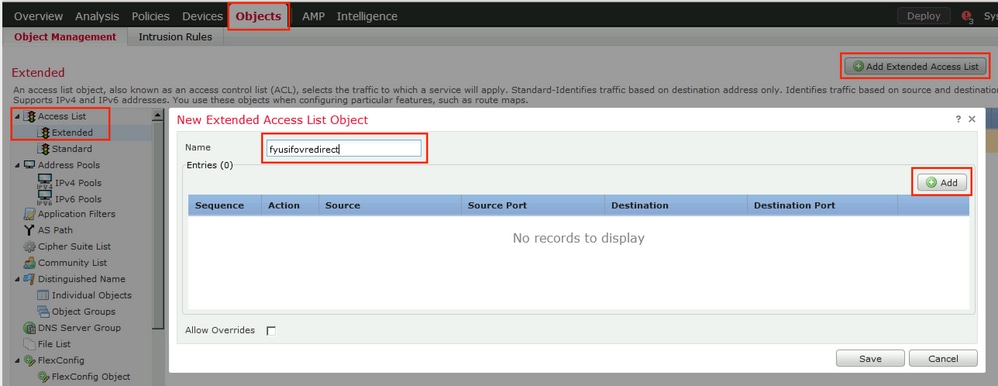
Step 2. Create Redirect ACL. Navigate to Objects > Object Management > Access List > Extended. Click Add Extended Access List and provide the name of Redirect ACL. This name must be the same as in the ISE authorization result.
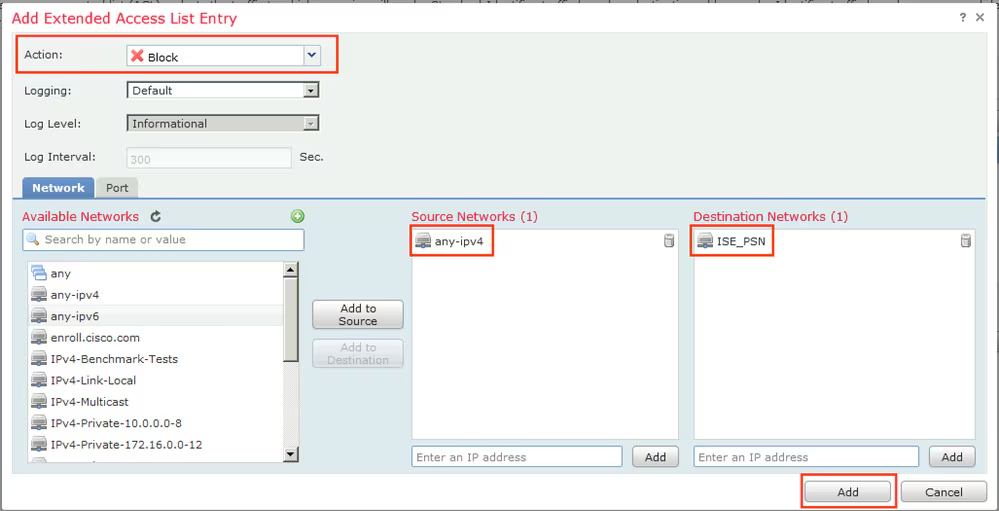
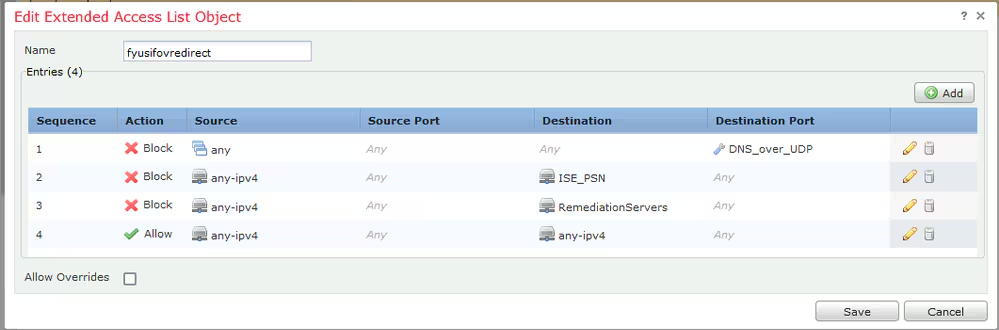
Step 3. Add Redirect ACL Entries. Click the Add button. Block traffic to DNS, ISE, and to the remediation servers to exclude them from redirection. Allow the rest of the traffic, this triggers redirection (ACL entries could be more specific if needed).
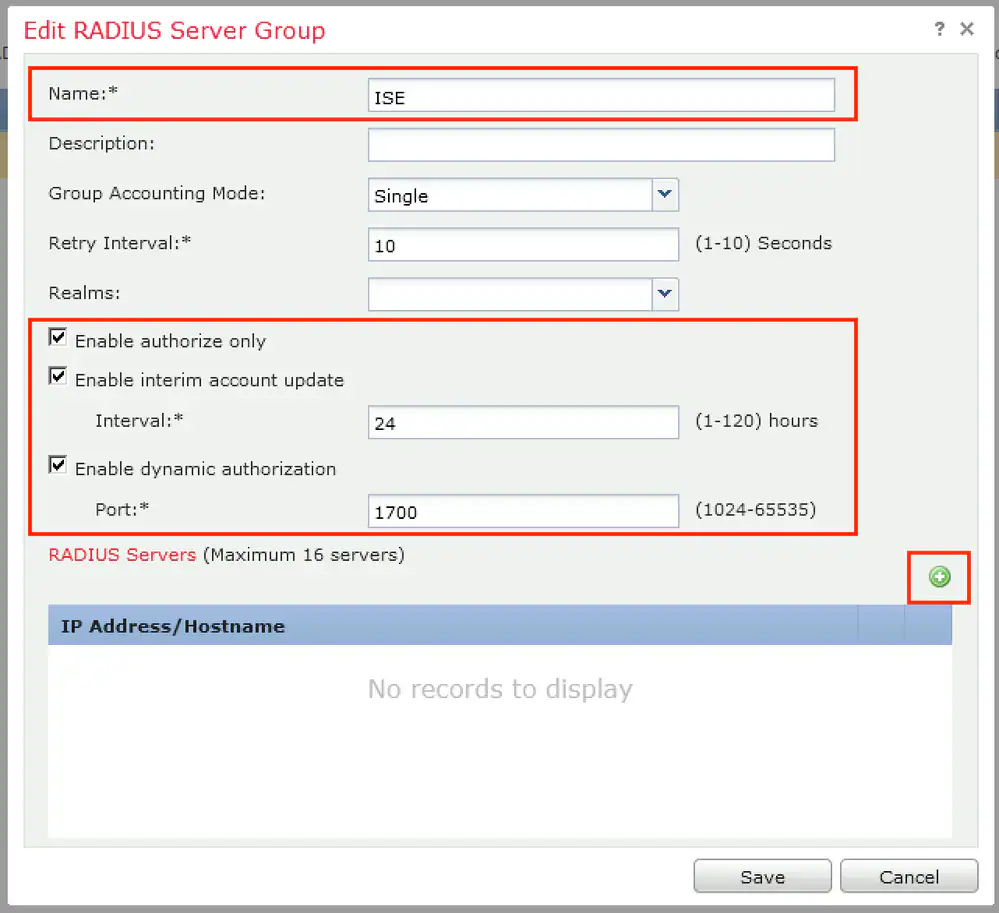
Step 4. Add ISE PSN node/nodes. Navigate to Objects > Object Management > RADIUS Server Group. Click Add RADIUS Server Group, then provide name, enable check all checkboxes and click the plus icon.
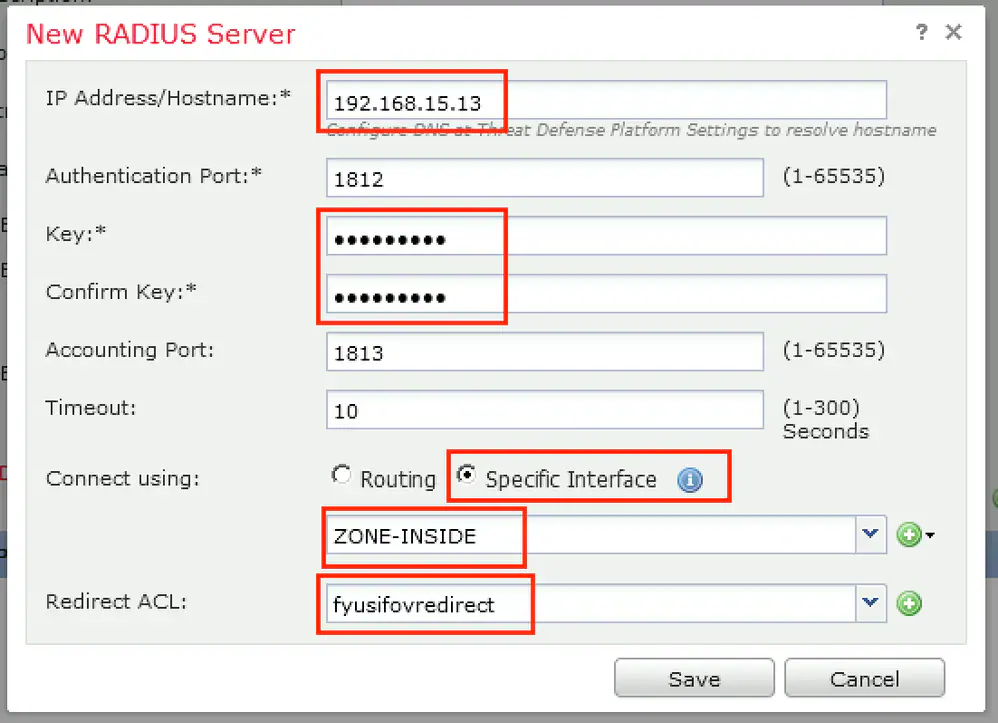
Step 5. In the opened window, provide ISE PSN IP address, RADIUS Key, select Specific Interface and select interface from which ISE is reachable (this interface is used as a source of RADIUS traffic) then select Redirect ACL which was configured previously.
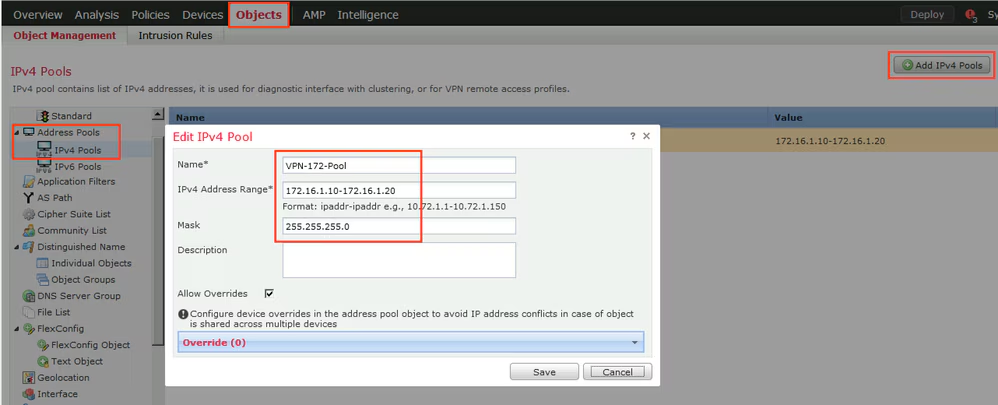
Step 6. Create Address Pool for VPN users. Navigate to Objects > Object Management > Address Pools > IPv4 Pools. Click Add IPv4 Pools and fill the in details.
Step 7. Create AnyConnect package. Navigate to Objects > Object Management > VPN > AnyConnect File. Click Add AnyConnect File, provide the package name, download the package from Cisco Software Download and select Anyconnect Client Image File Type.

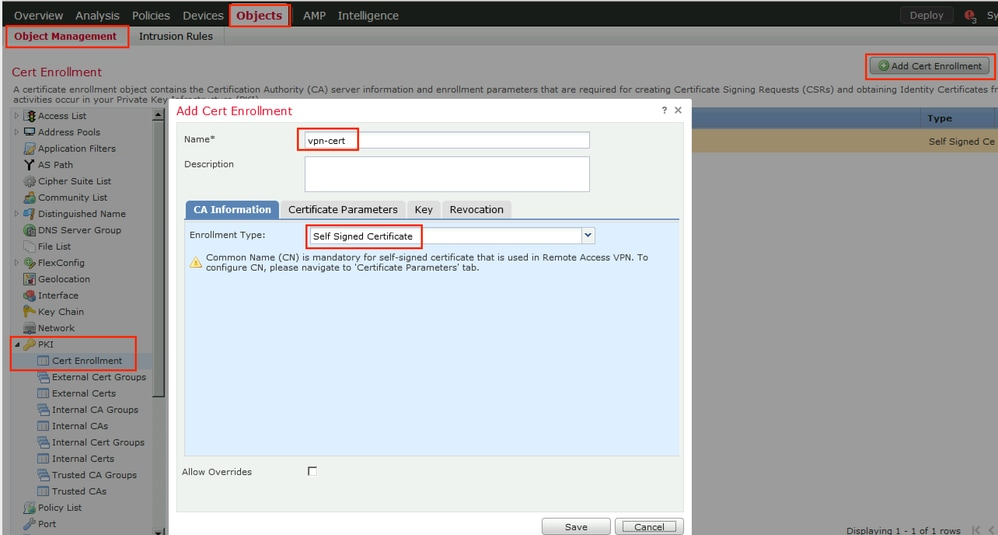
Step 8. Navigate to Certificate Objects > Object Management > PKI > Cert Enrollment. Click Add Cert Enrollment, provide name, choose Self Signed Certificate in Enrollment Type. Click the Certificate Parameters tab and provide CN.

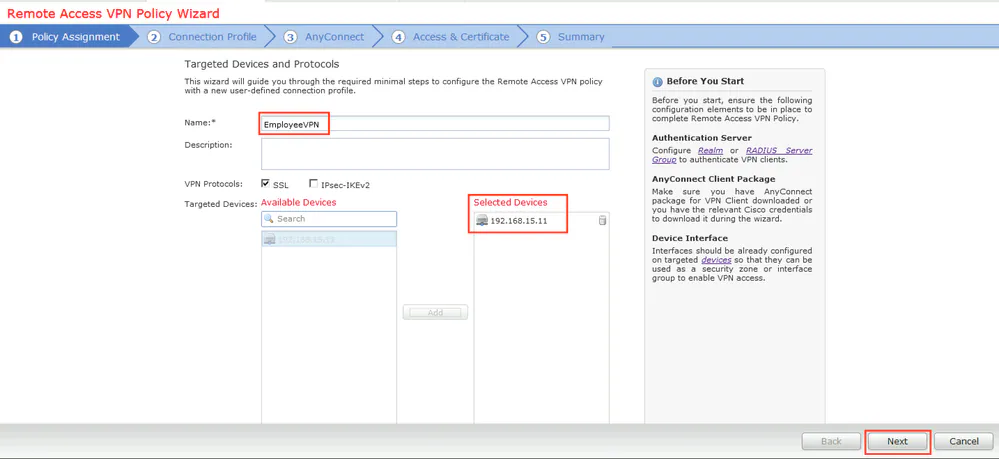
Step 9. Launch Remote Access VPN wizard. Navigate to Devices > VPN > Remote Access and click Add.

Step 10. Provide the name, check SSL as VPN Protocol, choose FTD which is used as VPN concentrator and click Next.
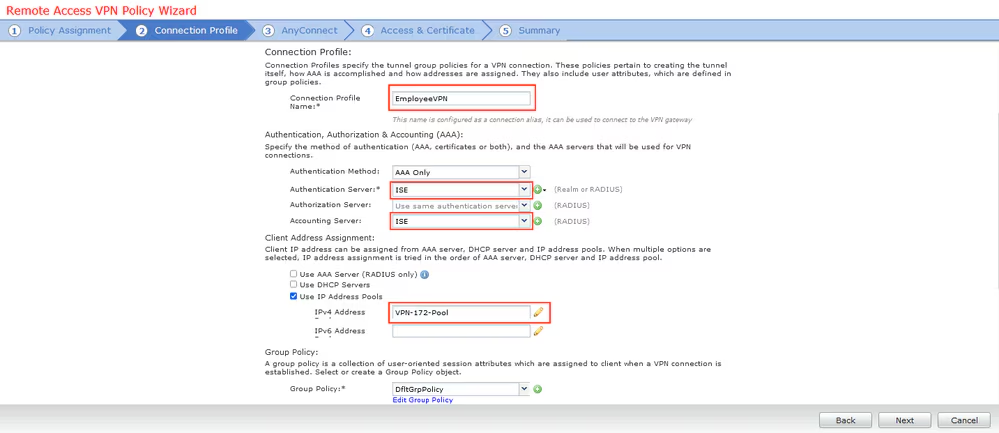
Step 11. Provide Connection Profile name, select Authentication/Accounting Servers, select the address pool which was configured previously and click Next.
Note: Do not select the authorization server. It triggers two Access Requests for a single user (once with the user password and the second time with password cisco).
Step 12. Select AnyConnect package that was configured previously and click Next.

Step 13. Select interface from which VPN traffic is expected, select Certificate Enrollment that was configured previously and click Next.

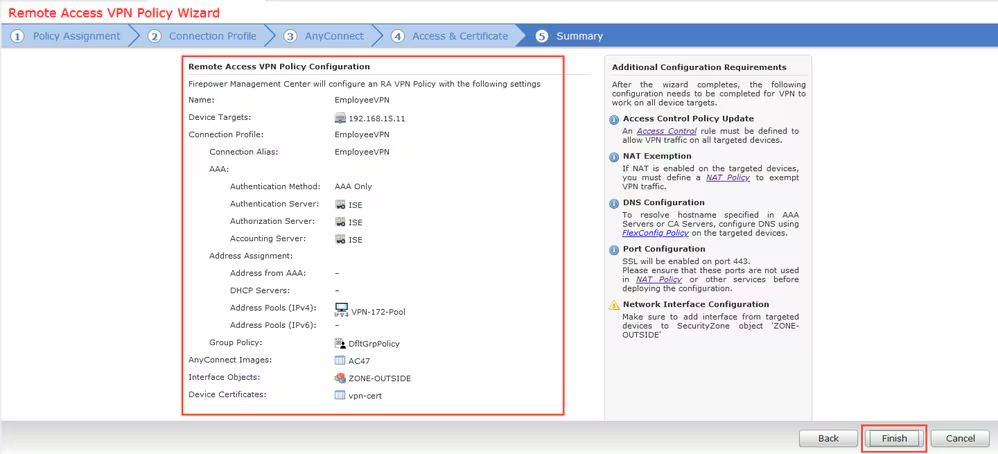
Step 14. Check the summary page and click Finish.
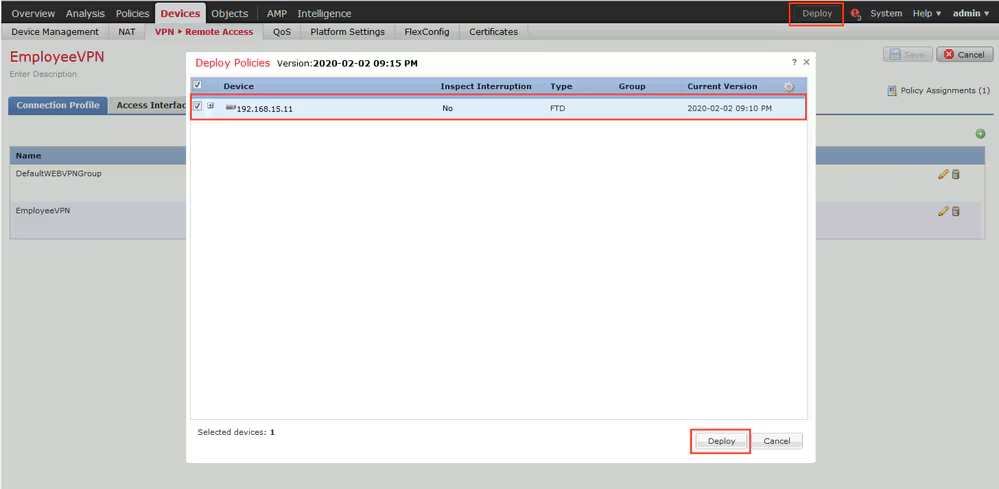
Step 15. Deploy configuration to FTD. Click Deploy and select FTD that is used as a VPN concentrator.
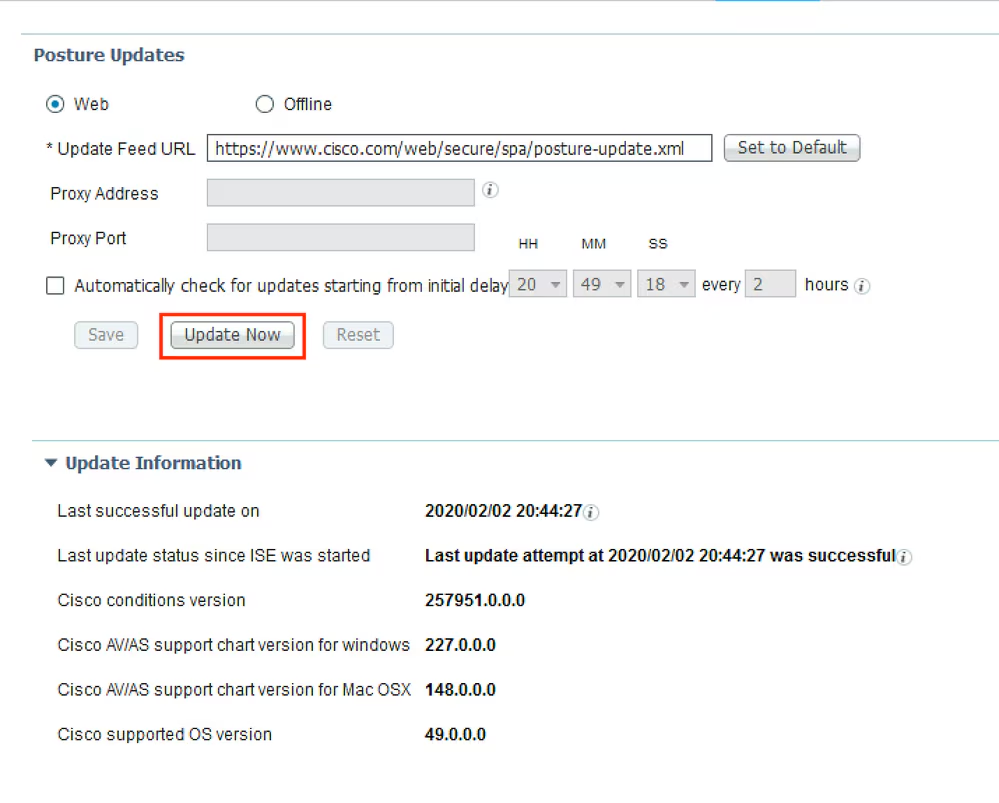
Step 1. Run Posture Updates. Navigate to Administration > System > Settings > Posture > Updates.
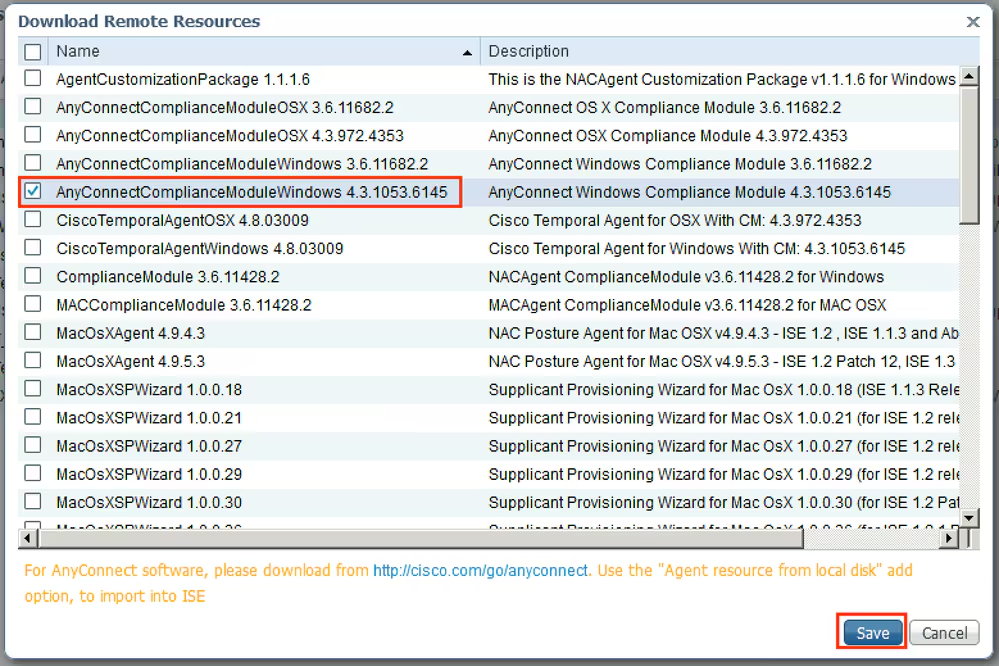
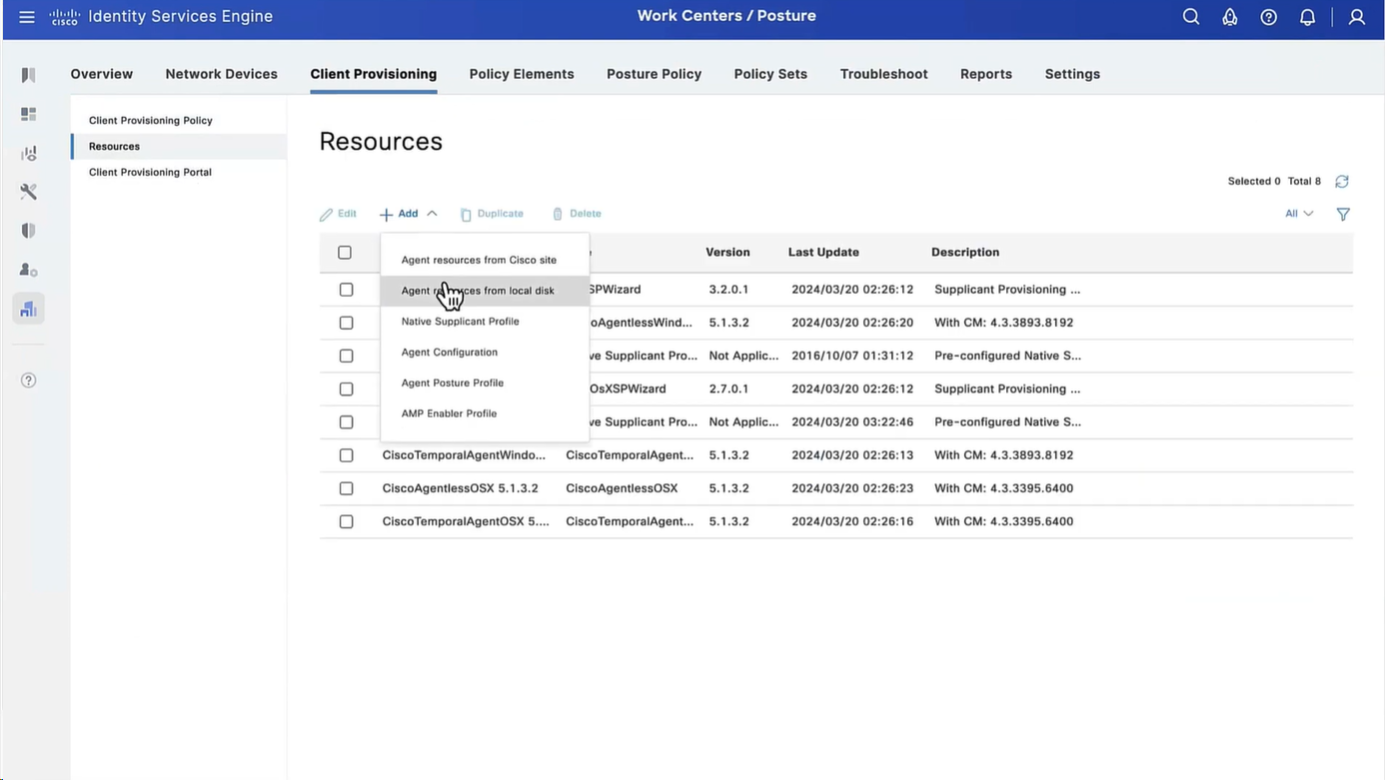
Step 2. Upload Compliance Module. Navigate to Policy > Policy Elements > Results > Client Provisioning > Resources. Click Add and select Agent resources from Cisco site
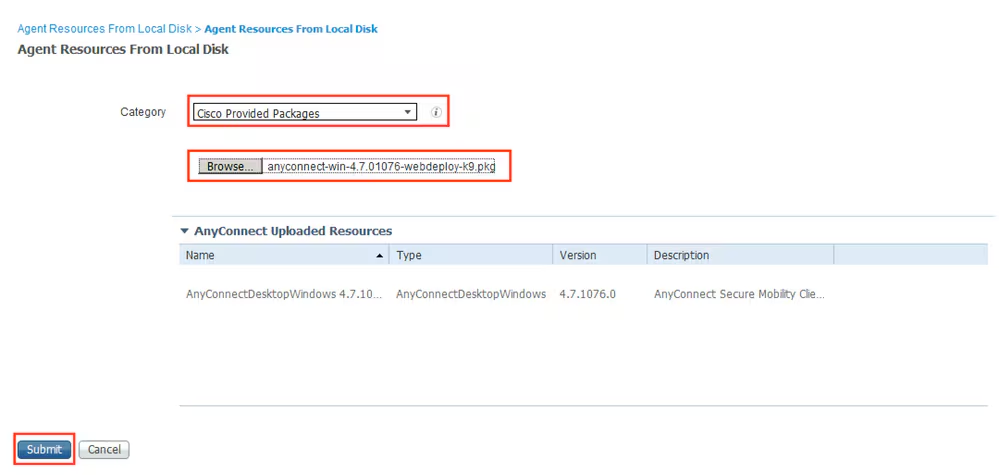
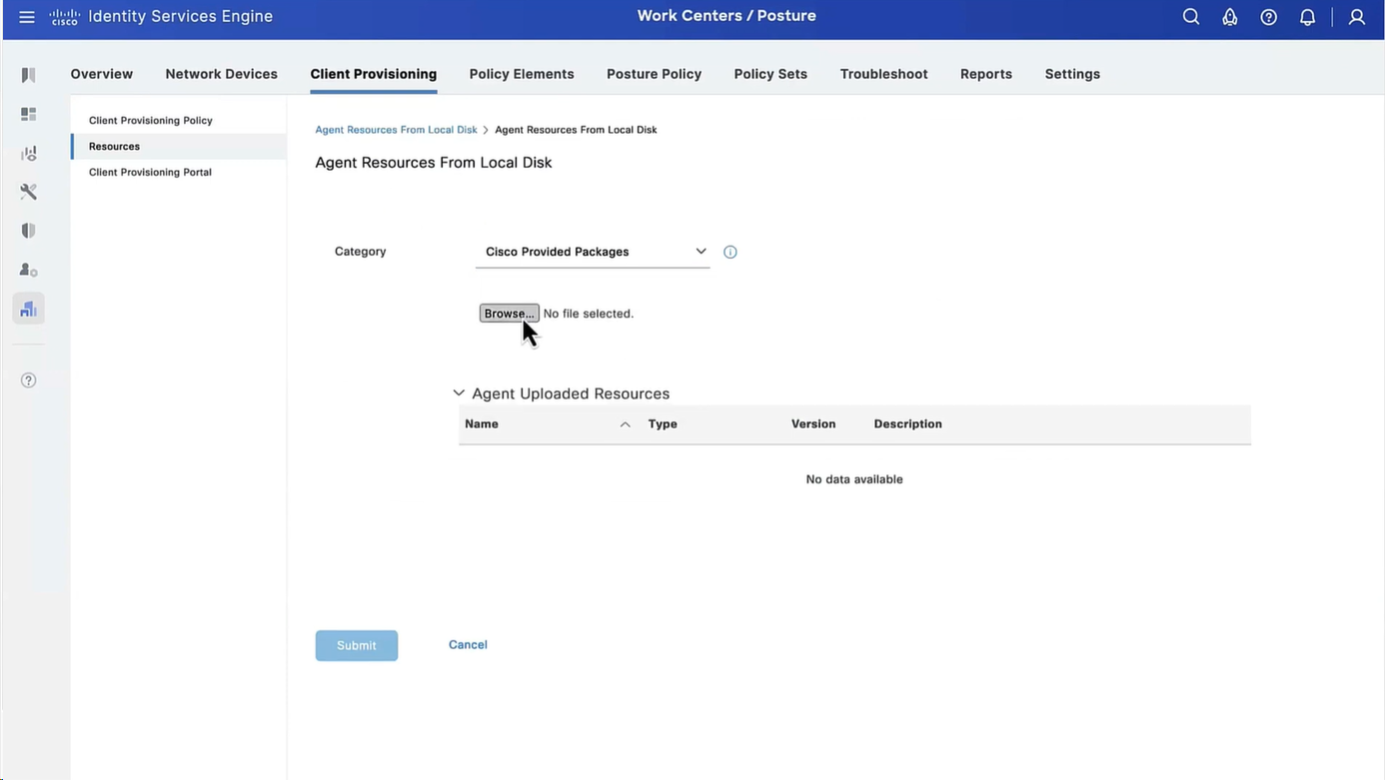
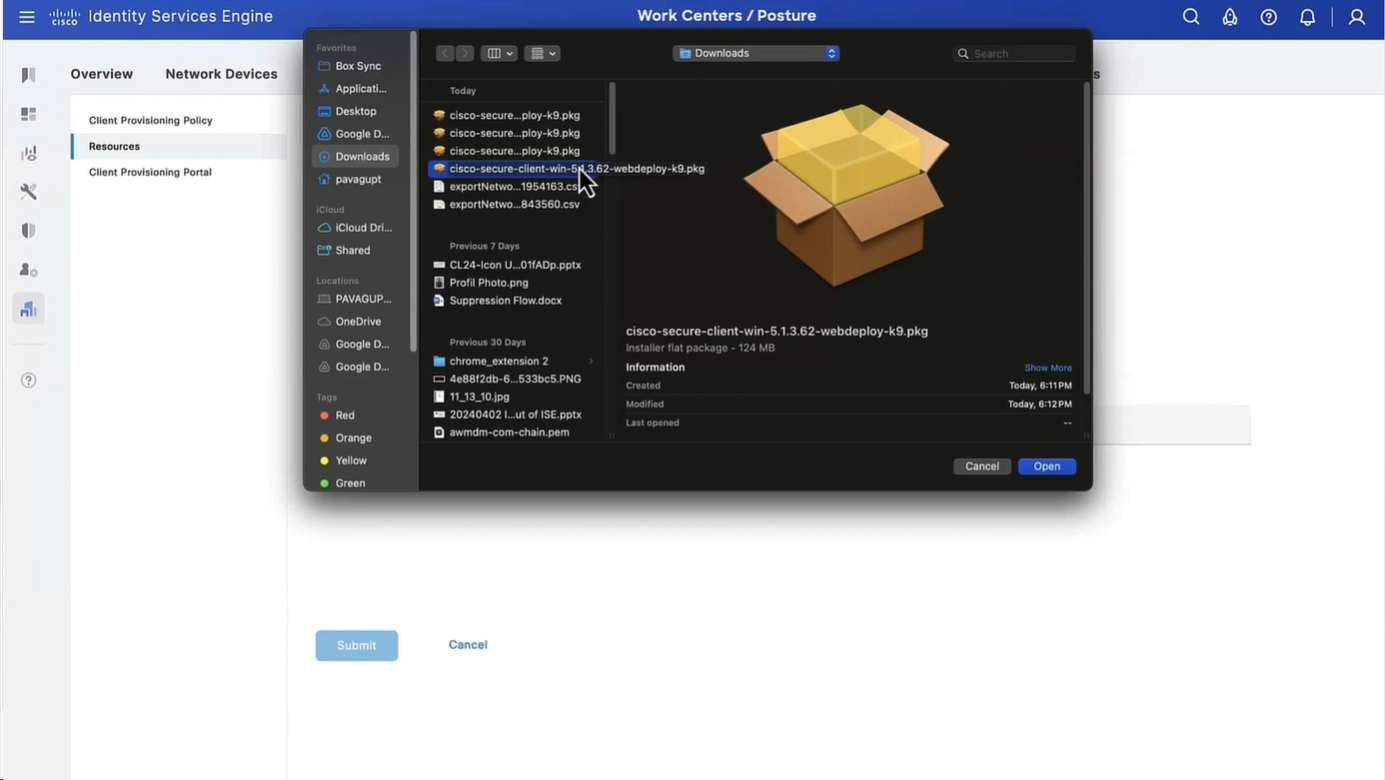
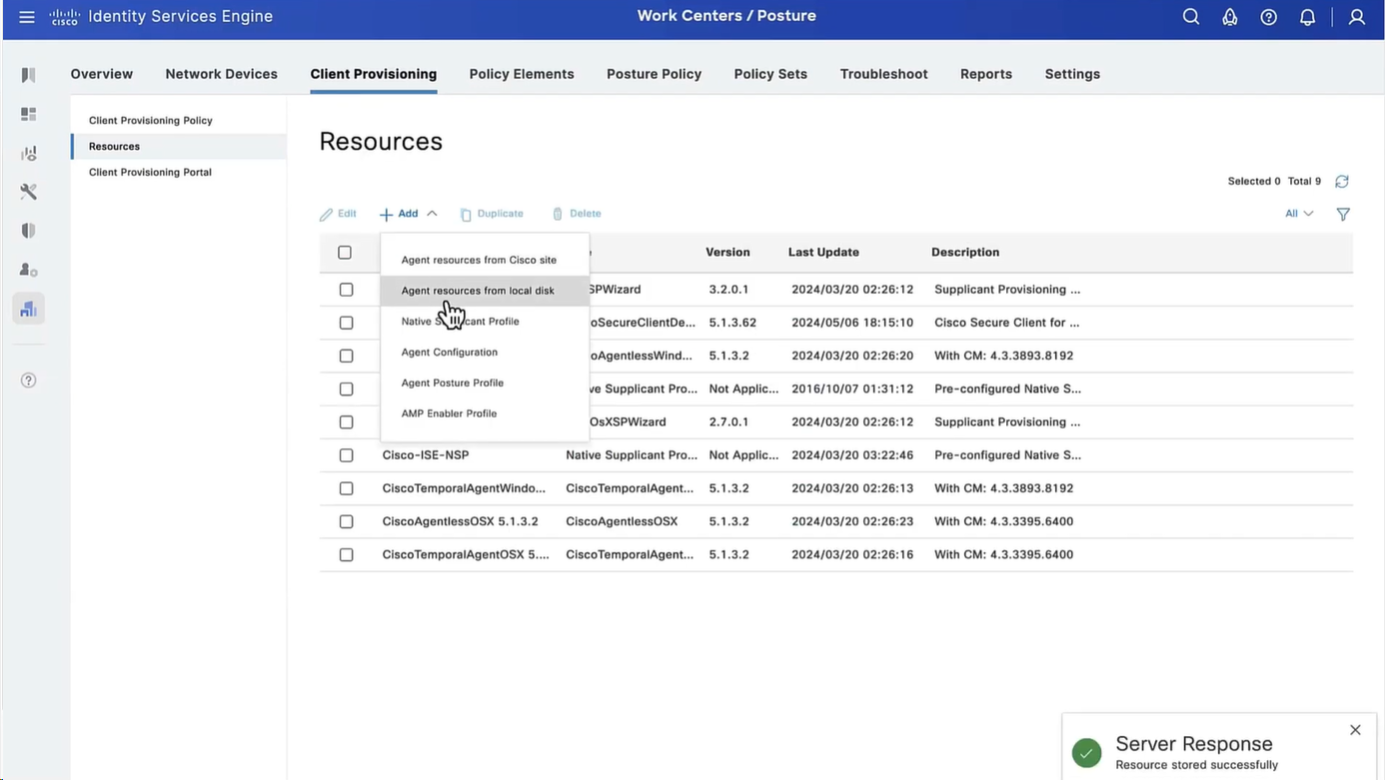
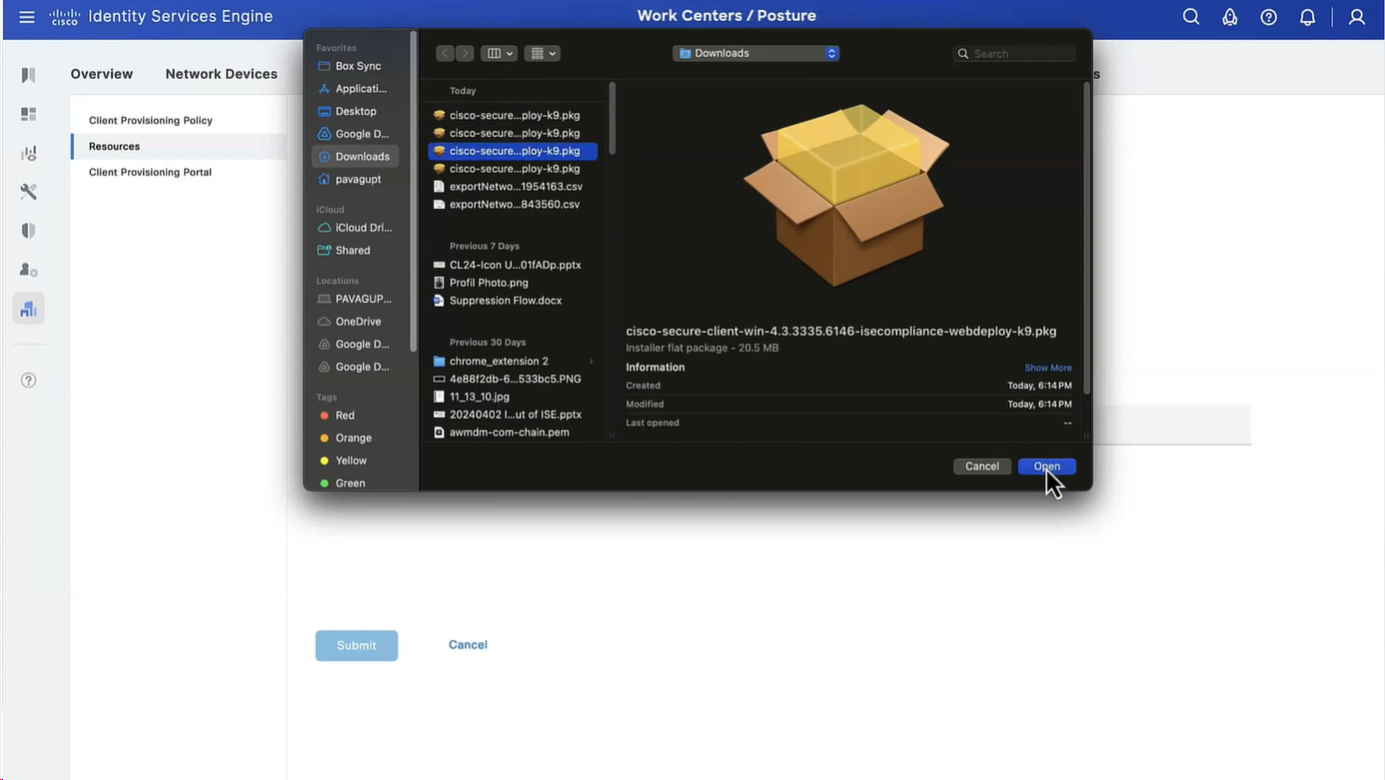
Step 3. Download AnyConnect from Cisco Software Download, then upload it to ISE. Navigate to Policy > Policy Elements > Results > Client Provisioning > Resources.
Click Add and select Agent Resources From Local Disk. Choose Cisco Provided Packages under Category, select AnyConnect package from local disk and click Submit.
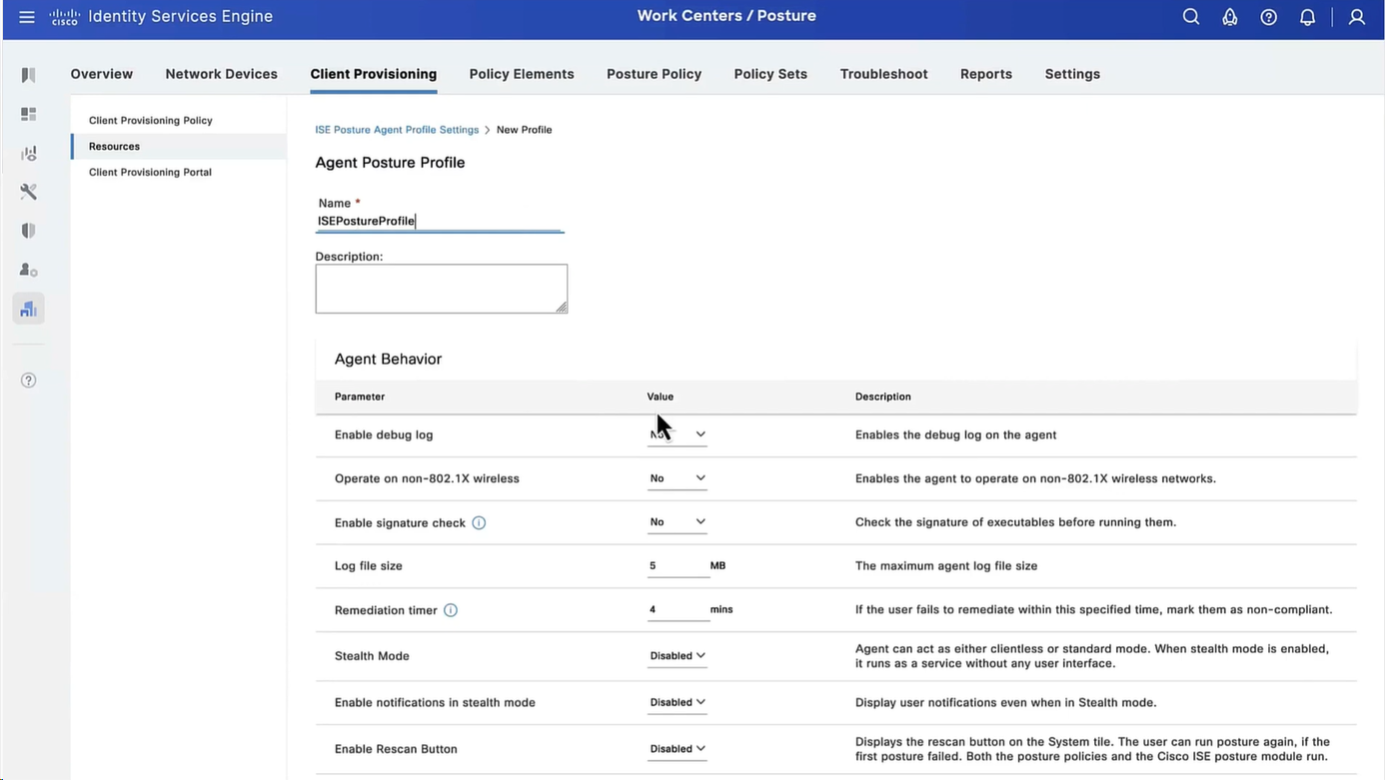
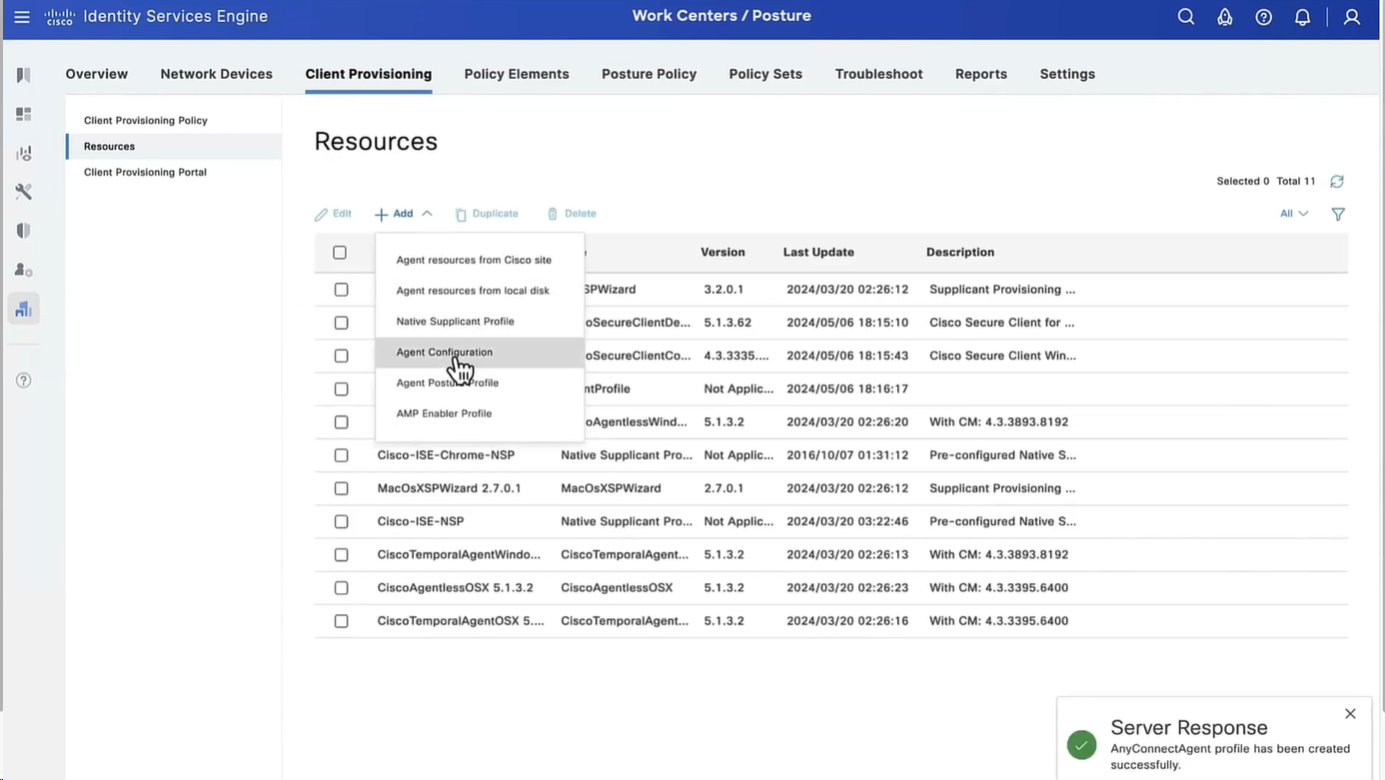
Step 4. Create AnyConnect Posture Profile. Navigate to Policy > Policy Elements > Results > Client Provisioning > Resources.
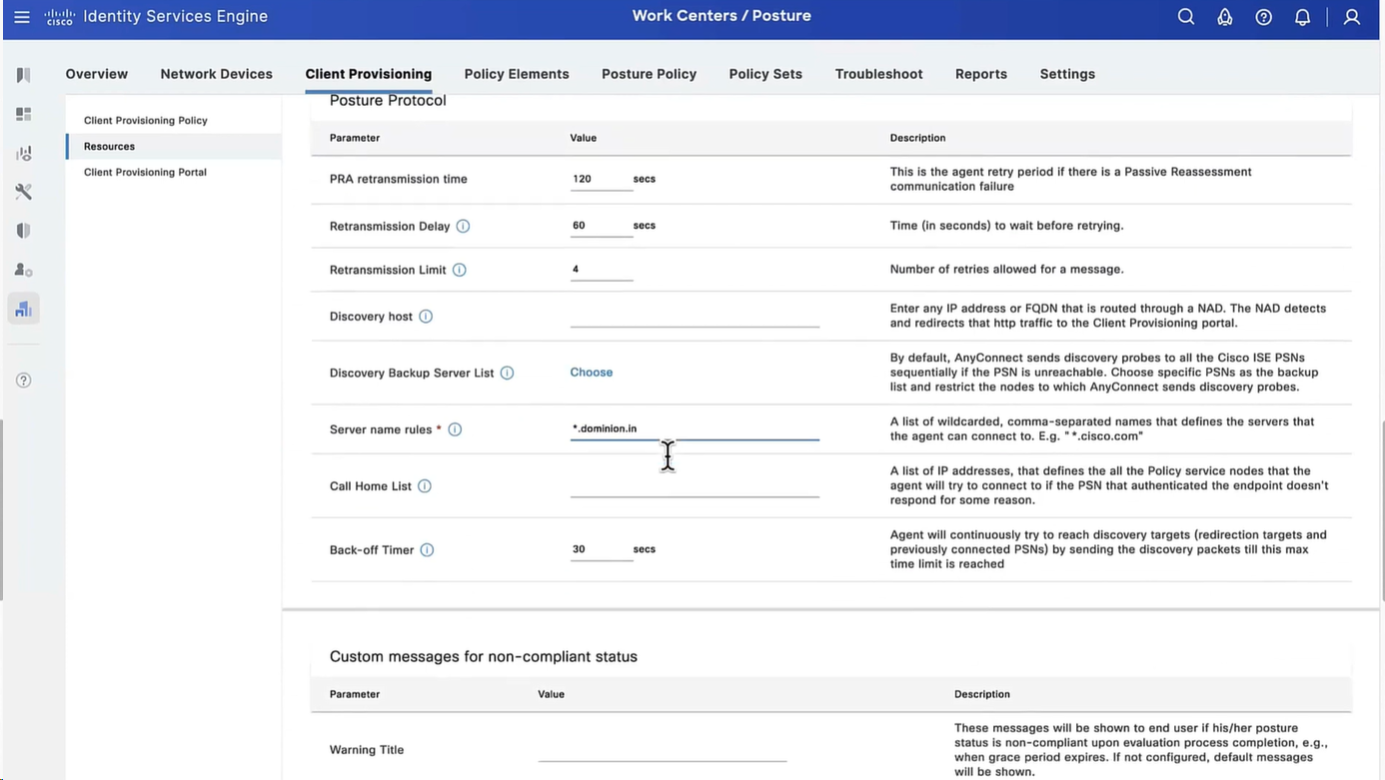
Click Add and select AnyConnect Posture Profile. Fill in the name and Posture Protocol.
Under *Server name rules put * and put any dummy IP address under Discovery host.


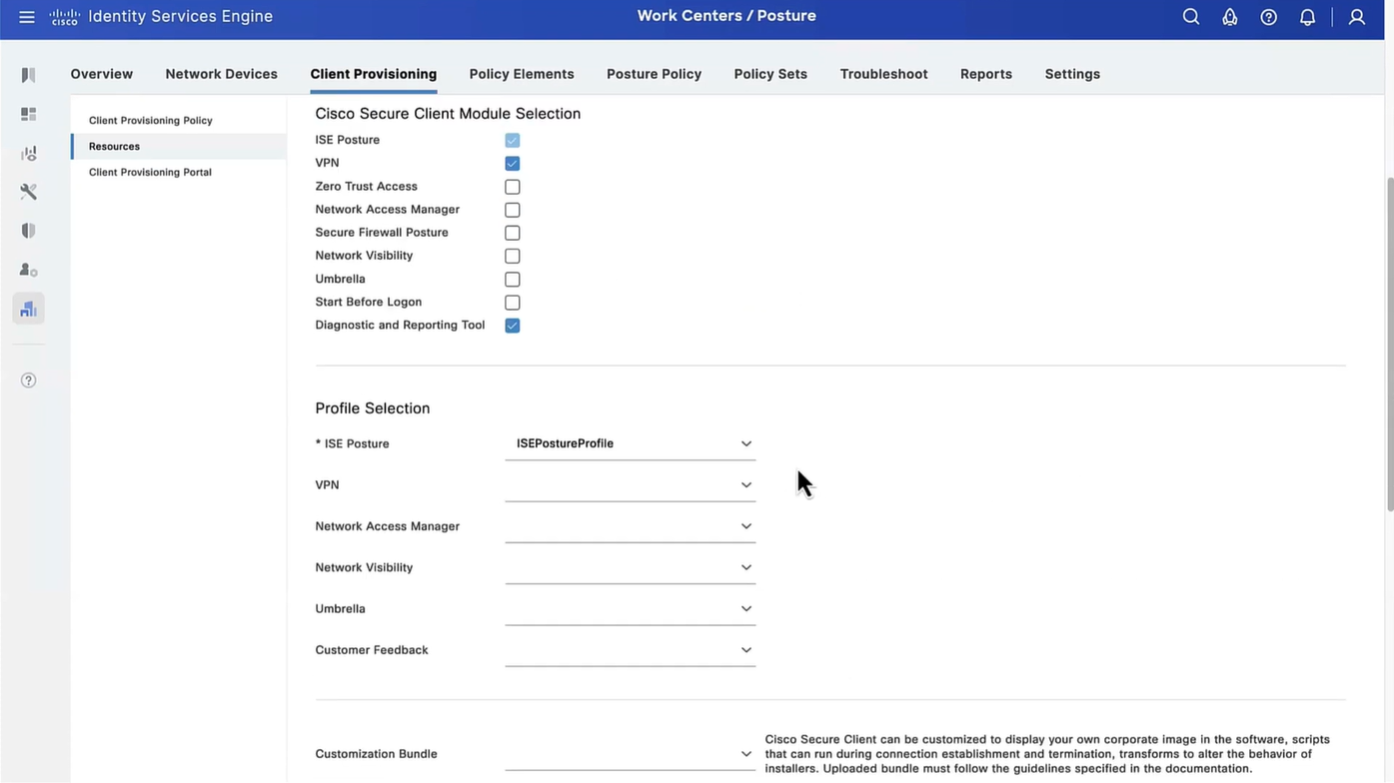
Step 5. Navigate to Policy > Policy Elements > Results > Client Provisioning > Resources and create AnyConnect Configuration. Click Add and select AnyConnect Configuration. Select AnyConnect Package, provide Configuration Name, select Compliance Module, check Diagnostic and Reporting Tool, select Posture Profile and click Save.

Step 6. Navigate to Policy > Client Provisioning and create Client Provisioning Policy. Click Edit and then select Insert Rule Above, provide name, select OS, and choose AnyConnect Configuration that was created in the previous step.

Step 7. Create Posture Condition under Policy > Policy Elements > Conditions > Posture > Anti-Malware Condition. In this example, predefined “ANY_am_win_inst” is used.

Step 8. Navigate to Policy > Policy Elements > Results > Posture > Remediation Actions and create Posture Remediation. In this example, it is skipped. Remediation Action can be a Text Message.
Step 9. Navigate to Policy > Policy Elements > Results > Posture > Requirements and create Posture Requirements. Predefined requirement Any_AM_Installation_Win is used.

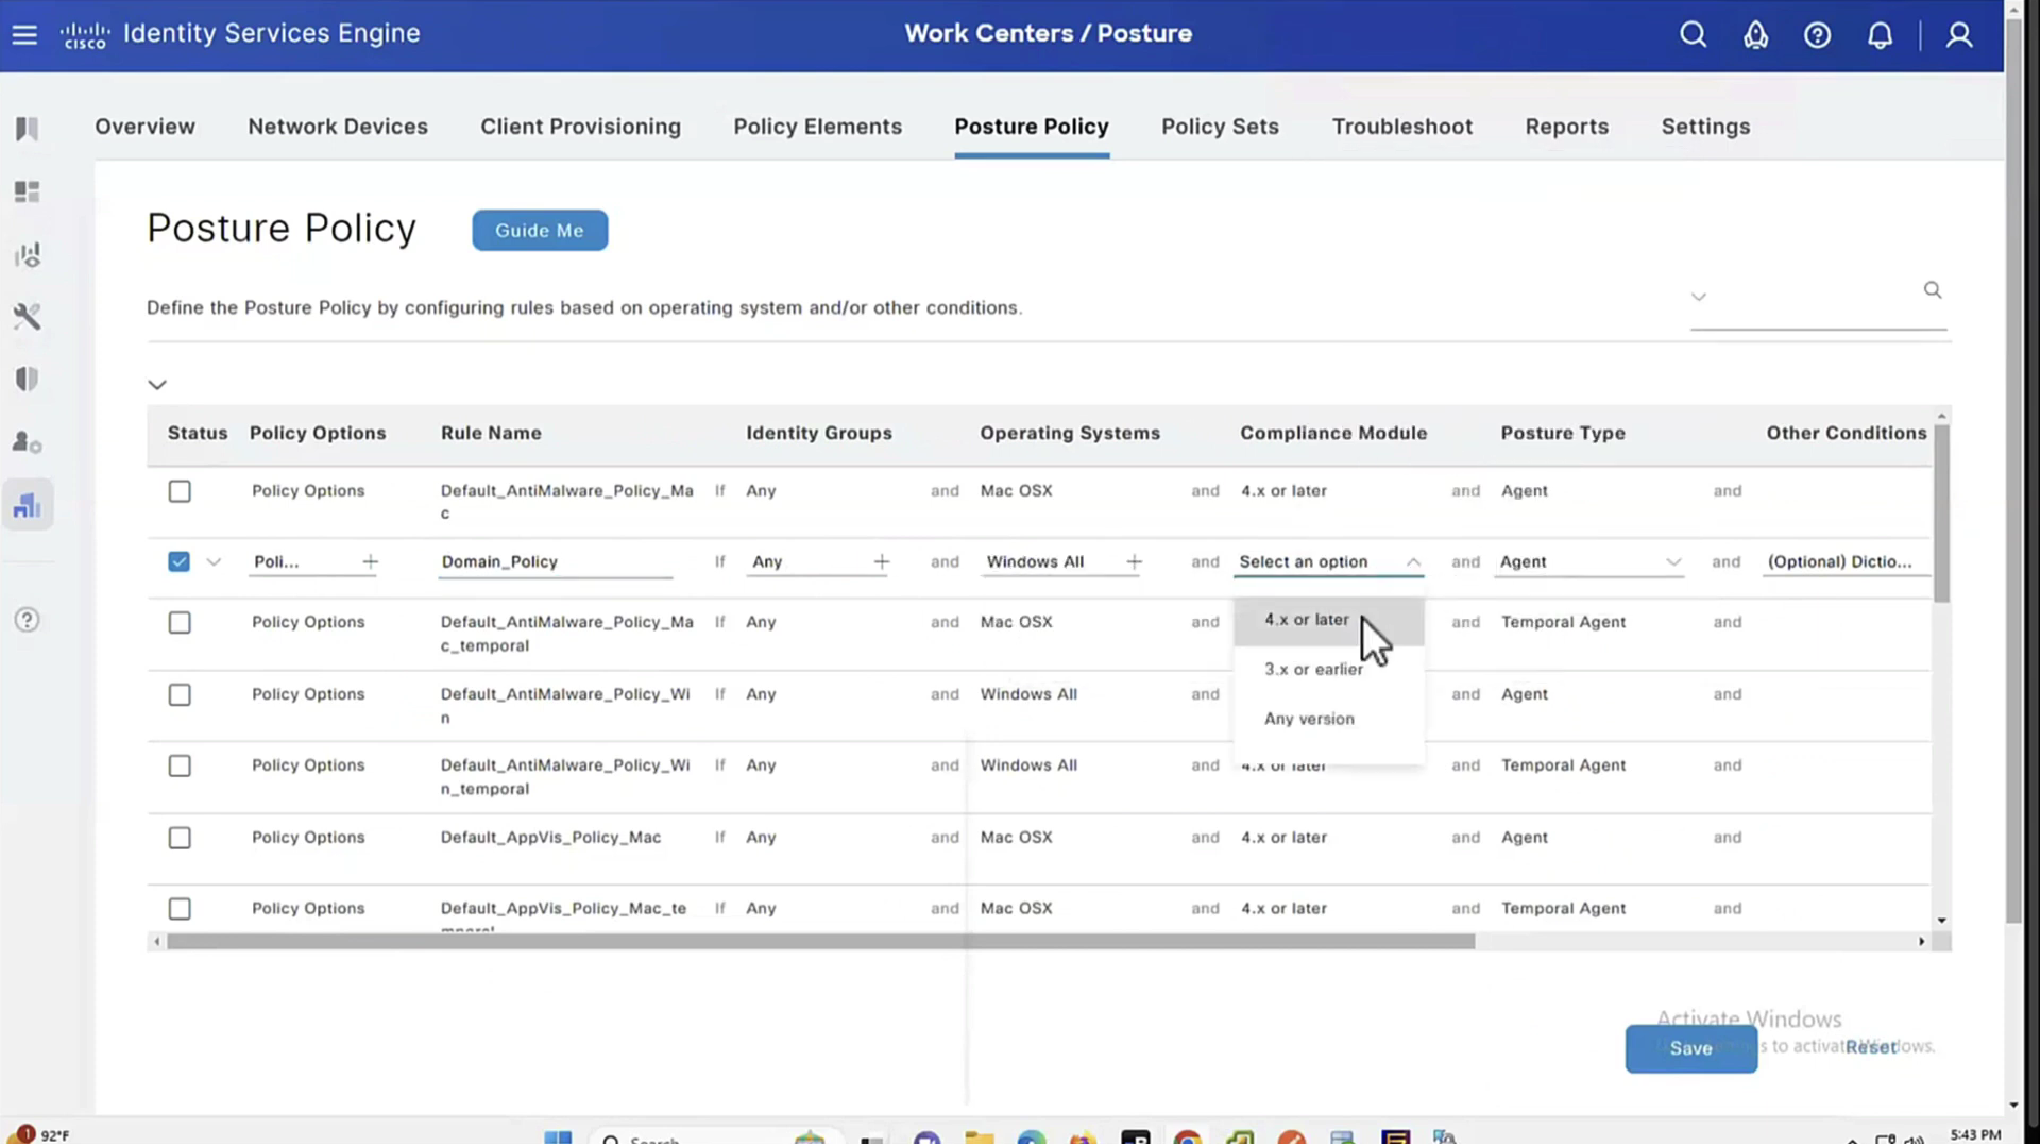
Step 10. Create Posture Policies under Policies > Posture. Default posture policy for any AntiMalware Check for Windows OS is used.

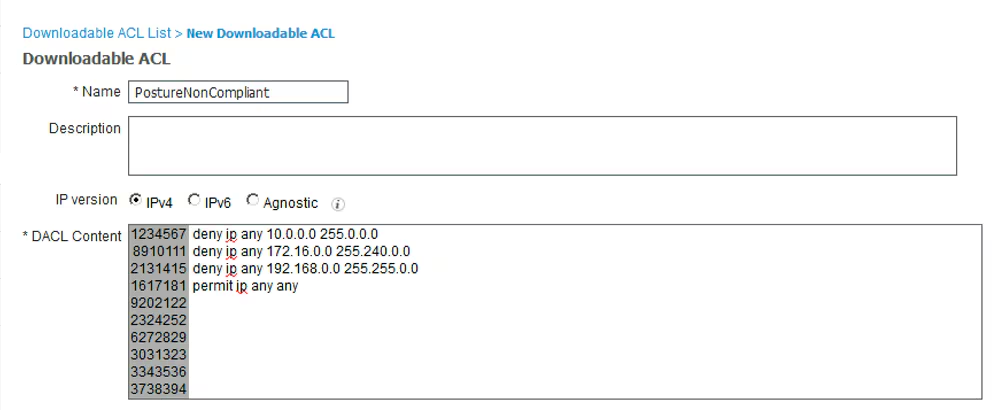
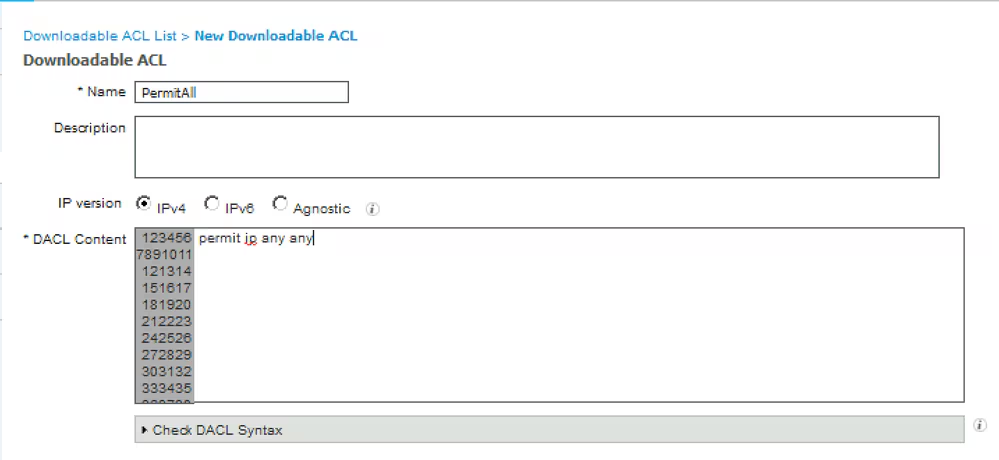
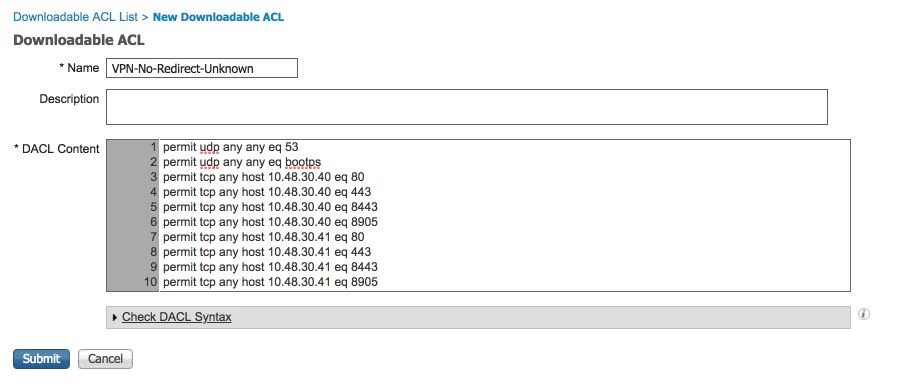
Step 11. Navigate to Policy > Policy Elements > Results > Authorization > Downlodable ACLS and create DACLs for different posture statuses.
In this example:
- Posture Unknown DACL – allows traffic to DNS, PSN and HTTP and HTTPS traffic.
- Posture NonCompliant DACL – denies access to Private Subnets and allow only internet traffic.
- Permit All DACL – allows all traffic for Posture Compliant Status.

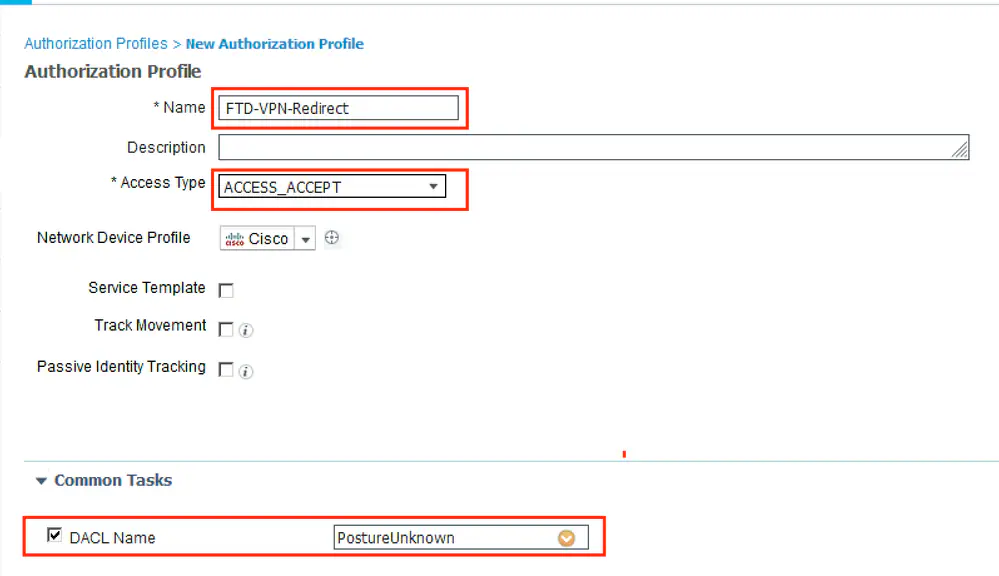
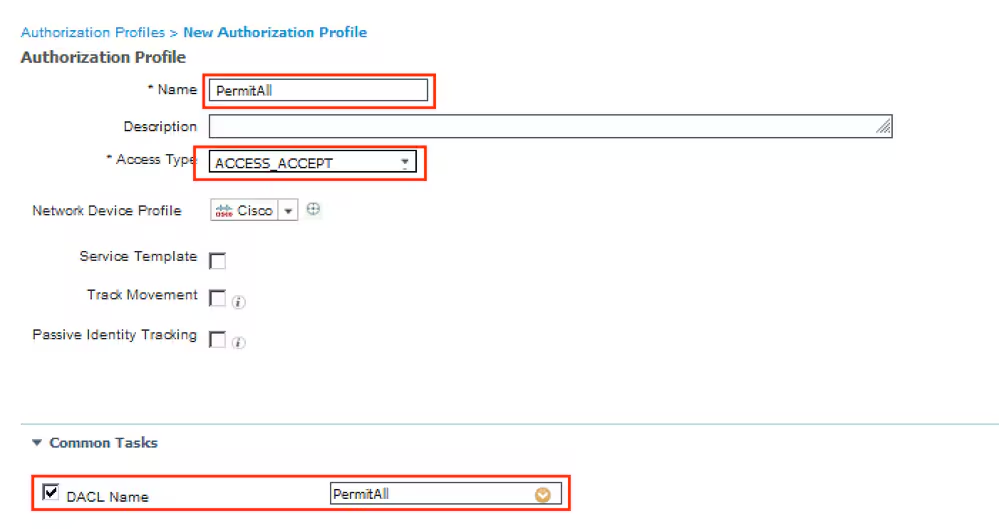
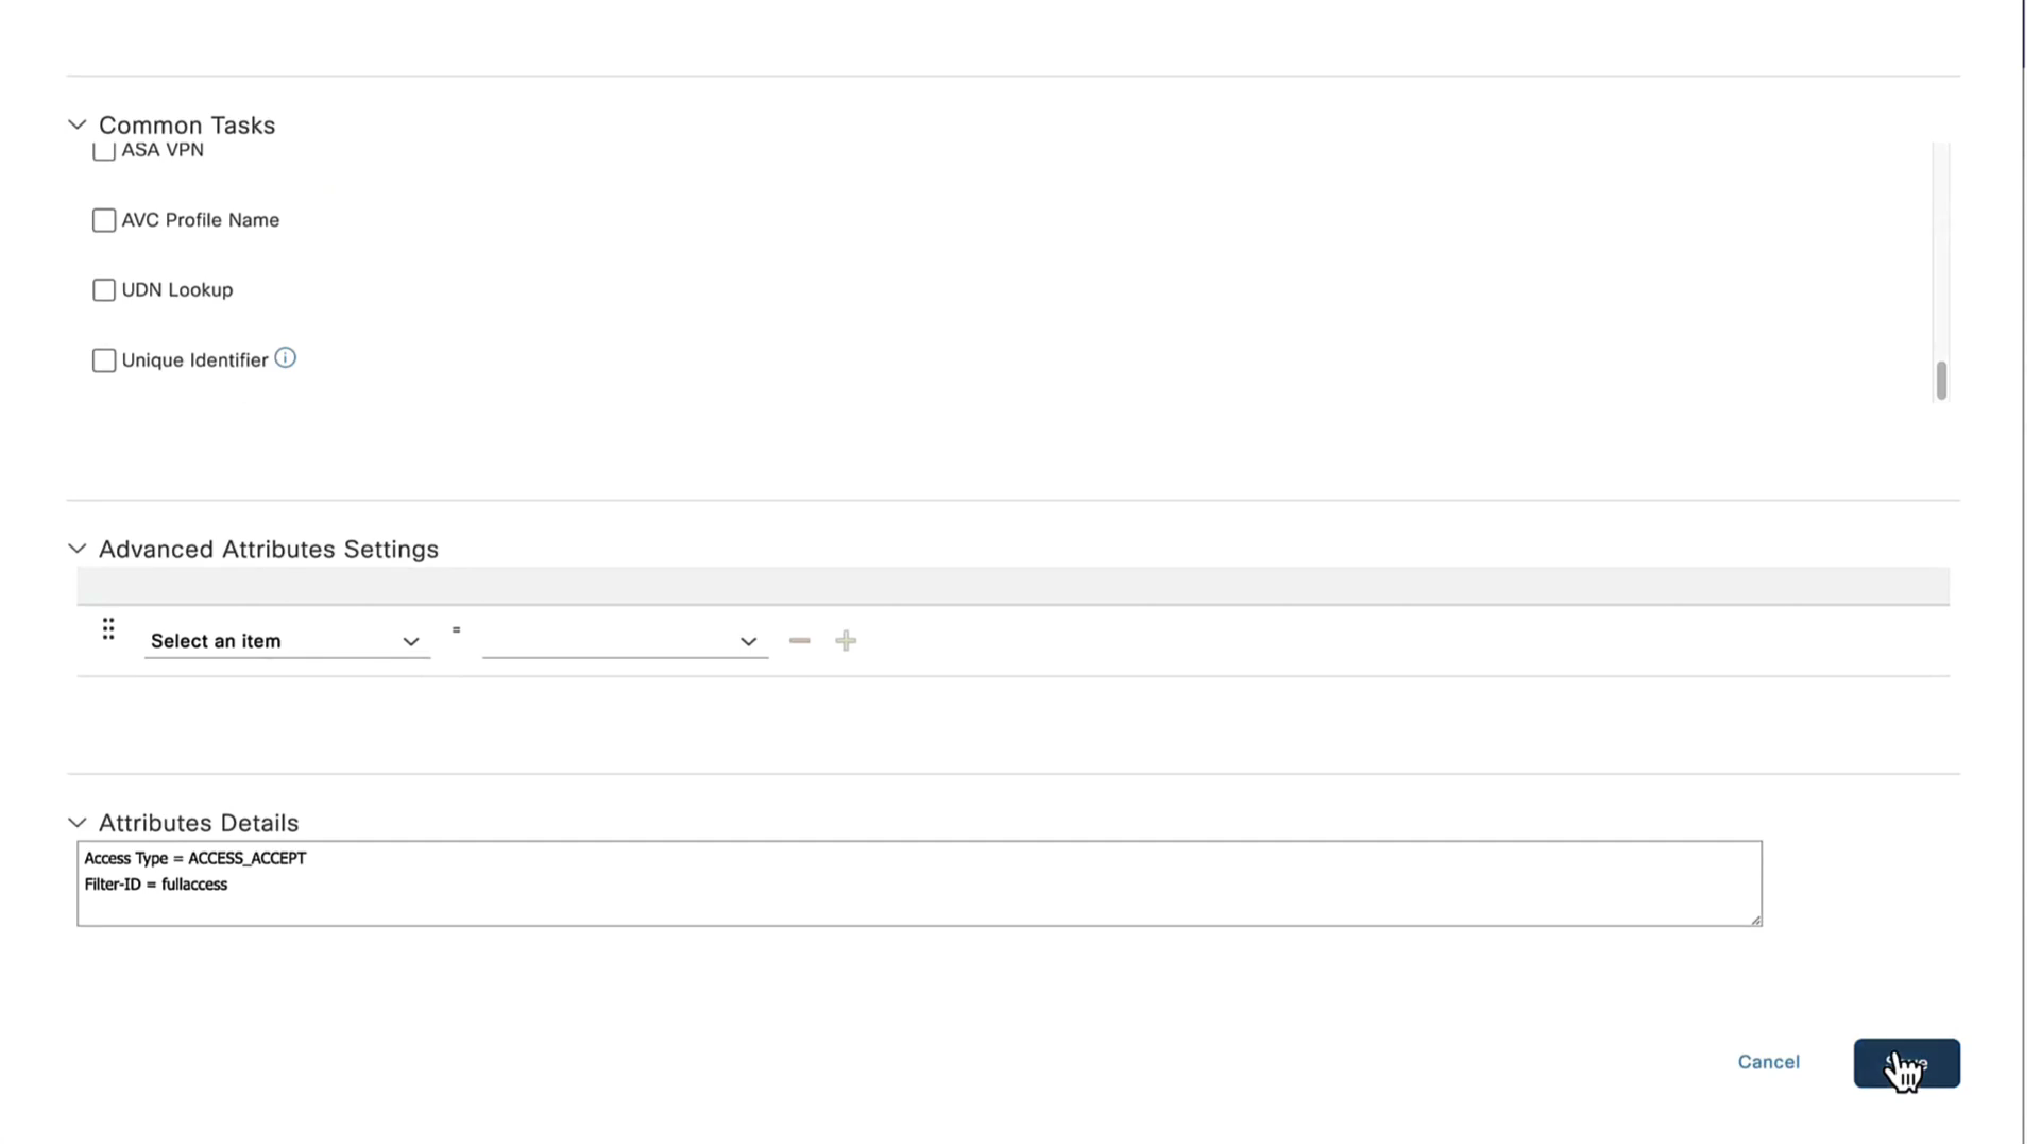
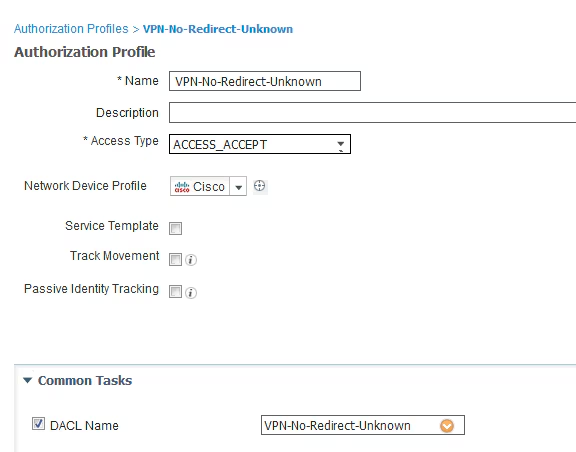
Step 12. Create three Authorization Profiles for Posture Unknown, Posture NonCompliant and Posture Compliant statuses. In order to do so, navigate to Policy > Policy Elements > Results > Authorization > Authorization Profiles. In the Posture Unknown profile, select Posture Unknown DACL, check Web Redirection, select Client Provisioning, provide Redirect ACL name (that is configured on FTD) and select the portal.


In the Posture NonCompliant profile, select DACL in order to limit access to the network.


In the Posture Compliant profile, select DACL in order to allow full access to the network.

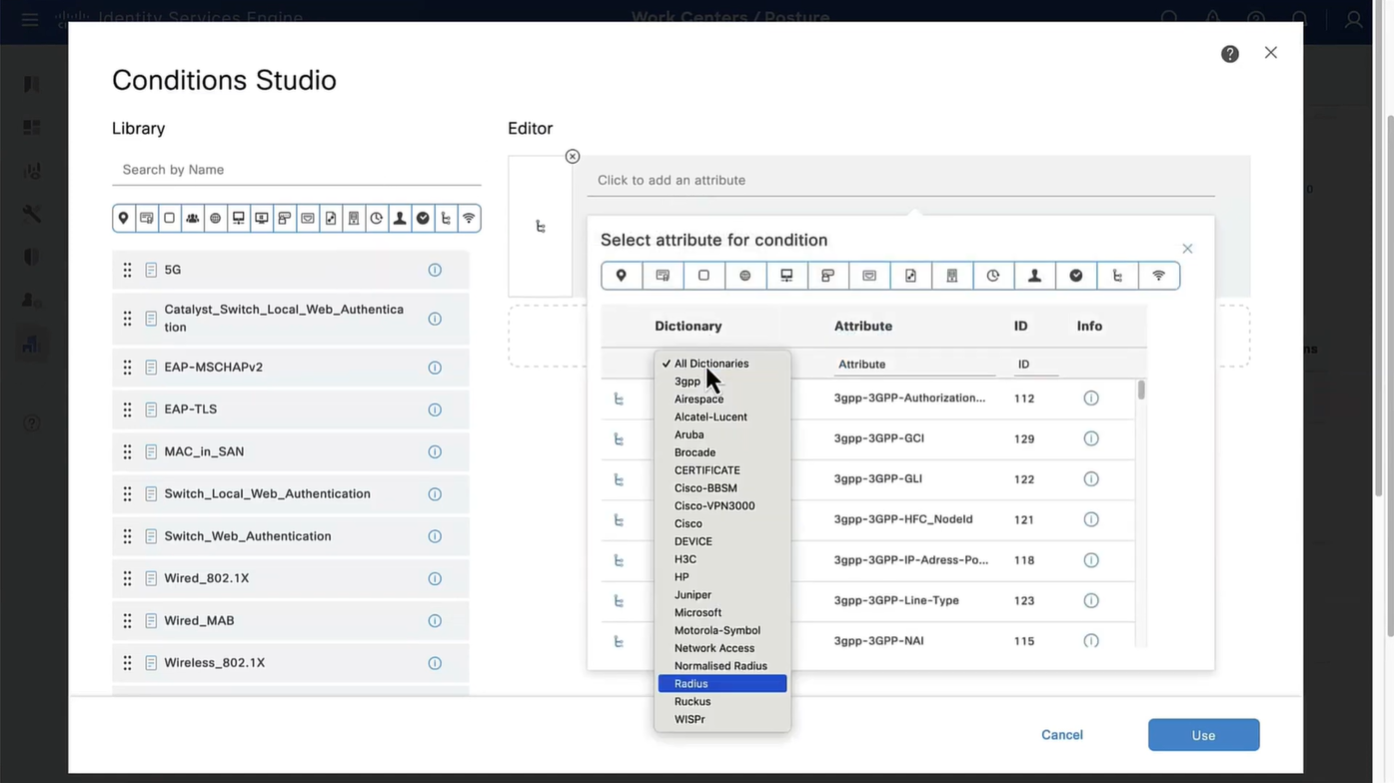
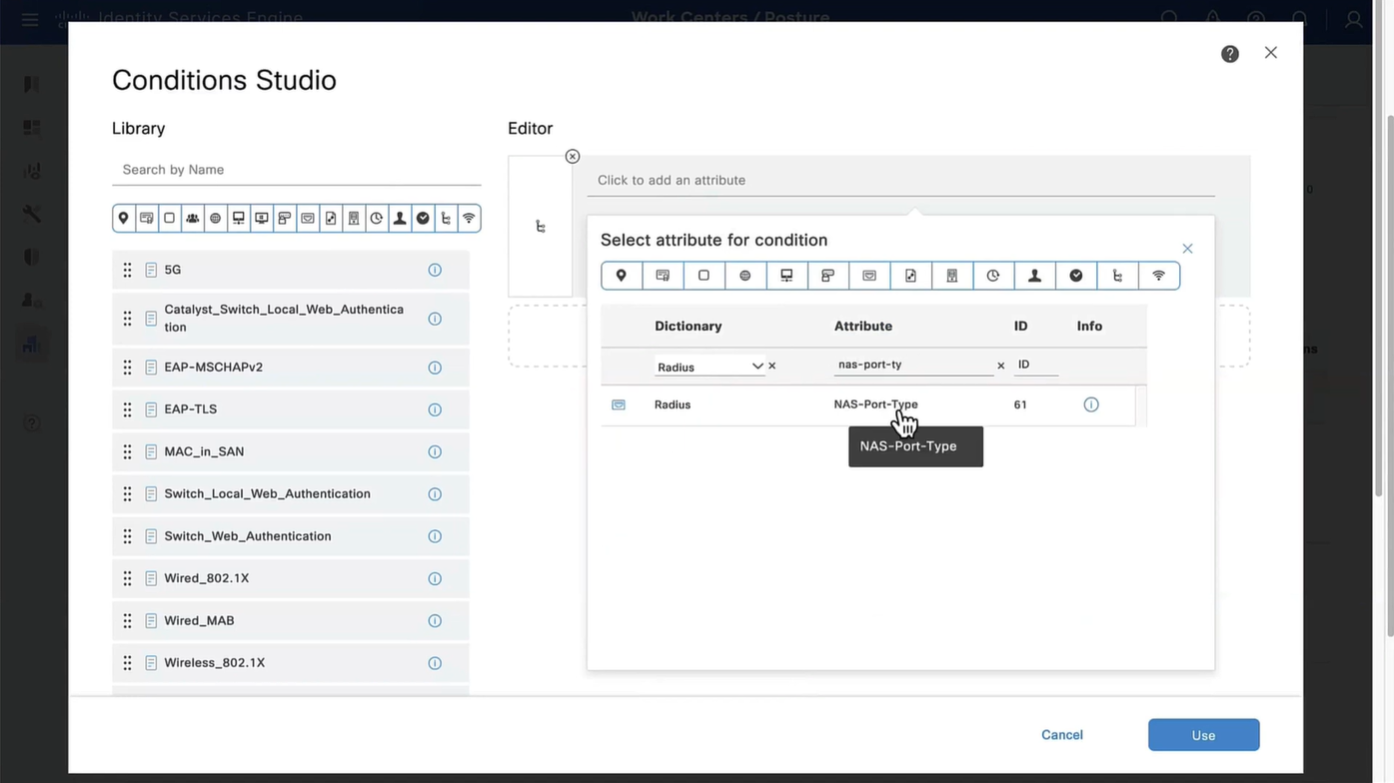
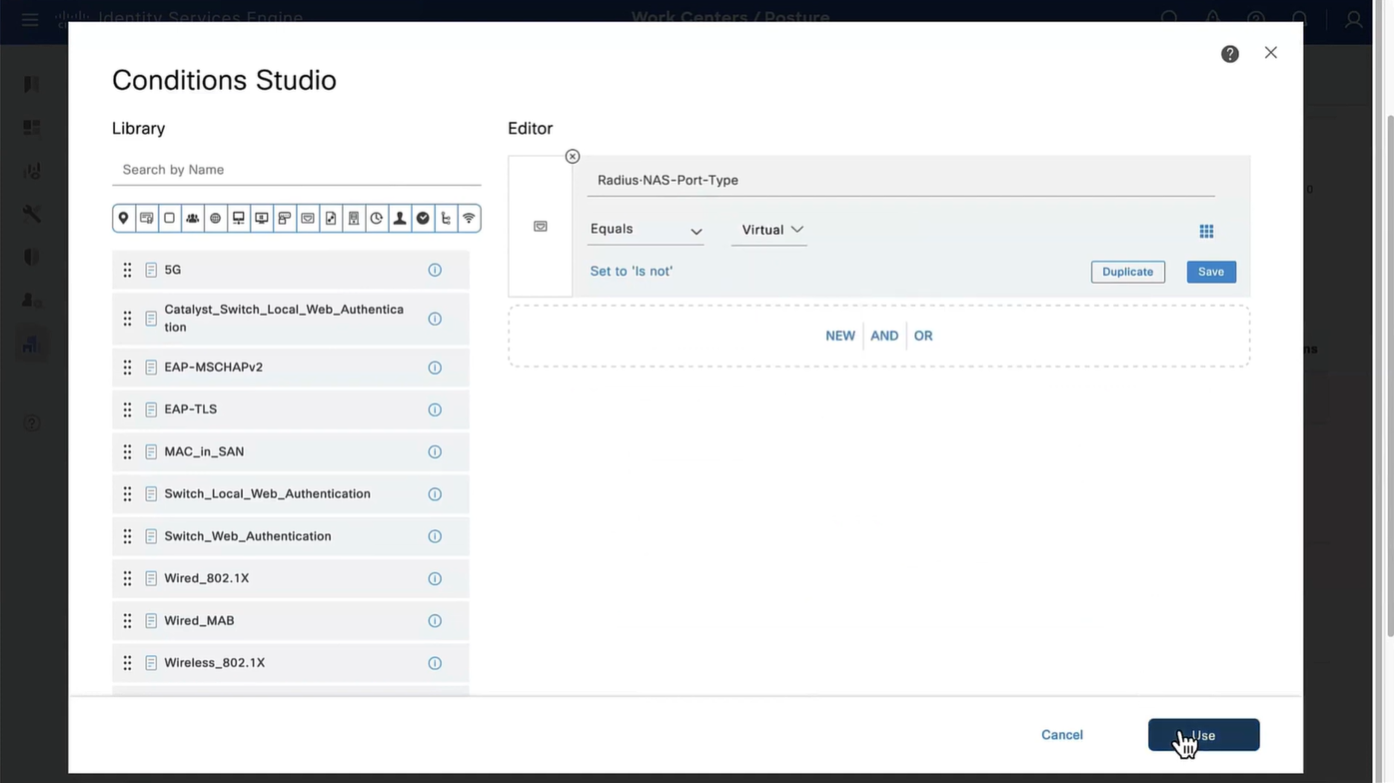
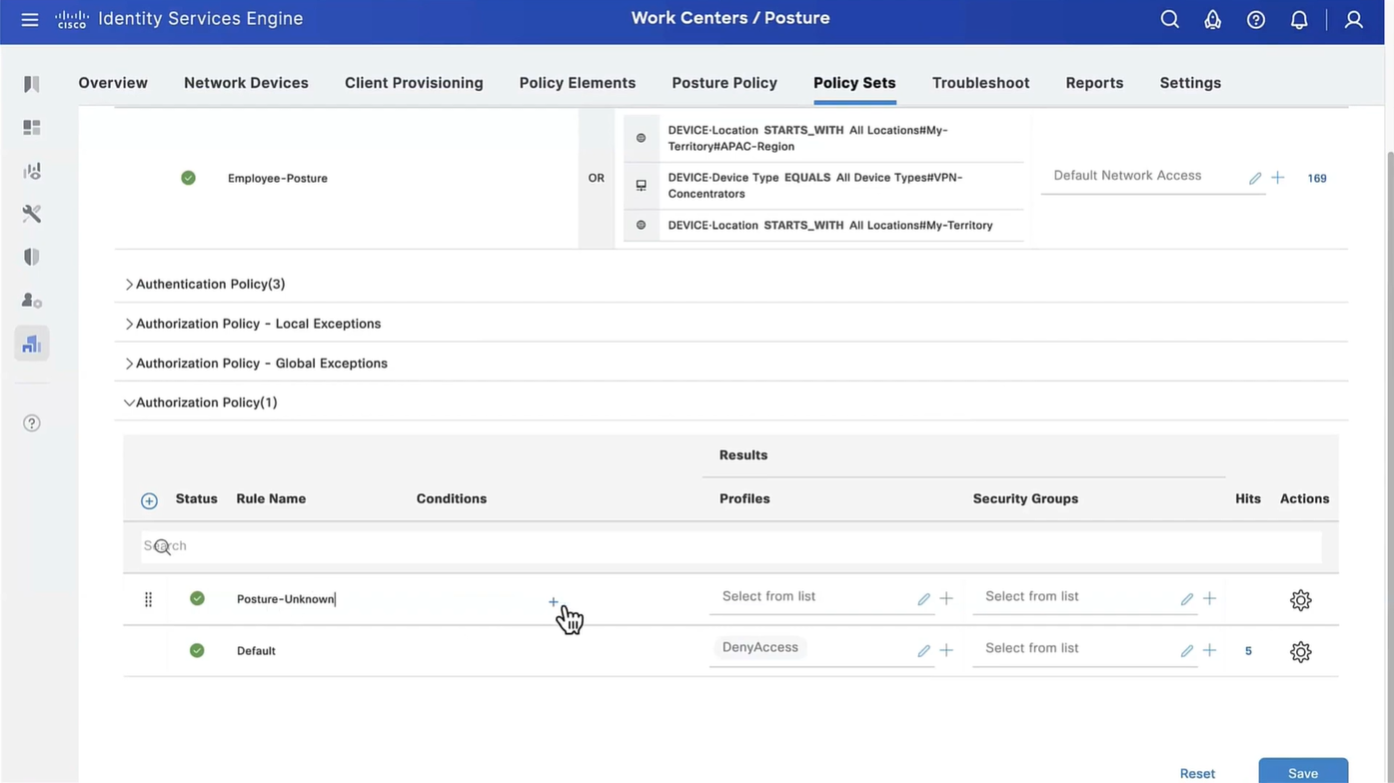
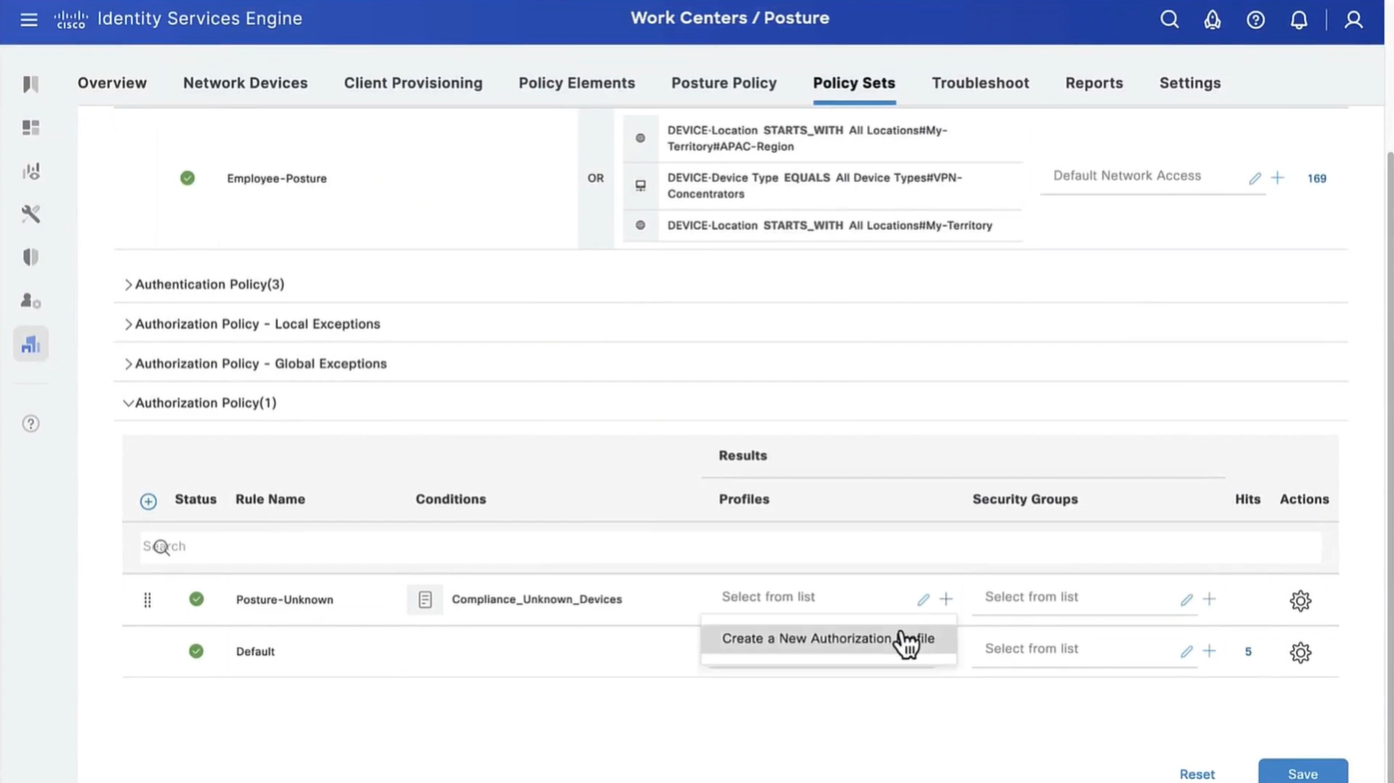
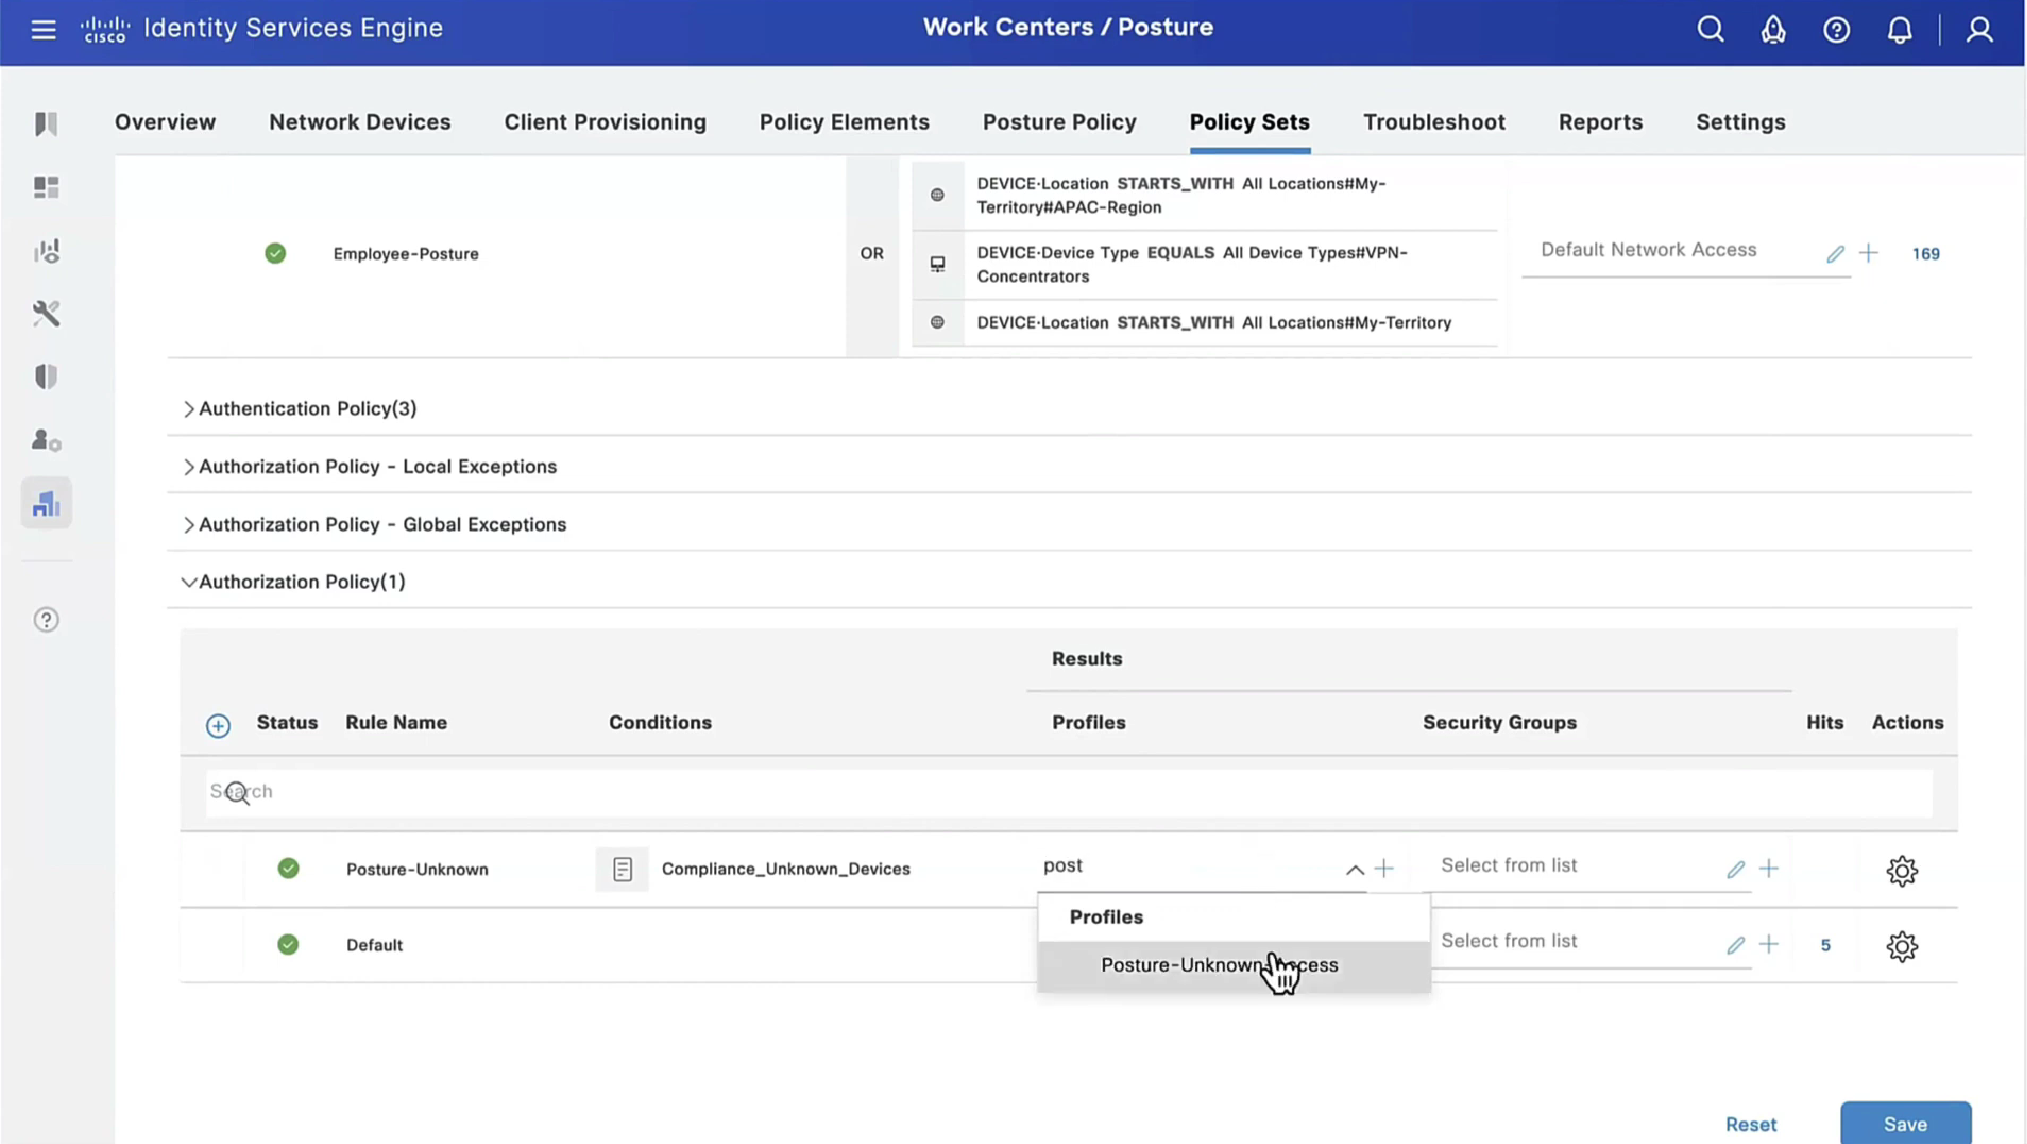
Step 13. Create Authorization Policies under Policy > Policy Sets > Default > Authorization Policy. As condition Posture Status and VNP TunnelGroup Name is used.

Verify
Use this section in order to confirm that your configuration works properly.
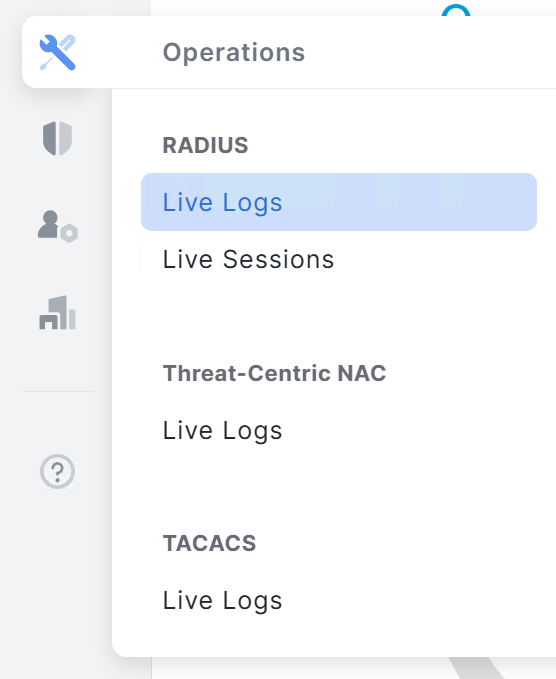
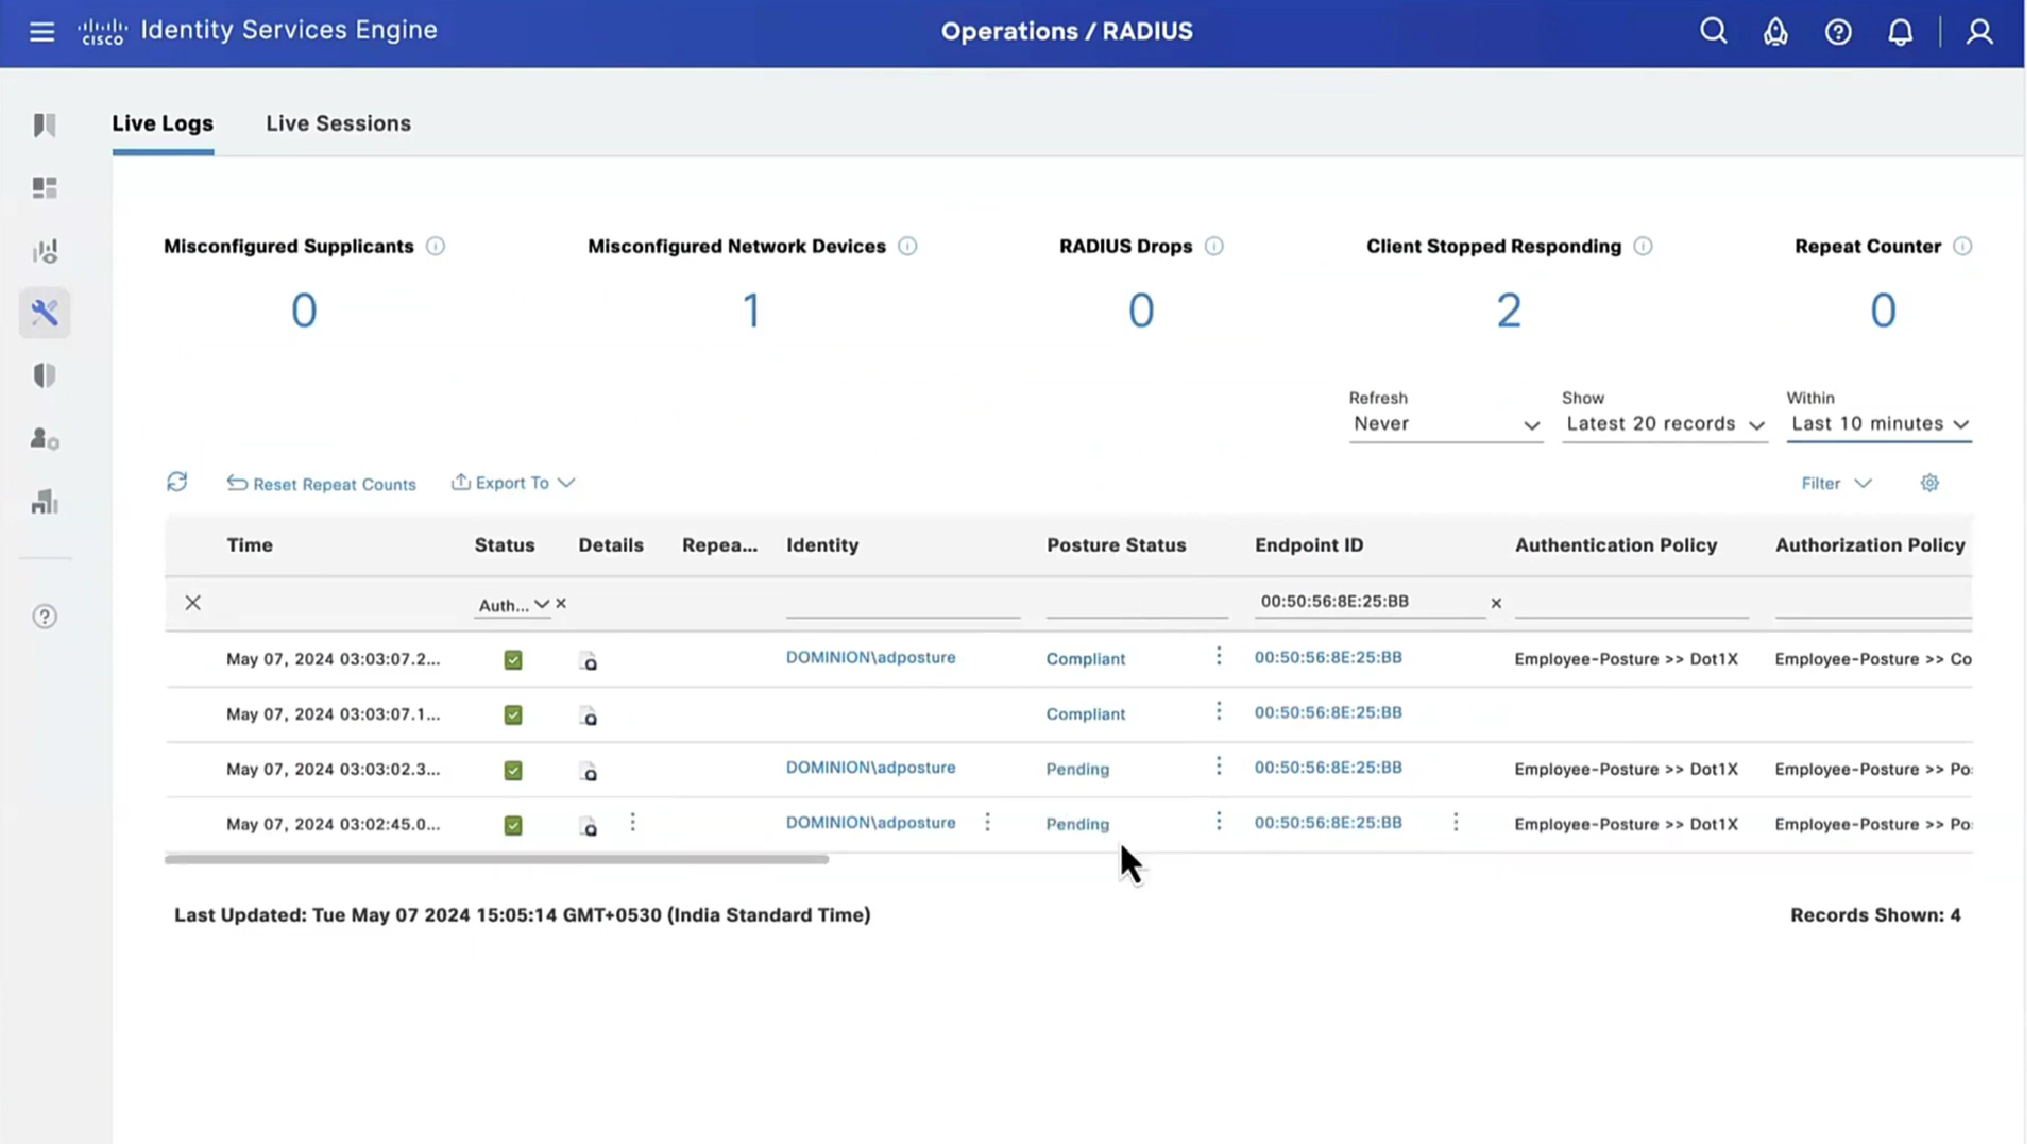
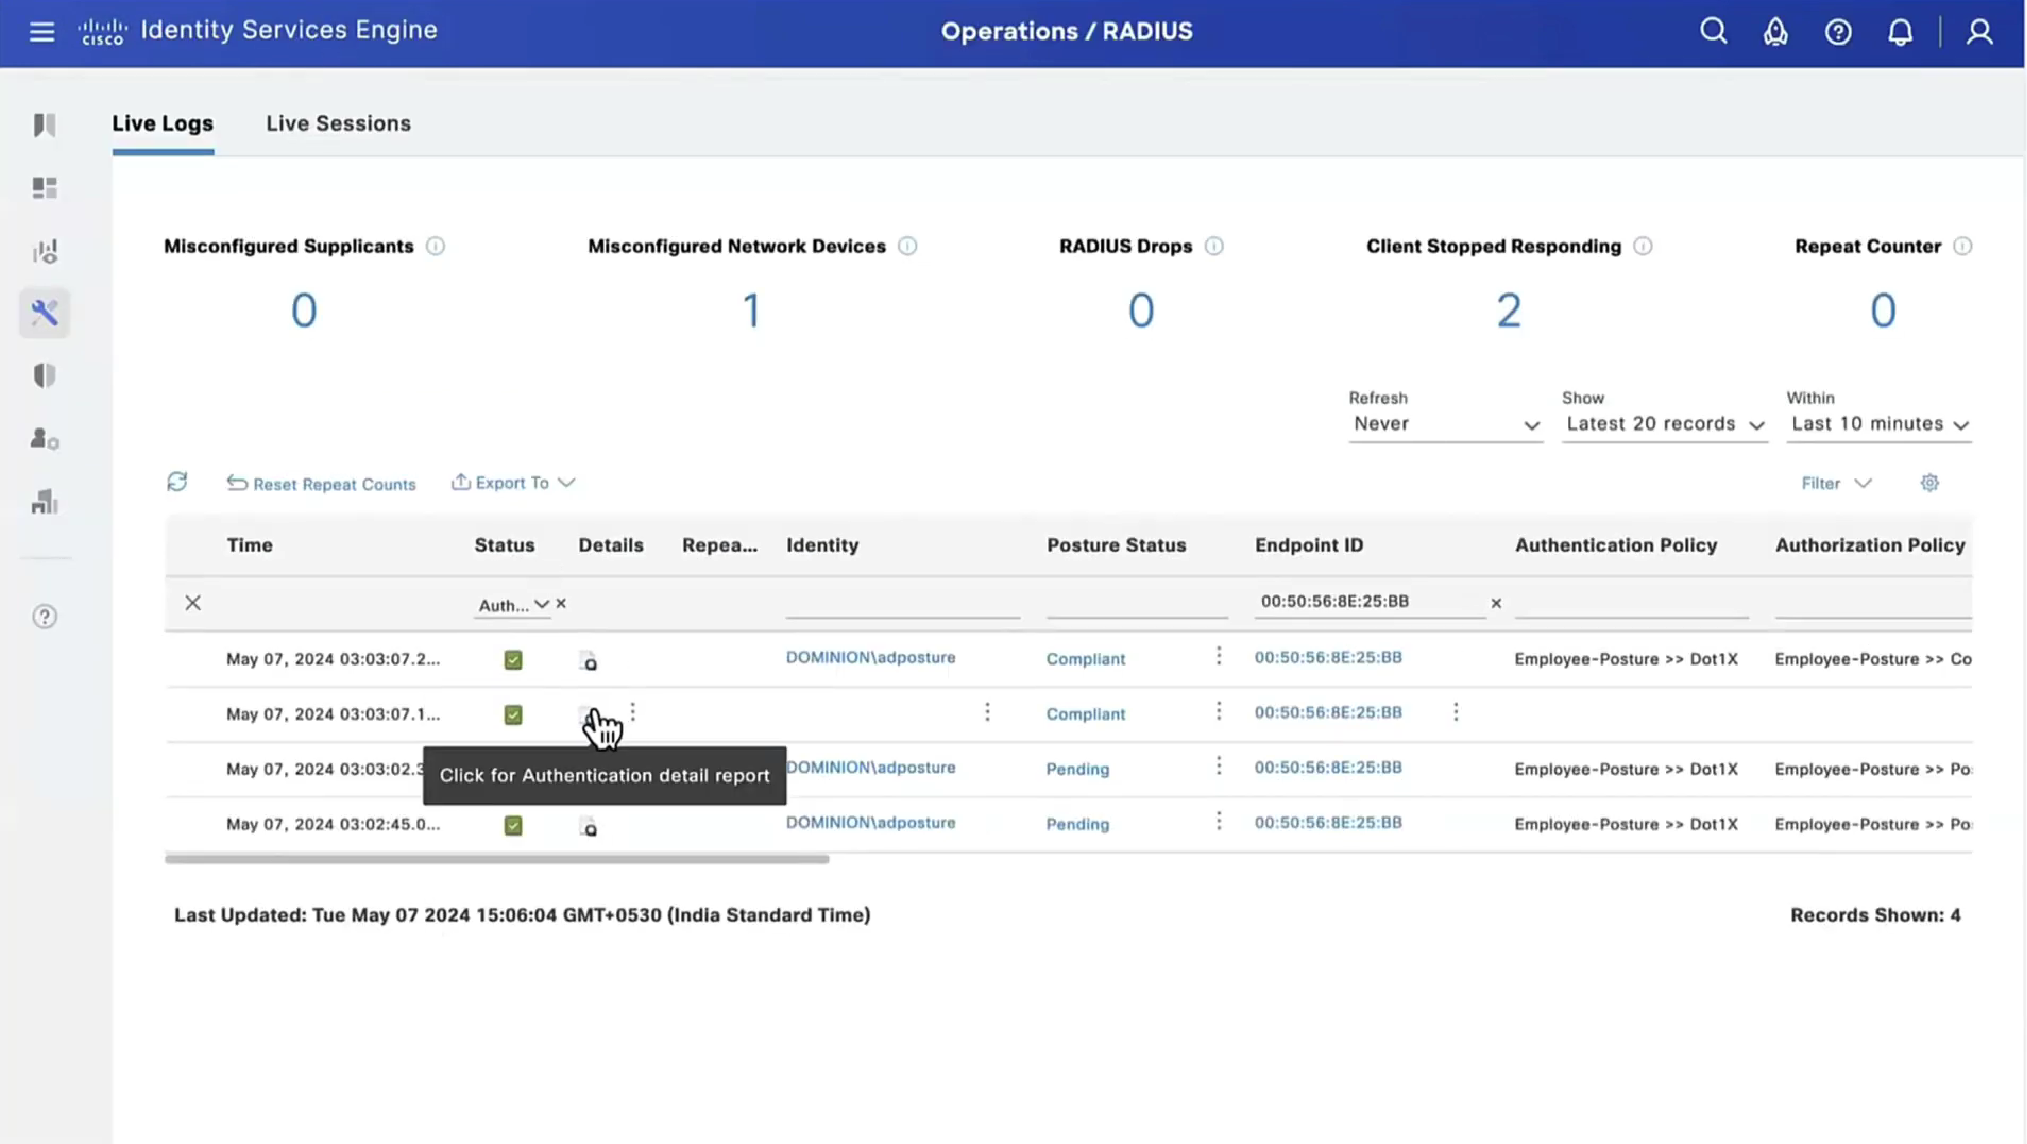
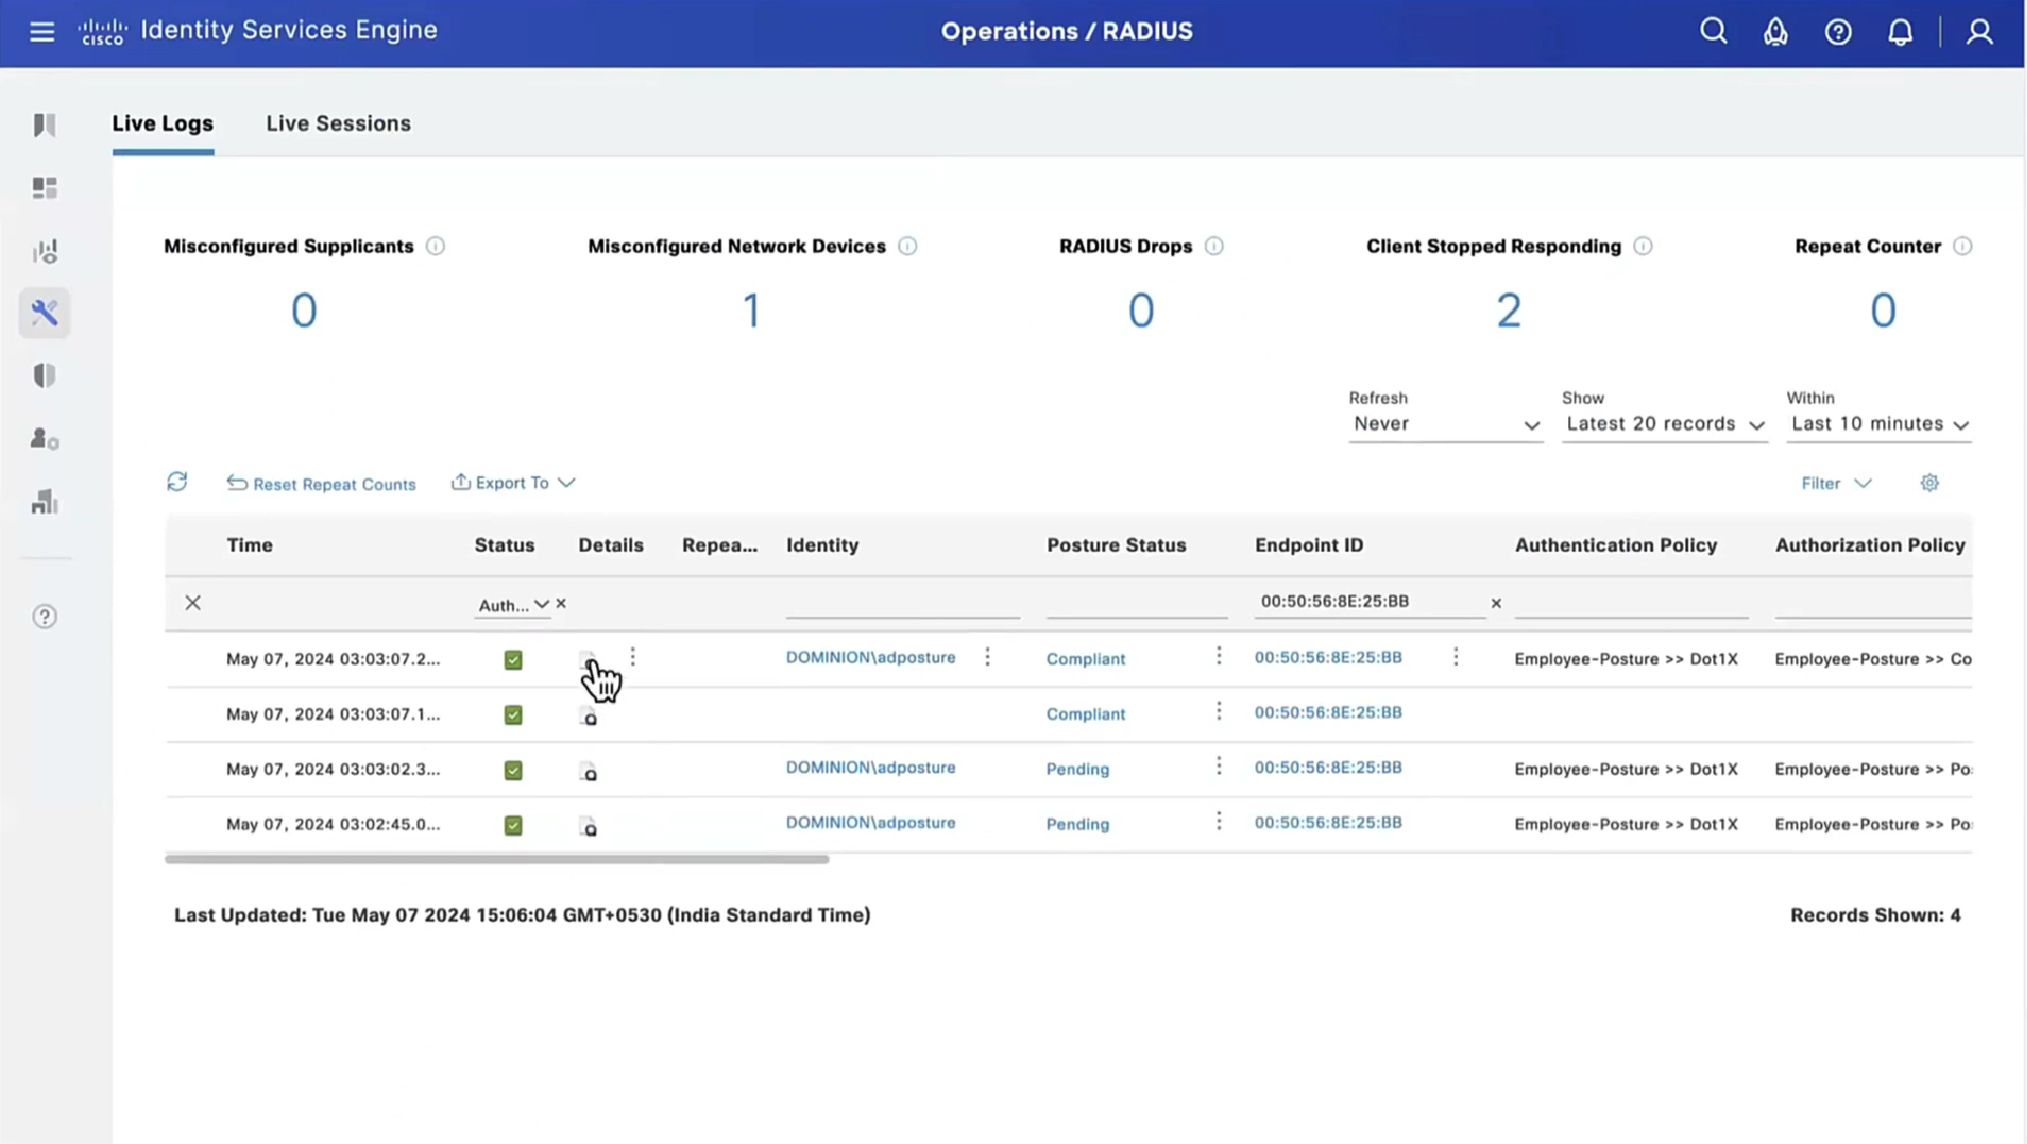
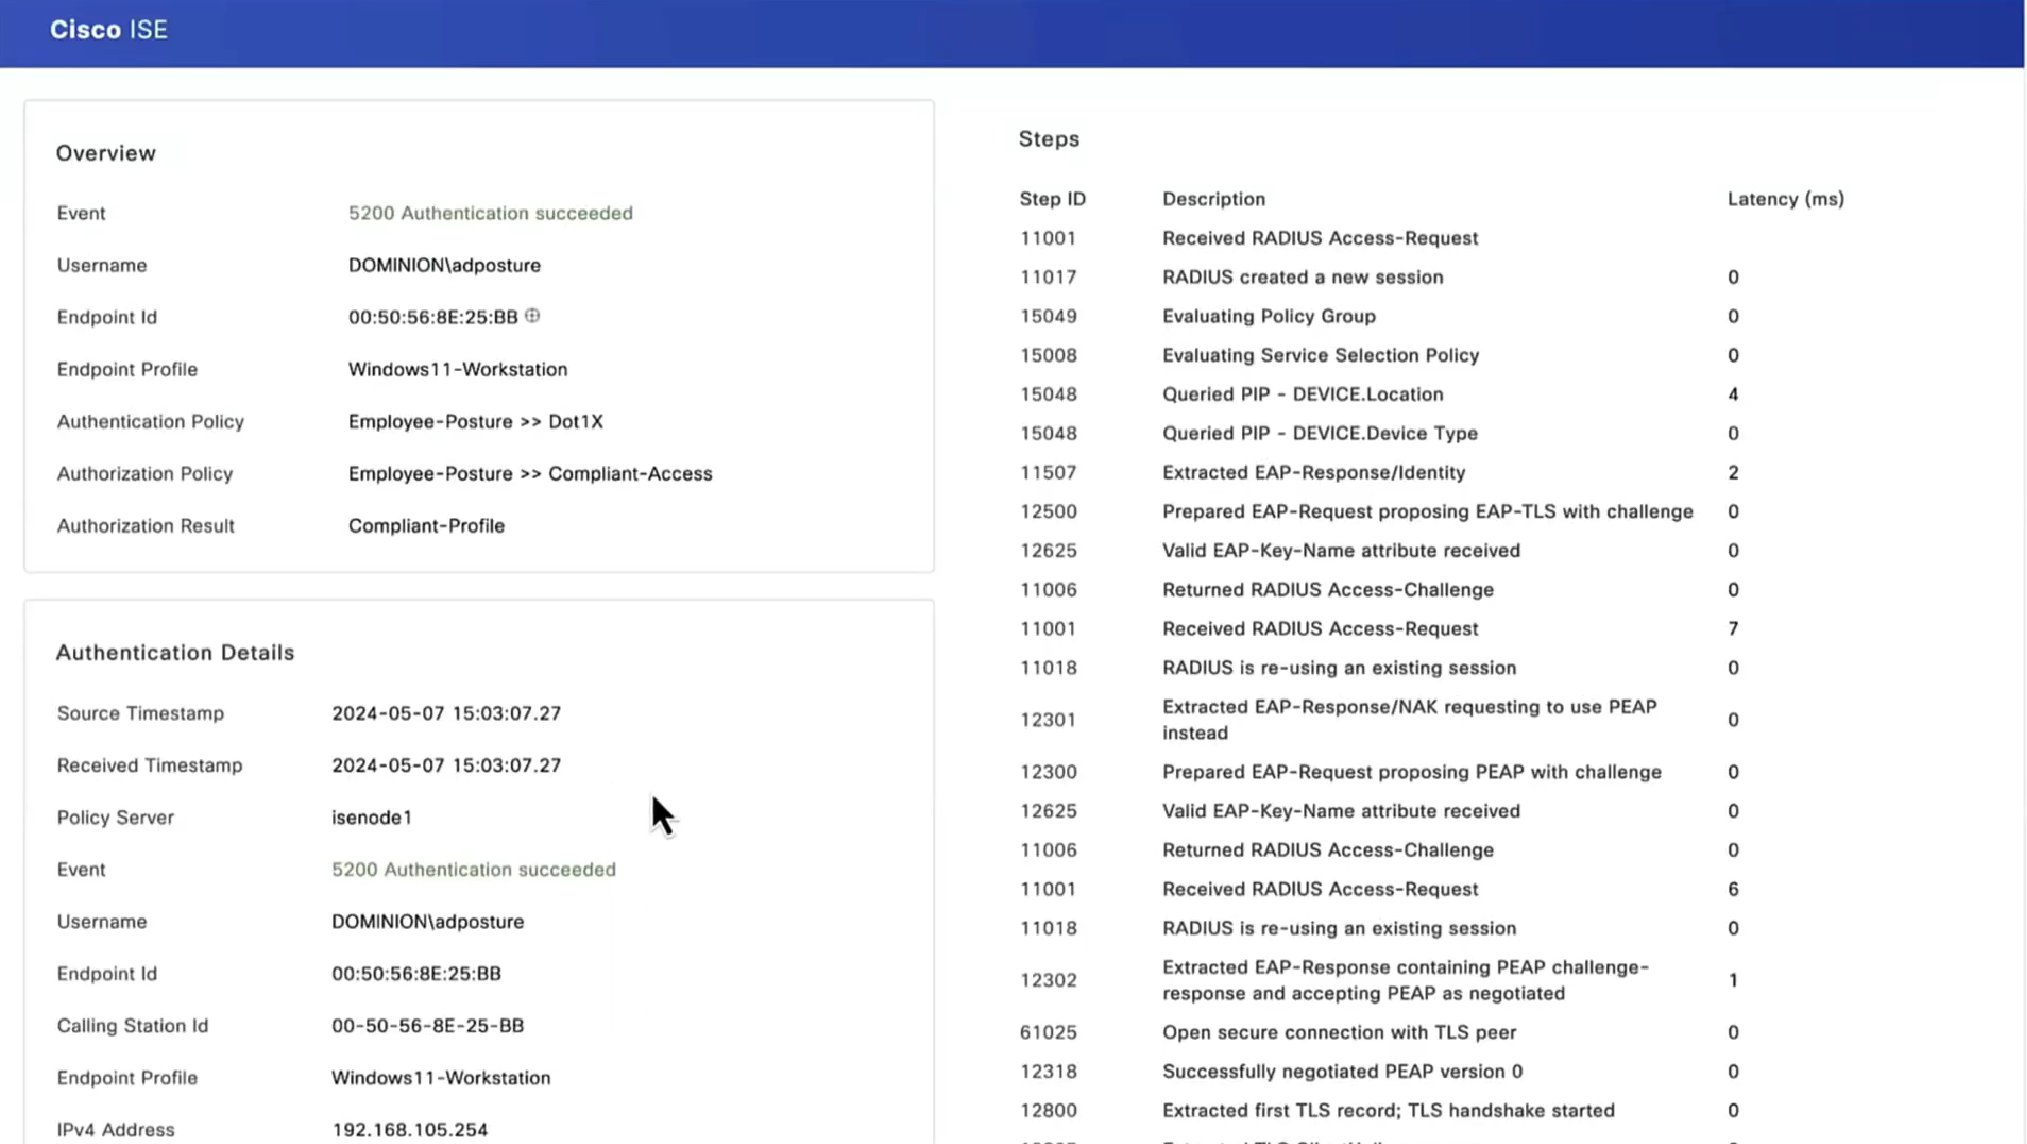
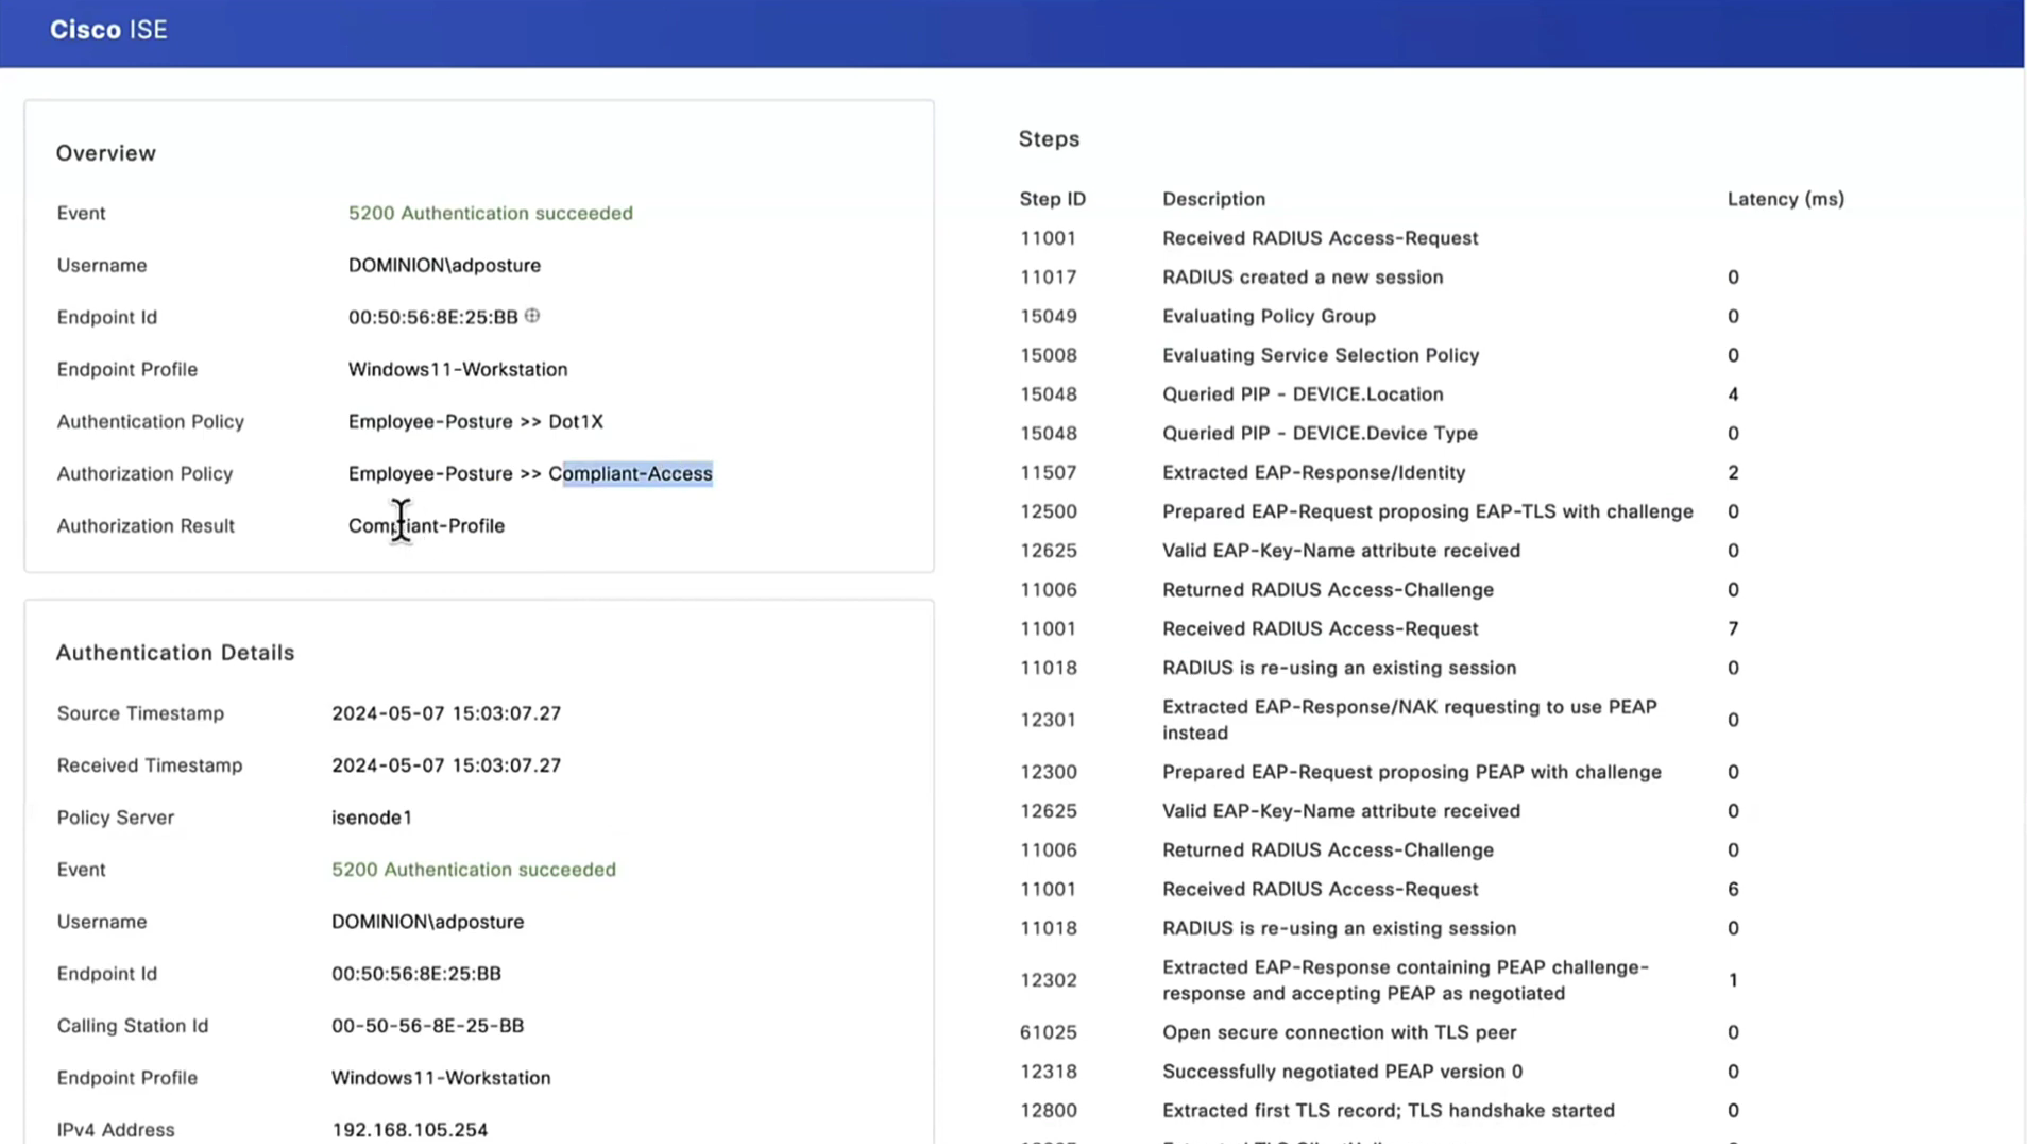
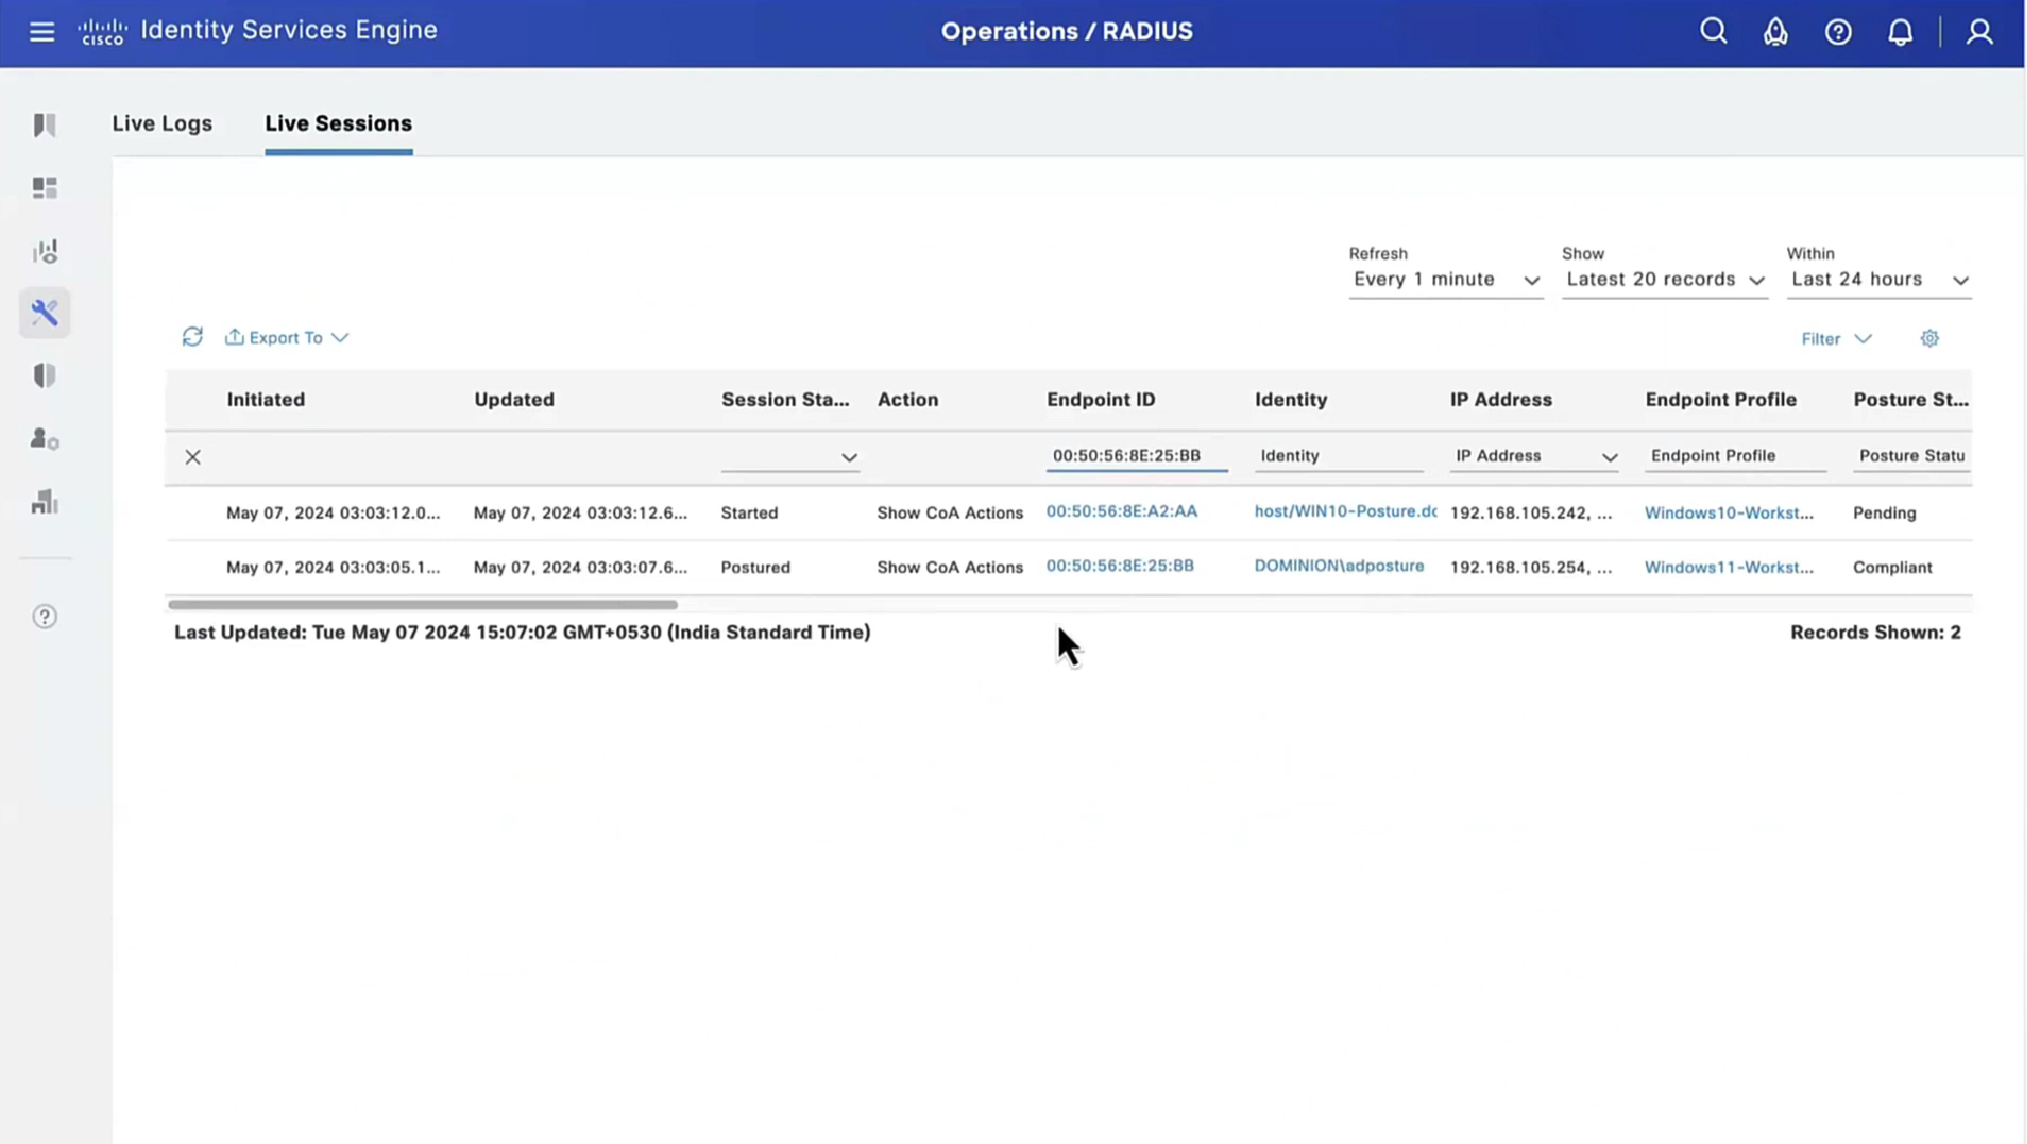
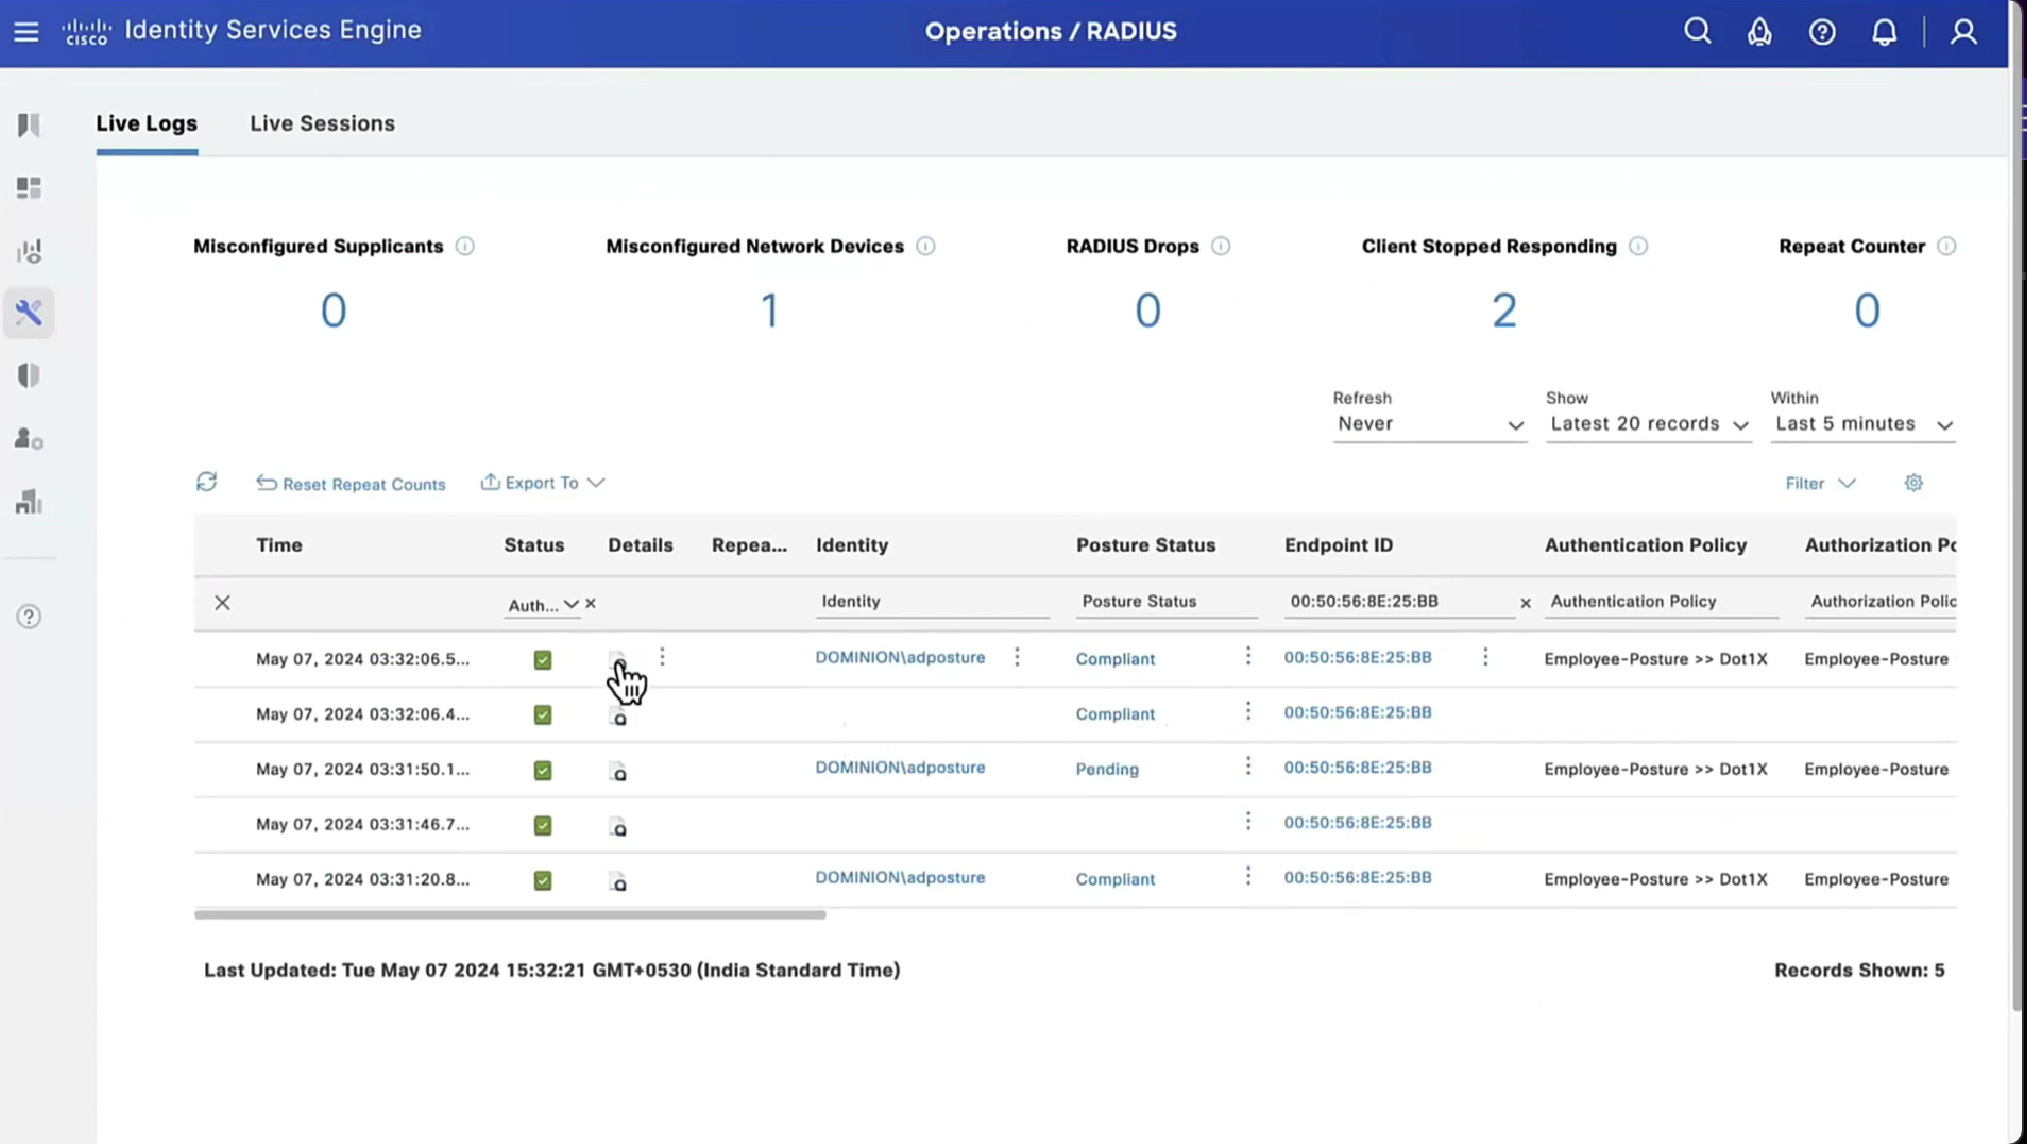
On ISE, the first verification step is RADIUS Live Log. Navigate to Operations > RADIUS Live Log. Here, user Alice is connected and the expected authorization policy is selected.
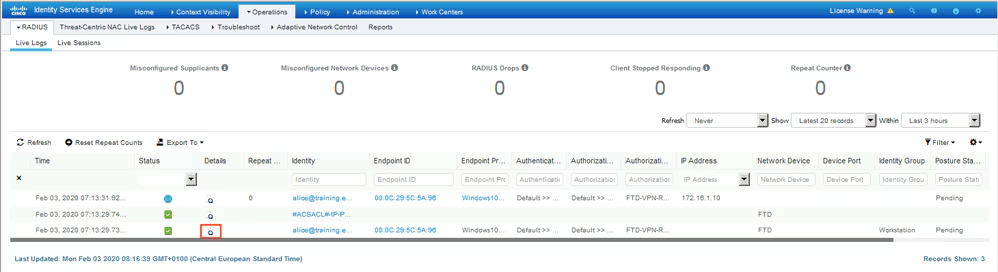
Authorization policy FTD-VPN-Posture-Unknown is matched and as result, FTD-VPN-Profile is sent to FTD.

Posture Status Pending.
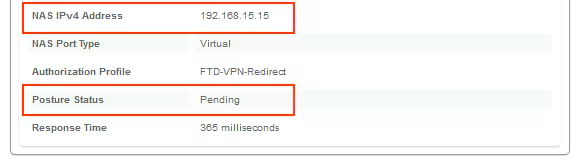
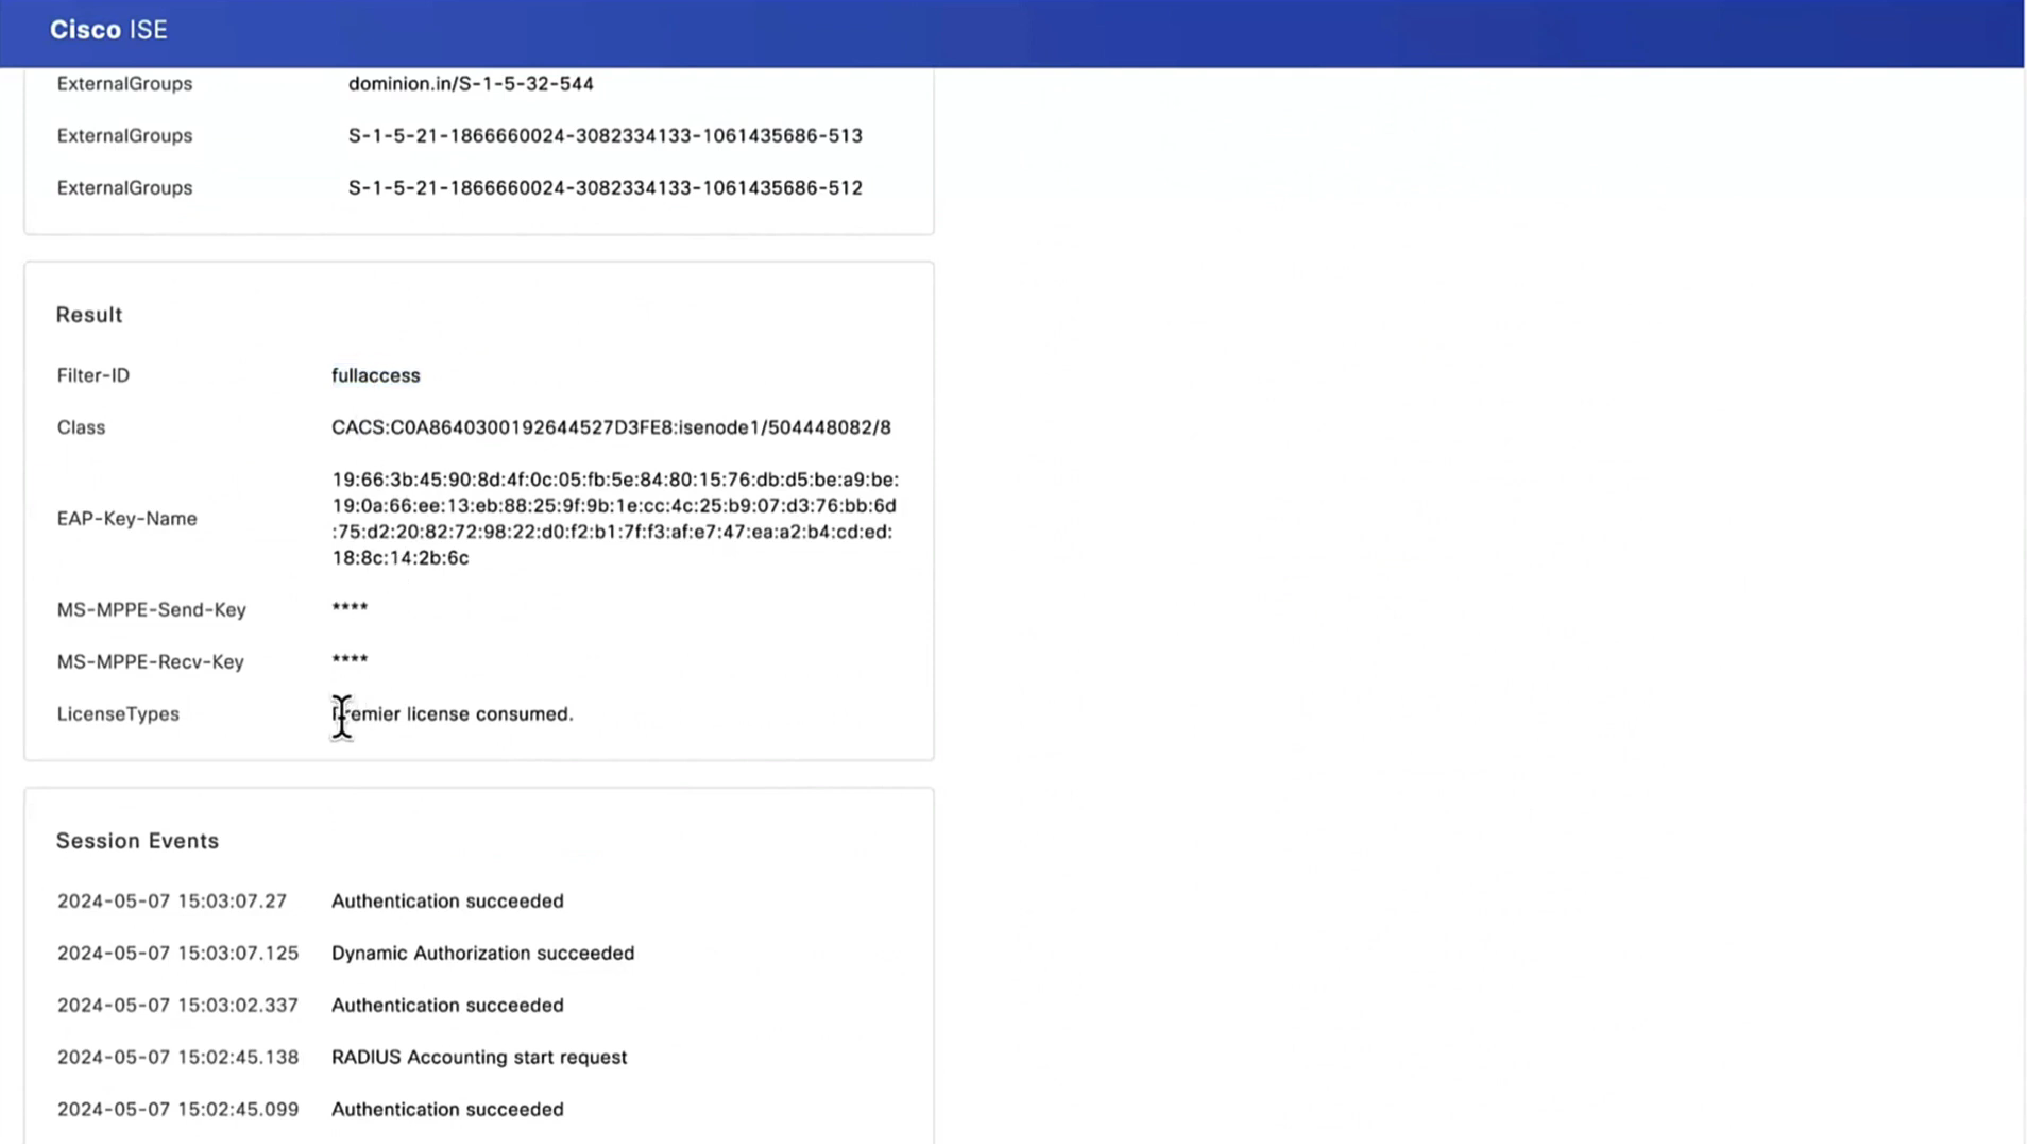
The Result section shows which attributes are sent to FTD.
On FTD, in order to verify VPN connection, SSH to the box, execute system support diagnostic-cli and then show vpn-sessiondb detail anyconnect. From this output, verify that attributes sent from ISE are applied for this VPN session.
fyusifov-ftd-64# show vpn-sessiondb detail anyconnect

Session Type: AnyConnect Detailed

Username     : alice@training.example.com
Index        : 12
Assigned IP  : 172.16.1.10            Public IP    : 10.229.16.169
Protocol     : AnyConnect-Parent SSL-Tunnel DTLS-Tunnel
License      : AnyConnect Premium
Encryption   : AnyConnect-Parent: (1)none  SSL-Tunnel: (1)AES-GCM-256  DTLS-Tunnel: (1)AES256
Hashing      : AnyConnect-Parent: (1)none  SSL-Tunnel: (1)SHA384  DTLS-Tunnel: (1)SHA1
Bytes Tx     : 15326                  Bytes Rx     : 13362
Pkts Tx      : 10                     Pkts Rx      : 49
Pkts Tx Drop : 0                      Pkts Rx Drop : 0
Group Policy : DfltGrpPolicy          Tunnel Group : EmployeeVPN
Login Time   : 07:13:30 UTC Mon Feb 3 2020
Duration     : 0h:06m:43s
Inactivity   : 0h:00m:00s
VLAN Mapping : N/A                    VLAN         : none
Audt Sess ID : 000000000000c0005e37c81a
Security Grp : none                   Tunnel Zone  : 0

AnyConnect-Parent Tunnels: 1
SSL-Tunnel Tunnels: 1
DTLS-Tunnel Tunnels: 1

AnyConnect-Parent:
  Tunnel ID    : 12.1
  Public IP    : 10.229.16.169
  Encryption   : none                   Hashing      : none
  TCP Src Port : 56491                  TCP Dst Port : 443
  Auth Mode    : userPassword
  Idle Time Out: 30 Minutes             Idle TO Left : 23 Minutes
  Client OS    : win
  Client OS Ver: 10.0.18363
  Client Type  : AnyConnect
  Client Ver   : Cisco AnyConnect VPN Agent for Windows 4.7.01076
  Bytes Tx     : 7663                   Bytes Rx     : 0
  Pkts Tx      : 5                      Pkts Rx      : 0
  Pkts Tx Drop : 0                      Pkts Rx Drop : 0

SSL-Tunnel:
  Tunnel ID    : 12.2
  Assigned IP  : 172.16.1.10            Public IP    : 10.229.16.169
  Encryption   : AES-GCM-256            Hashing      : SHA384
  Ciphersuite  : ECDHE-RSA-AES256-GCM-SHA384
  Encapsulation: TLSv1.2                TCP Src Port : 56495
  TCP Dst Port : 443                    Auth Mode    : userPassword
  Idle Time Out: 30 Minutes             Idle TO Left : 23 Minutes
  Client OS    : Windows
  Client Type  : SSL VPN Client
  Client Ver   : Cisco AnyConnect VPN Agent for Windows 4.7.01076
  Bytes Tx     : 7663                   Bytes Rx     : 592
  Pkts Tx      : 5                      Pkts Rx      : 7
  Pkts Tx Drop : 0                      Pkts Rx Drop : 0
  Filter Name  : #ACSACL#-IP-PostureUnknown-5e37414d

DTLS-Tunnel:
  Tunnel ID    : 12.3
  Assigned IP  : 172.16.1.10            Public IP    : 10.229.16.169
  Encryption   : AES256                 Hashing      : SHA1
  Ciphersuite  : DHE-RSA-AES256-SHA
  Encapsulation: DTLSv1.0               UDP Src Port : 59396
  UDP Dst Port : 443                    Auth Mode    : userPassword
  Idle Time Out: 30 Minutes             Idle TO Left : 29 Minutes
  Client OS    : Windows
  Client Type  : DTLS VPN Client
  Client Ver   : Cisco AnyConnect VPN Agent for Windows 4.7.01076
  Bytes Tx     : 0                      Bytes Rx     : 12770
  Pkts Tx      : 0                      Pkts Rx      : 42
  Pkts Tx Drop : 0                      Pkts Rx Drop : 0
  Filter Name  : #ACSACL#-IP-PostureUnknown-5e37414d

ISE Posture:
  Redirect URL : https://fyusifov-26-3.example.com:8443/portal/gateway?sessionId=000000000000c0005e37c81a&portal=27b1bc...
  Redirect ACL : fyusifovredirect
Client Provisioning policies can be verified. Navigate to Operations > Reports > Endpoints and Users > Client Provisioning.

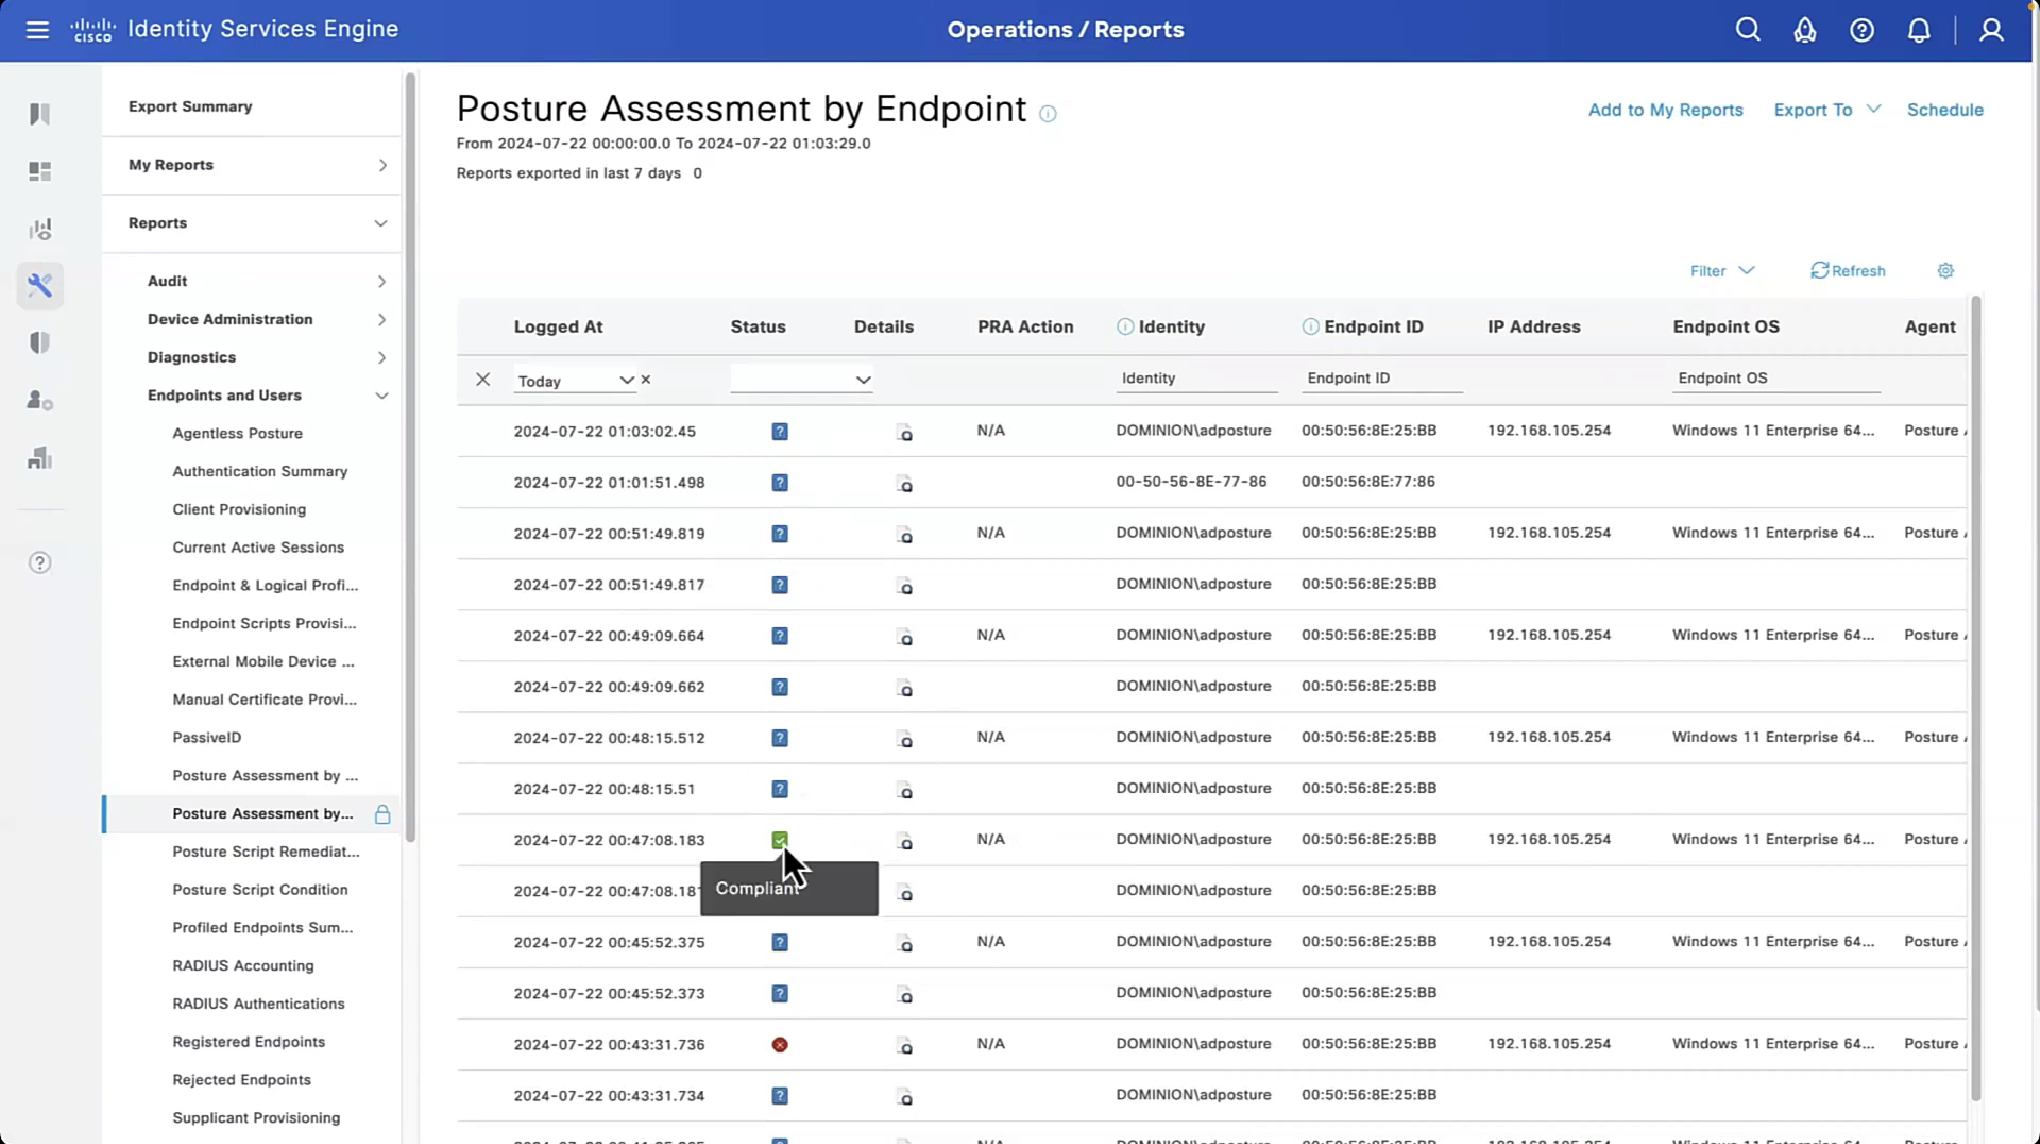
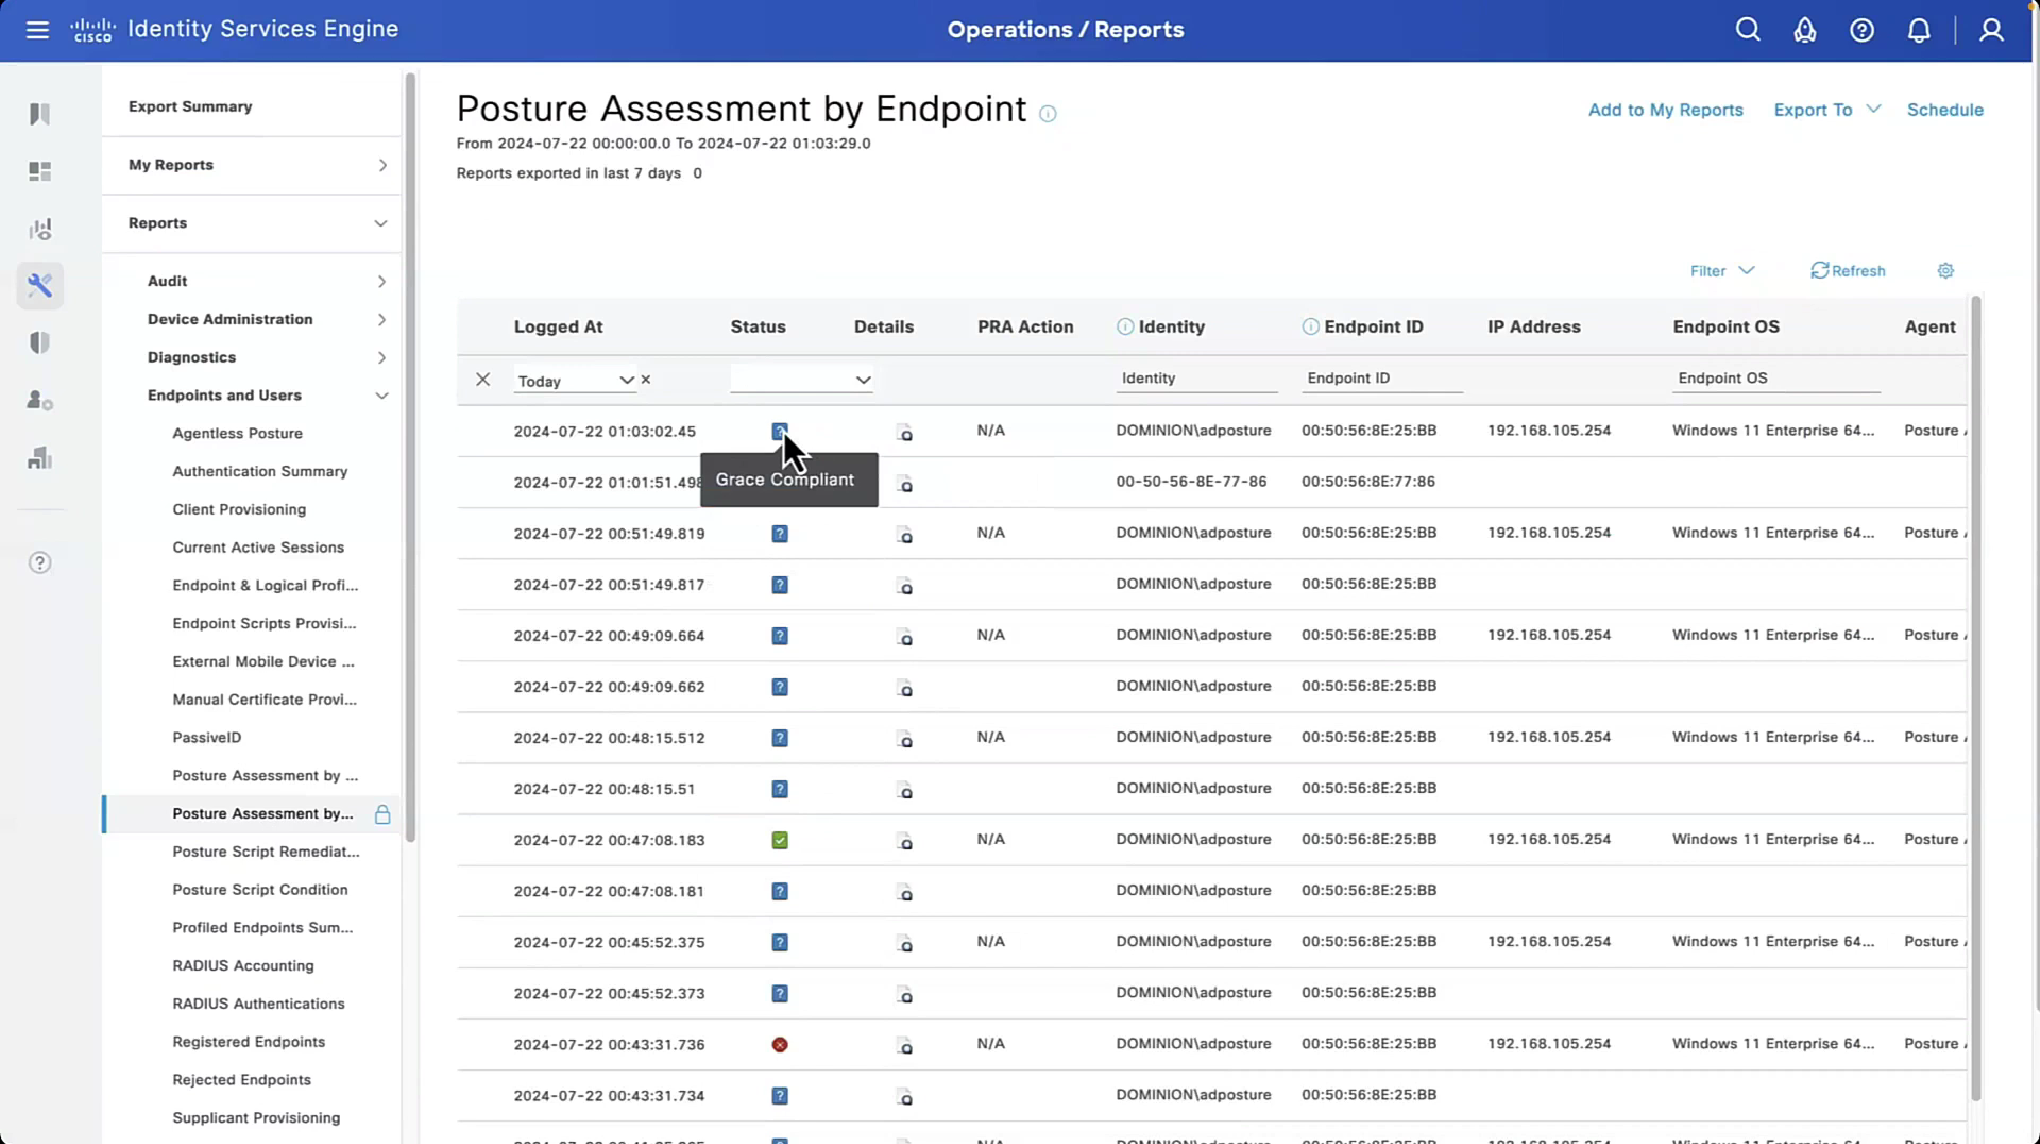
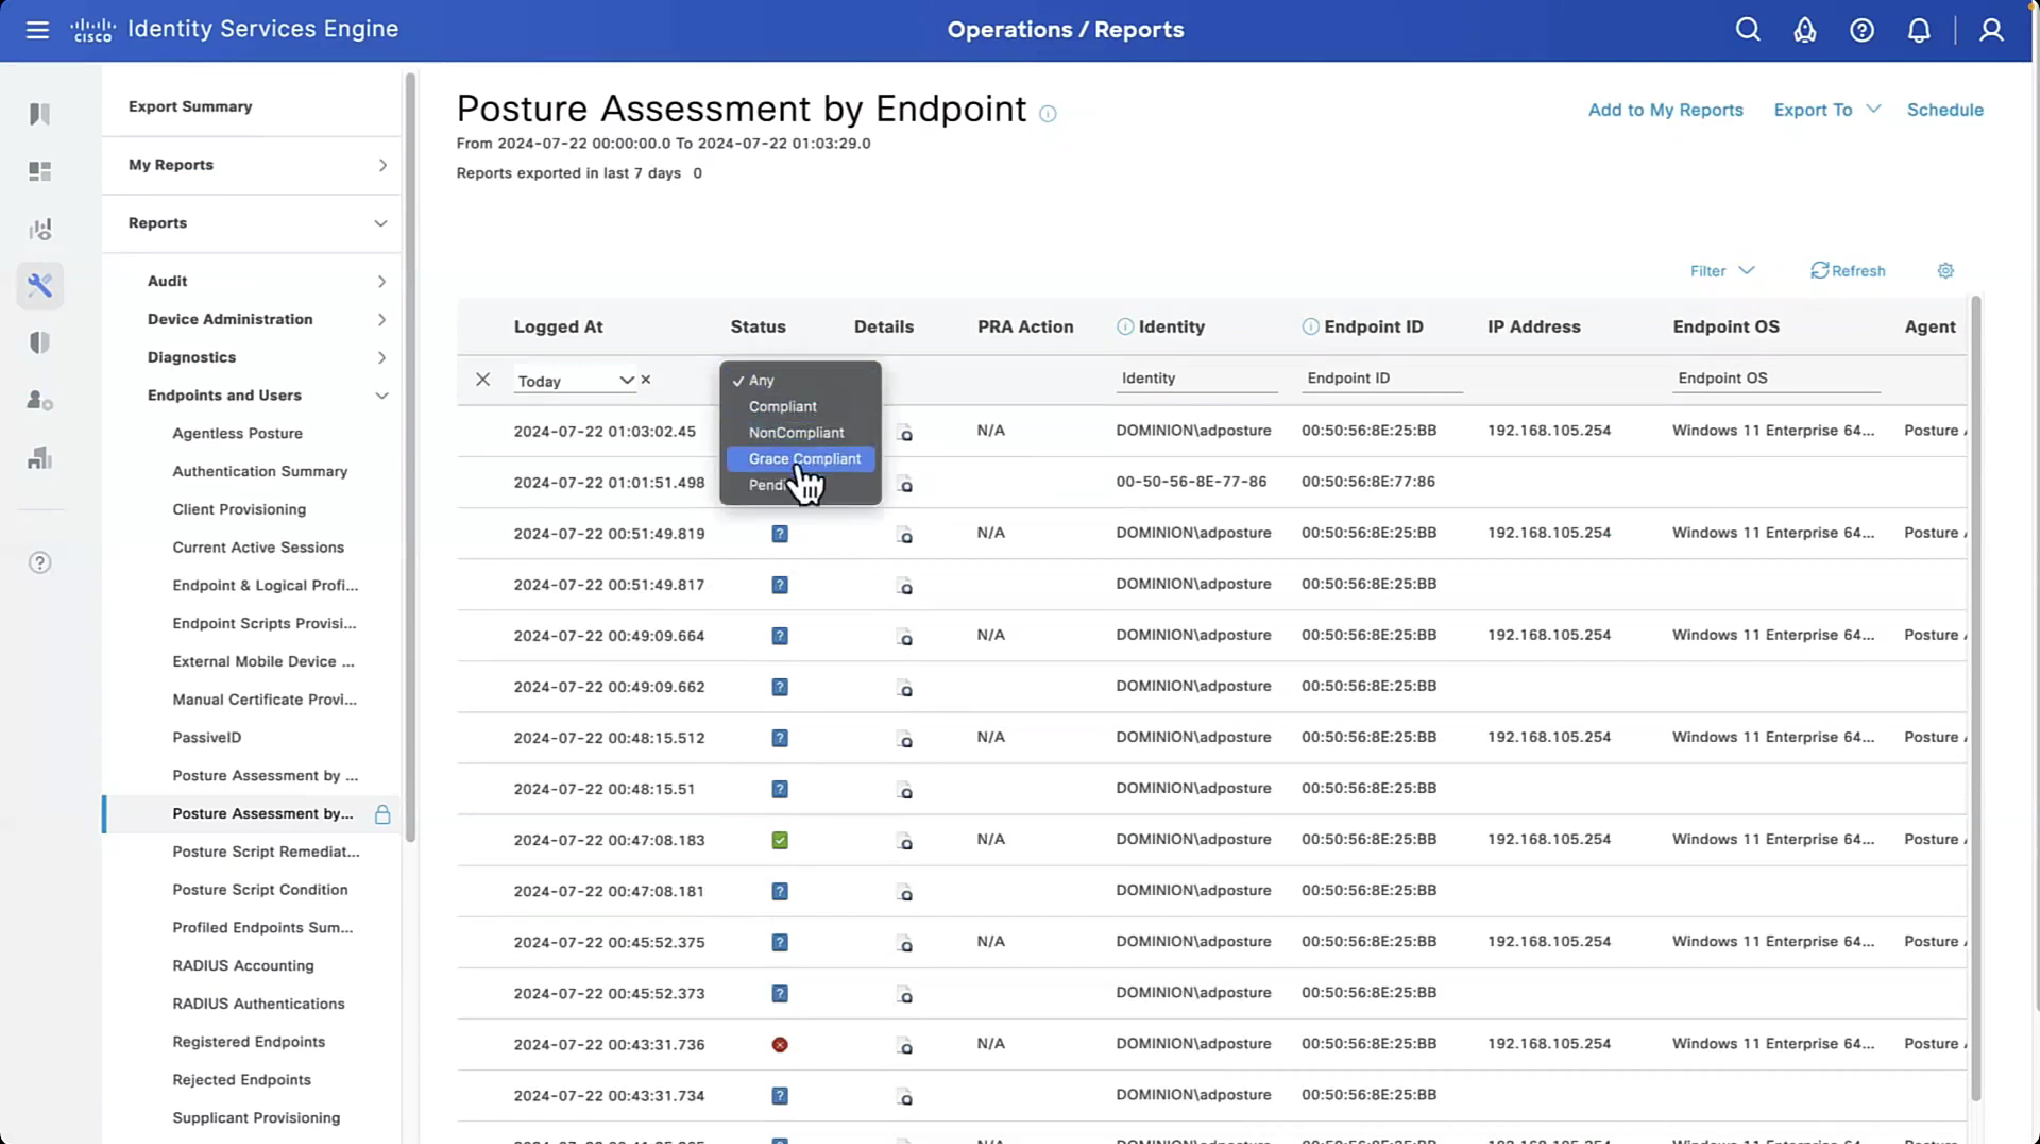
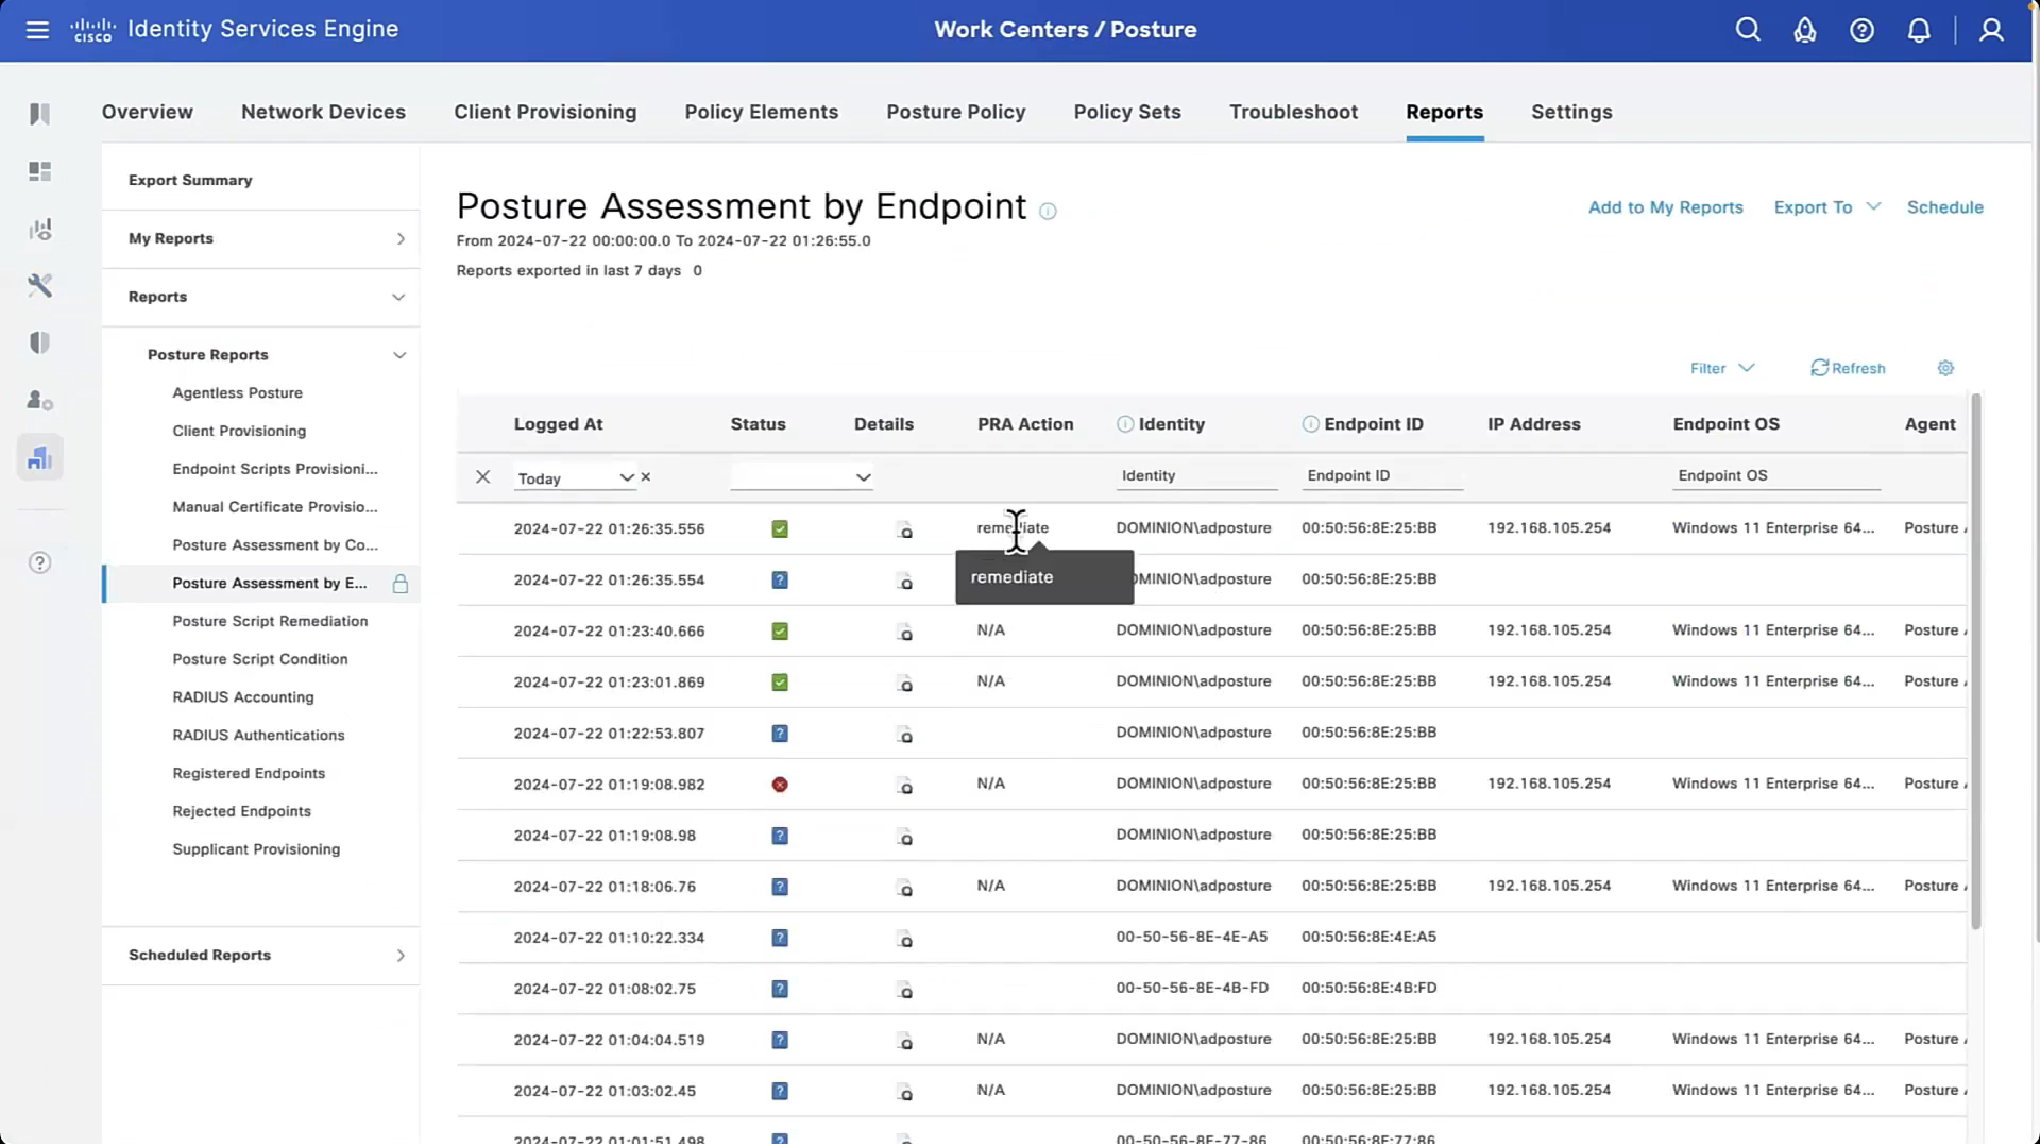
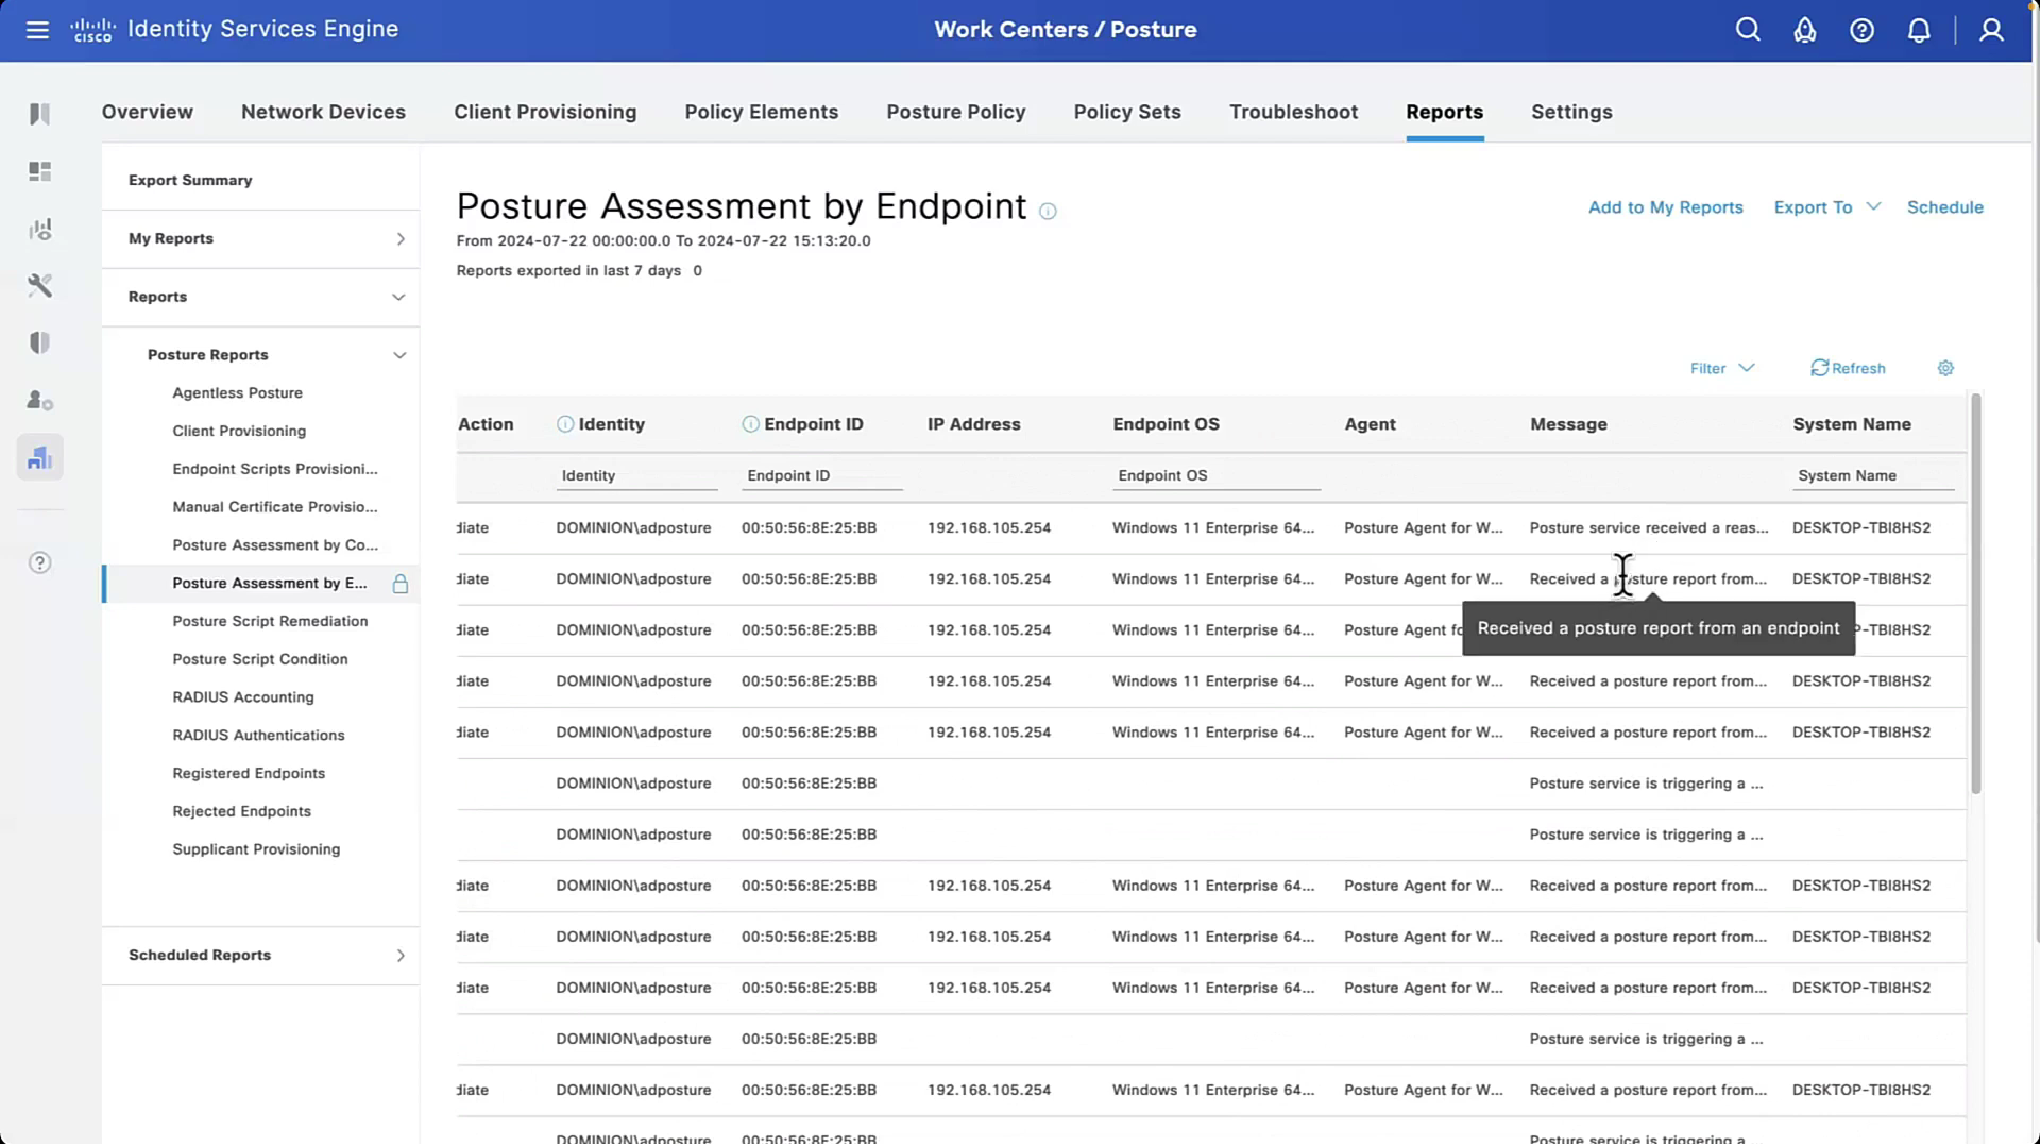
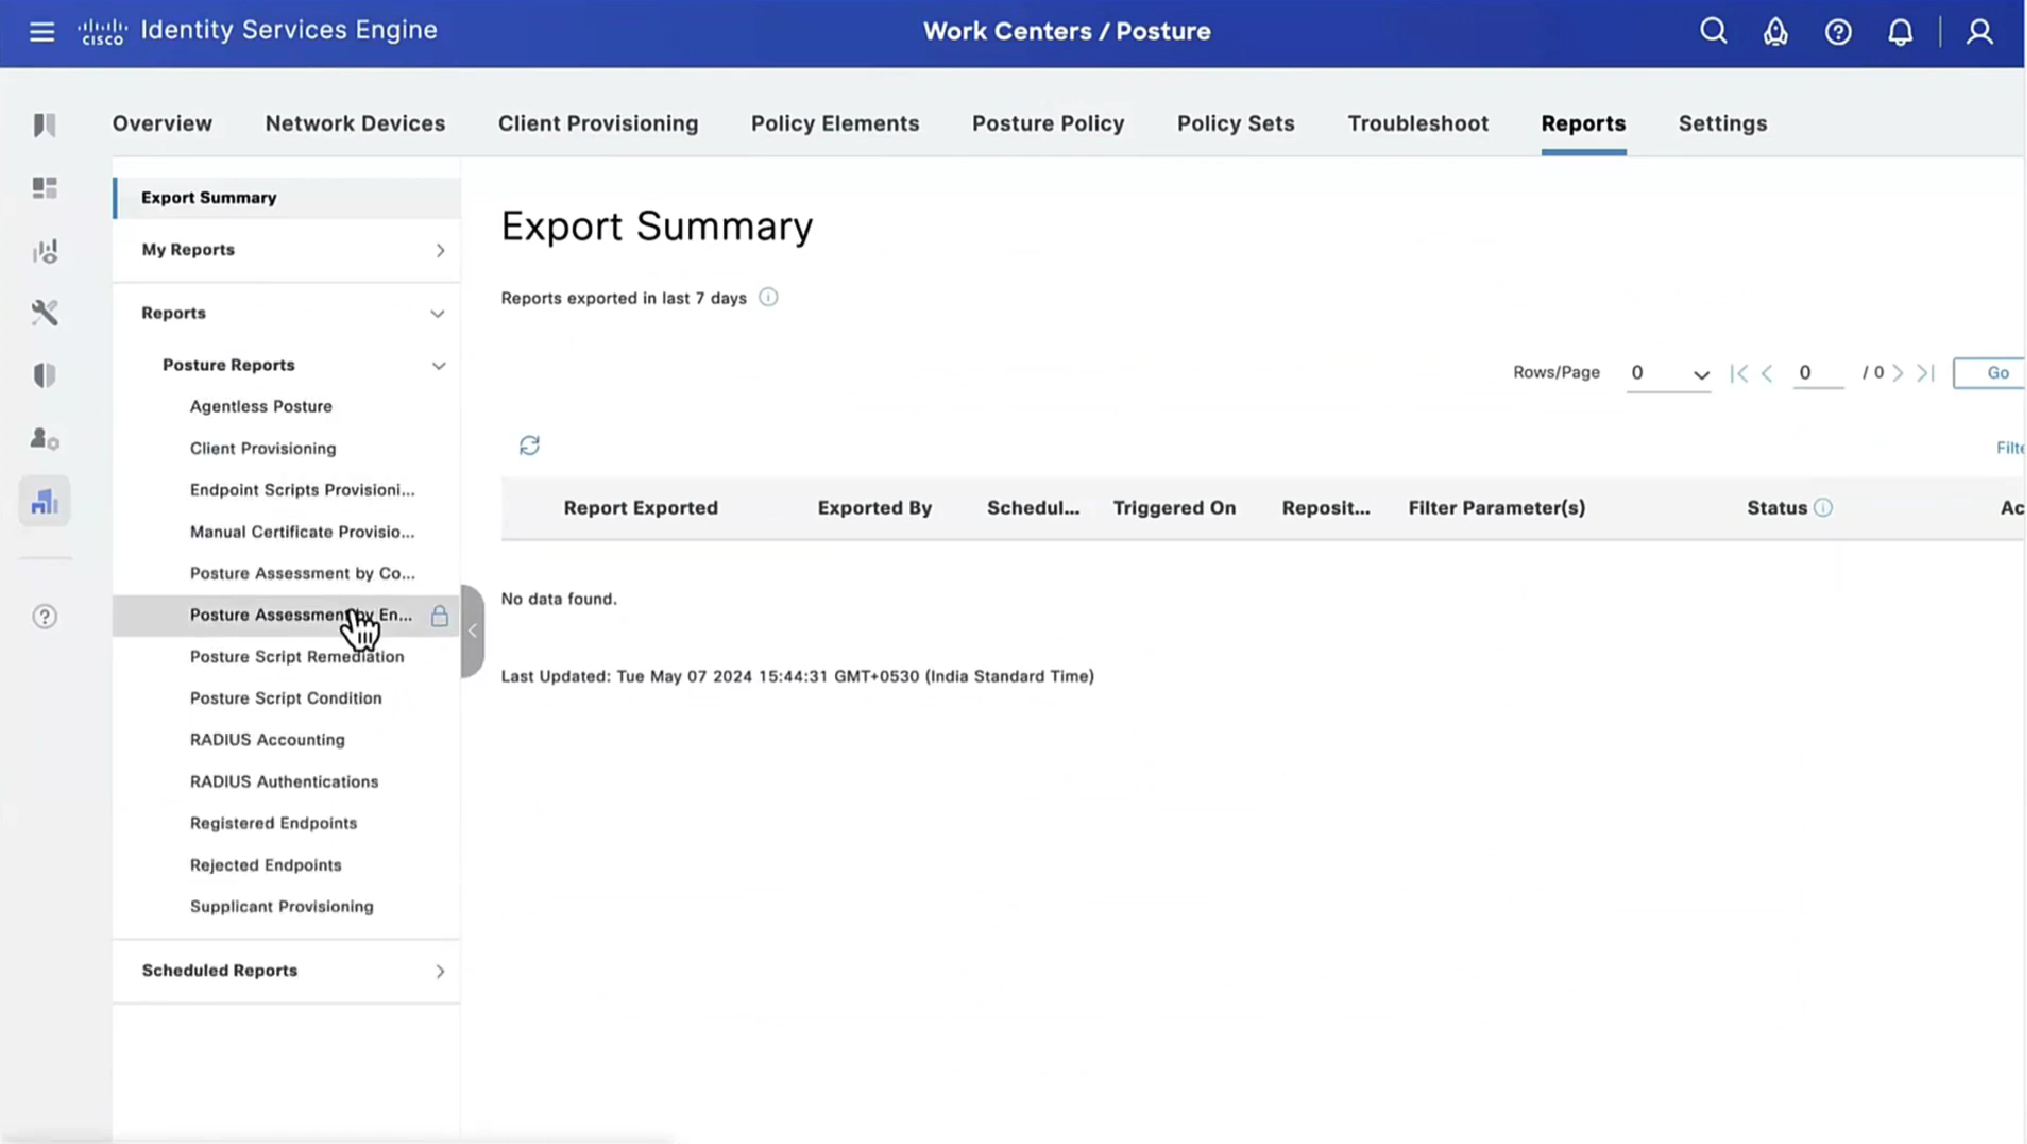
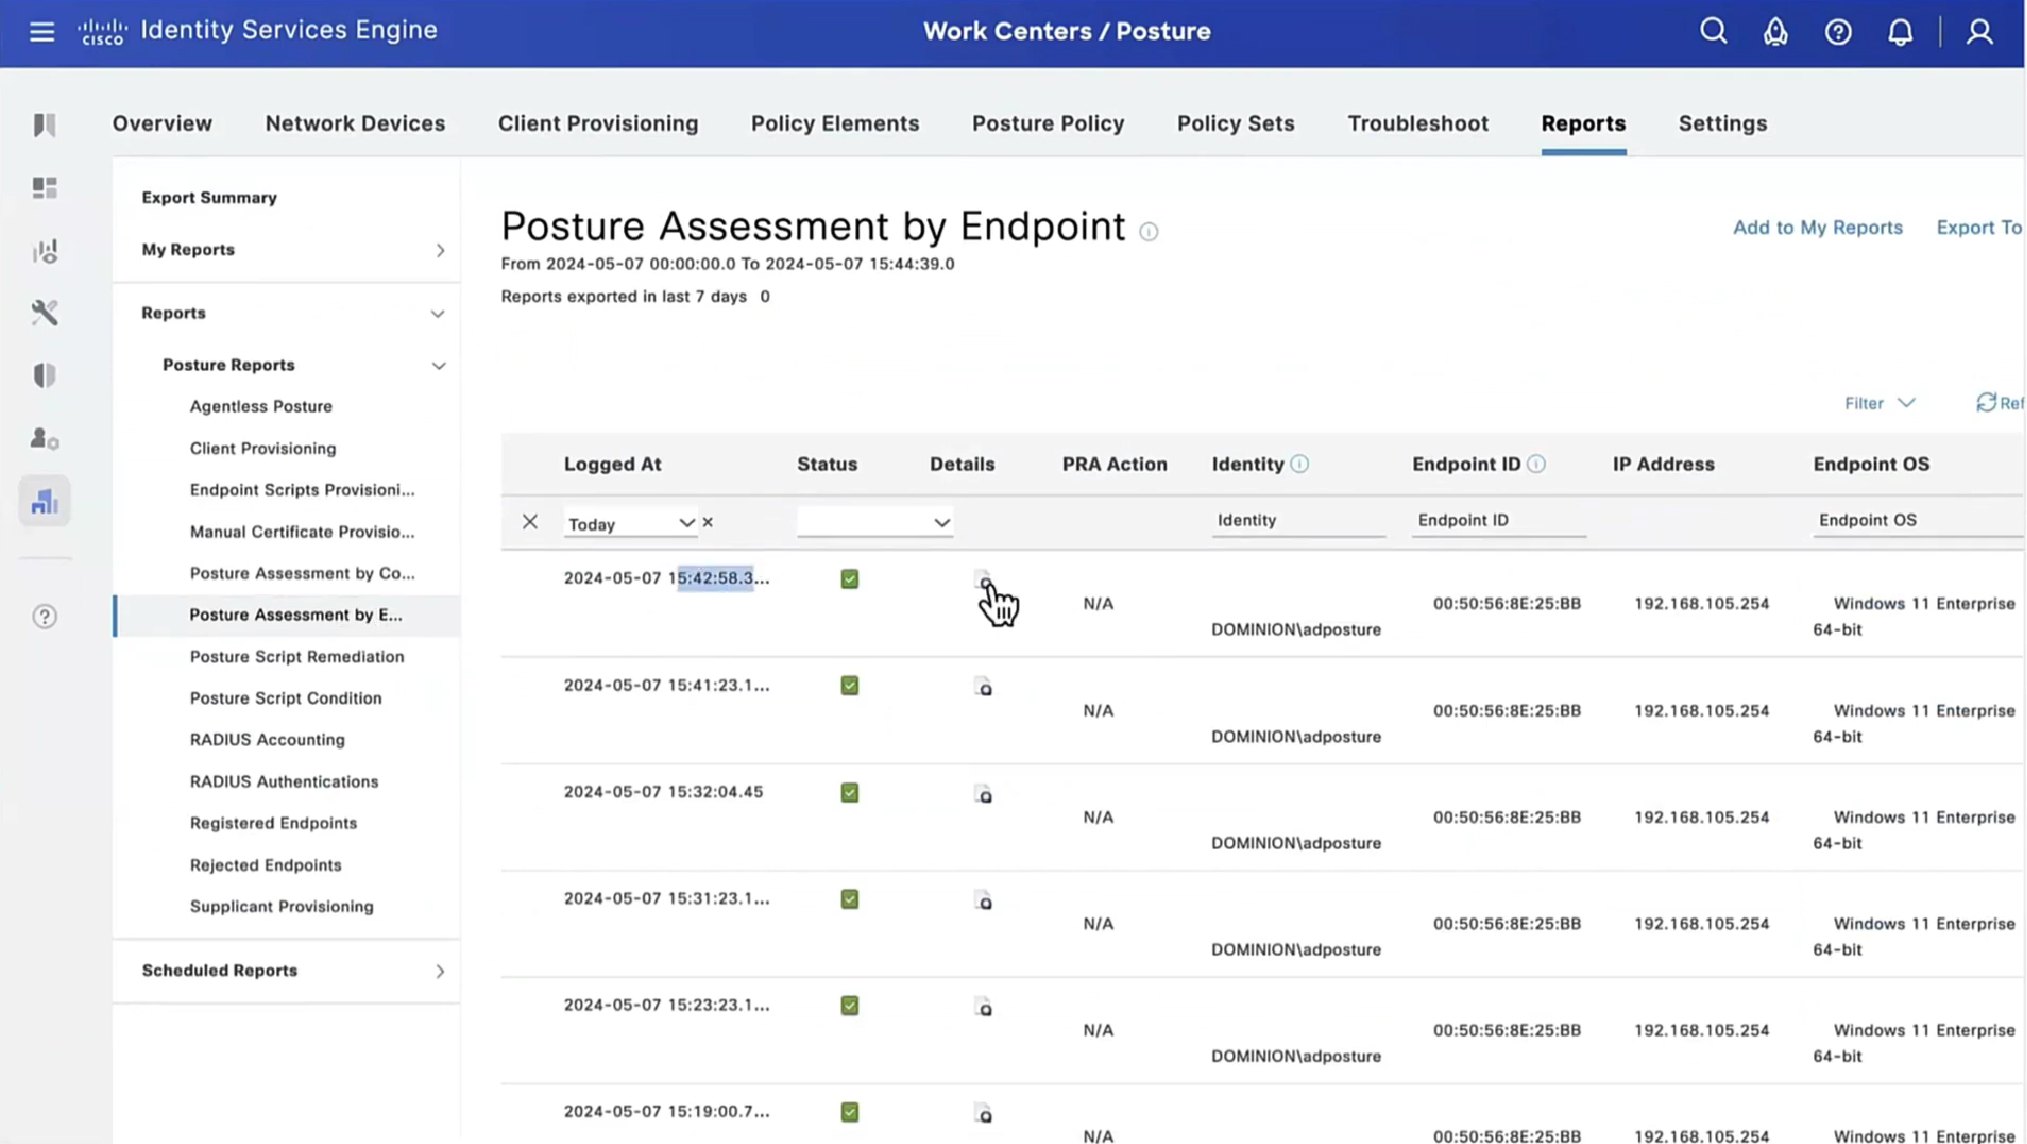
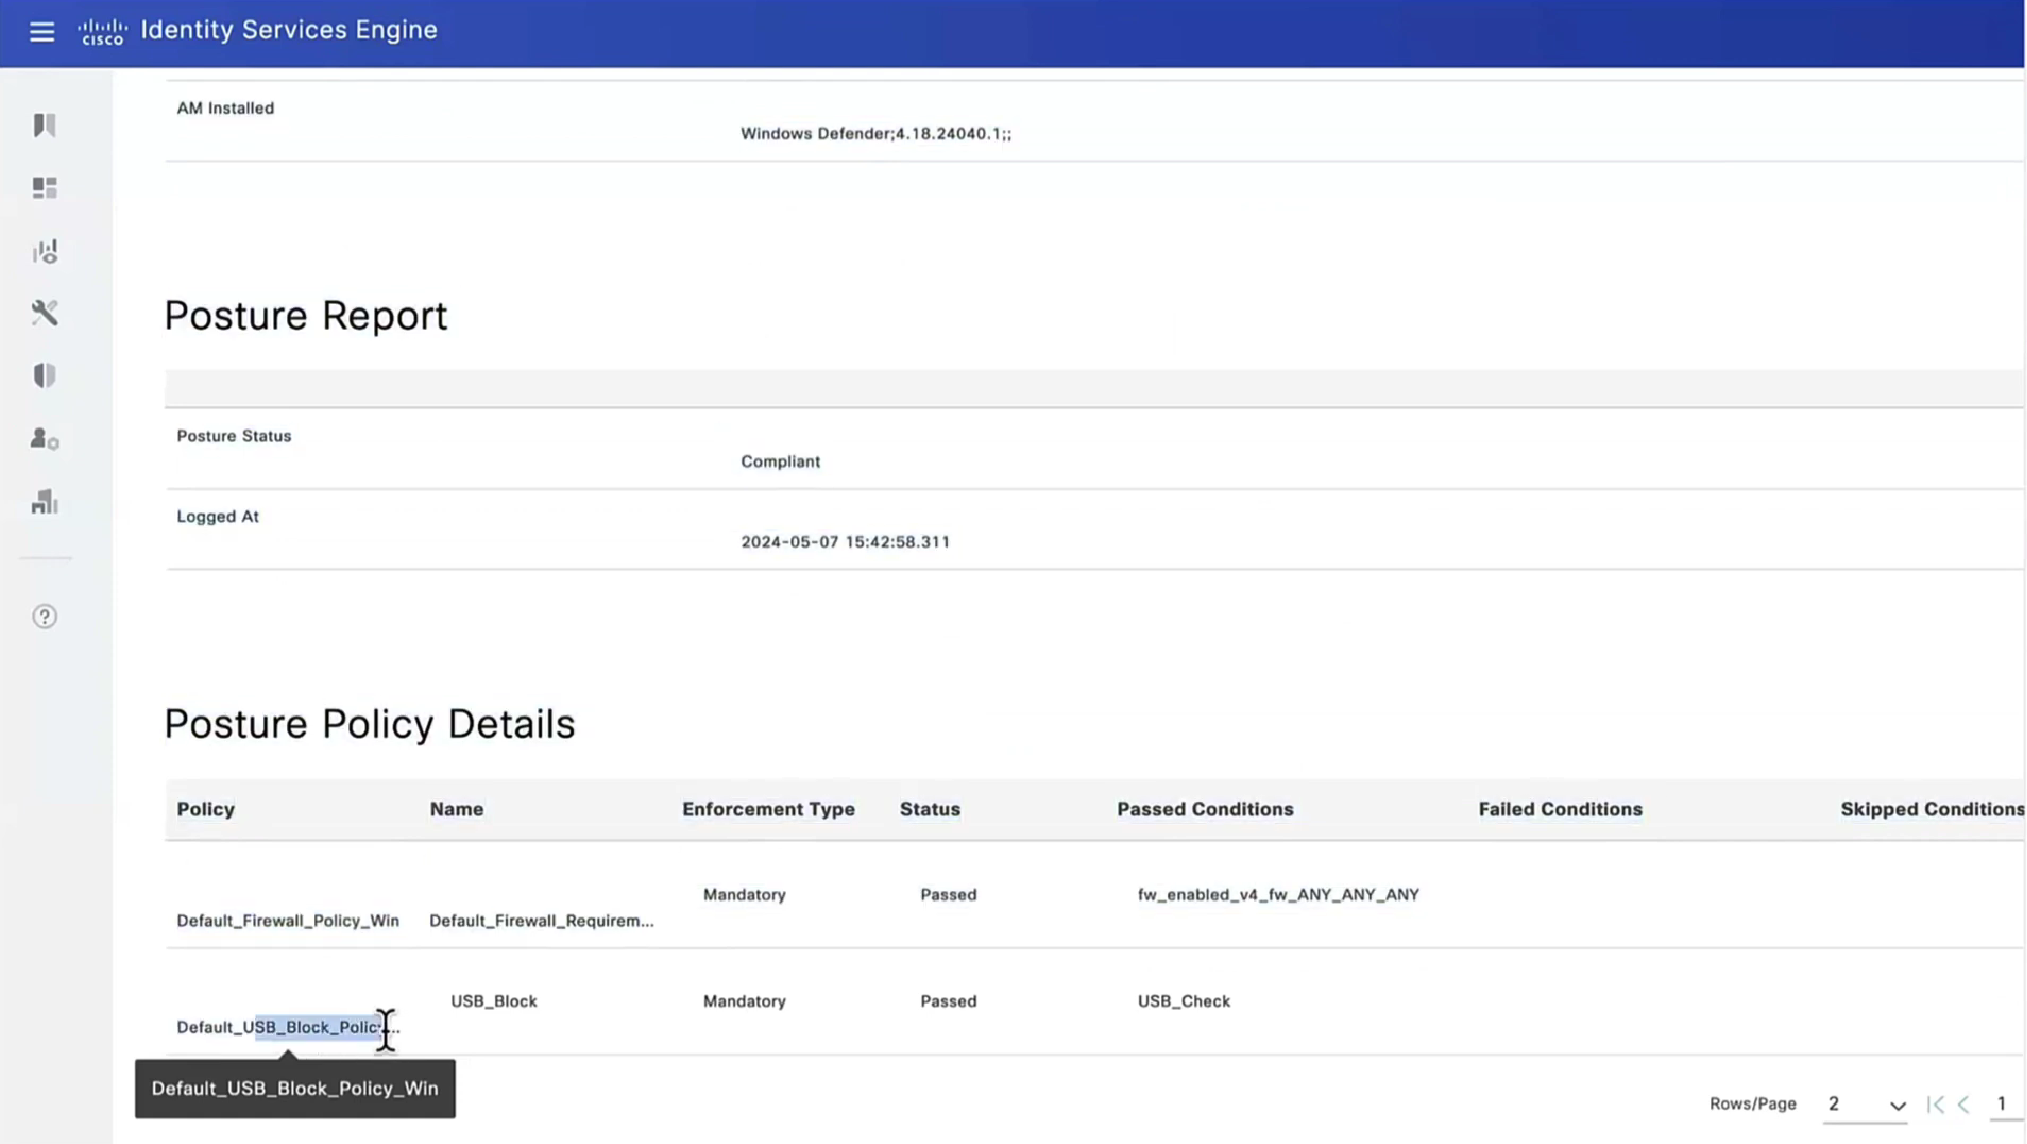
Posture Report sent from AnyConnect can be checked. Navigate to Operations > Reports > Endpoints and Users > Posture Assessment by Endpoint.

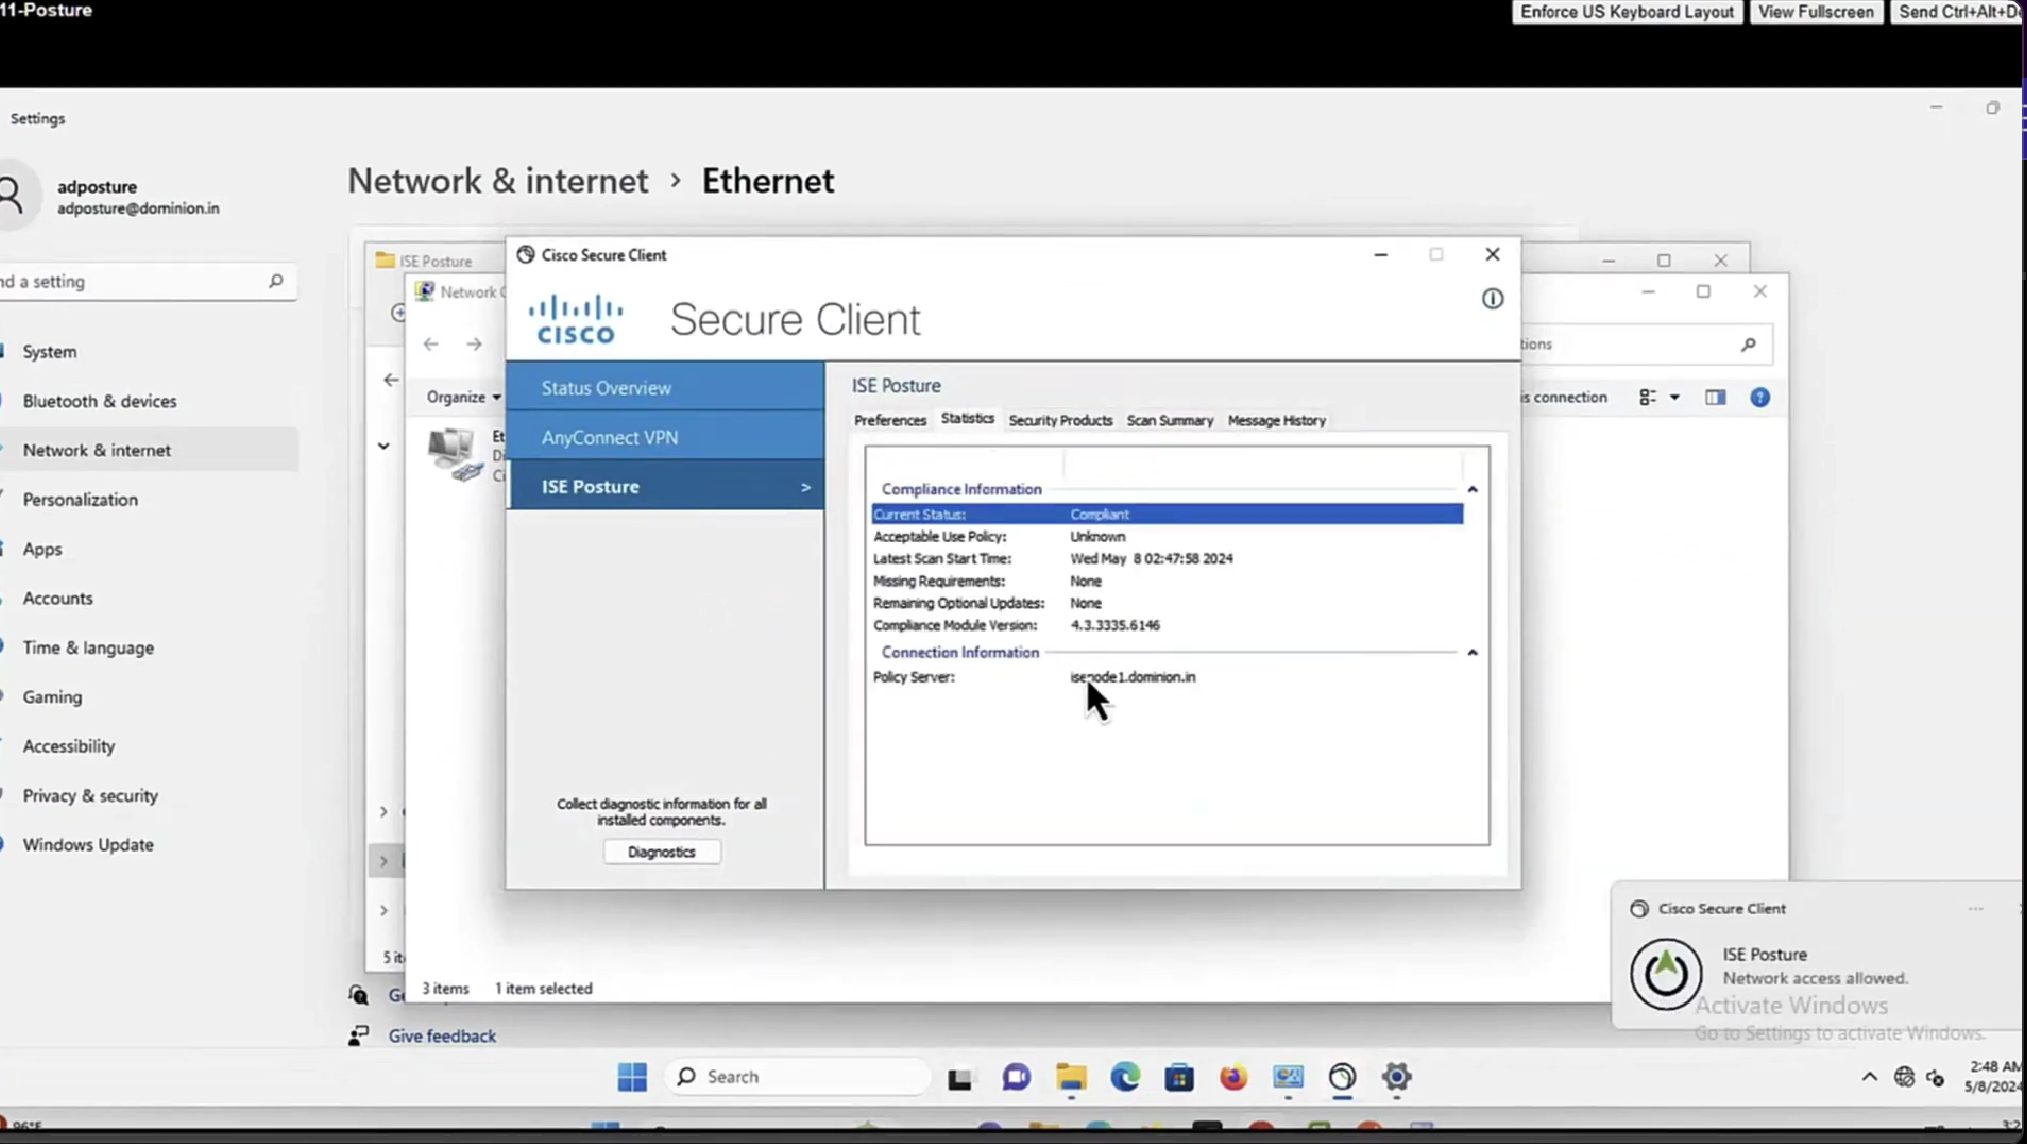
In order to see more details on the posture report, click Details.


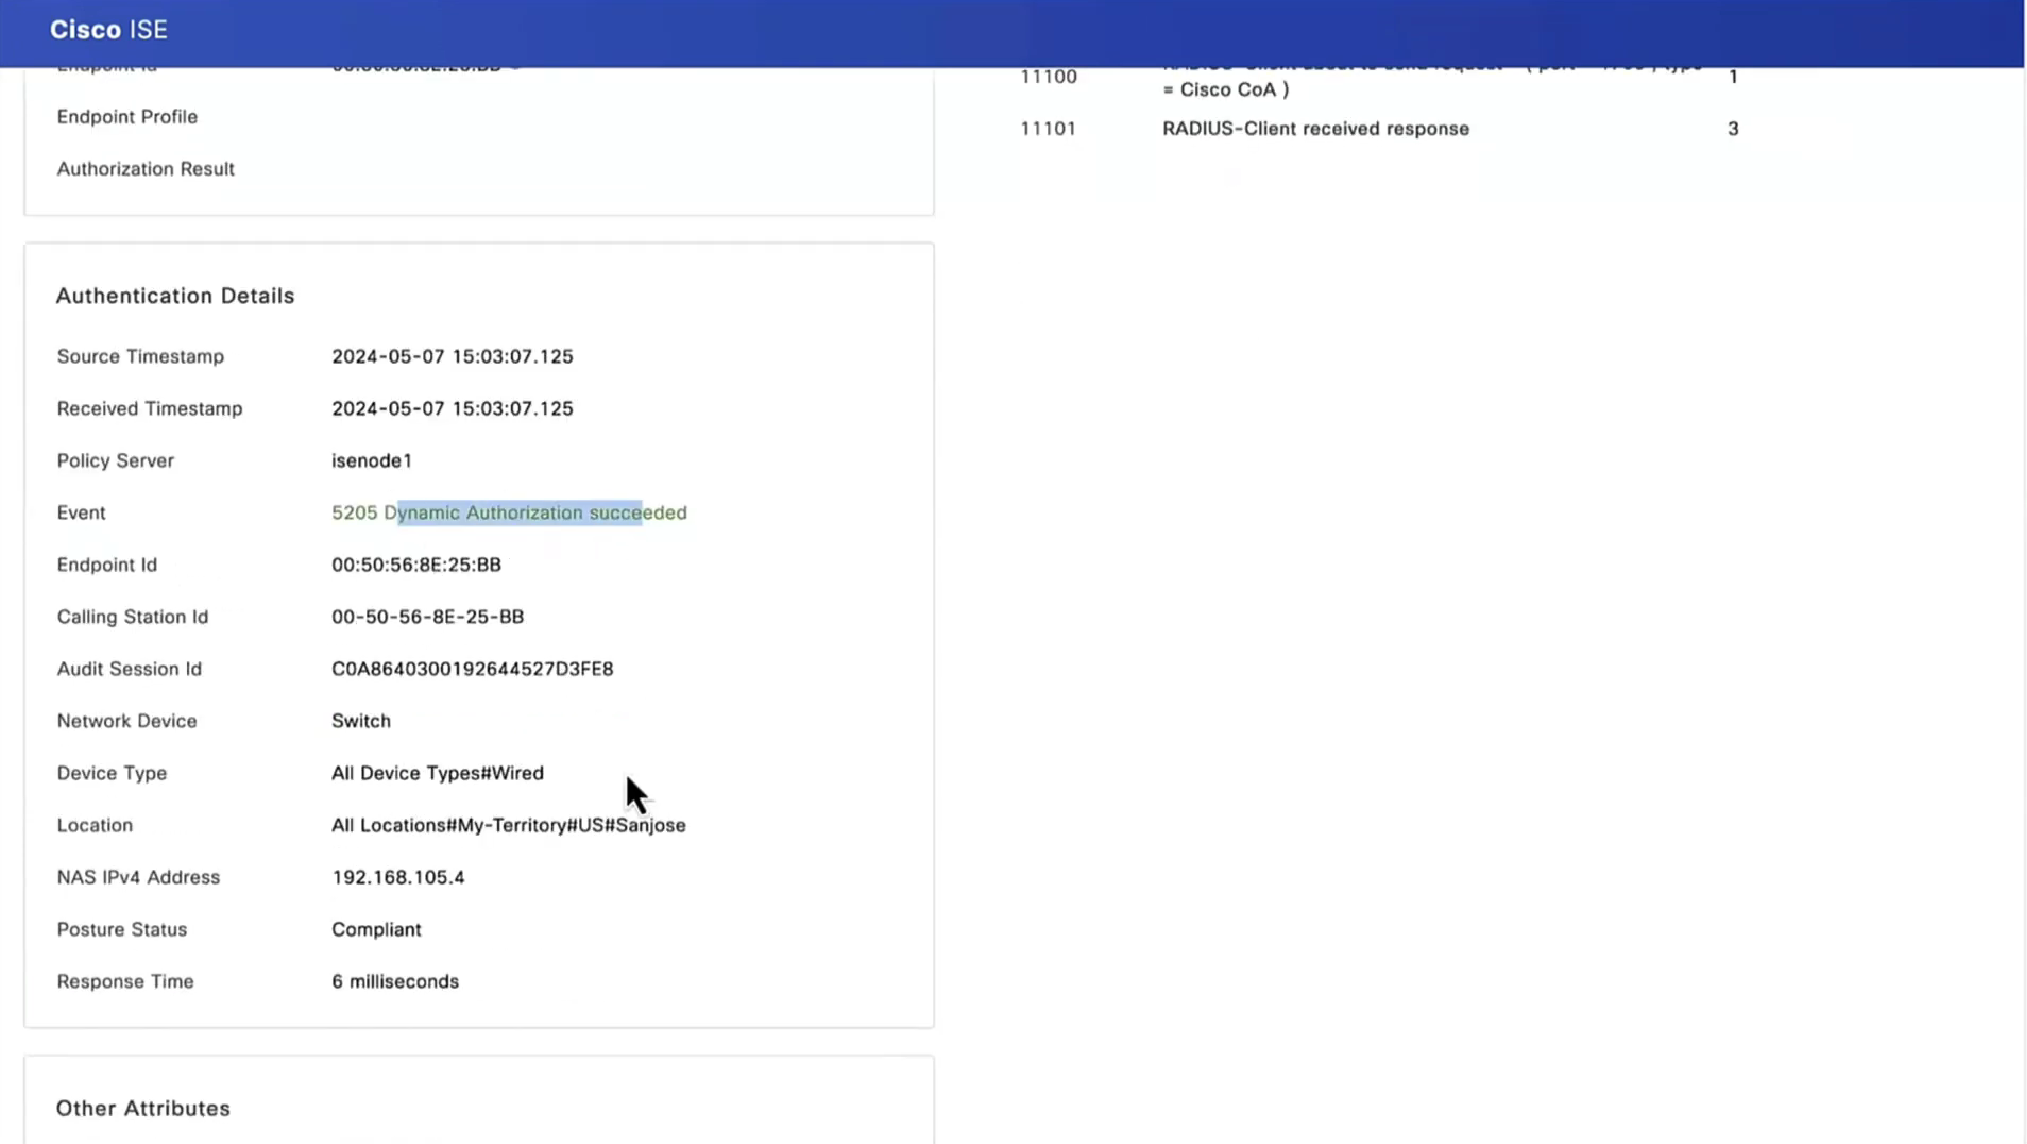
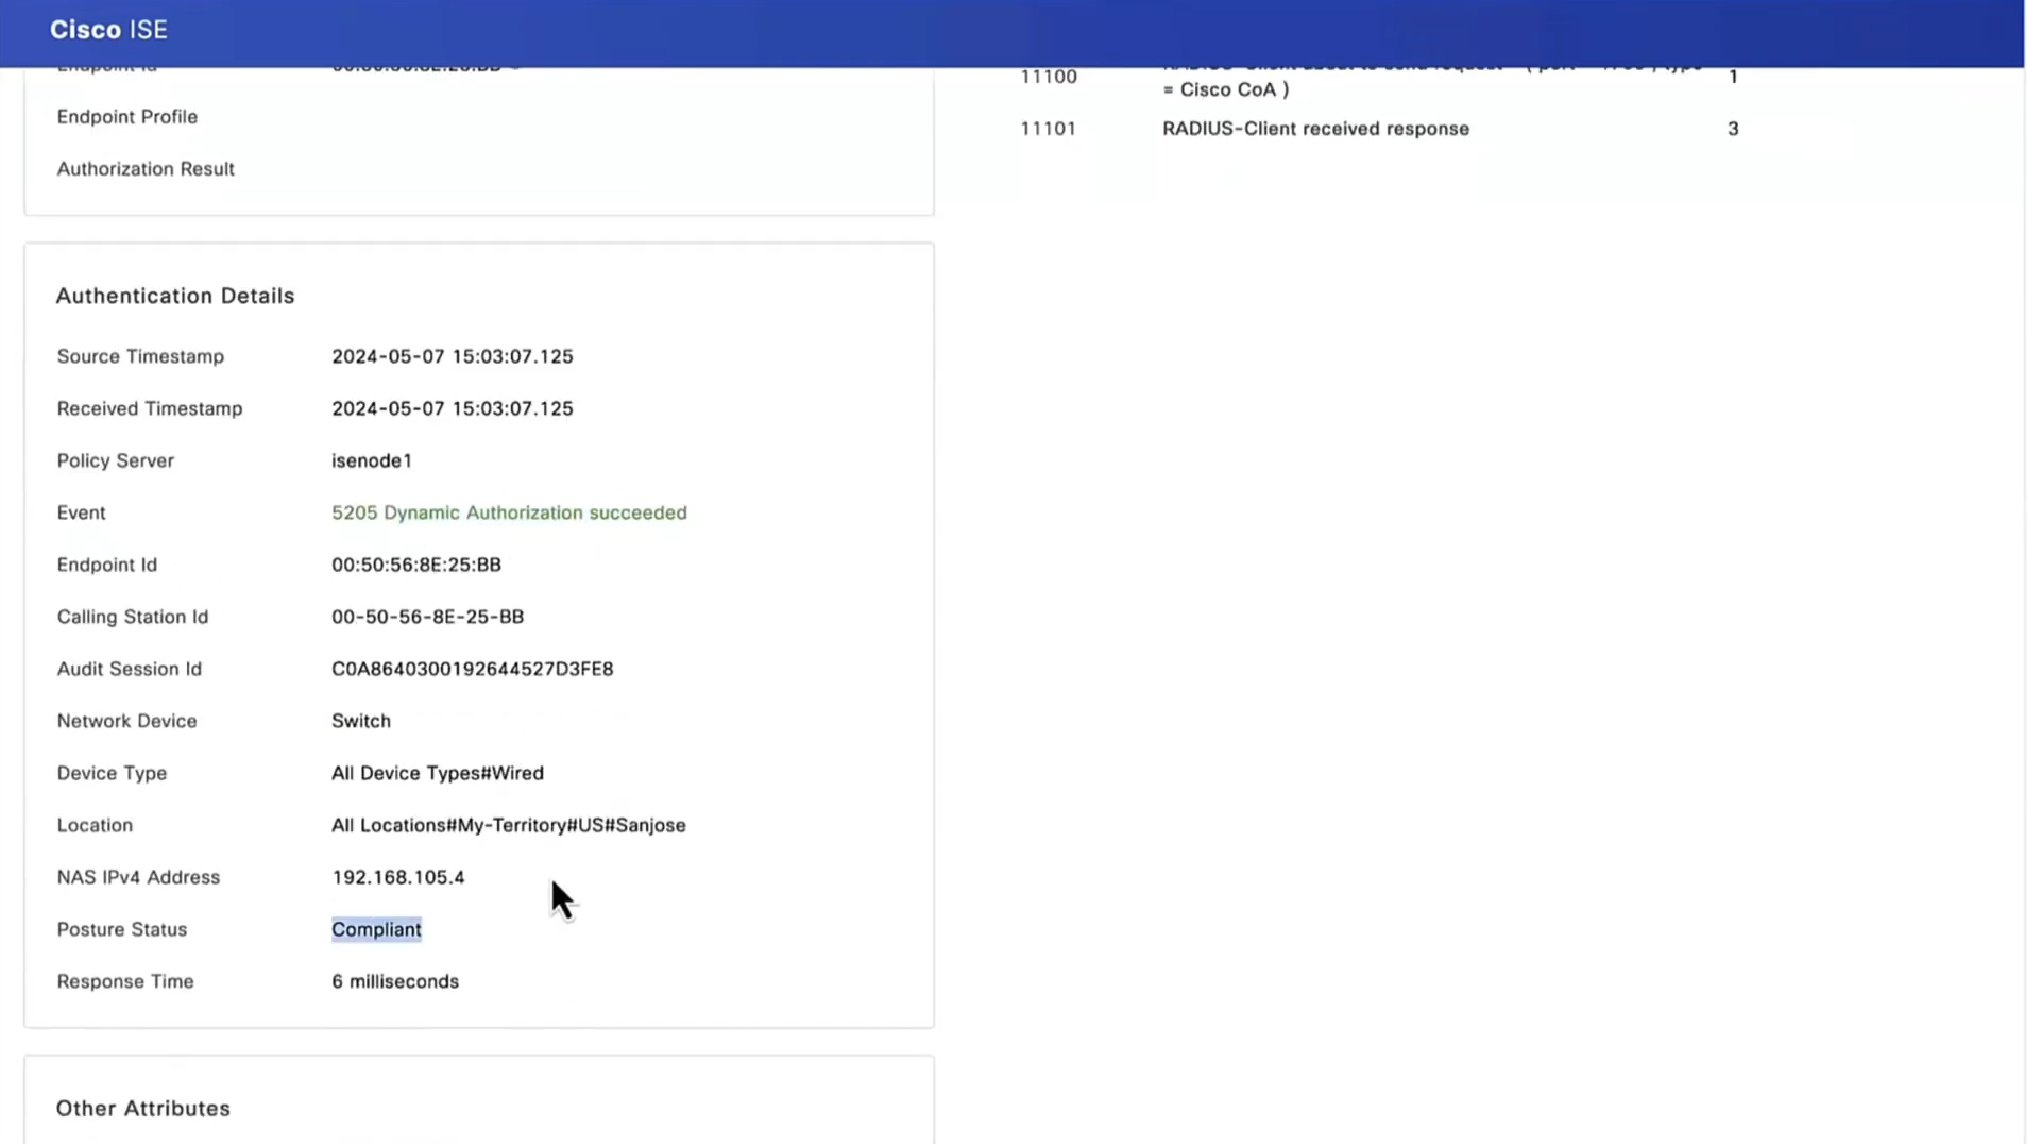
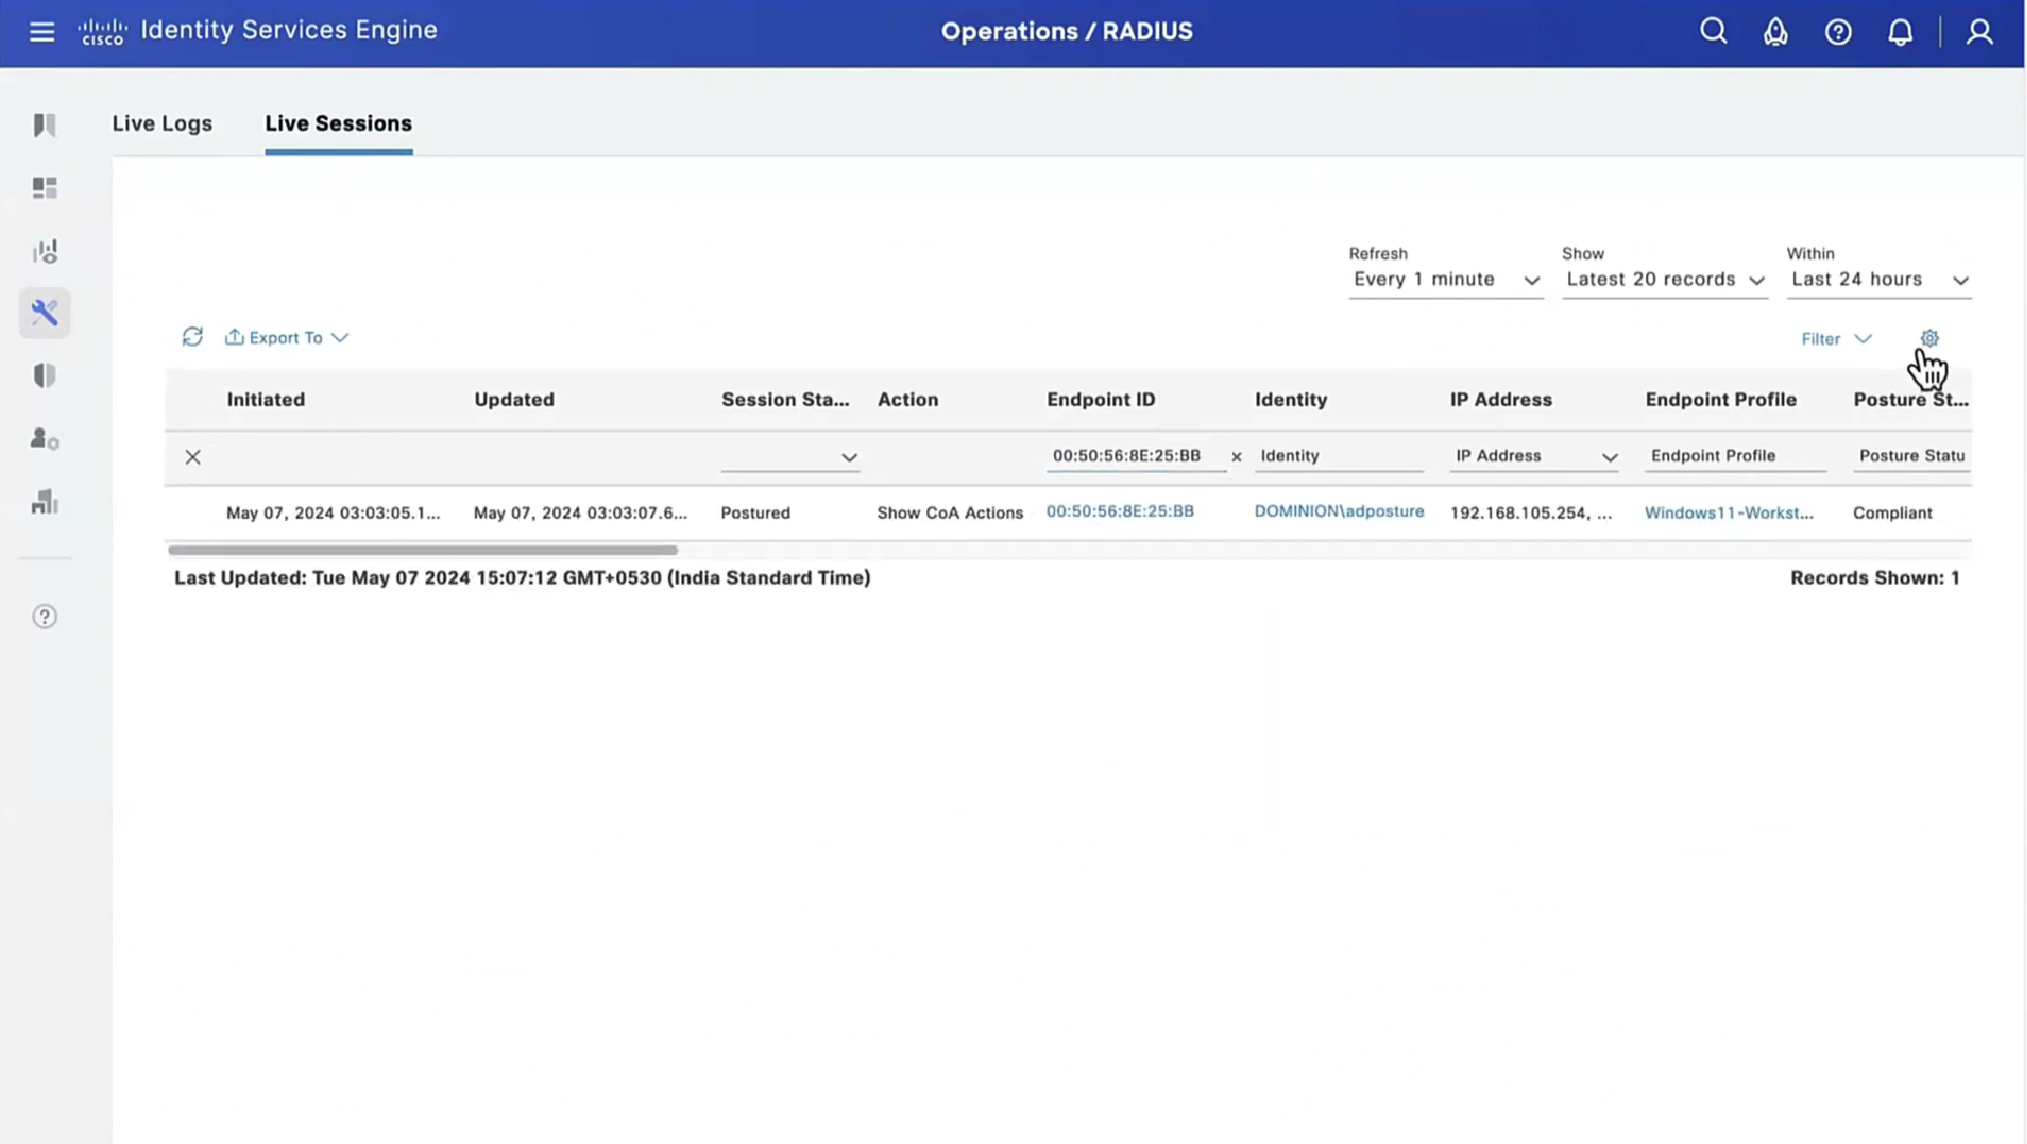
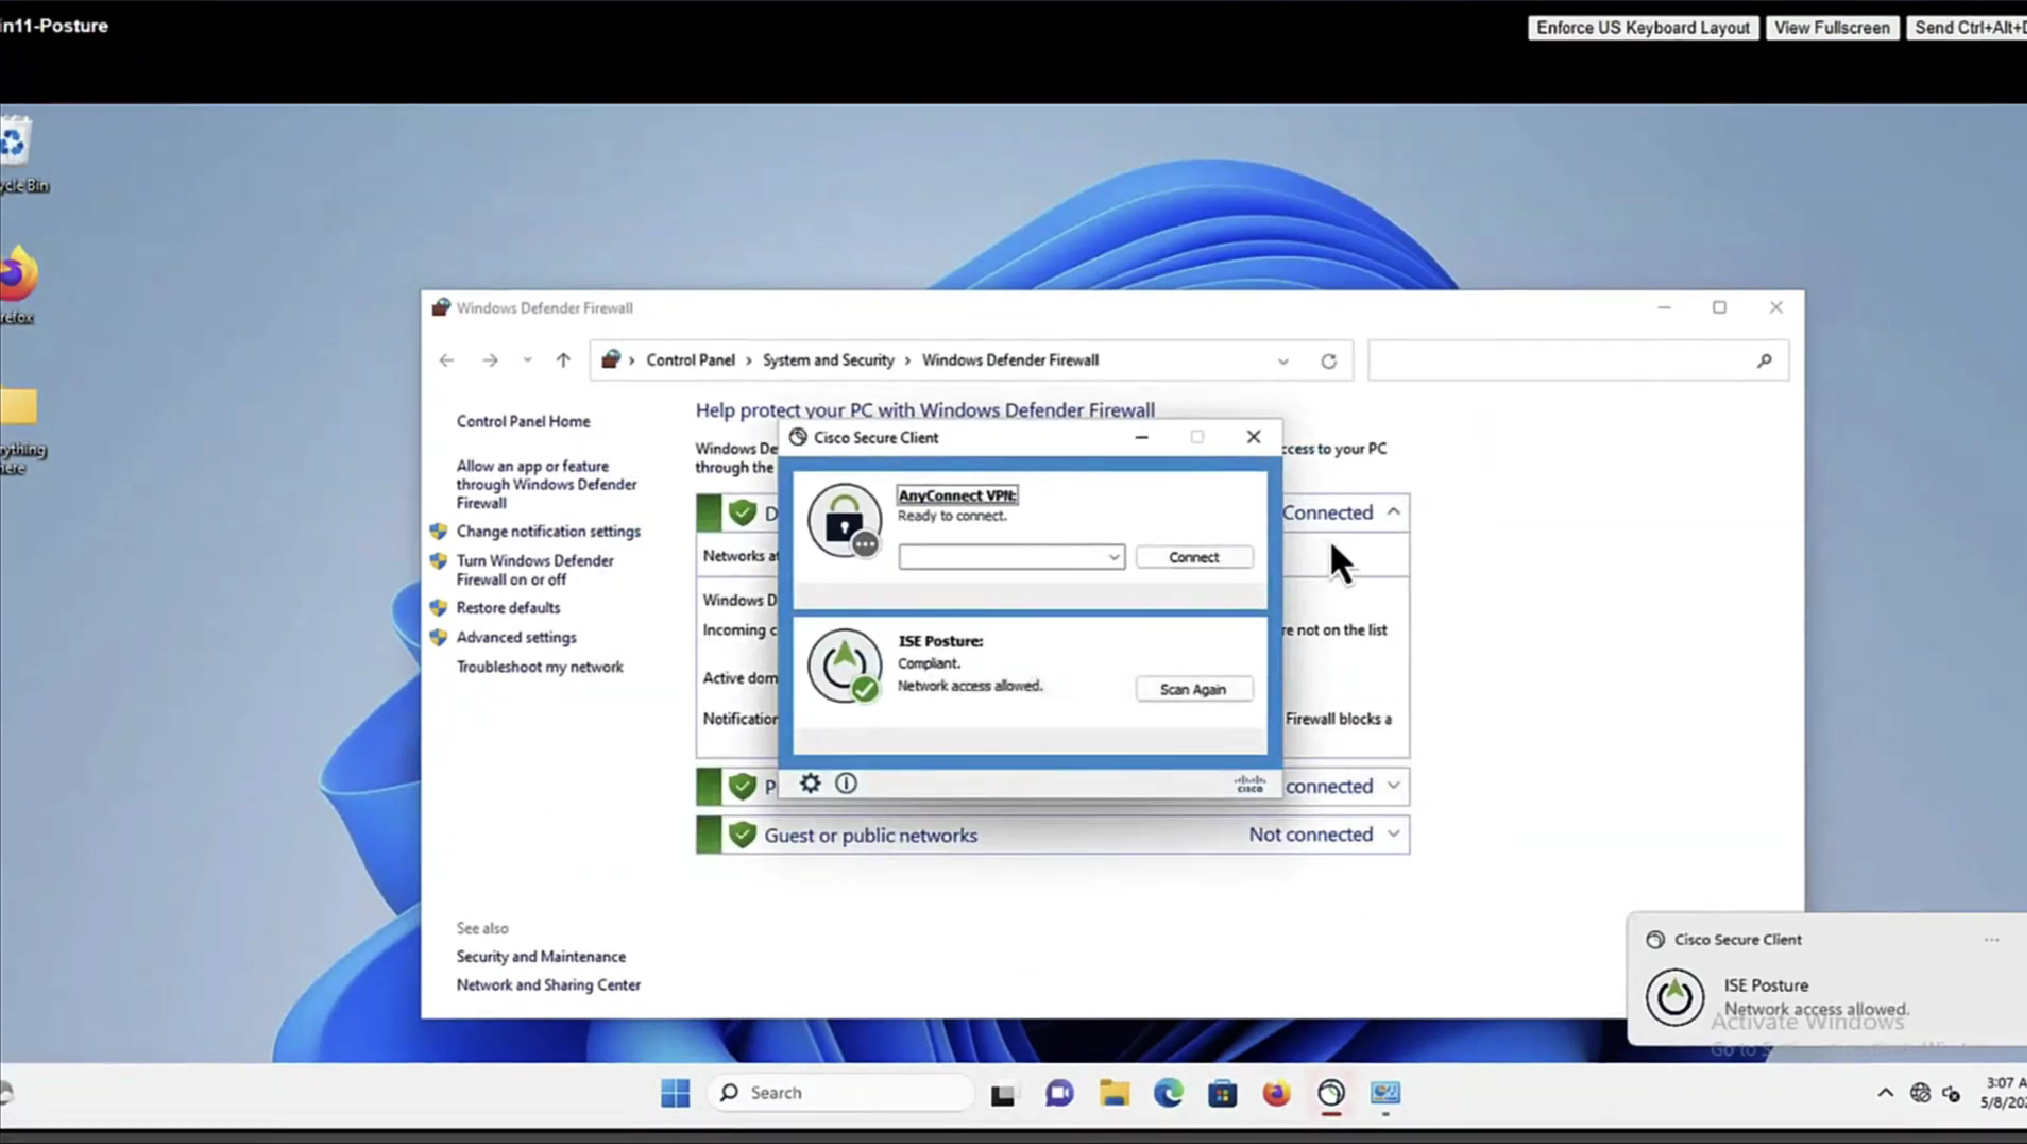
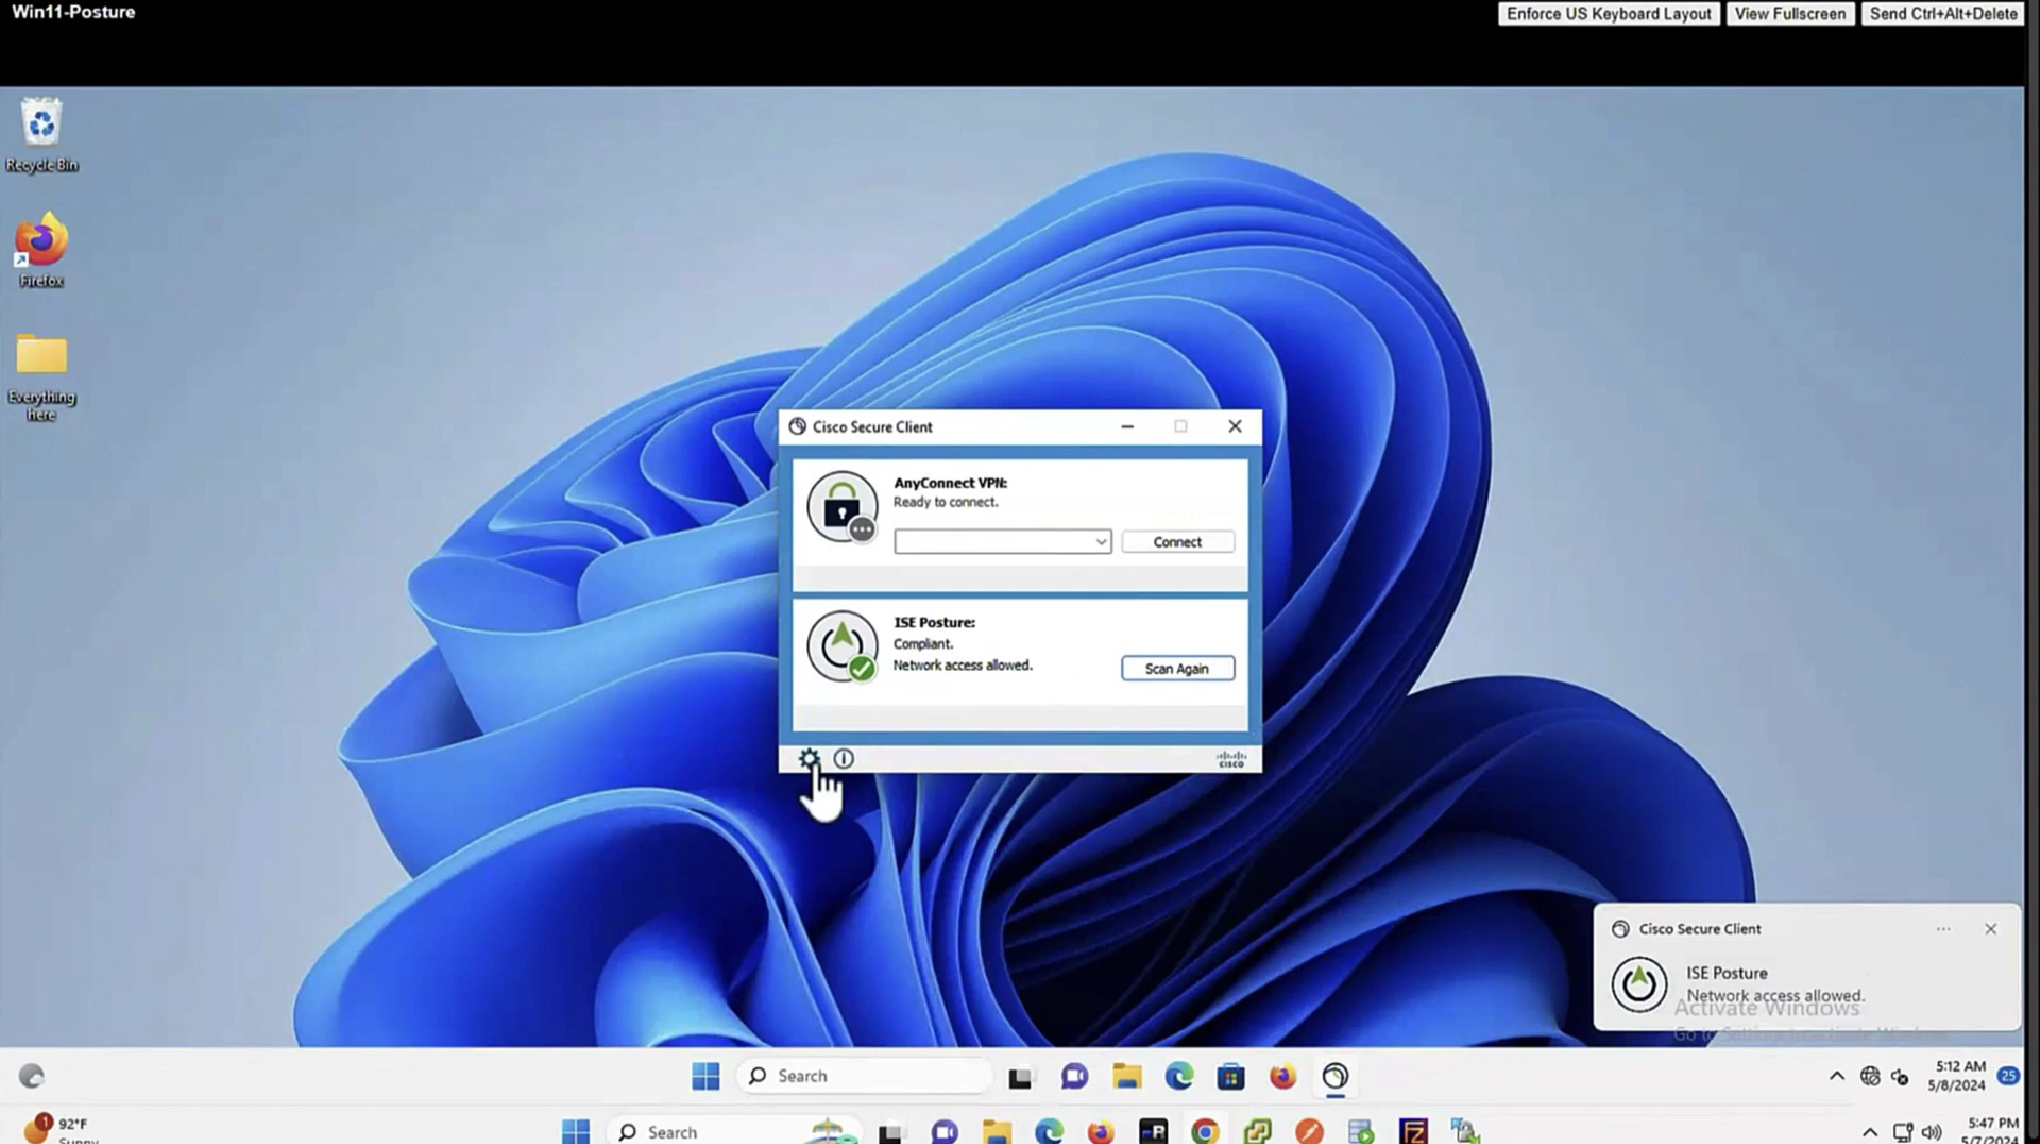
After the report is received on ISE, posture status is updated. In this example, posture status is compliant and CoA Push is triggered with a new set of attributes.

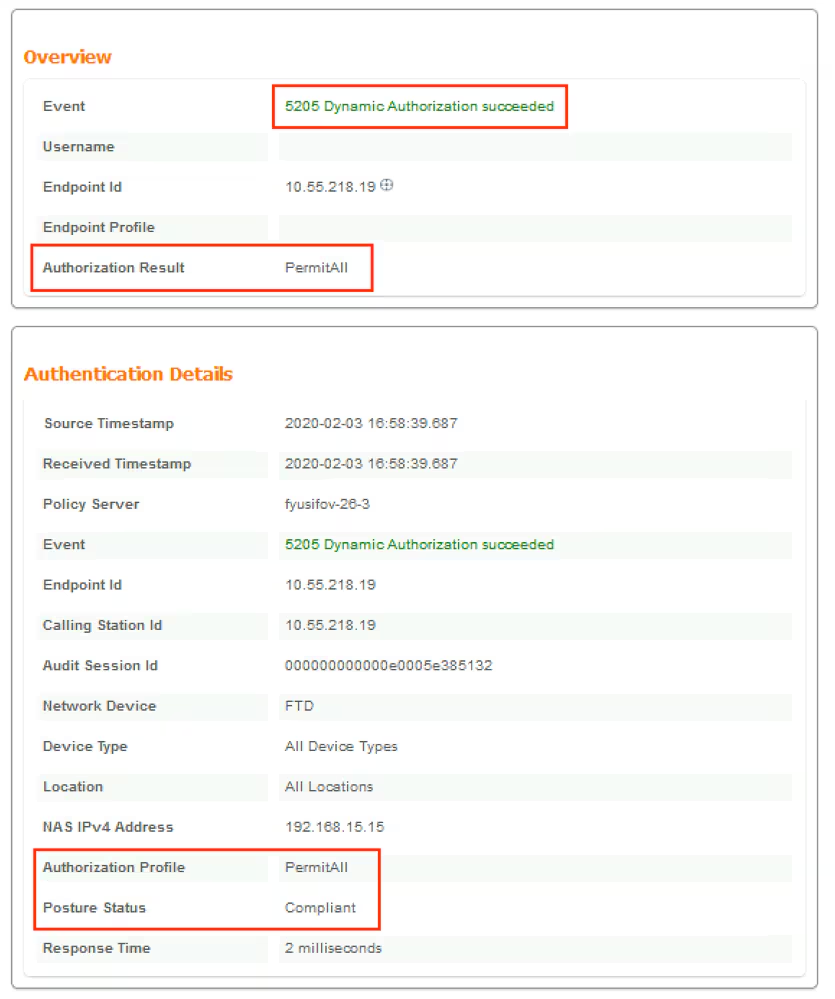

Verify on FTD that new Redirect ACL and Redirect URL are removed for VPN session and PermitAll DACL is applied.
fyusifov-ftd-64# show vpn-sessiondb detail anyconnect

Session Type: AnyConnect Detailed

Username     : alice@training.example.com
Index        : 14
Assigned IP  : 172.16.1.10            Public IP    : 10.55.218.19
Protocol     : AnyConnect-Parent SSL-Tunnel DTLS-Tunnel
License      : AnyConnect Premium
Encryption   : AnyConnect-Parent: (1)none  SSL-Tunnel: (1)AES-GCM-256  DTLS-Tunnel: (1)AES256
Hashing      : AnyConnect-Parent: (1)none  SSL-Tunnel: (1)SHA384  DTLS-Tunnel: (1)SHA1
Bytes Tx     : 53990                  Bytes Rx     : 23808
Pkts Tx      : 73                     Pkts Rx      : 120
Pkts Tx Drop : 0                      Pkts Rx Drop : 0
Group Policy : DfltGrpPolicy          Tunnel Group : EmployeeVPN
Login Time   : 16:58:26 UTC Mon Feb 3 2020
Duration     : 0h:02m:24s
Inactivity   : 0h:00m:00s
VLAN Mapping : N/A                    VLAN         : none
Audt Sess ID : 000000000000e0005e385132
Security Grp : none                   Tunnel Zone  : 0

AnyConnect-Parent Tunnels: 1
SSL-Tunnel Tunnels: 1
DTLS-Tunnel Tunnels: 1

AnyConnect-Parent:
  Tunnel ID    : 14.1
  Public IP    : 10.55.218.19
  Encryption   : none                   Hashing      : none
  TCP Src Port : 51965                  TCP Dst Port : 443
  Auth Mode    : userPassword
  Idle Time Out: 30 Minutes             Idle TO Left : 27 Minutes
  Client OS    : win
  Client OS Ver: 10.0.18363
  Client Type  : AnyConnect
  Client Ver   : Cisco AnyConnect VPN Agent for Windows 4.7.01076
  Bytes Tx     : 7663                   Bytes Rx     : 0
  Pkts Tx      : 5                      Pkts Rx      : 0
  Pkts Tx Drop : 0                      Pkts Rx Drop : 0

SSL-Tunnel:
  Tunnel ID    : 14.2
  Assigned IP  : 172.16.1.10            Public IP    : 10.55.218.19
  Encryption   : AES-GCM-256            Hashing      : SHA384
  Ciphersuite  : ECDHE-RSA-AES256-GCM-SHA384
  Encapsulation: TLSv1.2                TCP Src Port : 51970
  TCP Dst Port : 443                    Auth Mode    : userPassword
  Idle Time Out: 30 Minutes             Idle TO Left : 27 Minutes
  Client OS    : Windows
  Client Type  : SSL VPN Client
  Client Ver   : Cisco AnyConnect VPN Agent for Windows 4.7.01076
  Bytes Tx     : 7715                   Bytes Rx     : 10157
  Pkts Tx      : 6                      Pkts Rx      : 33
  Pkts Tx Drop : 0                      Pkts Rx Drop : 0
  Filter Name  : #ACSACL#-IP-PermitAll-5e384dc0

DTLS-Tunnel:
  Tunnel ID    : 14.3
  Assigned IP  : 172.16.1.10            Public IP    : 10.55.218.19
  Encryption   : AES256                 Hashing      : SHA1
  Ciphersuite  : DHE-RSA-AES256-SHA
  Encapsulation: DTLSv1.0               UDP Src Port : 51536
  UDP Dst Port : 443                    Auth Mode    : userPassword
  Idle Time Out: 30 Minutes             Idle TO Left : 28 Minutes
  Client OS    : Windows
  Client Type  : DTLS VPN Client
  Client Ver   : Cisco AnyConnect VPN Agent for Windows 4.7.01076
  Bytes Tx     : 38612                  Bytes Rx     : 13651
  Pkts Tx      : 62                     Pkts Rx      : 87
  Pkts Tx Drop : 0                      Pkts Rx Drop : 0
  Filter Name  : #ACSACL#-IP-PermitAll-5e384dc0
Troubleshoot
Spilt Tunnel
One of the common issues, when there is a spit tunnel is configured. In this example, default Group Policy is used, which tunnels all traffic. In case if only specific traffic is tunnelled, then AnyConnect probes (enroll.cisco.com and discovery host) must go through the tunnel in addition to traffic to ISE and other internal resources.
In order to check the tunnel policy on FMC, first, check which Group Policy is used for VPN connection. Navigate to Devices > VPN Remote Access.

Then, navigate to Objects > Object Management > VPN > Group Policy and click on Group Policy configured for VPN.

- Identity NAT
Another common issue, when VPN users’ return traffic gets translated with the use of incorrect NAT entry. In order to fix this issue, Identity NAT must be created in an appropriate order.
First, check NAT rules for this device. Navigate to Devices > NAT and then click Add Rule to create a new rule.

In the opened window, under the Interface Objects tab, select Security Zones. In this example, NAT entry is created from ZONE-INSIDE to ZONE-OUTSIDE.

Under the Translation tab, select original and translated packet details. As it is Identity NAT, source and destination are kept unchanged:

Under the Advanced tab, check checkboxes as shown in this image:

next post
Cisco | ISE Posture 2
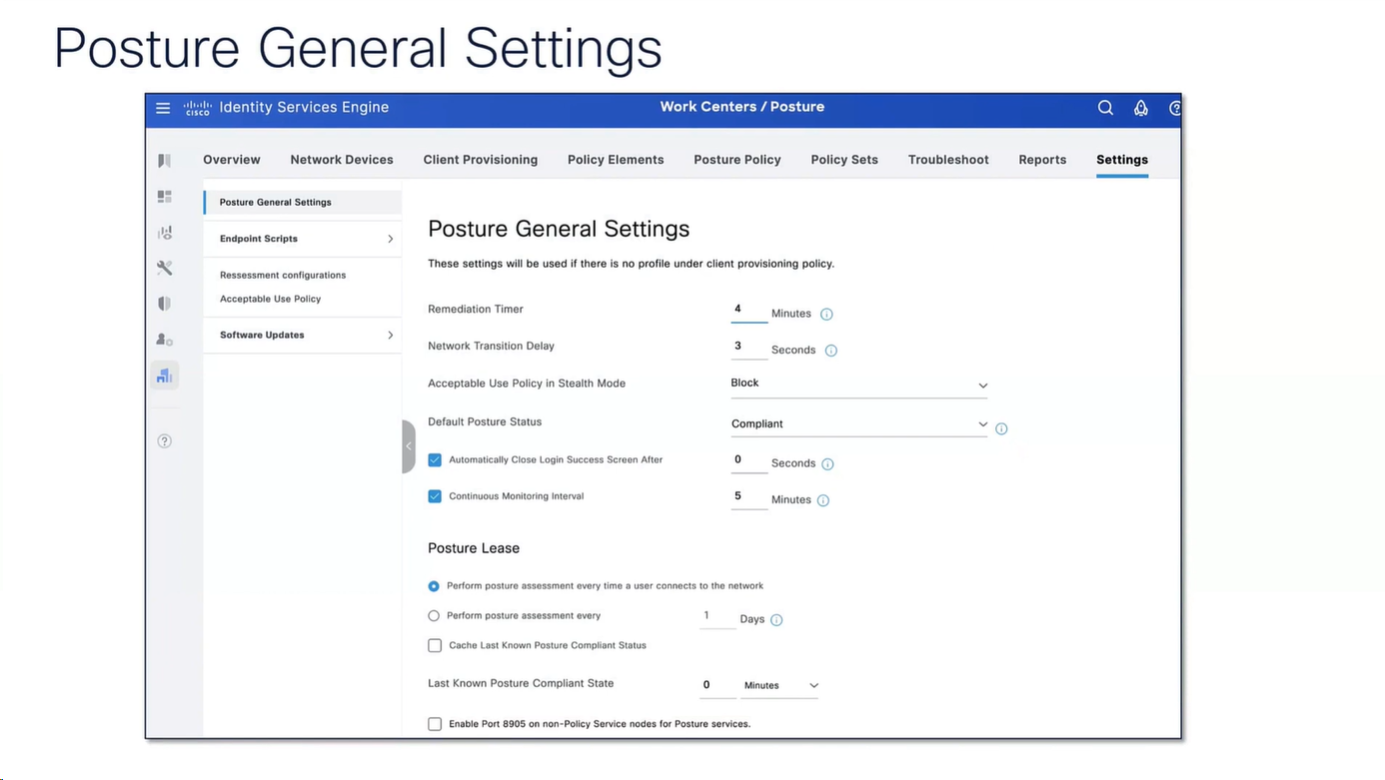
Posture Settings
“These settings will be used if there is no profile under client provisioning policy”
whatever is defined in Agent profile, that overtakes these settings in Global profile
if no agent profile is assigned in client provisioning policy then these global setting will apply

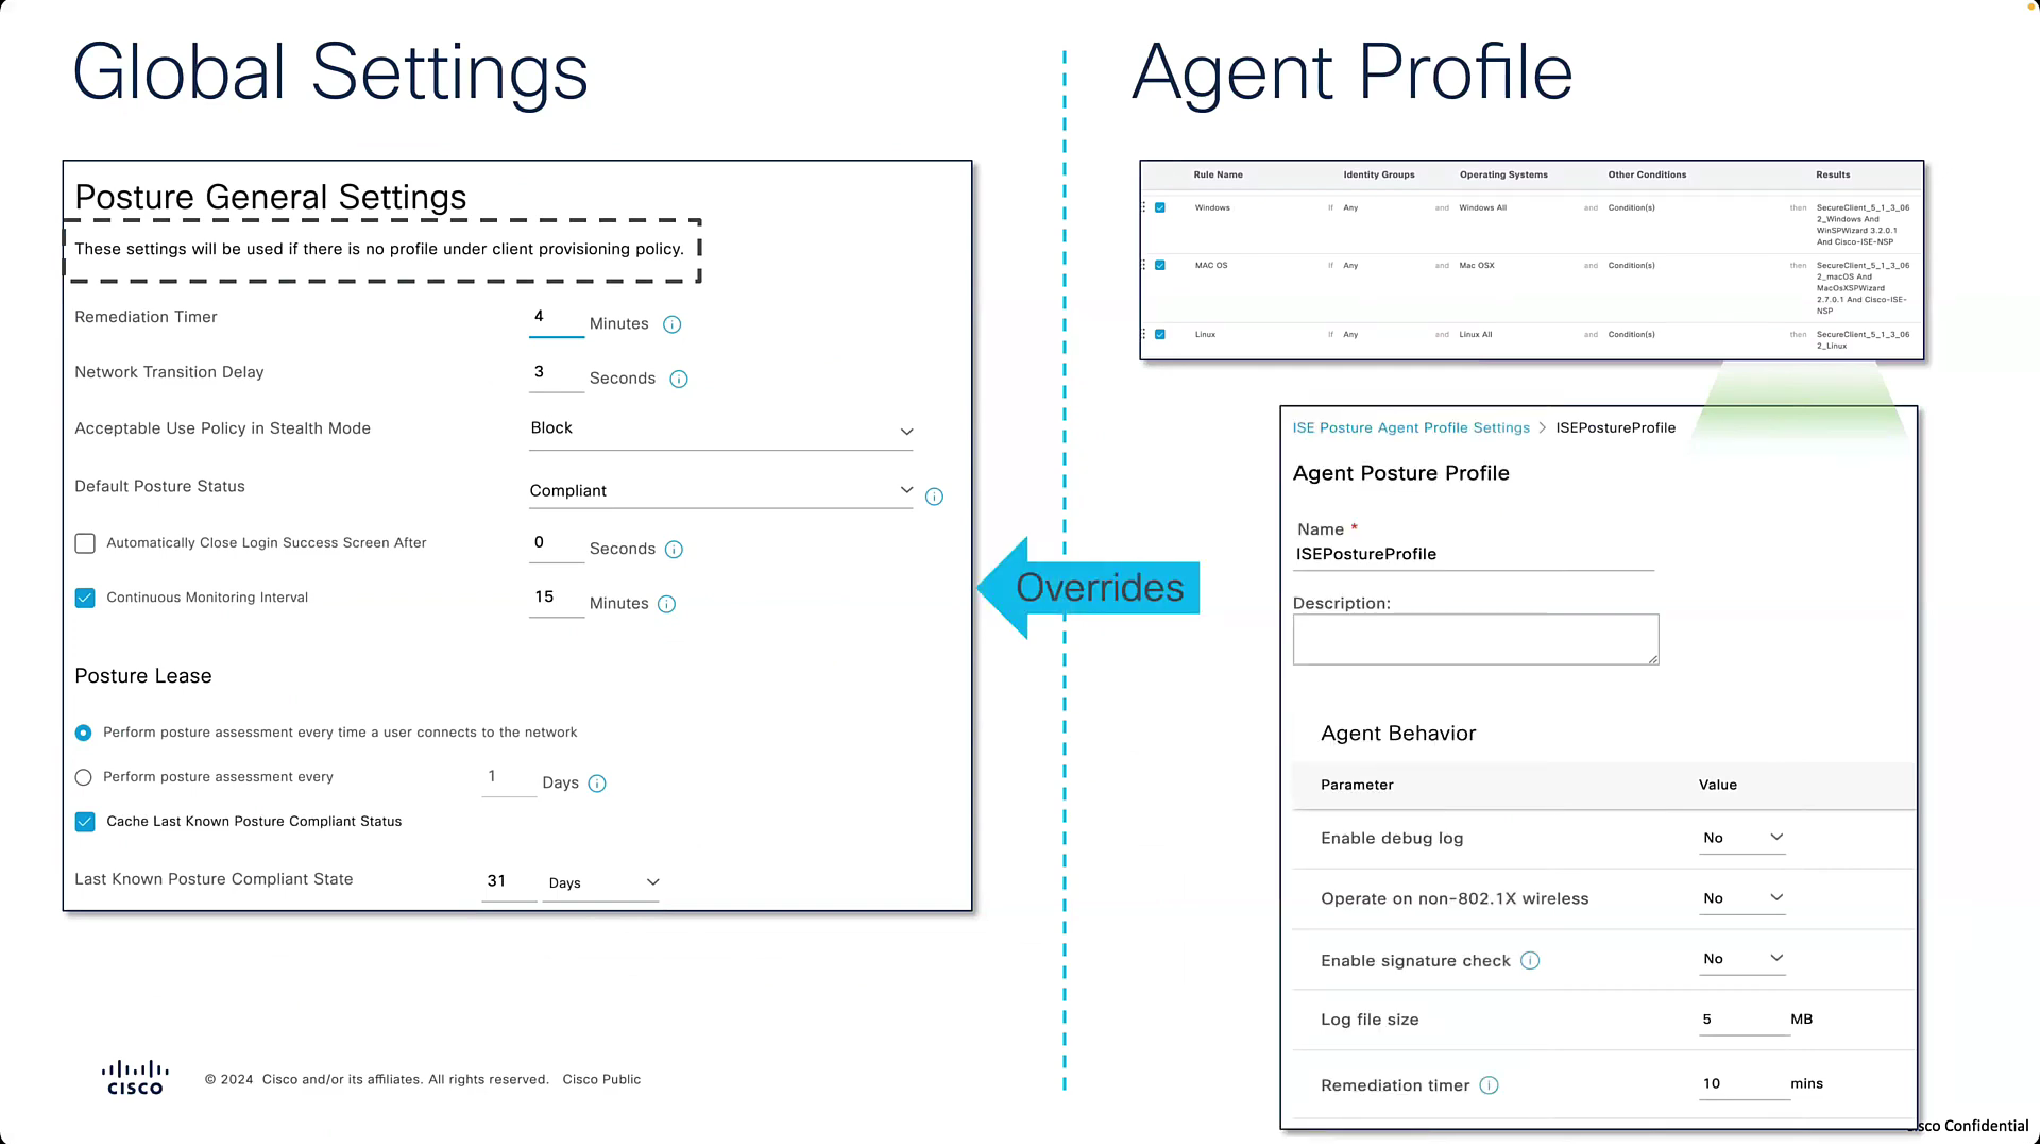


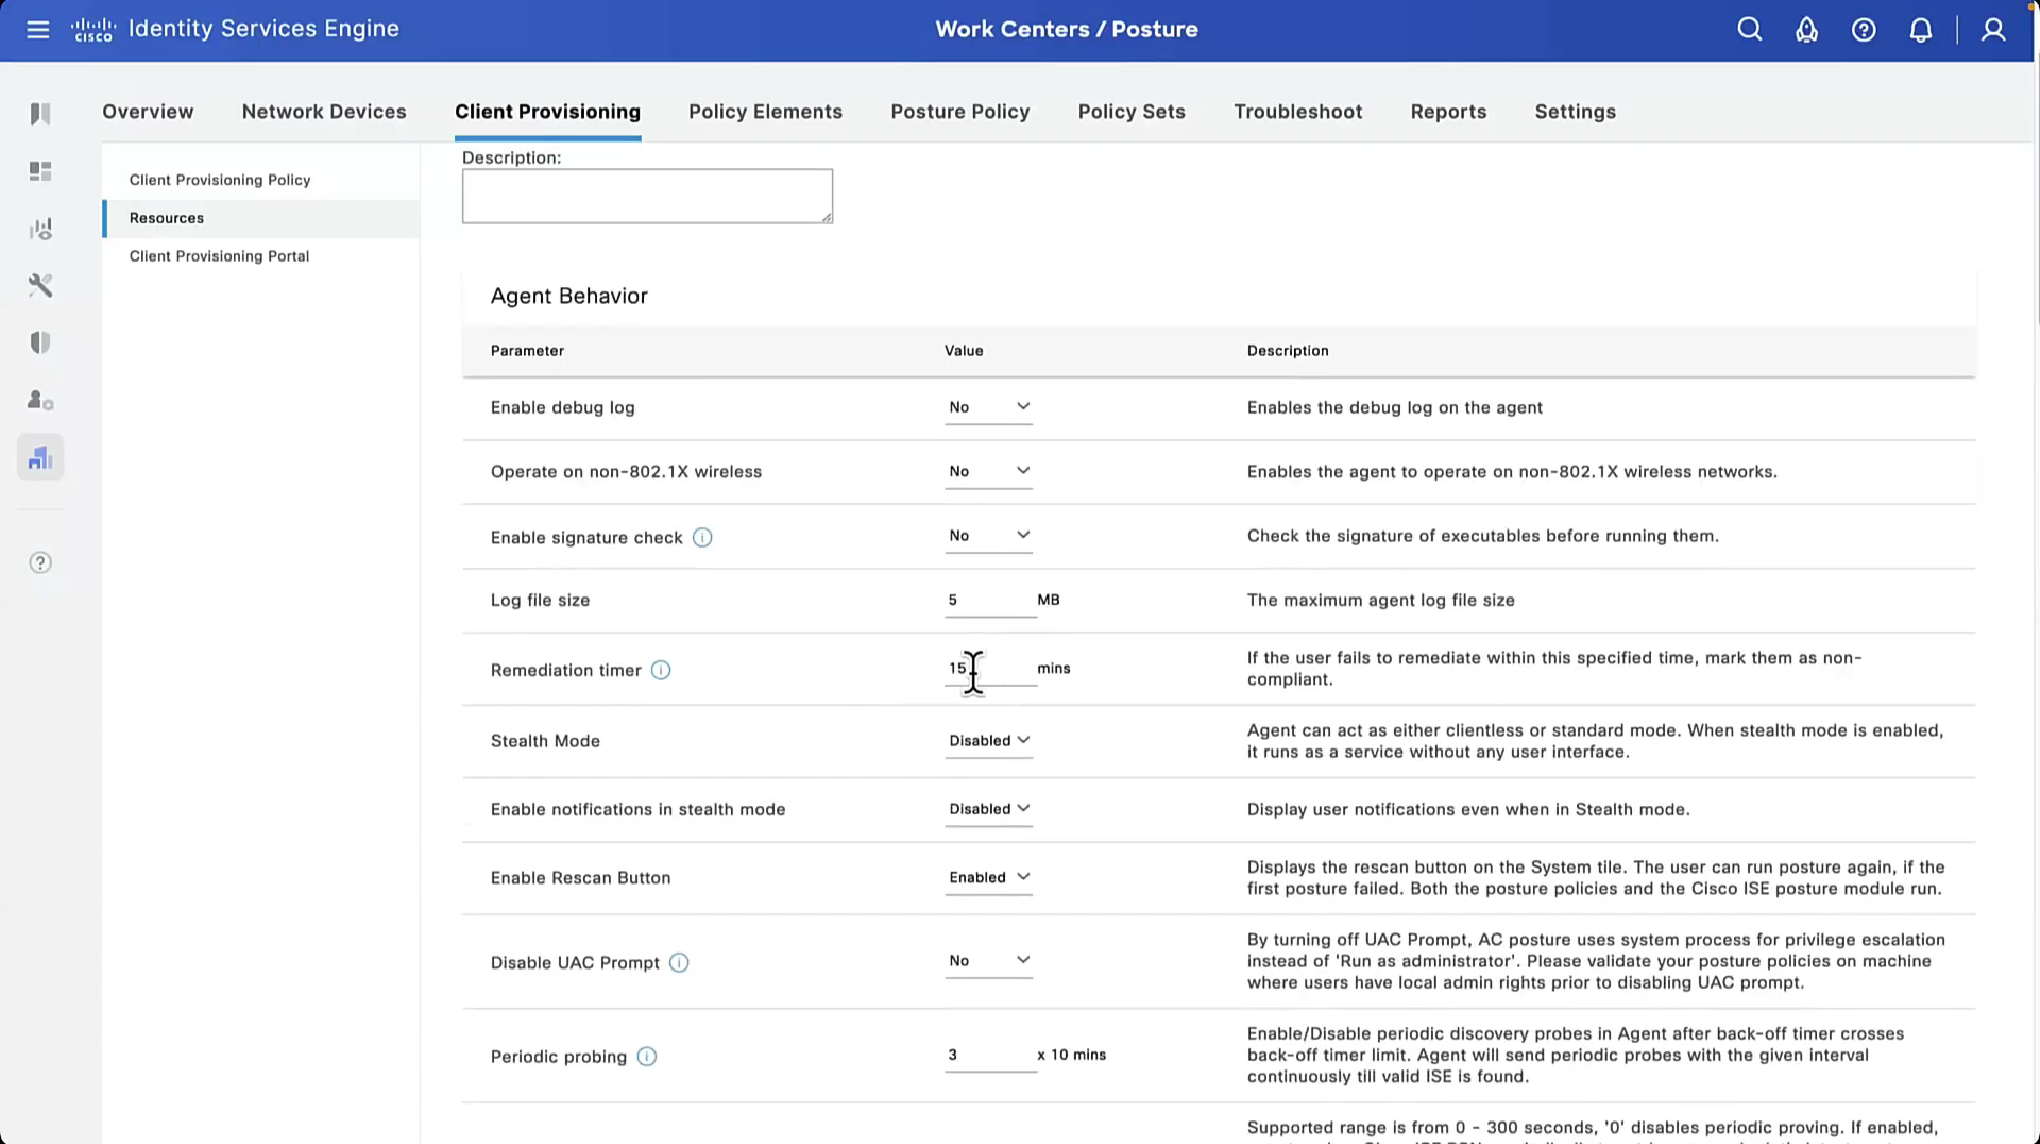


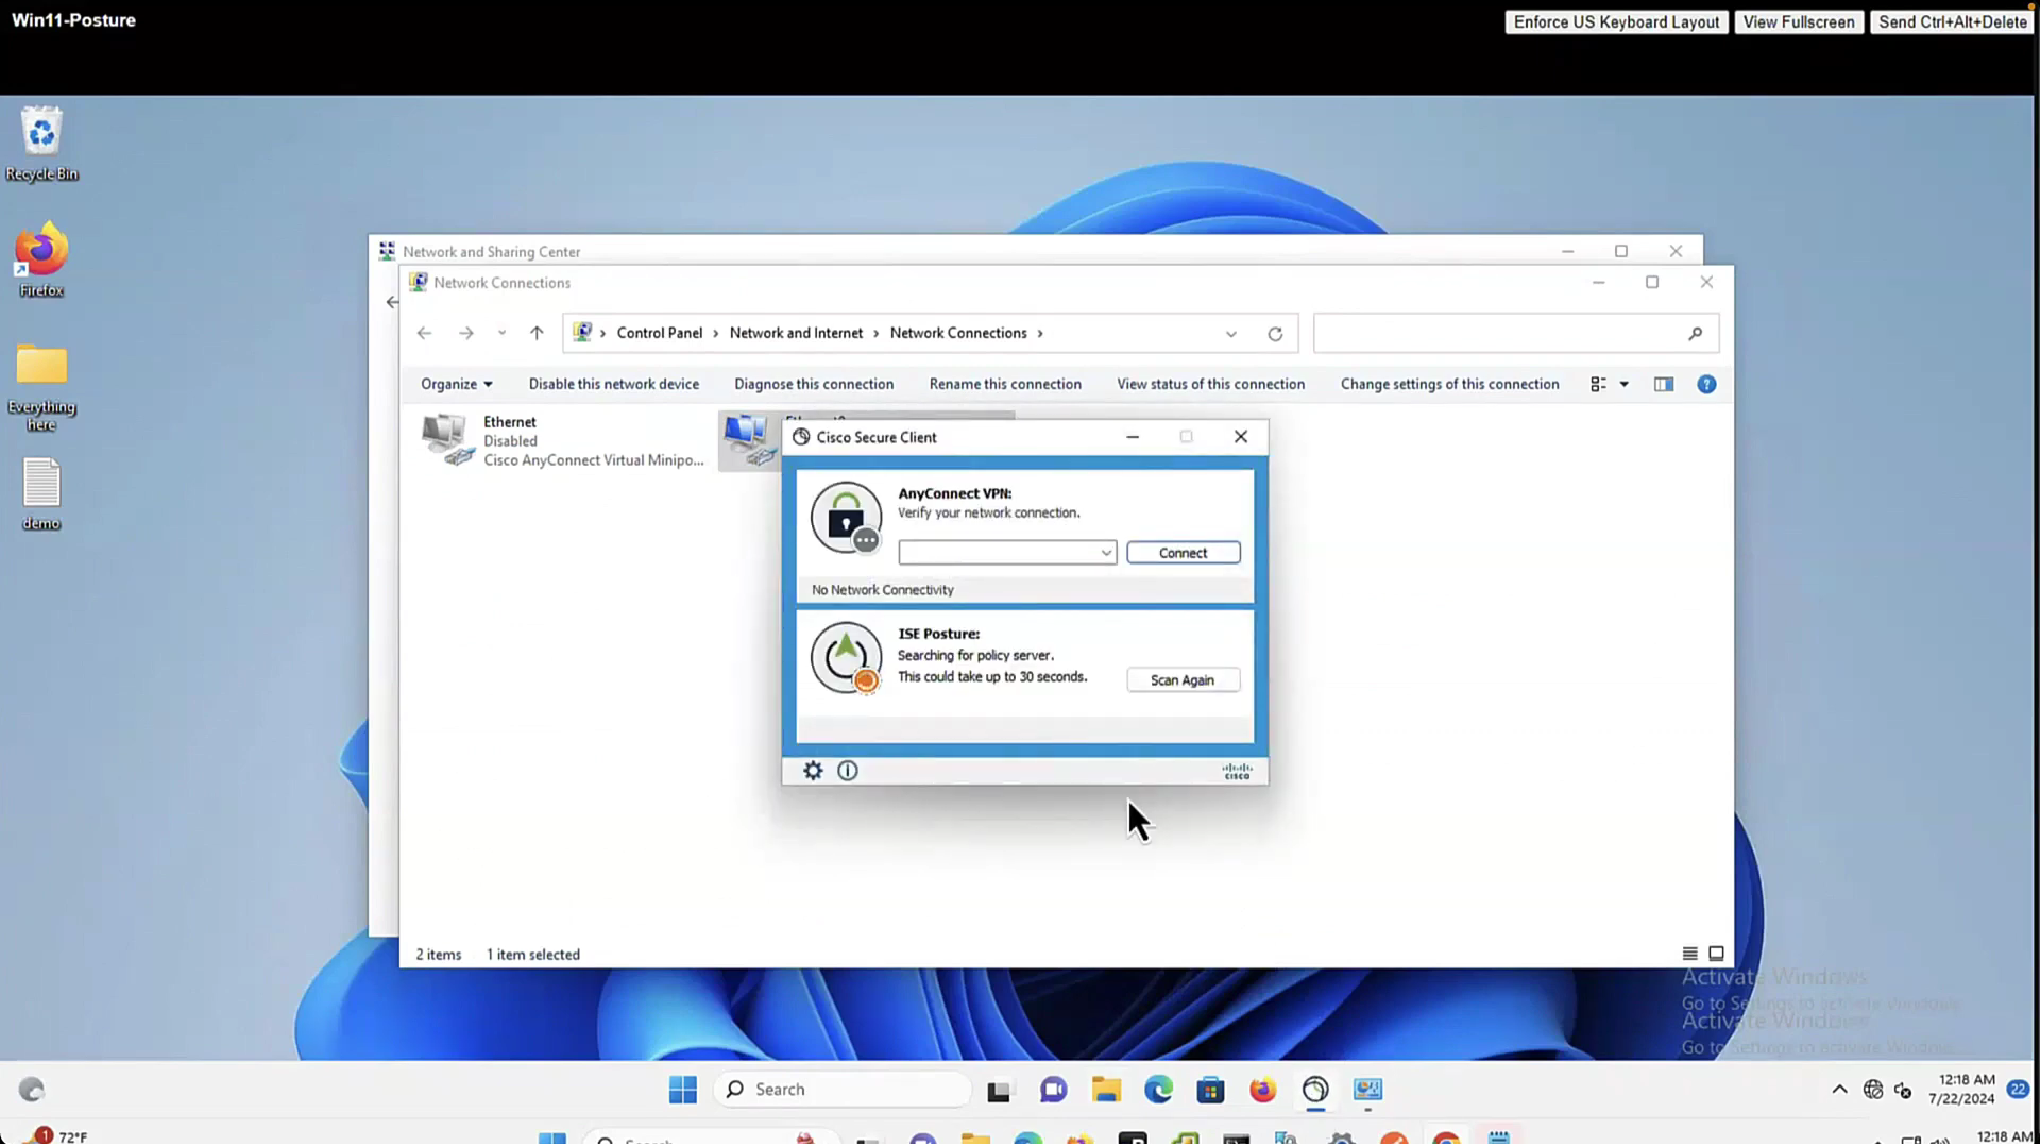
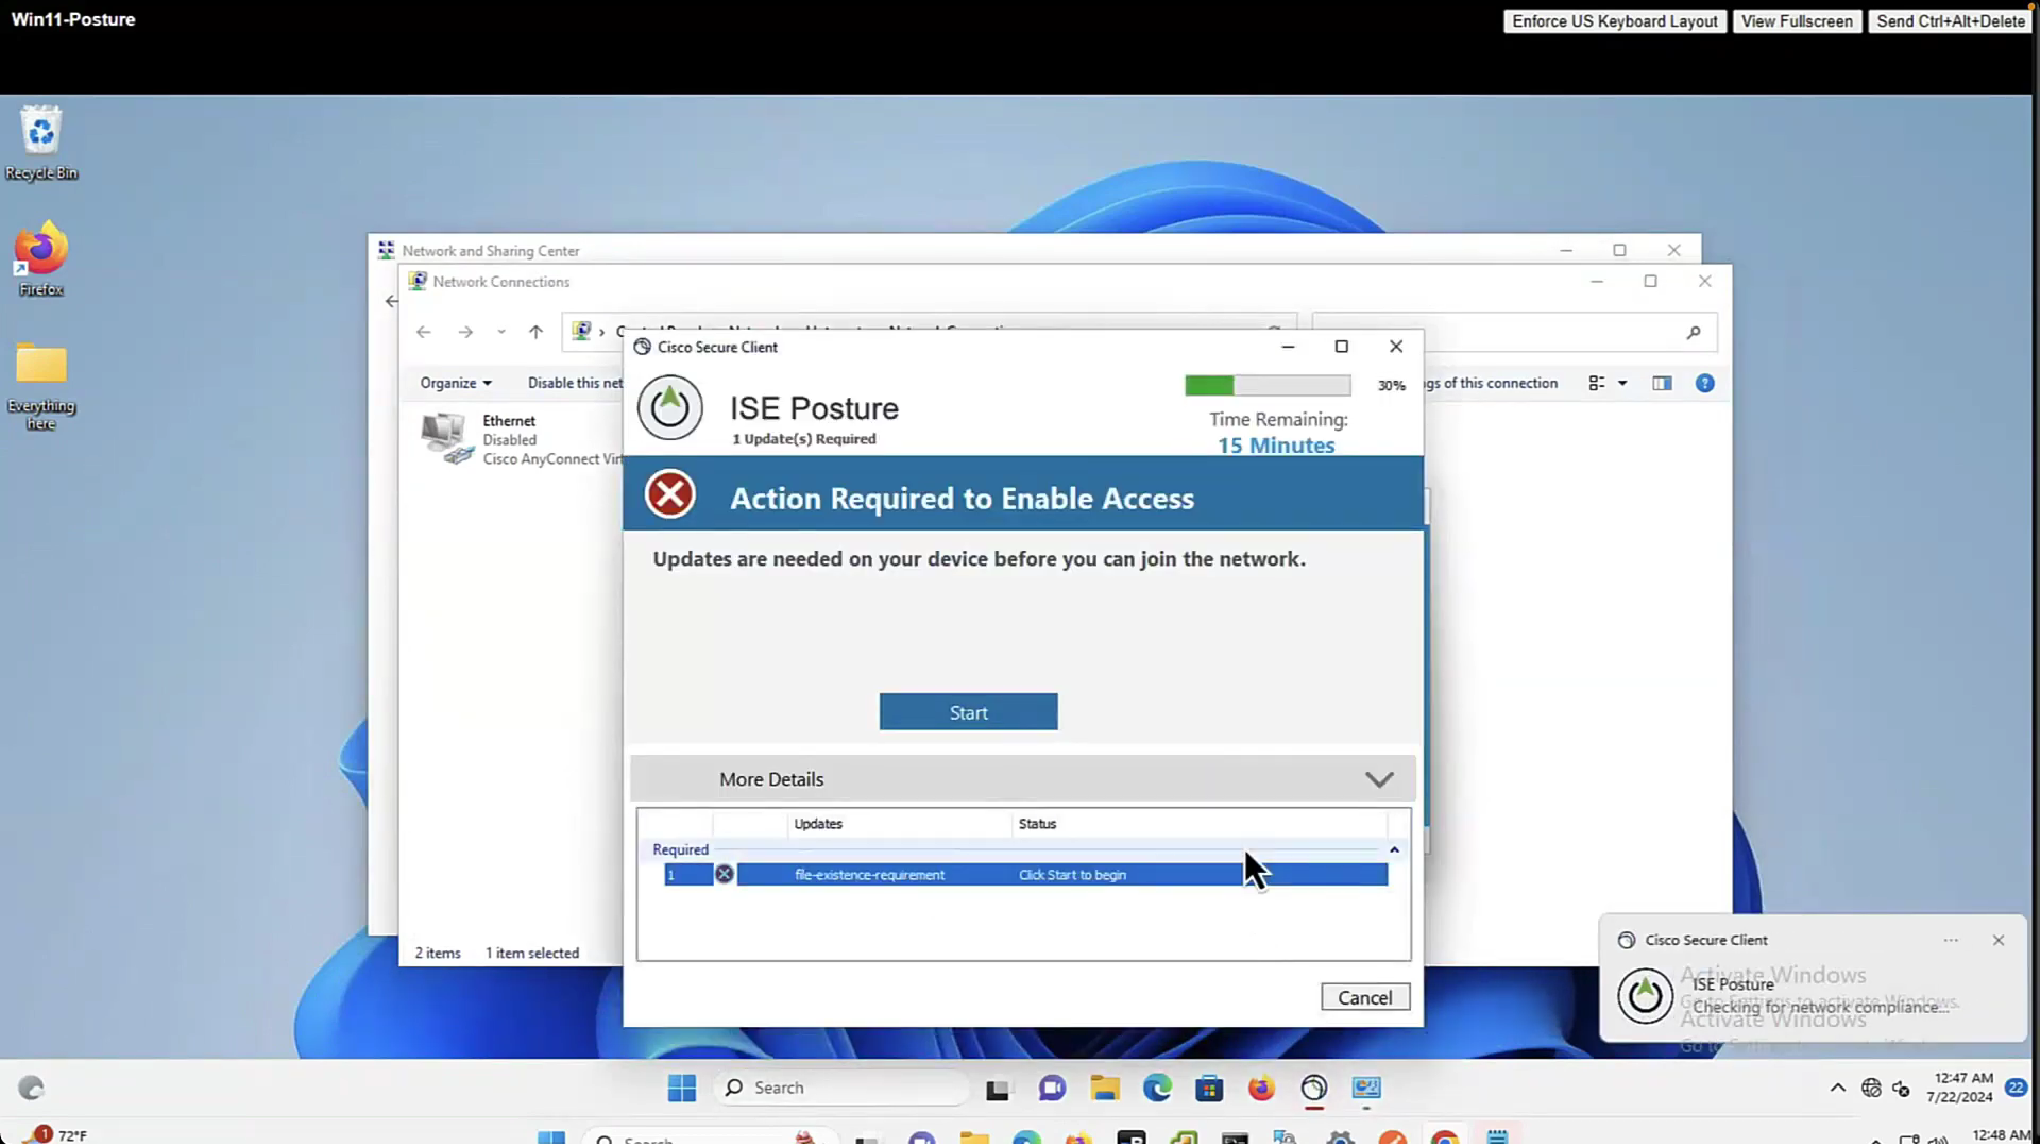
now it shows 15 minutes

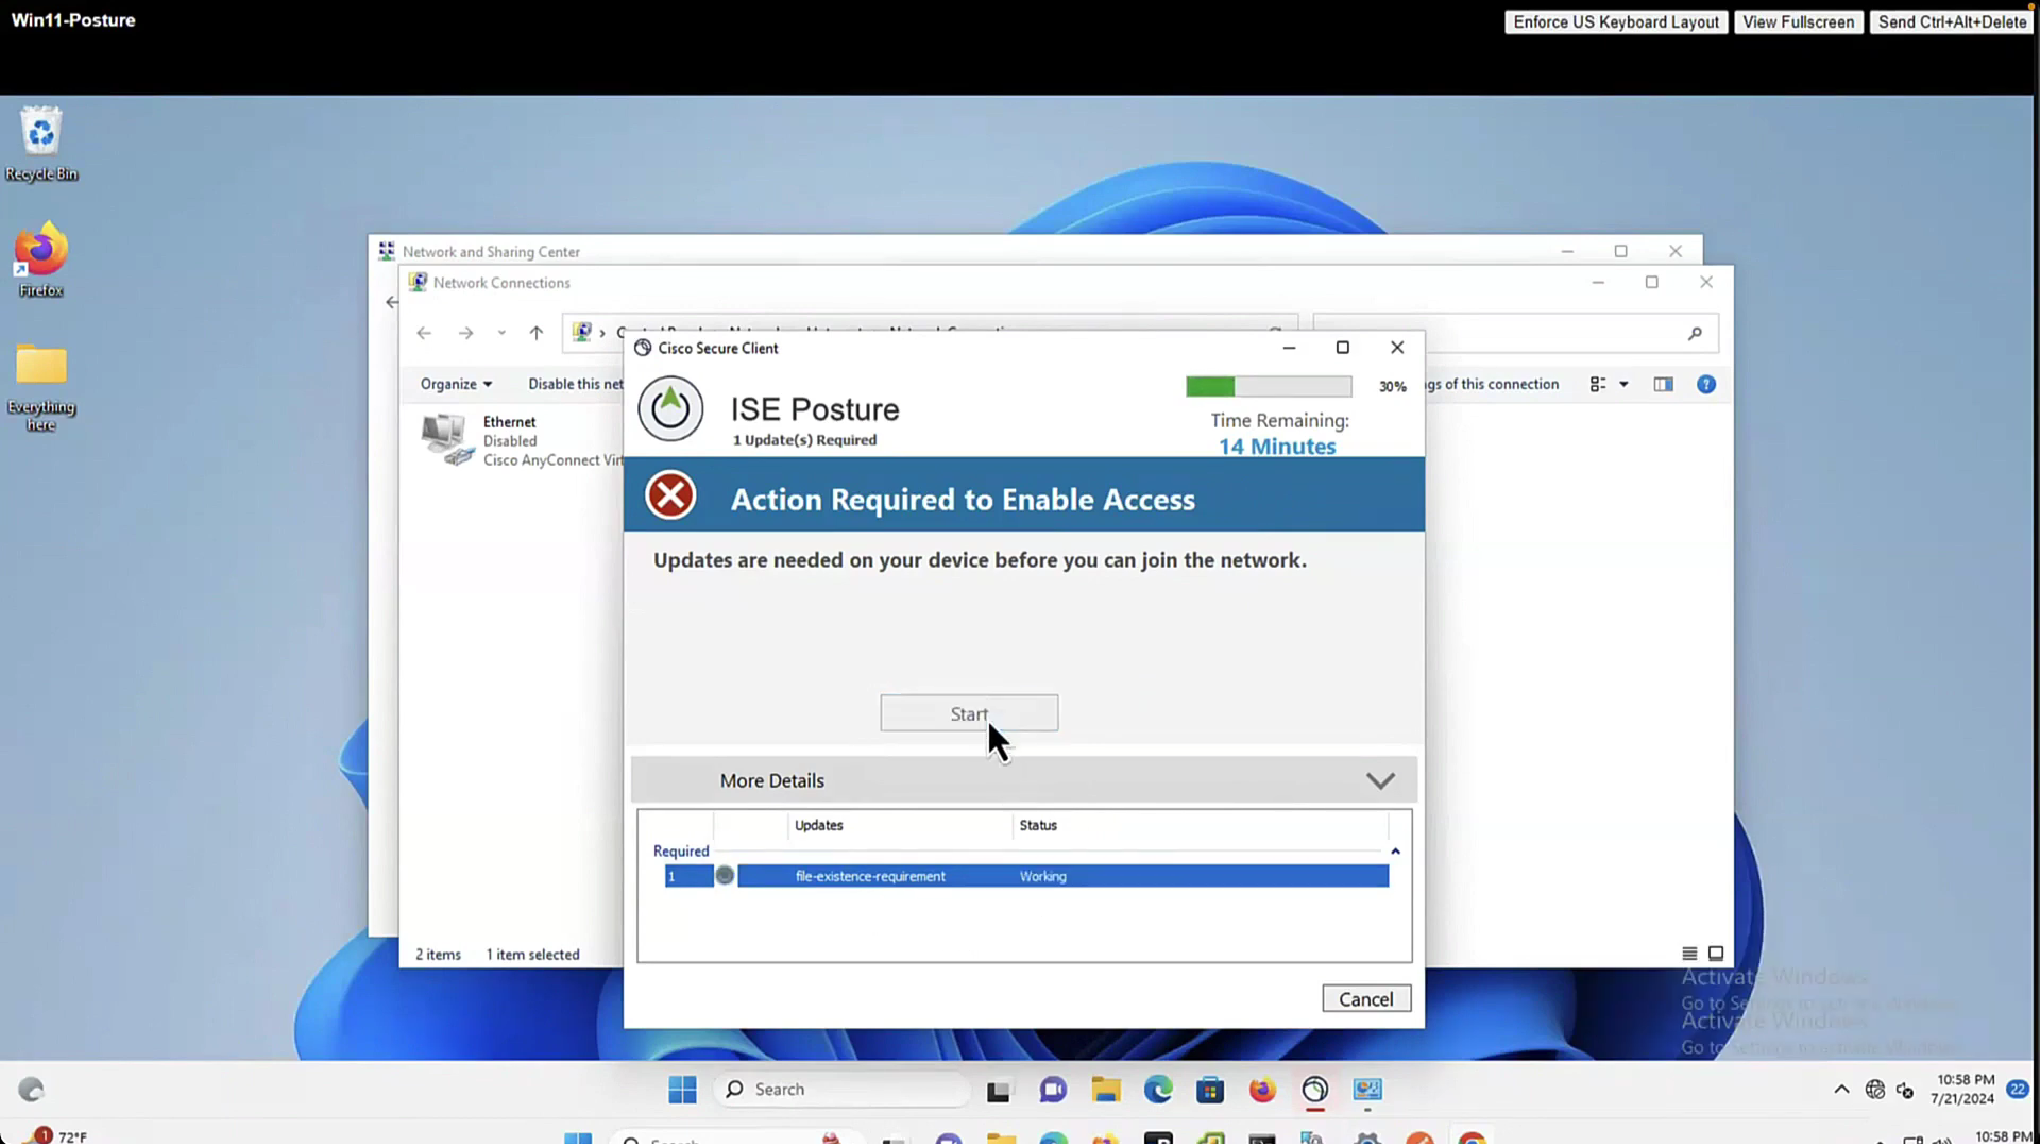
As part of the remediation, demo.txt file is allowed to download and as it downloads, posture becomes compliant


By default and as shown in Global Settings, client goes through posture assessment as soon as it connects to the network

However there is an option to give out lease in days to the client so it does not posture every time it connects to the network
Perform posture assessment every time a user connects to the network: Select this option to initiate posture assessment every time the user connects to network
Perform posture assessment every n days: Select this option to initiate posture assessment after the specified number of days even if the client is already postured Compliant.
Cache Last Known Posture Compliant Status: Check this check box for Cisco ISE to cache the result of posture assessment. By default, this field is disabled.
Last Known Posture Compliant Status: This setting only applies if you have checked Cache Last Known Posture Compliant Status. Cisco ISE caches the result of posture assessment for the amount of time specified in this field. Valid values are from 1 to 30 days, or from 1 to 720 hours, or from 1 to 43200 minutes – this acts as kind of a posture bypass for reconnecting client after number of days – idea is that once client is back on network (wired / wireless / vpn) it can posture again instead of facing remediation out of the gate


enable Session ID

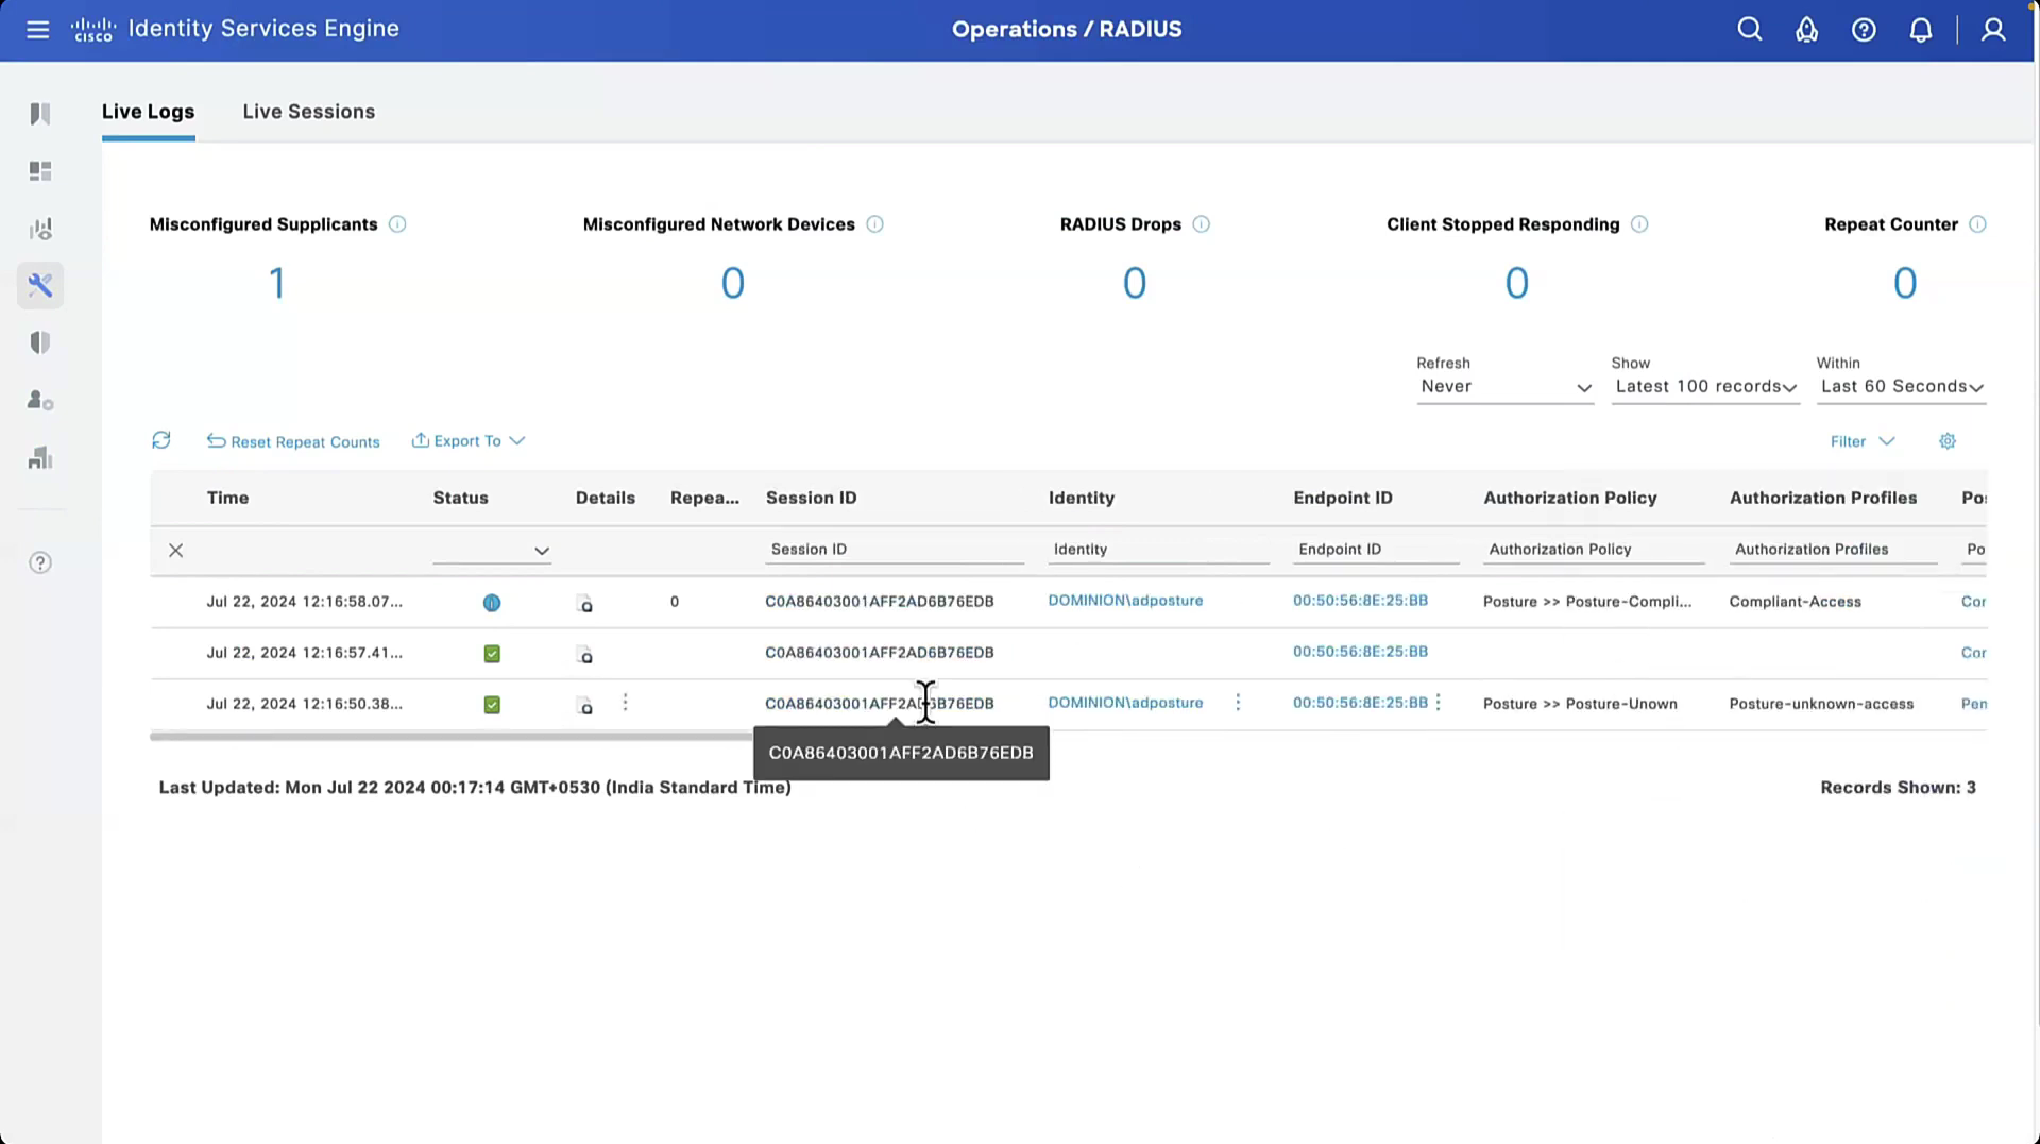
2 times compliant because once client becomes client on ISE it issues a log and once a COA is issued to NAD, final log is left when client is actually given access as a result of compliance from COA

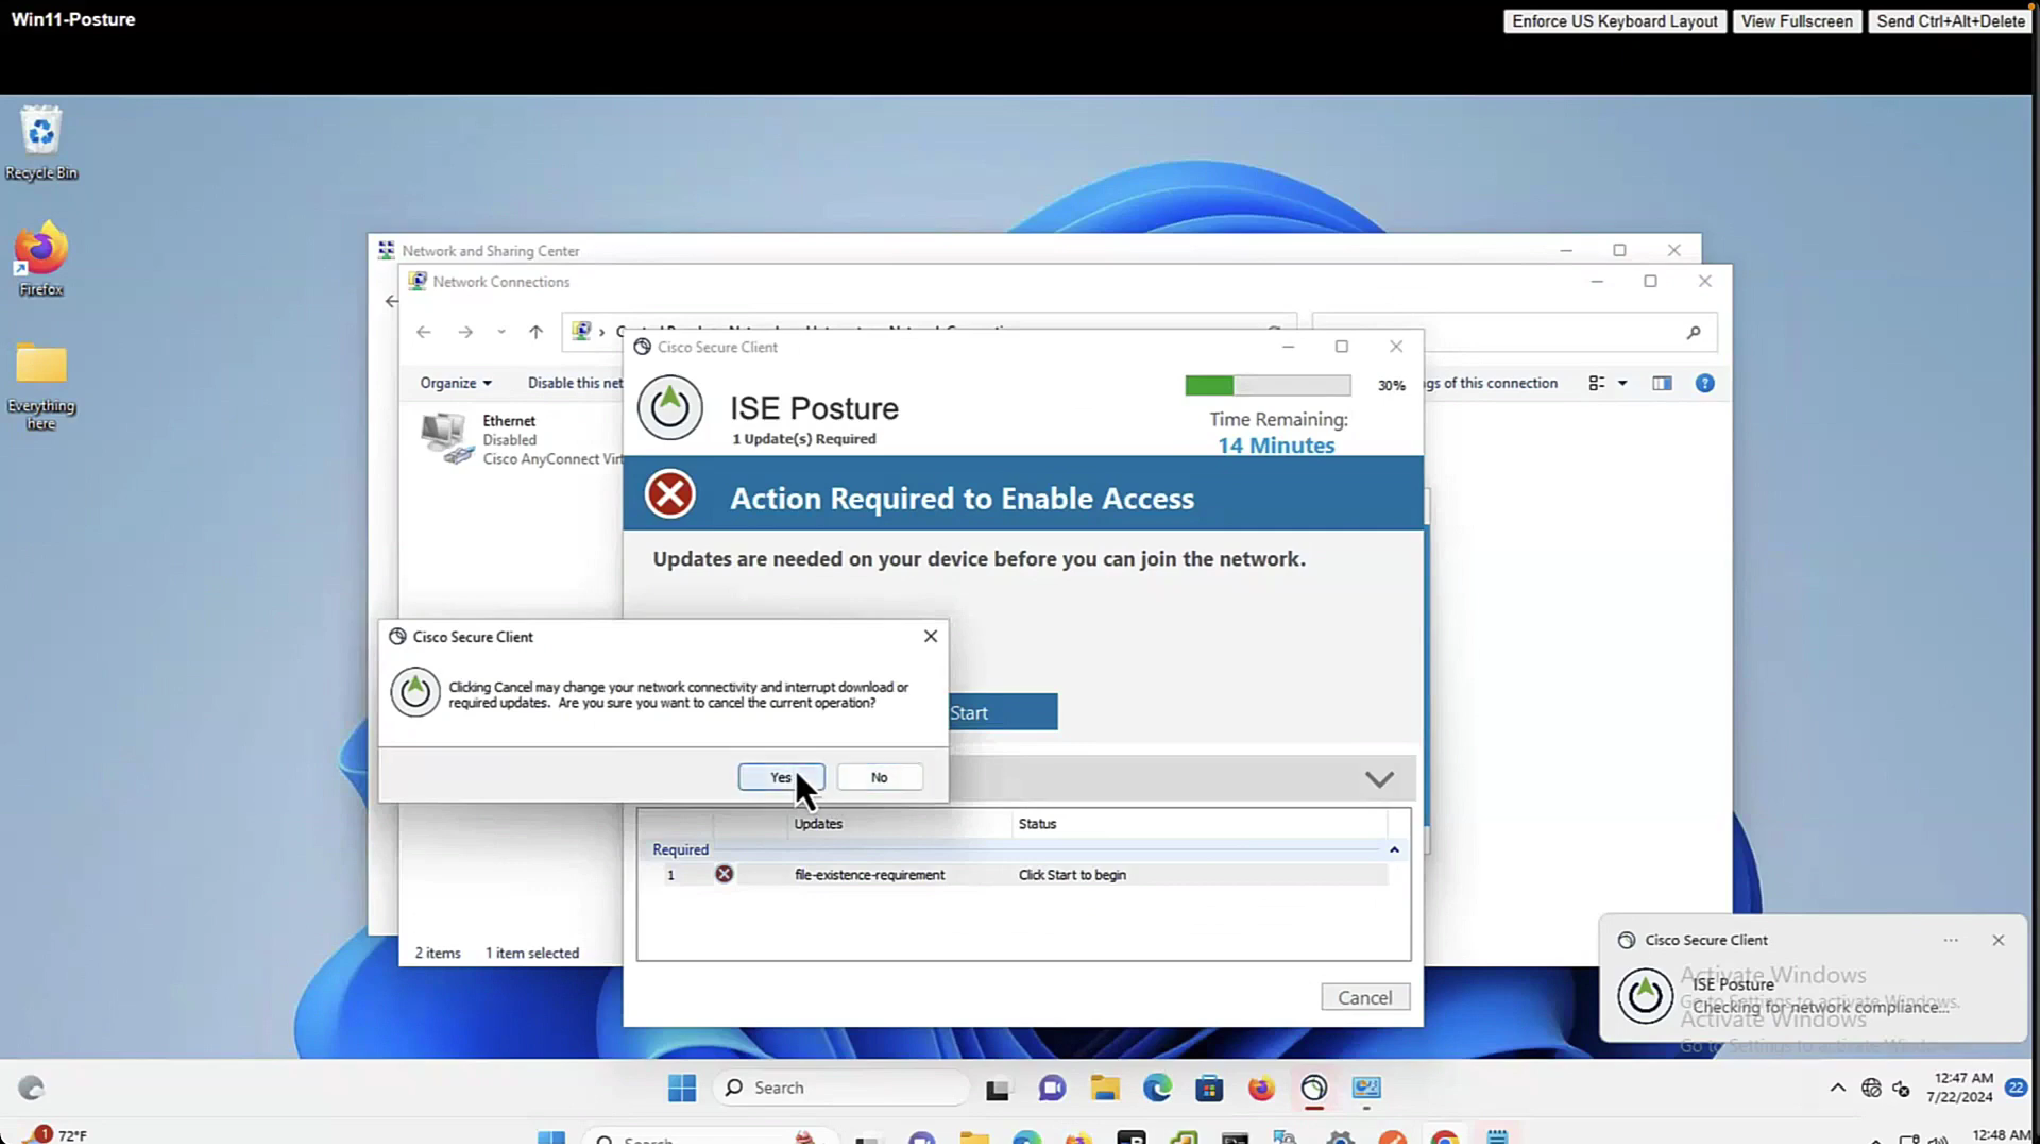
now configure posture lease


The thing about lease is that ISE and agent will completely skip the posture evaluation when lease is configured if client has postured once on the network
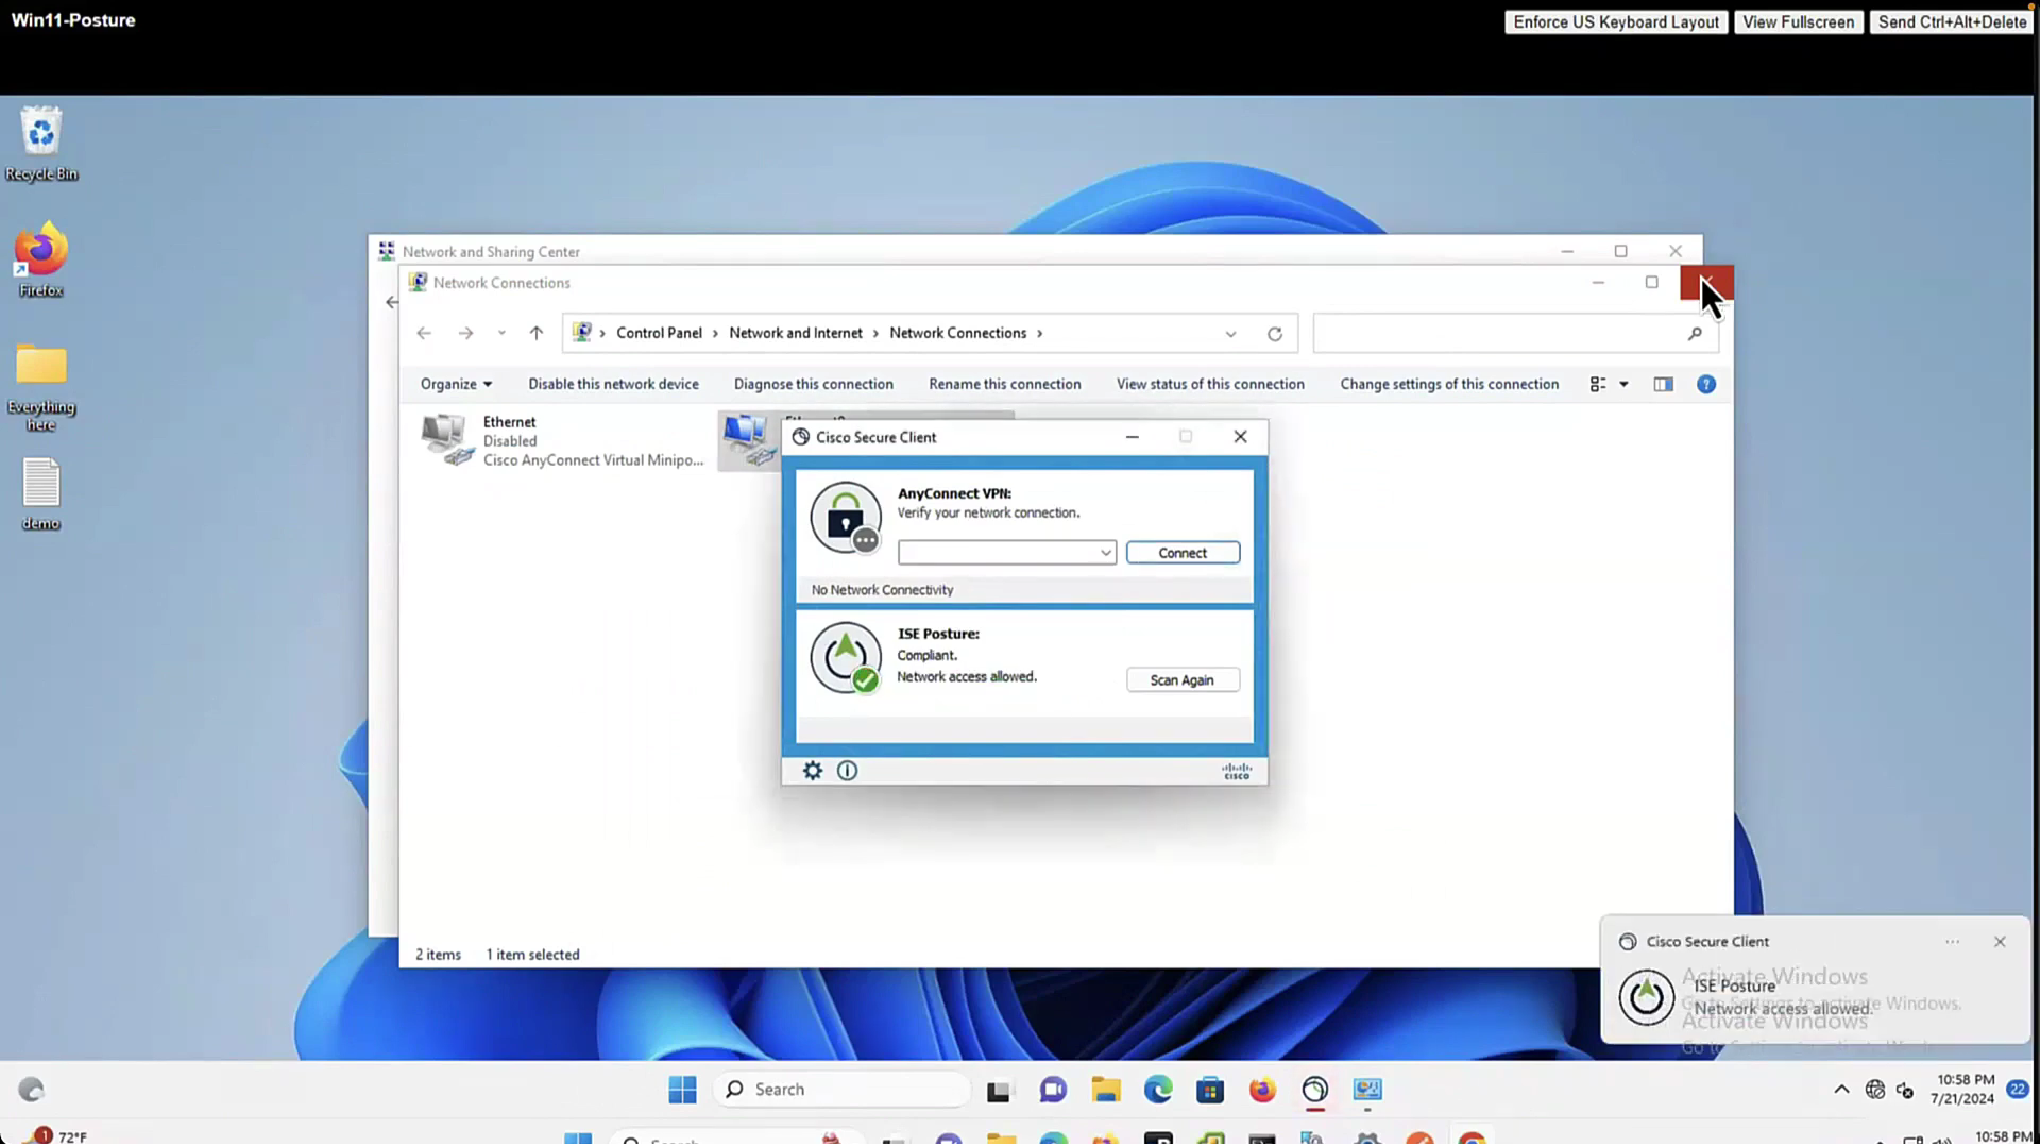
You can scan again and again and it will just connect


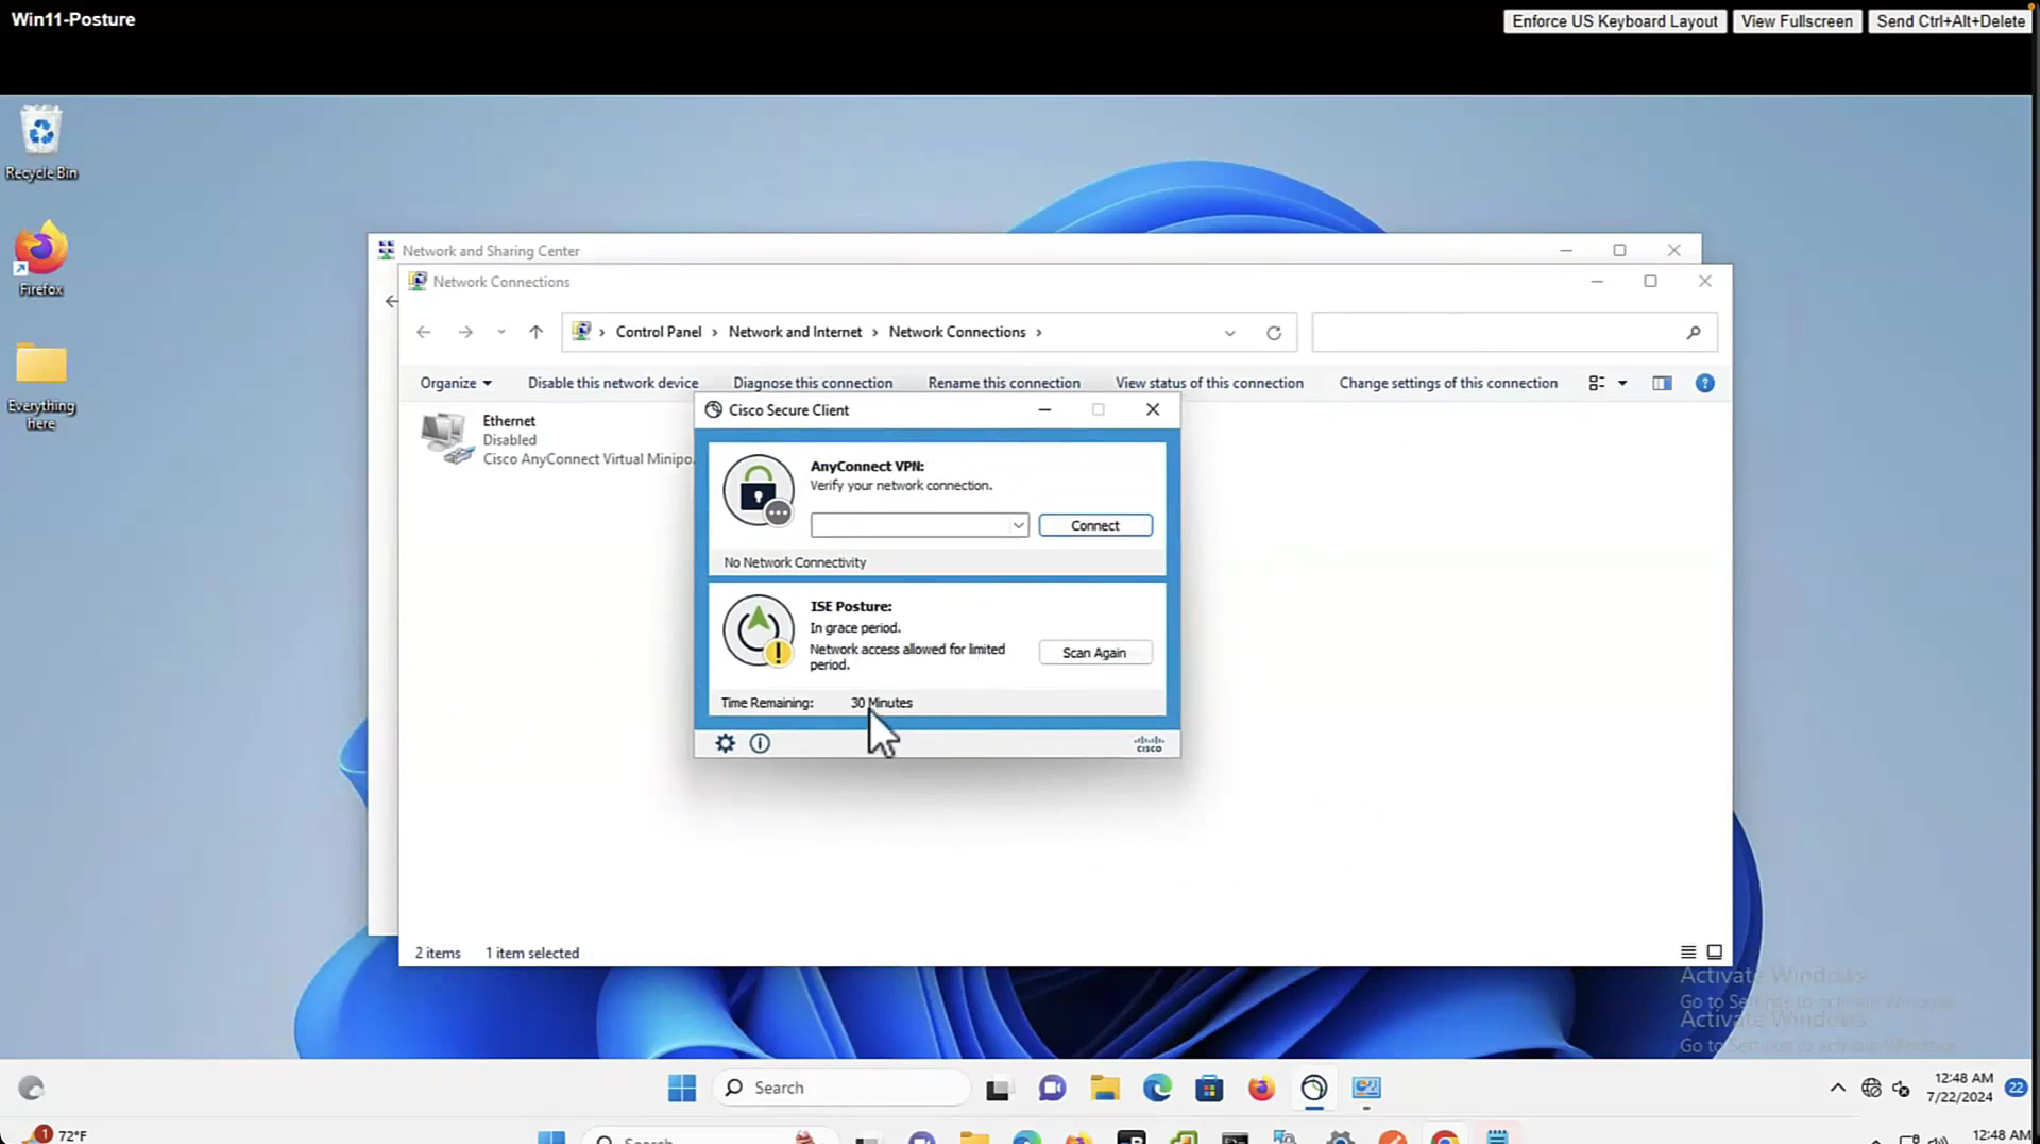
With Flexible grace period, user is not locked or stuck in posture non-compliant access, instead from end user experience perspective they still get some chance
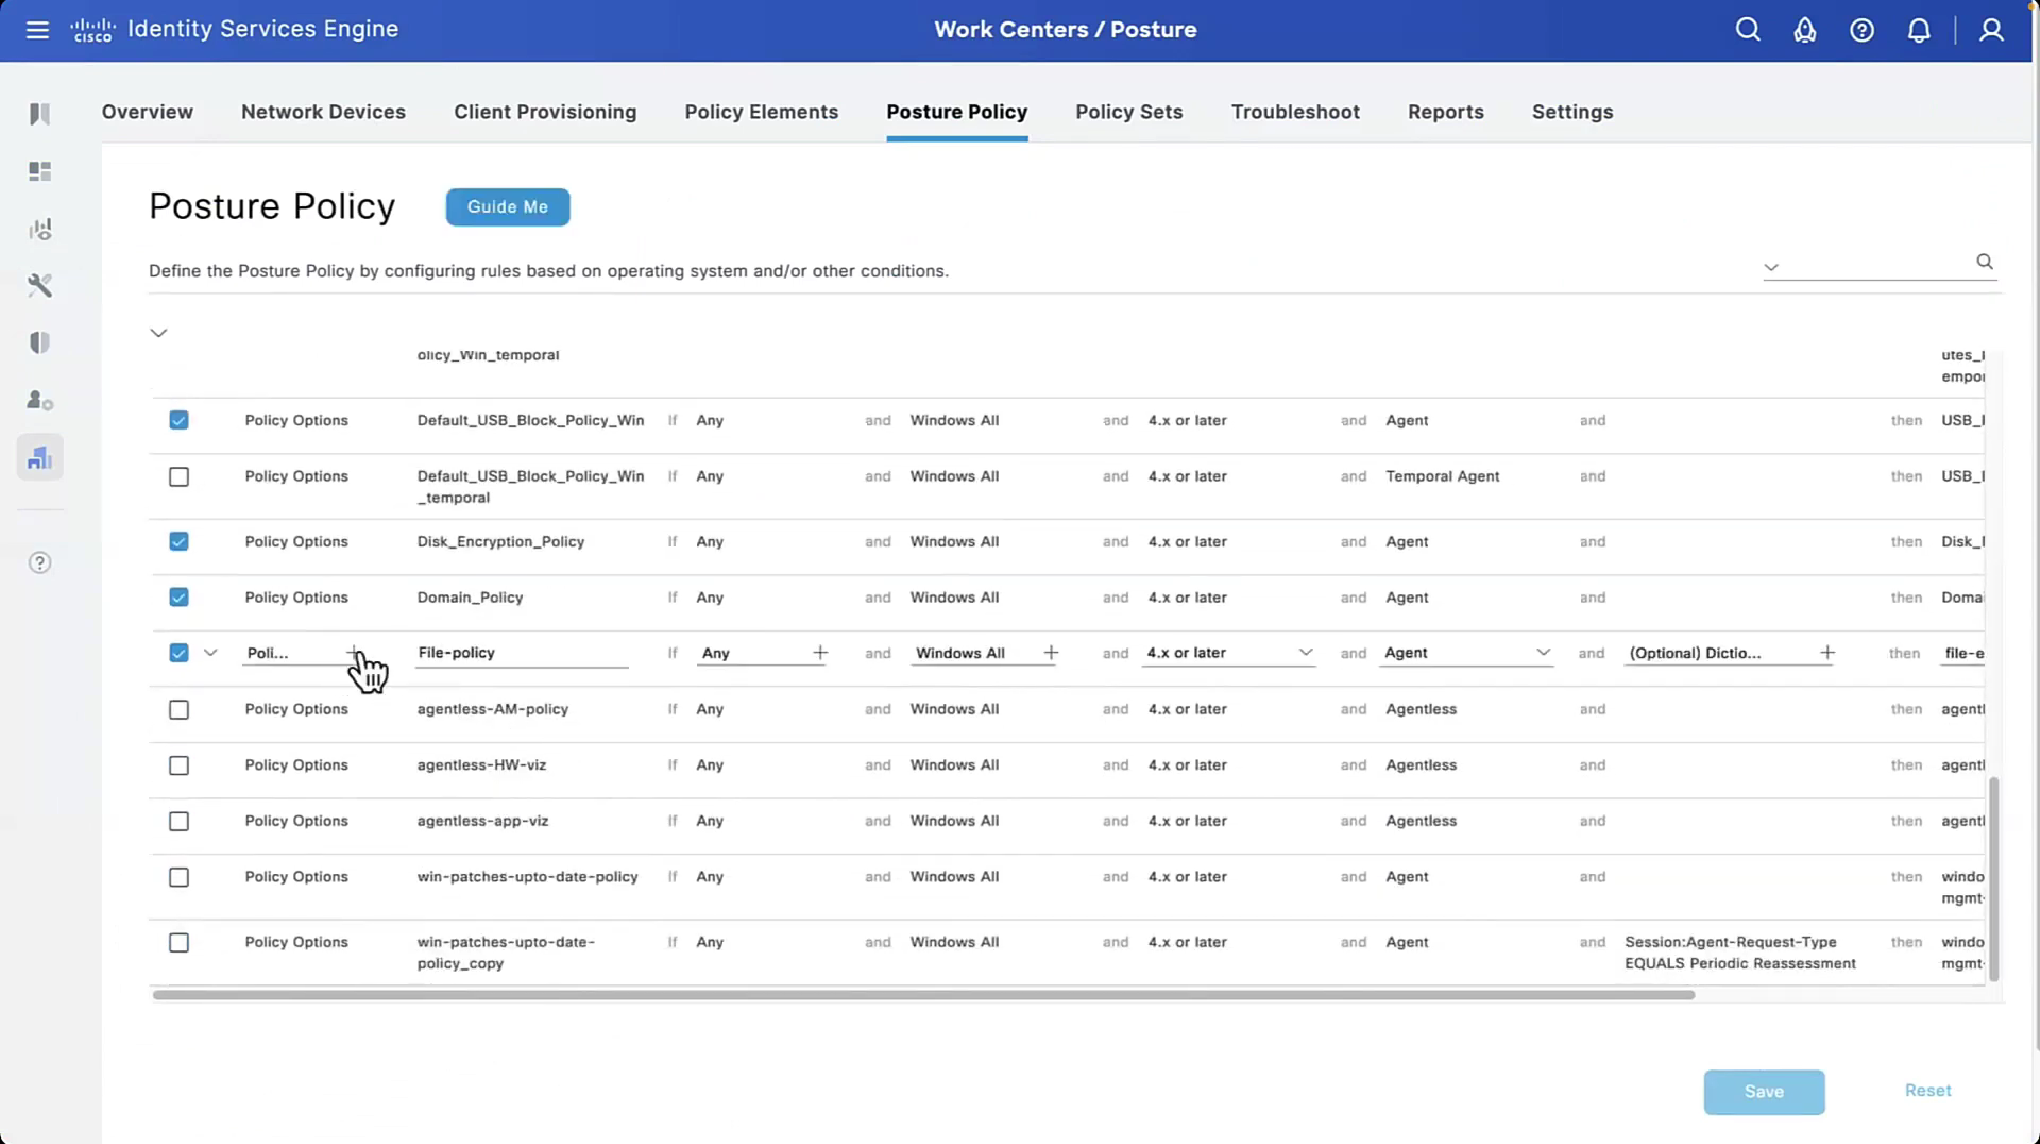
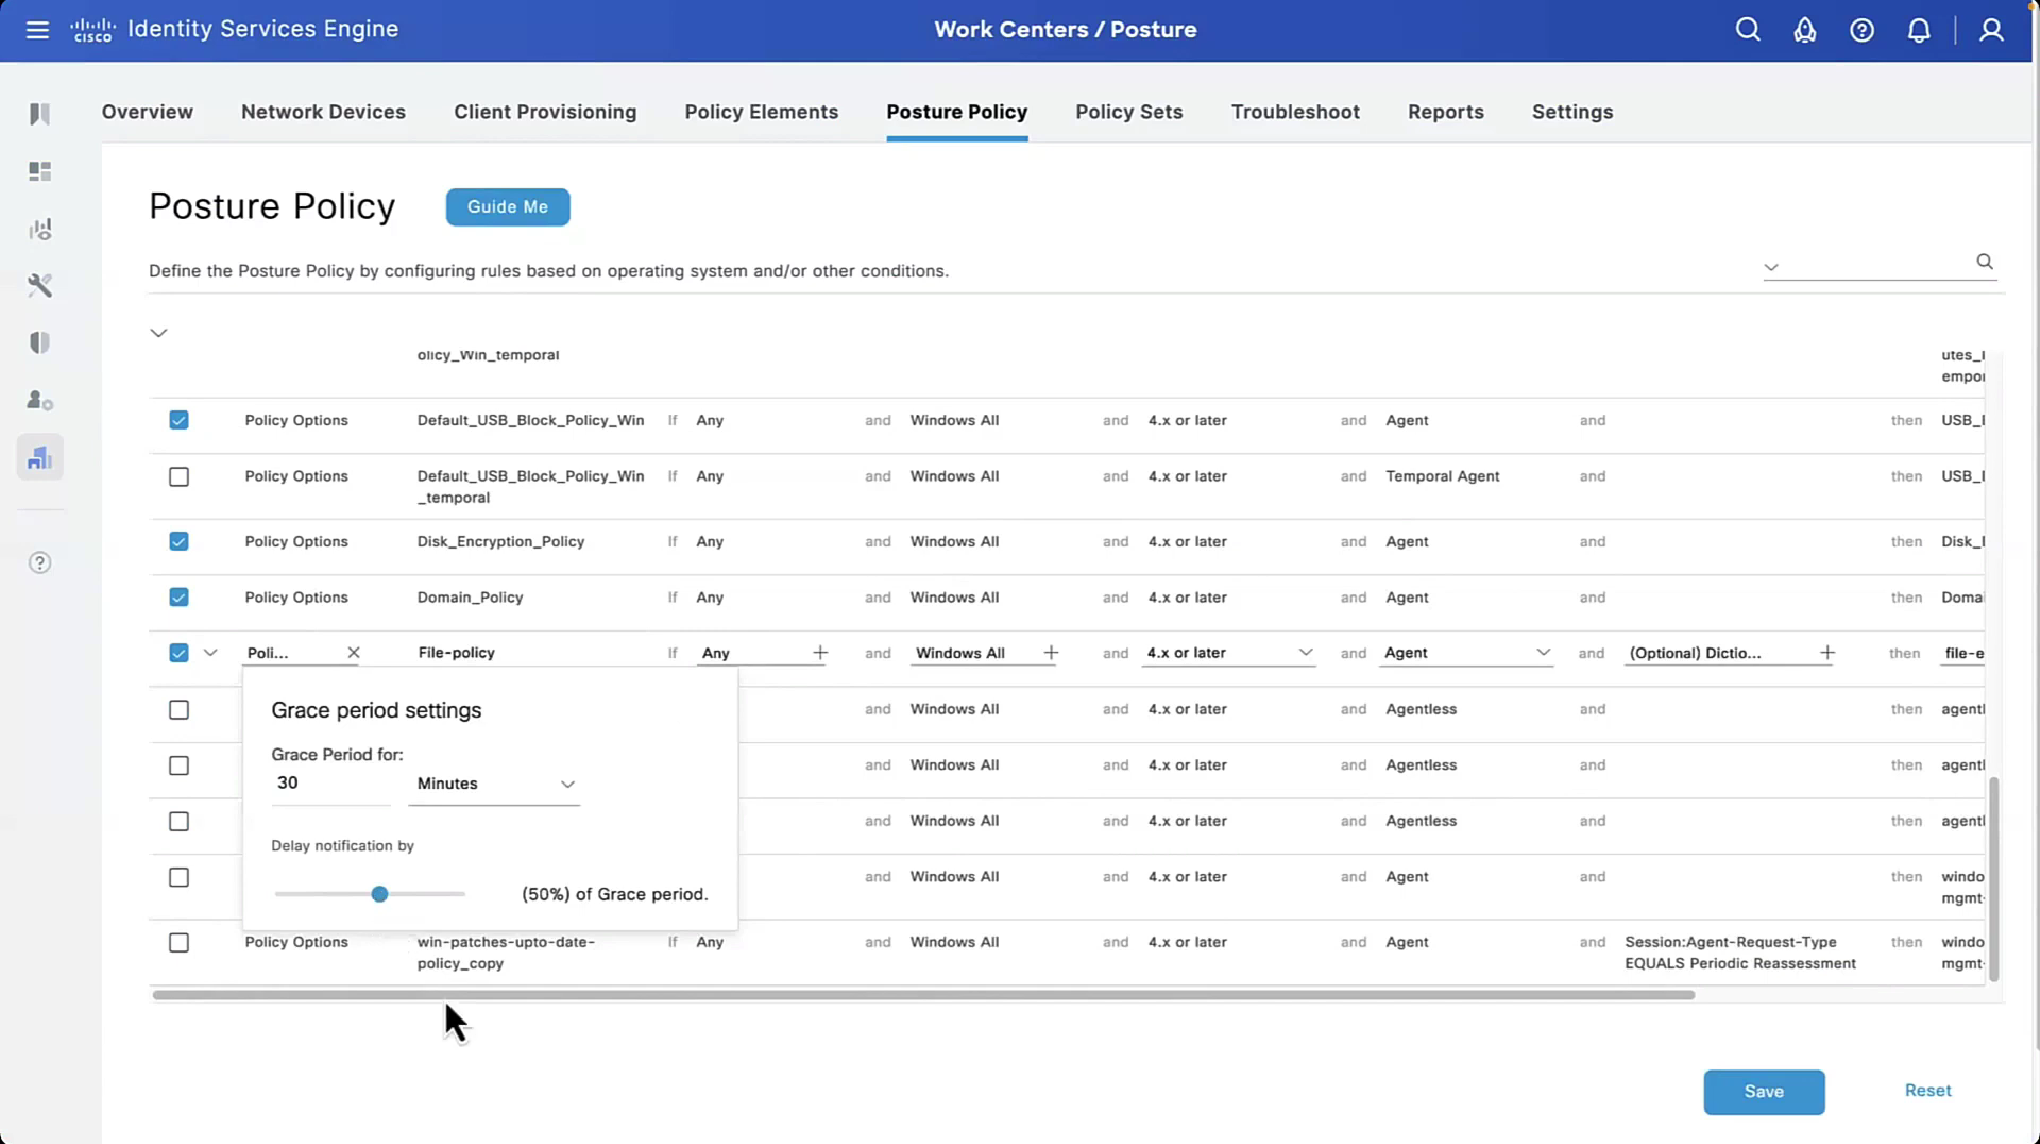
on each posture policy level we can define grace period for each policy
among those X , Y and Z, the one that is longest will get applied

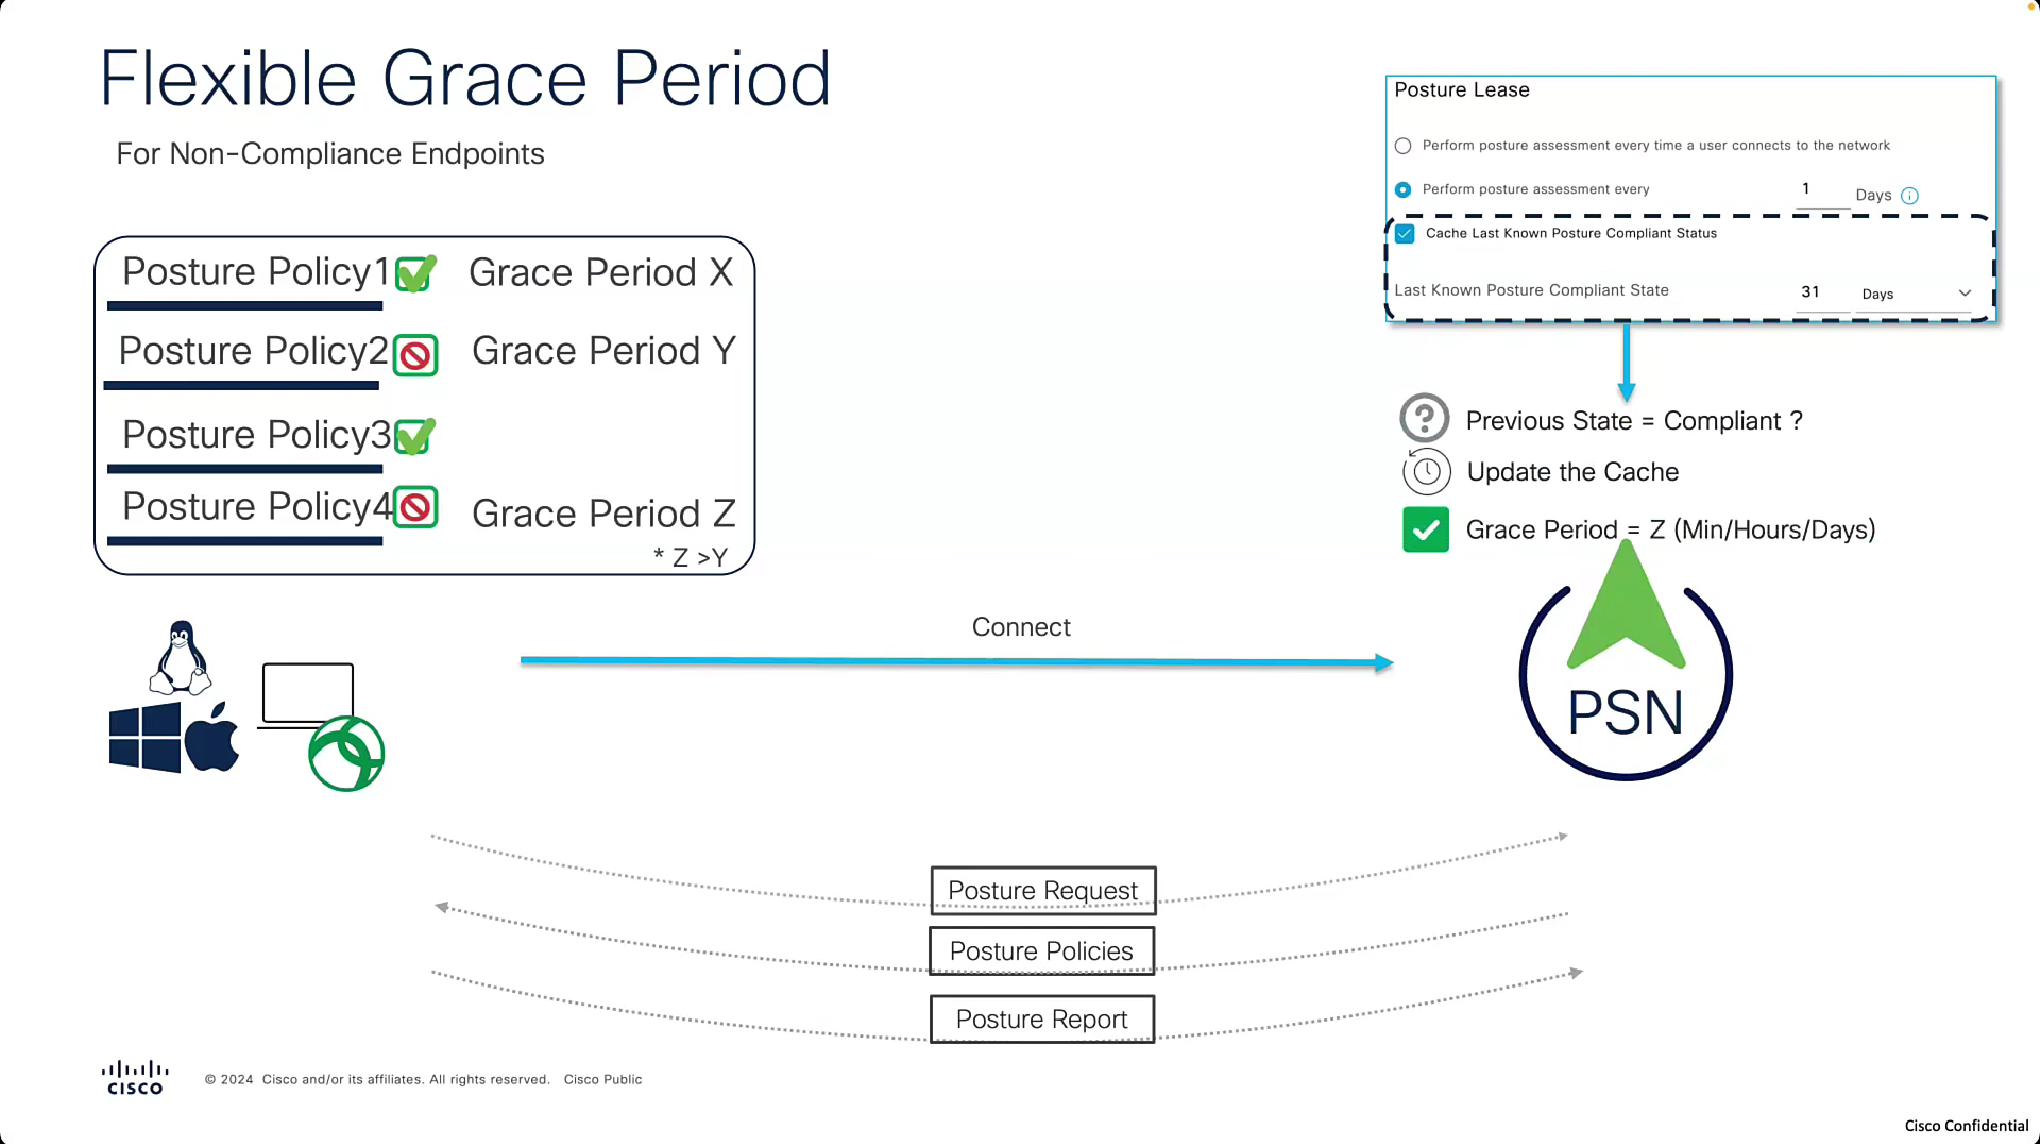
and here is the catch, grace period will only apply if the previous state option “Cache Last Known Posture Compliant Status” and “Last Known Posture Compliant State” are enabled and client’s last posture state is remembered and within the defined days


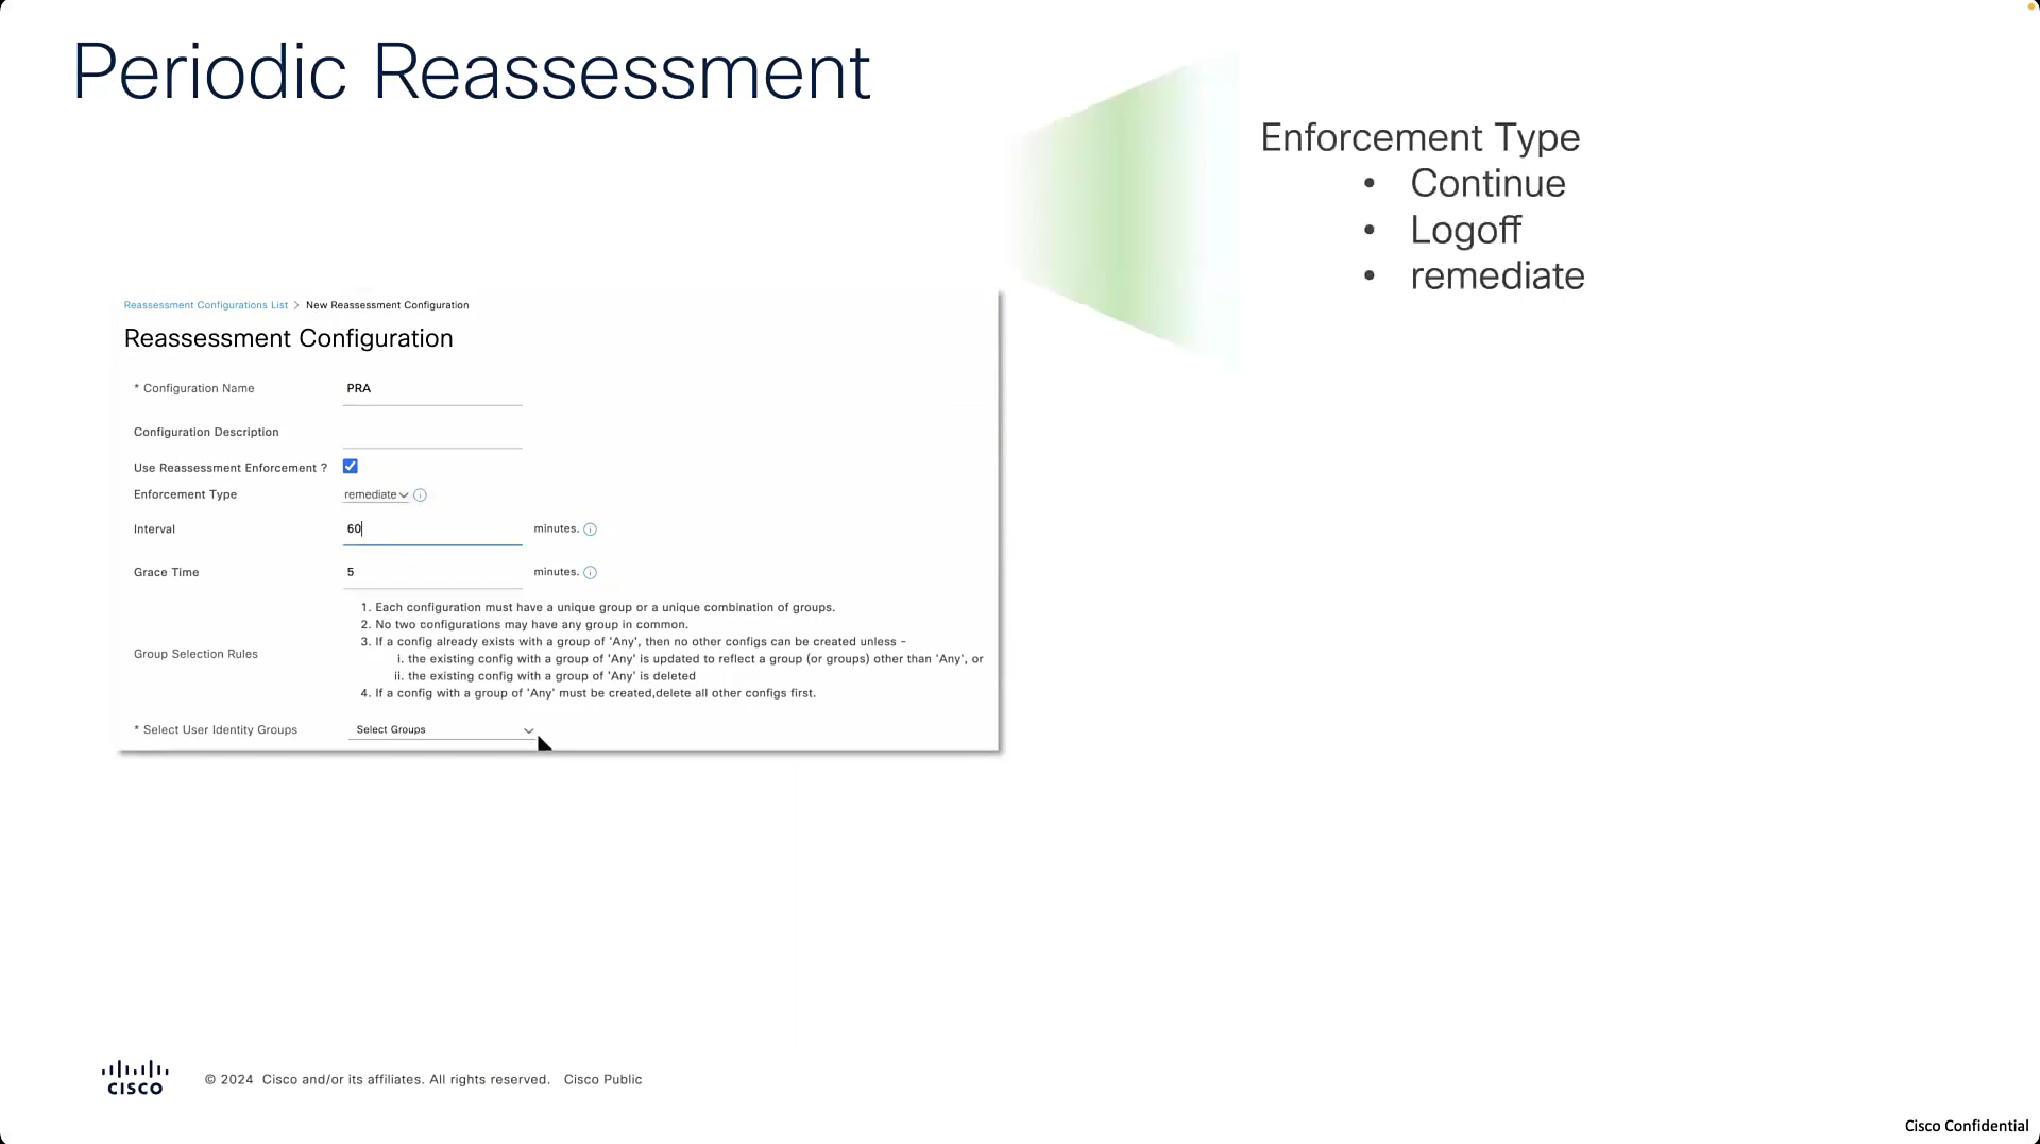


Periodic Reassessment
For Periodic Reassessment we will disable the posture lease as posture lease stops posture reassessment

Reassessment enforcement type action is action to take if non-compliance is detected upon reassessment
if set to continue then user will continue with access to network


in the logs we can see the PRA action as a column
Check message column to see if it says Received reassessment report or posture report, if reassessment report is shown then it means that client got reassessed by PRA interval

next post
Cisco | ISE Posture 1
ISE Posture Concepts & Configuration
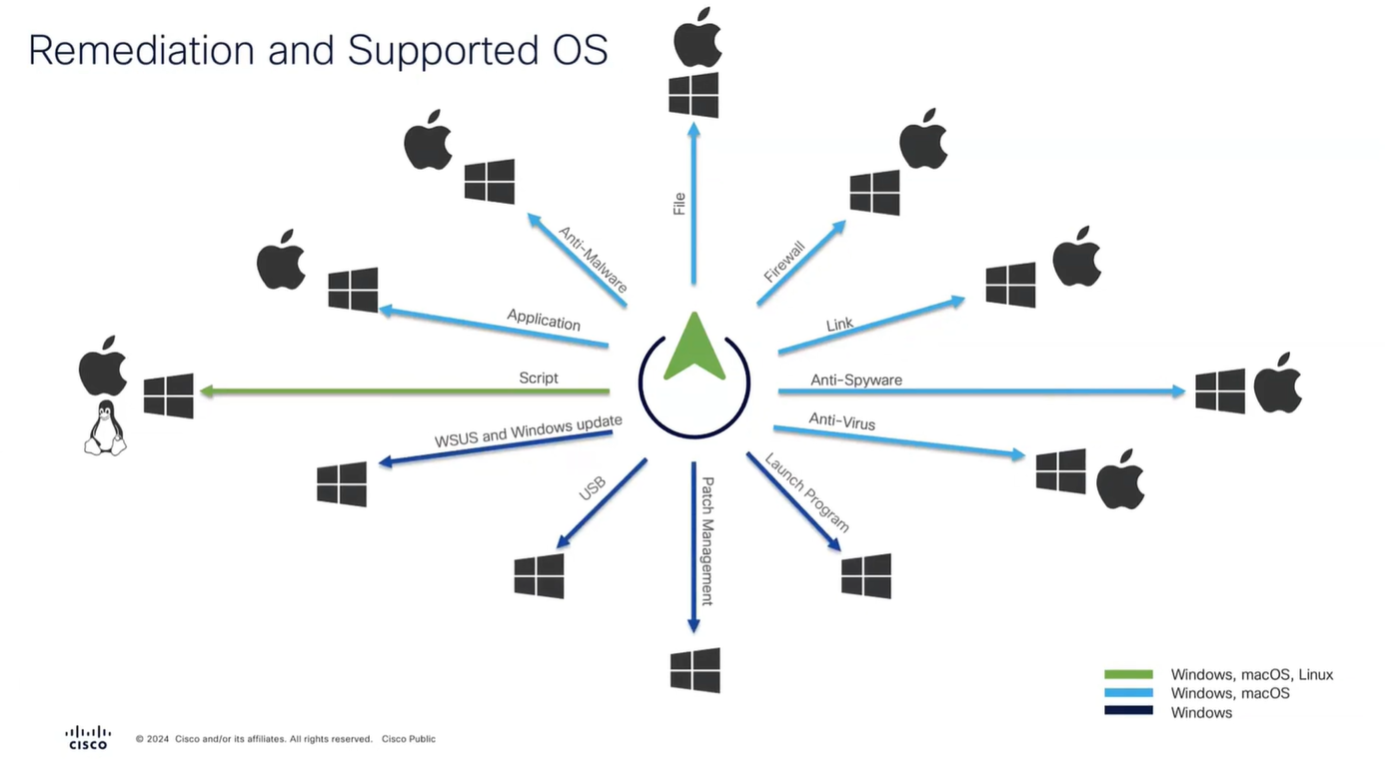
These are all the checks for posture

Checks
but not all checks are supported in all operating systems
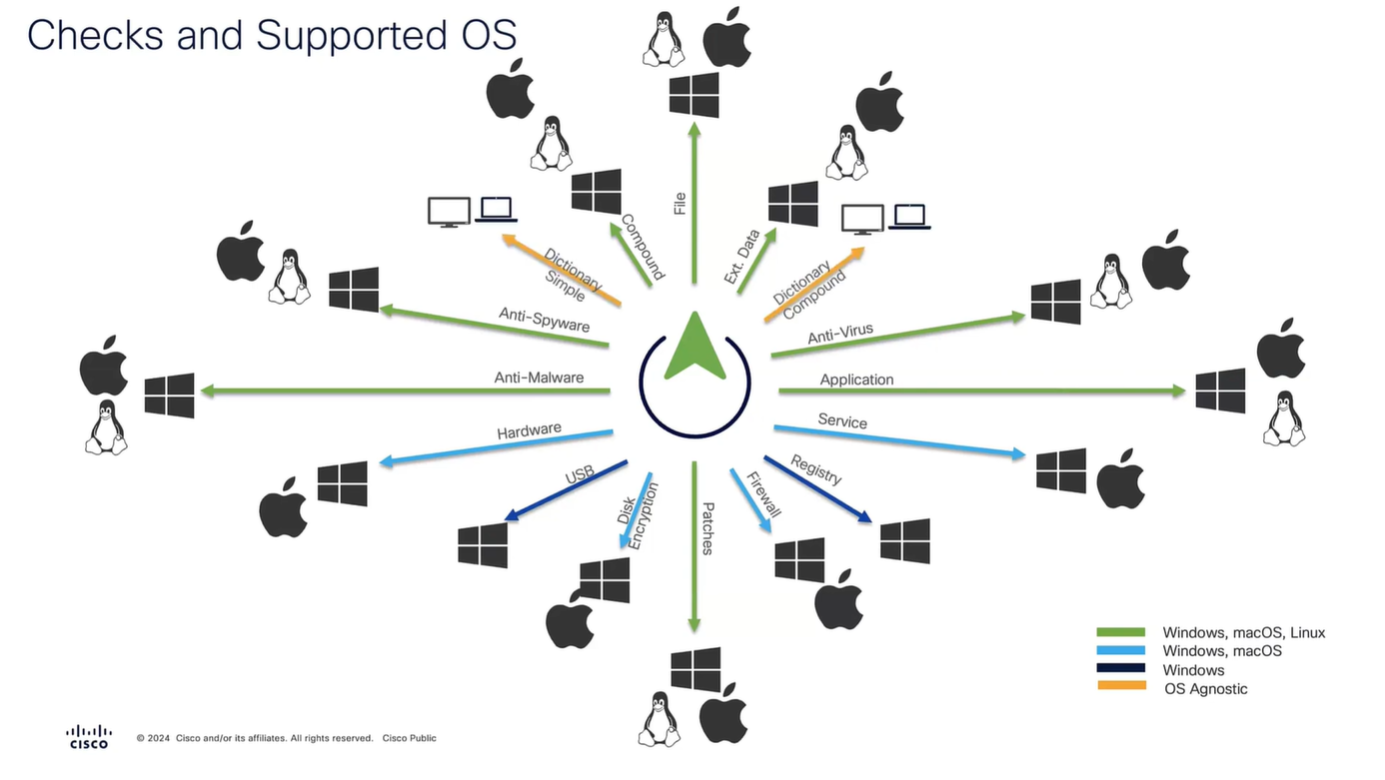
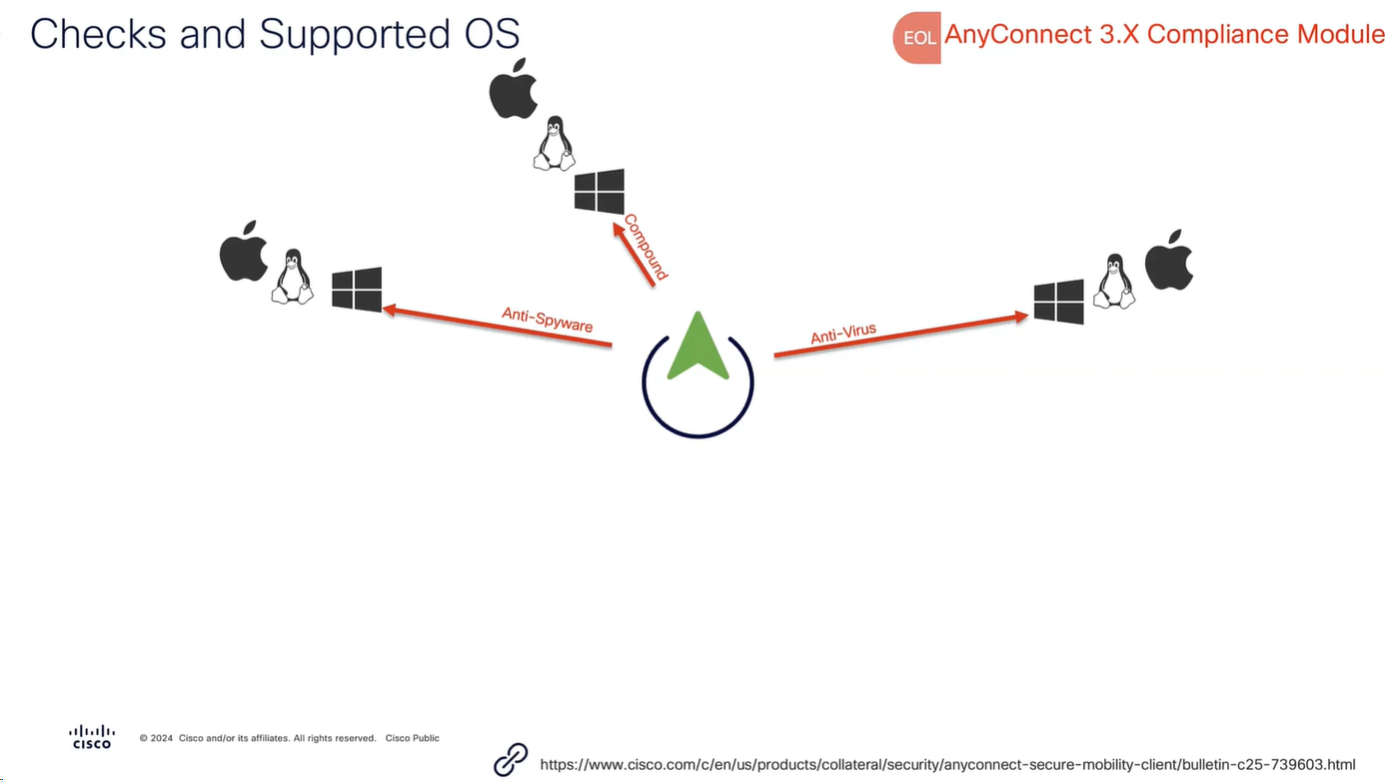
Anti-Spyware, and Anti-Virus have been replaced with Anti-Malware
and use of compound has been replaced with Patch Management
Remediation
Checks are different from Remediation
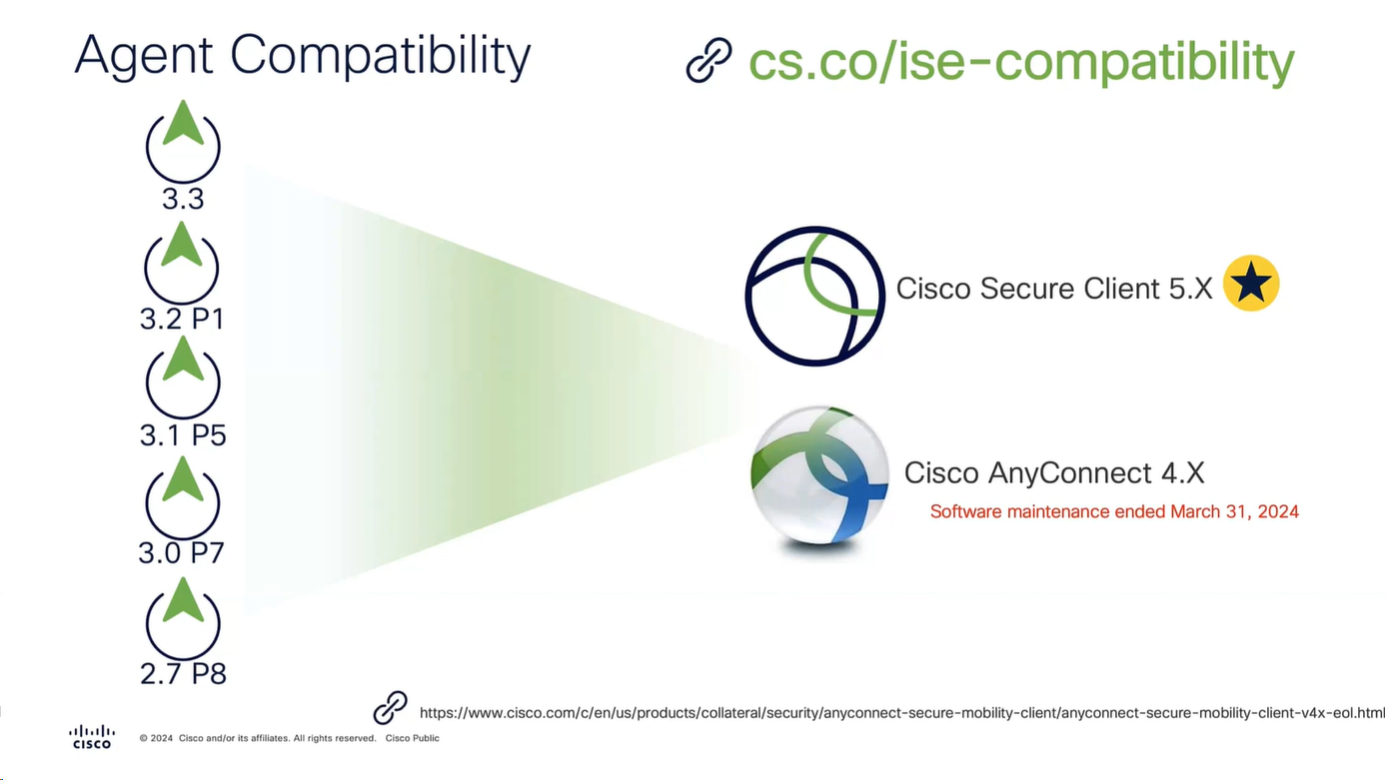
Different types of Agents and their capabilities
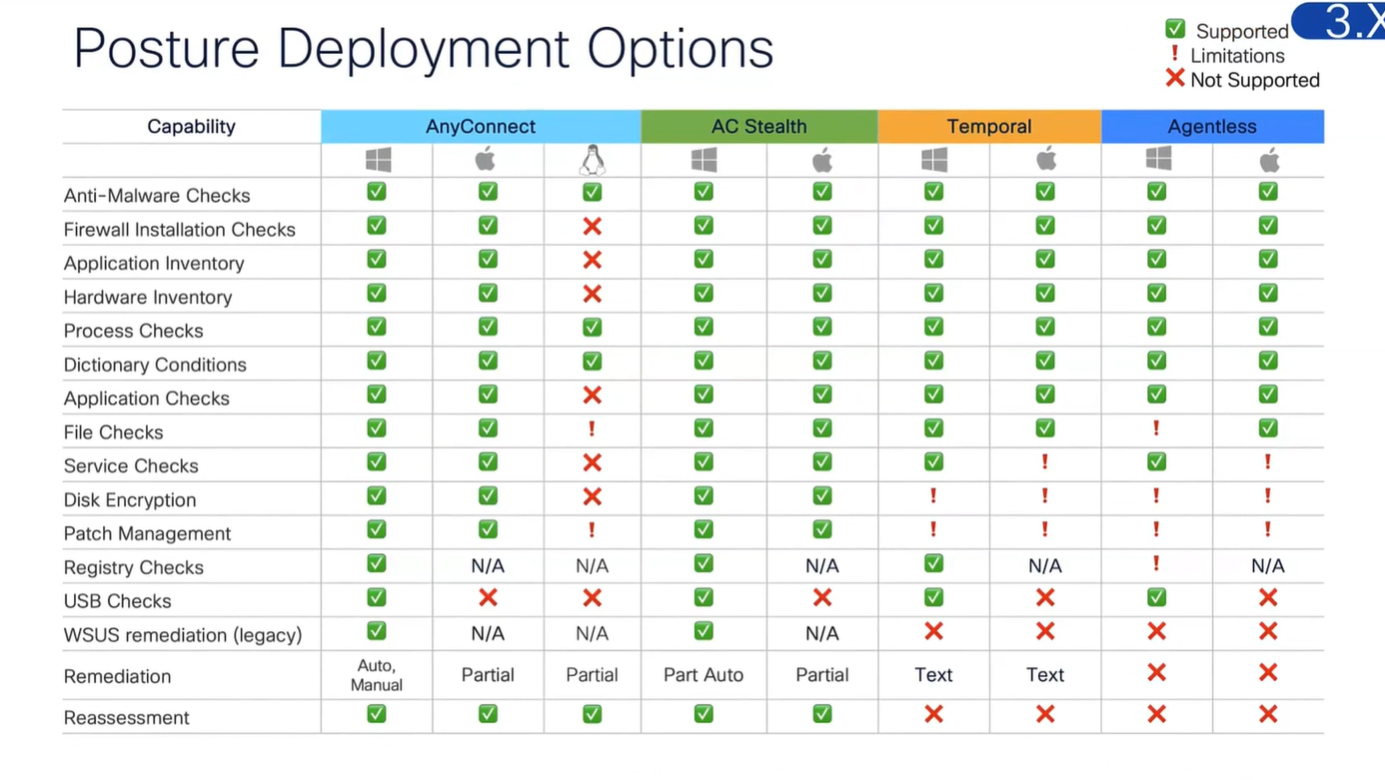
Modes of access
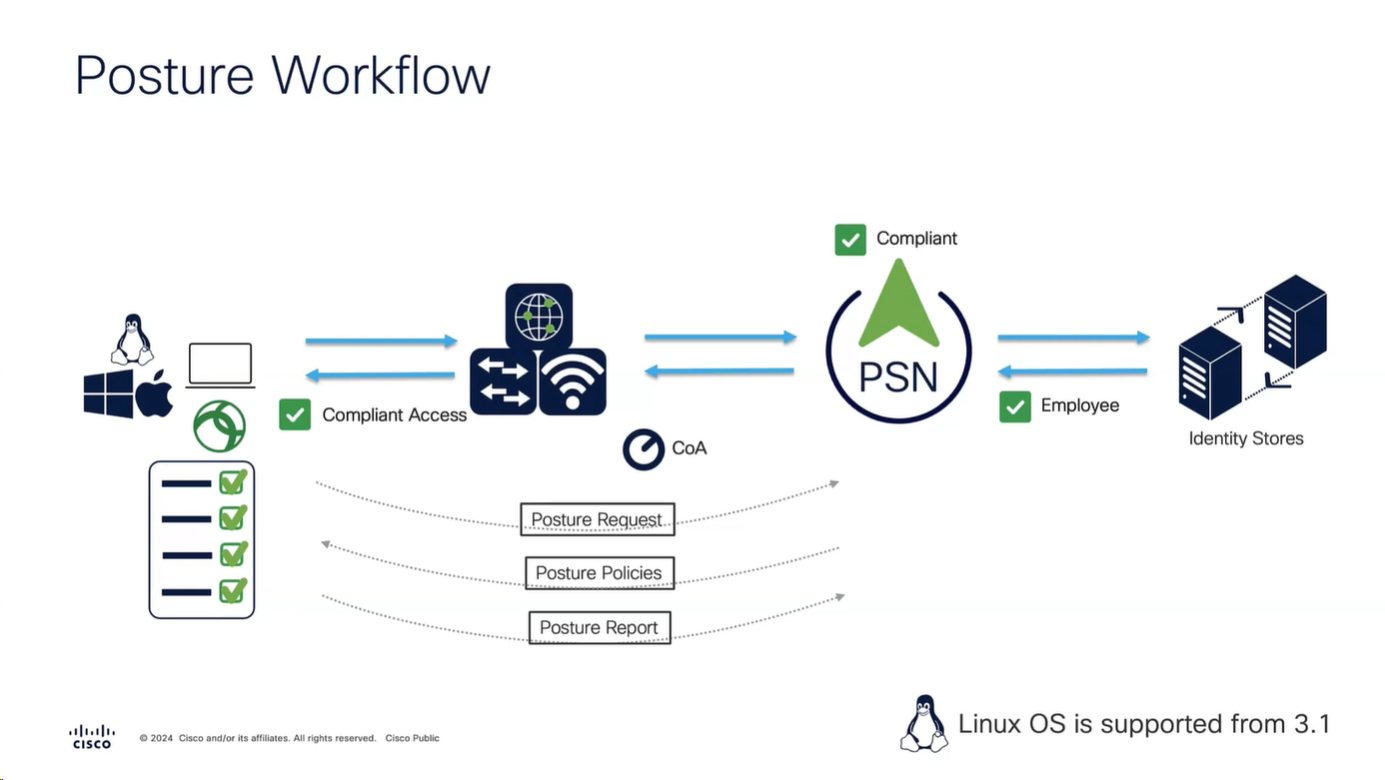
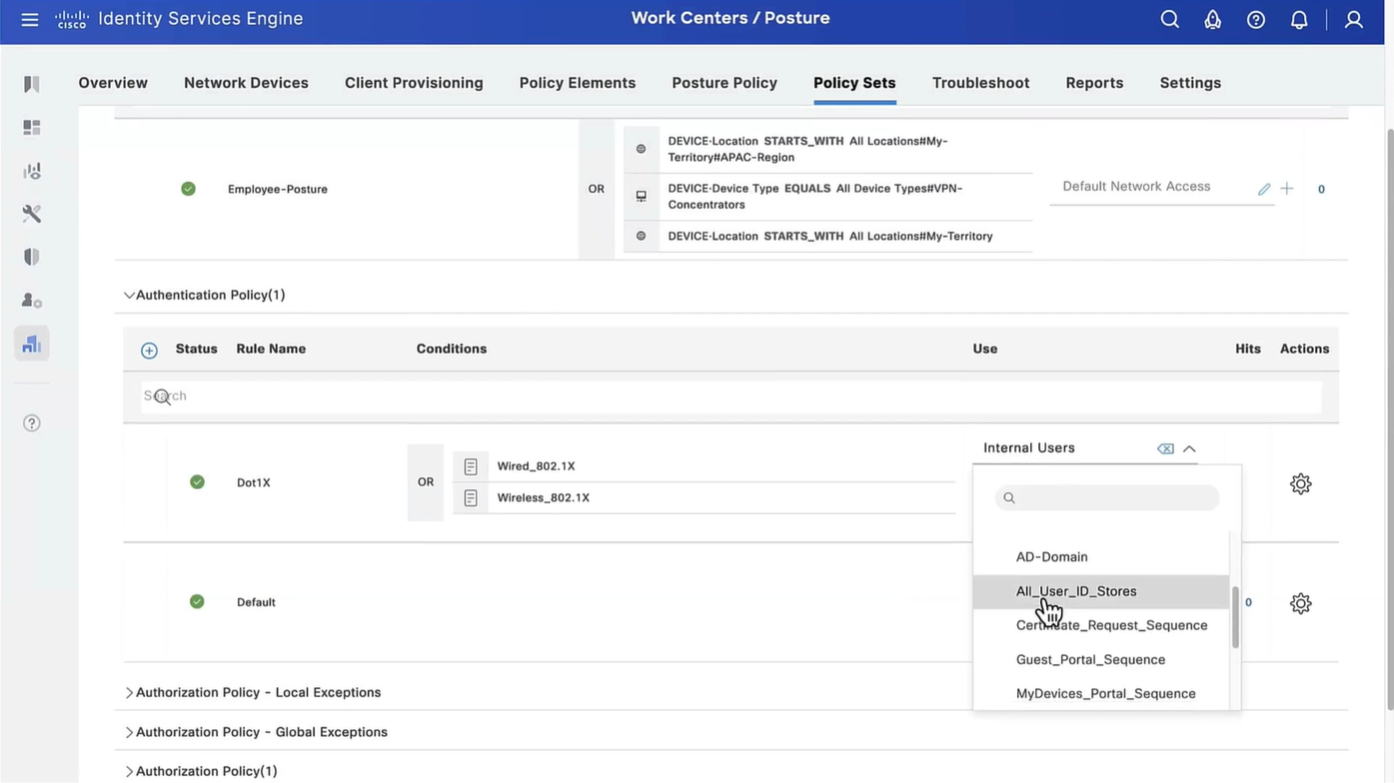
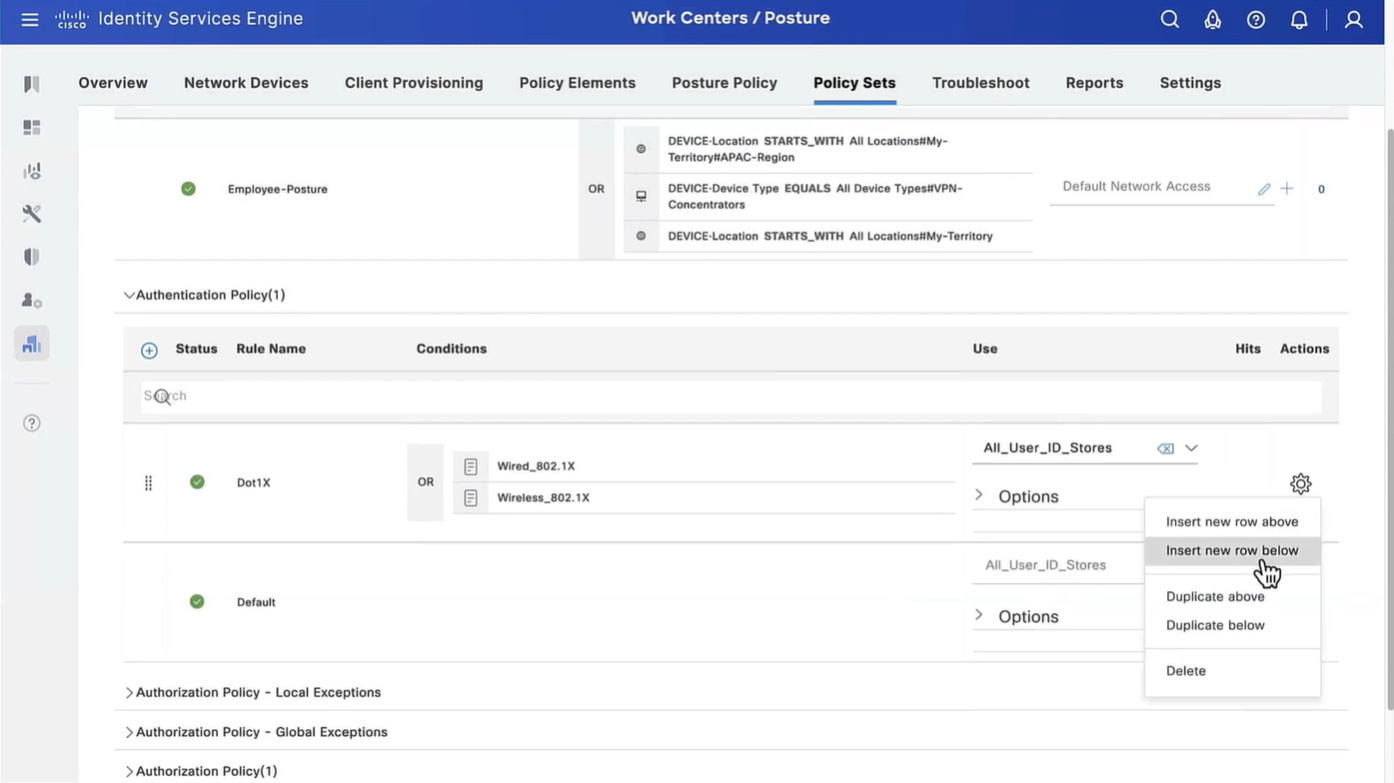
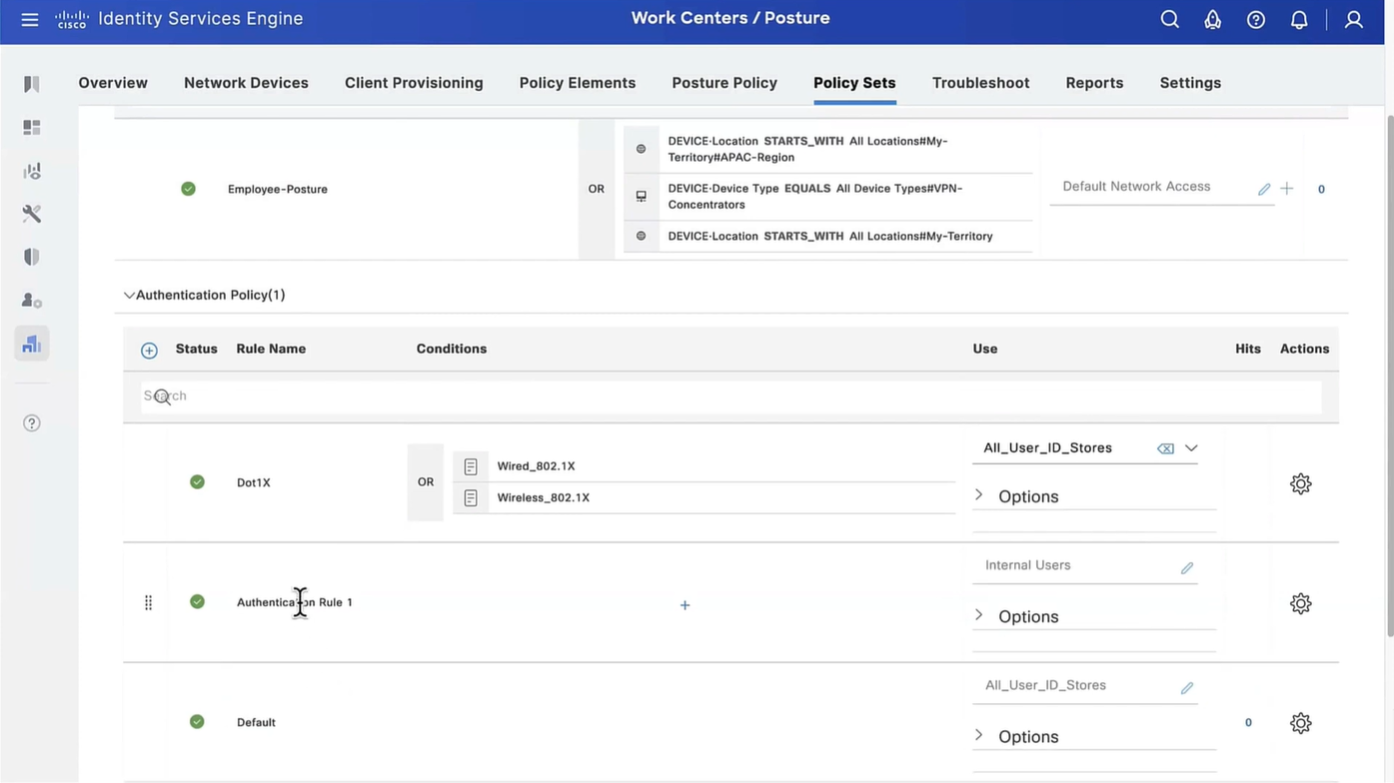
Policy set must be configured with rules that treat devices at first to be in Posture=Unknown, Devices can access over wired, wireless or VPN
“Posture request” is made by Anyconnect client
“Posture policies” are sent to Anyconnect client
“Posture report” is sent back to PSN based on the policies (checks) that were sent earlier
PSN determines the posture status to be “Compliant” or “Non-Compliant” and delivers via CoA
Posture Configuration Sequence

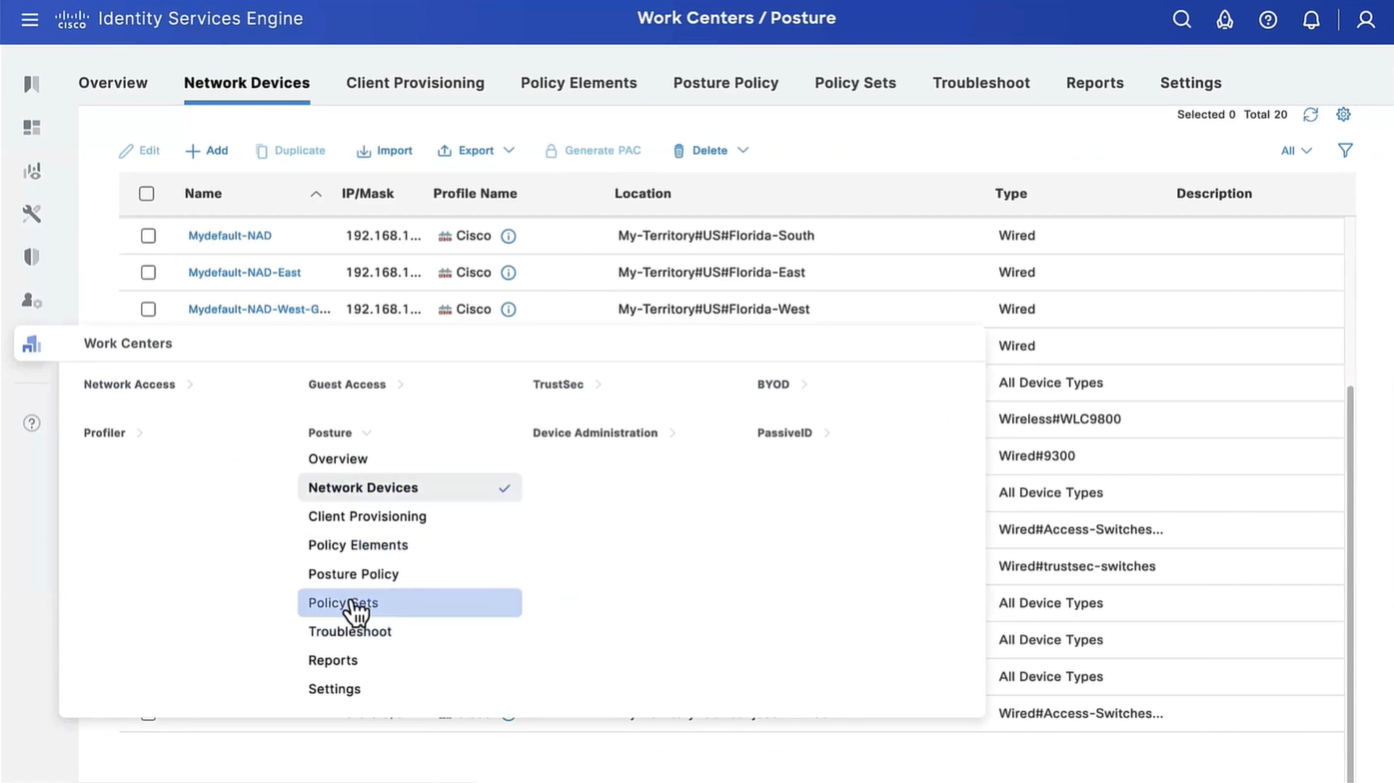
We need to add as much information about NAD as possible in ISE
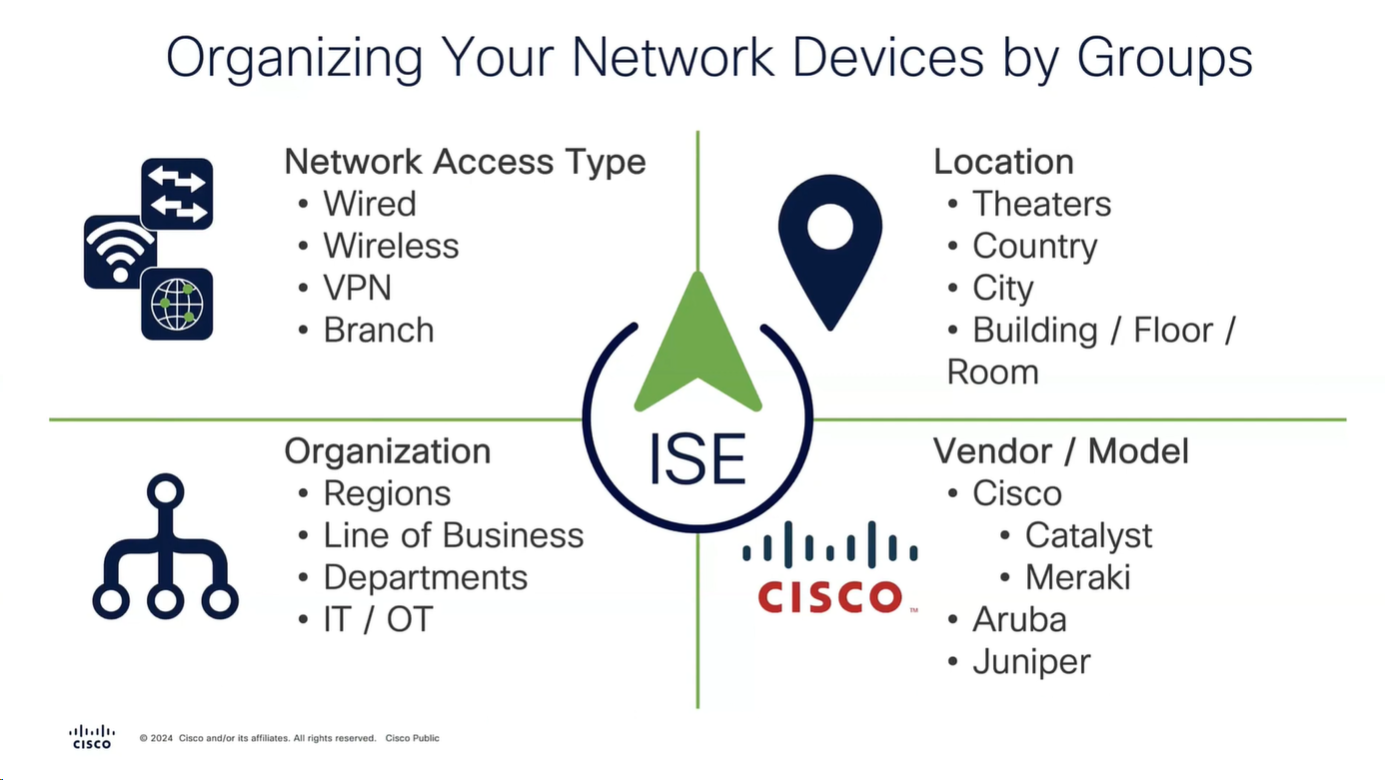
Configure
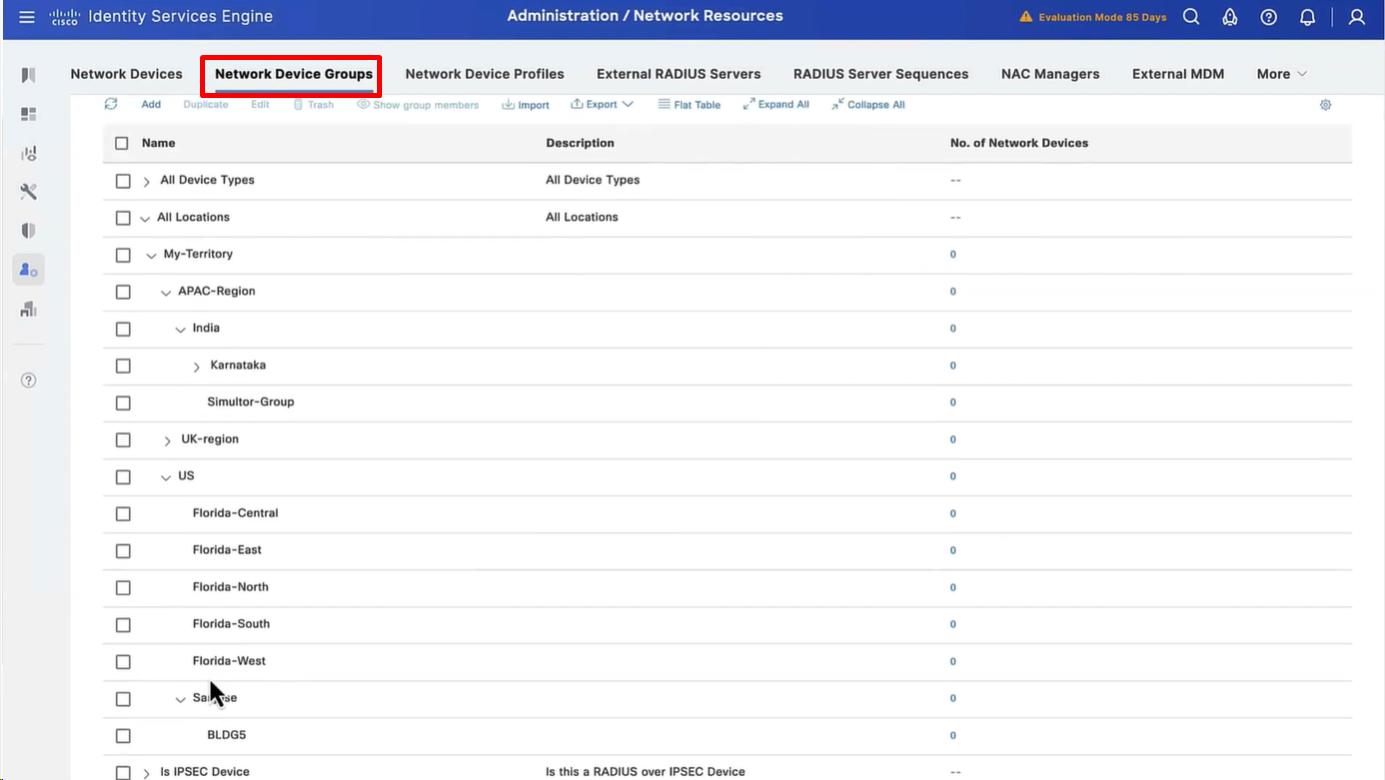
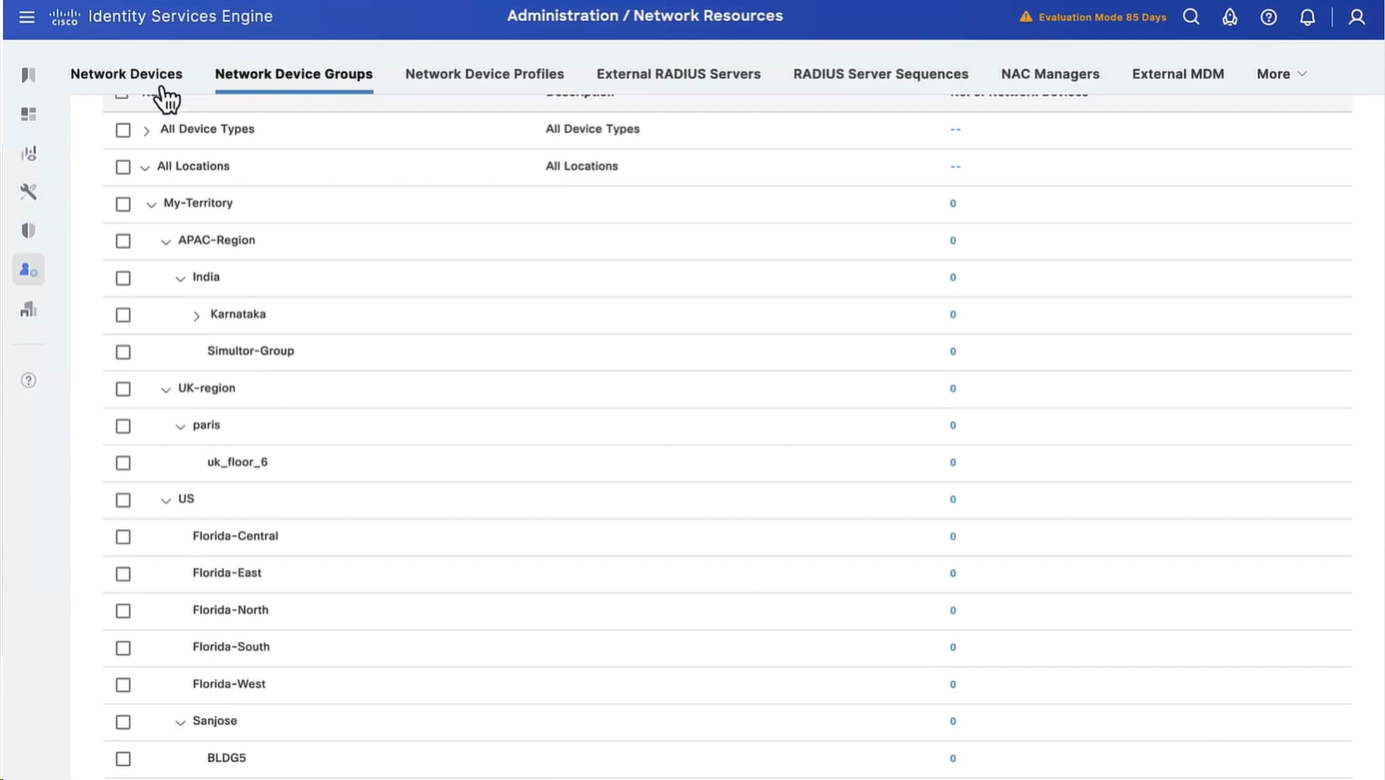
Configure Network Device Groups
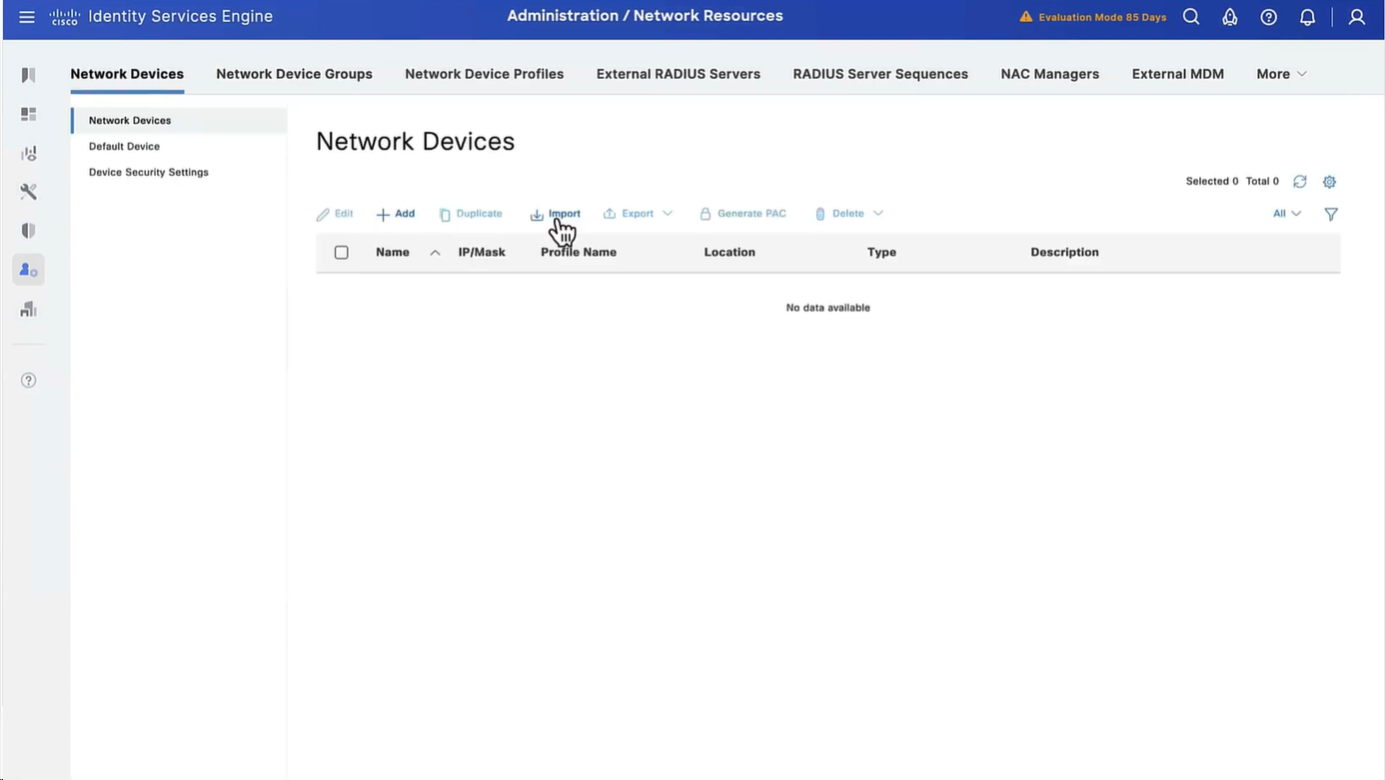
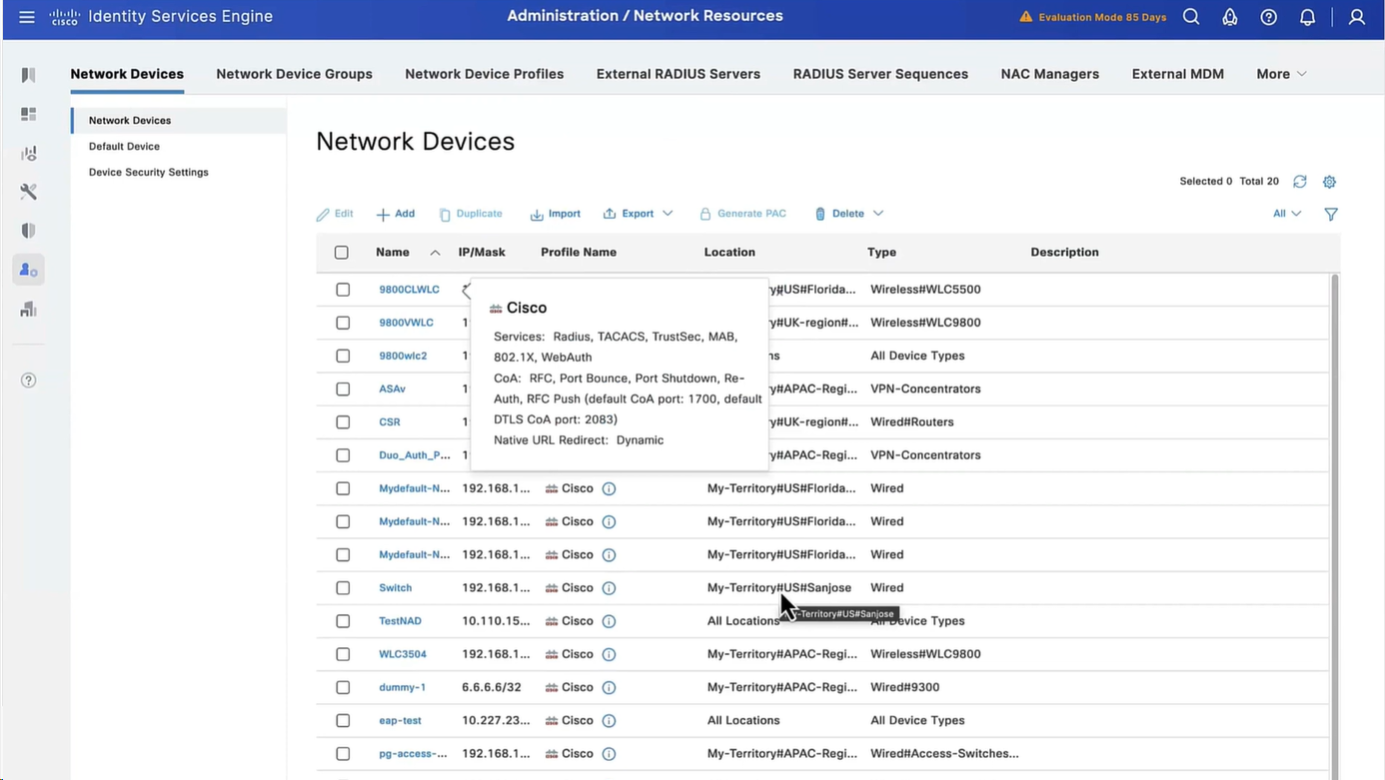
Import network devices
As you can see all devices have location and type defined correctly
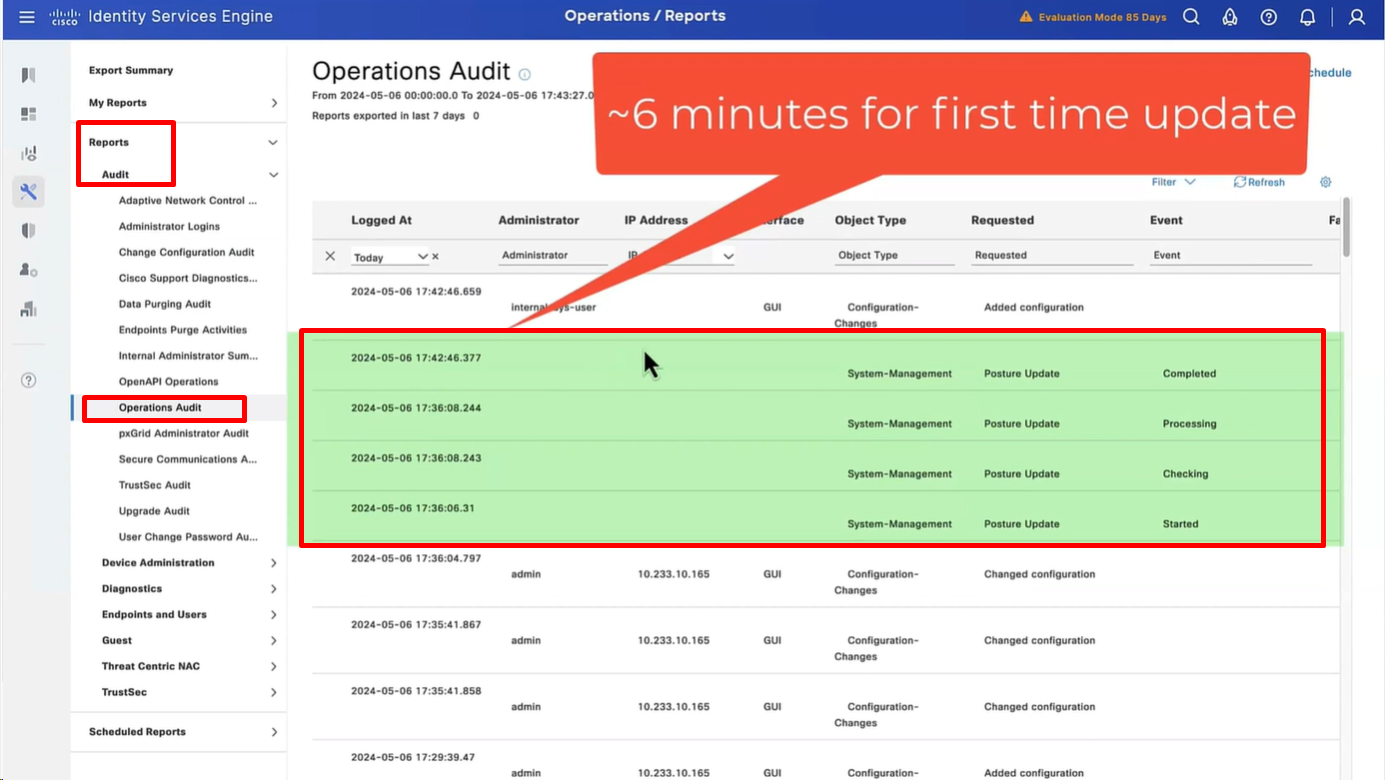
Configure Posture Updates
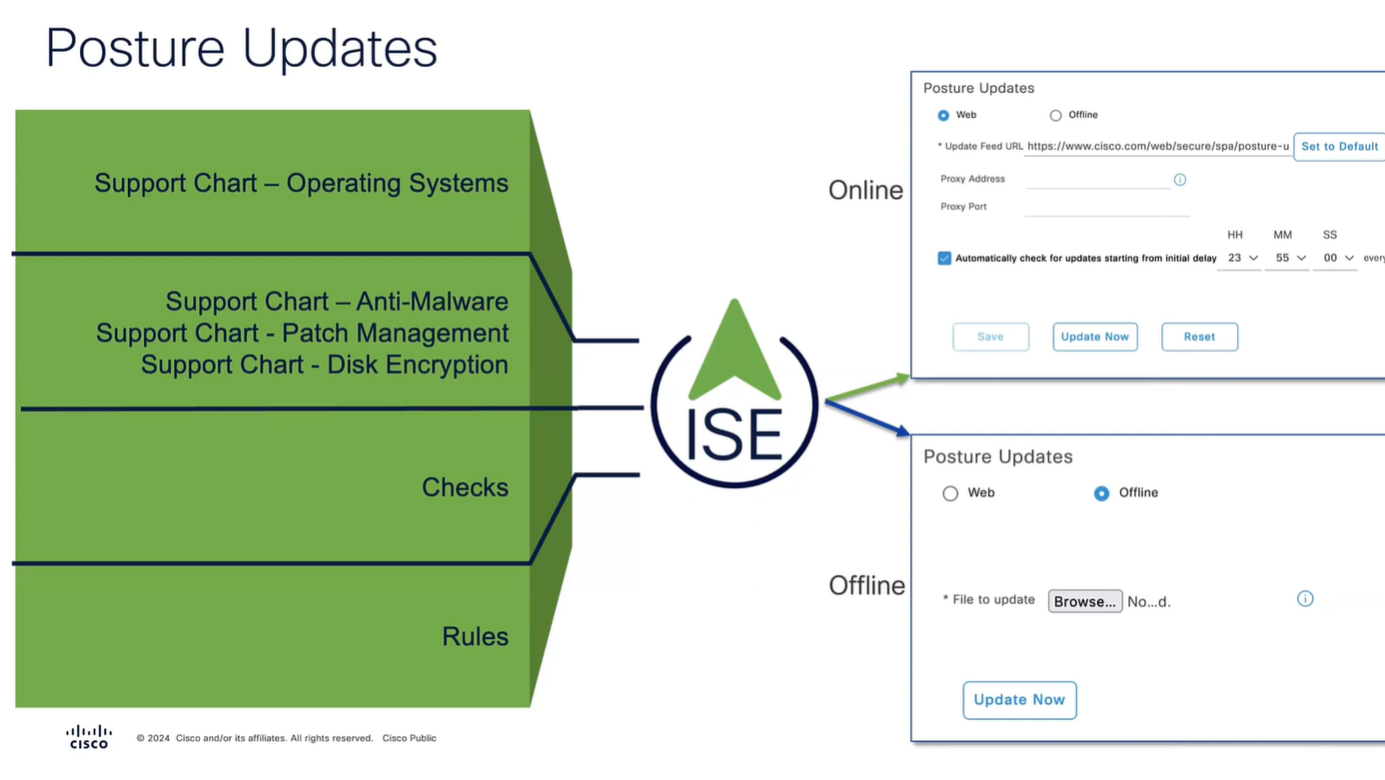
Offline updates are only for air gapped ISE deployments
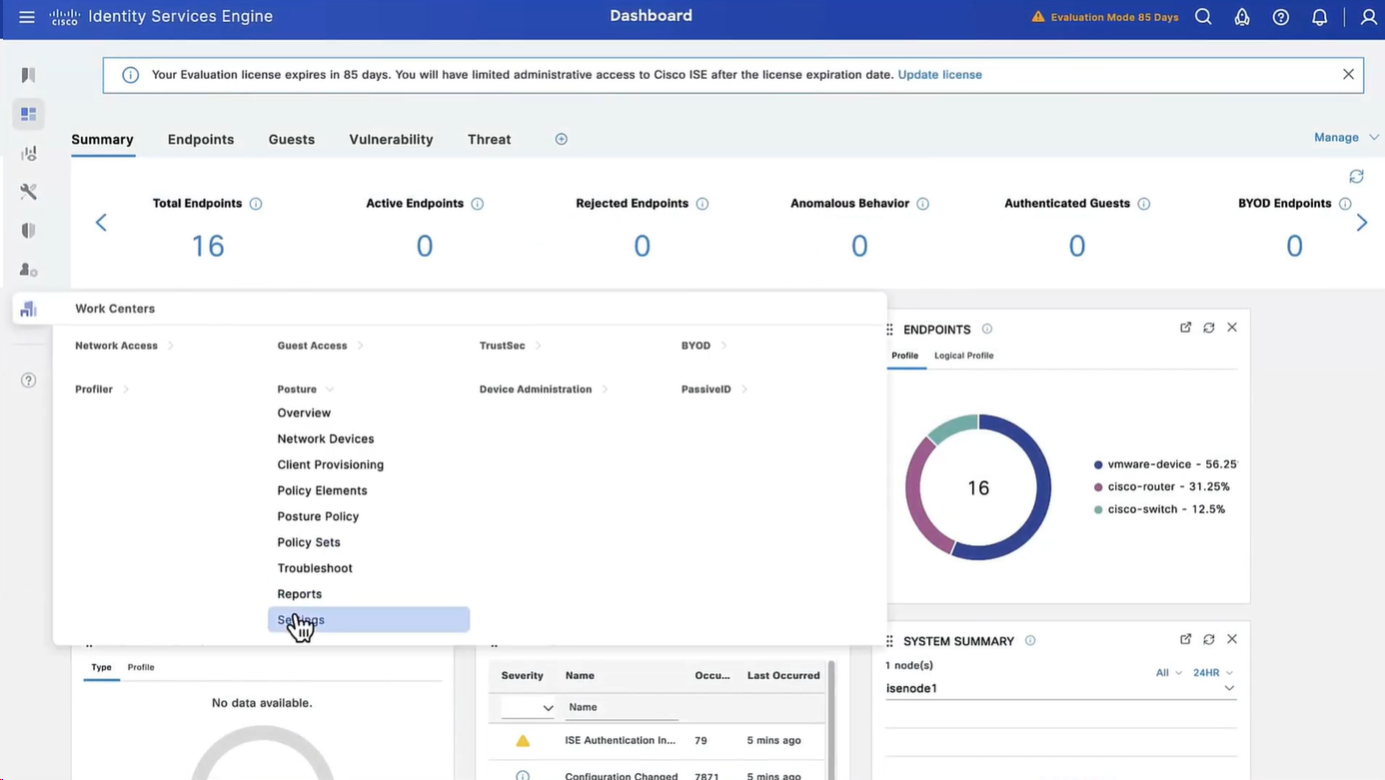
Set posture updates
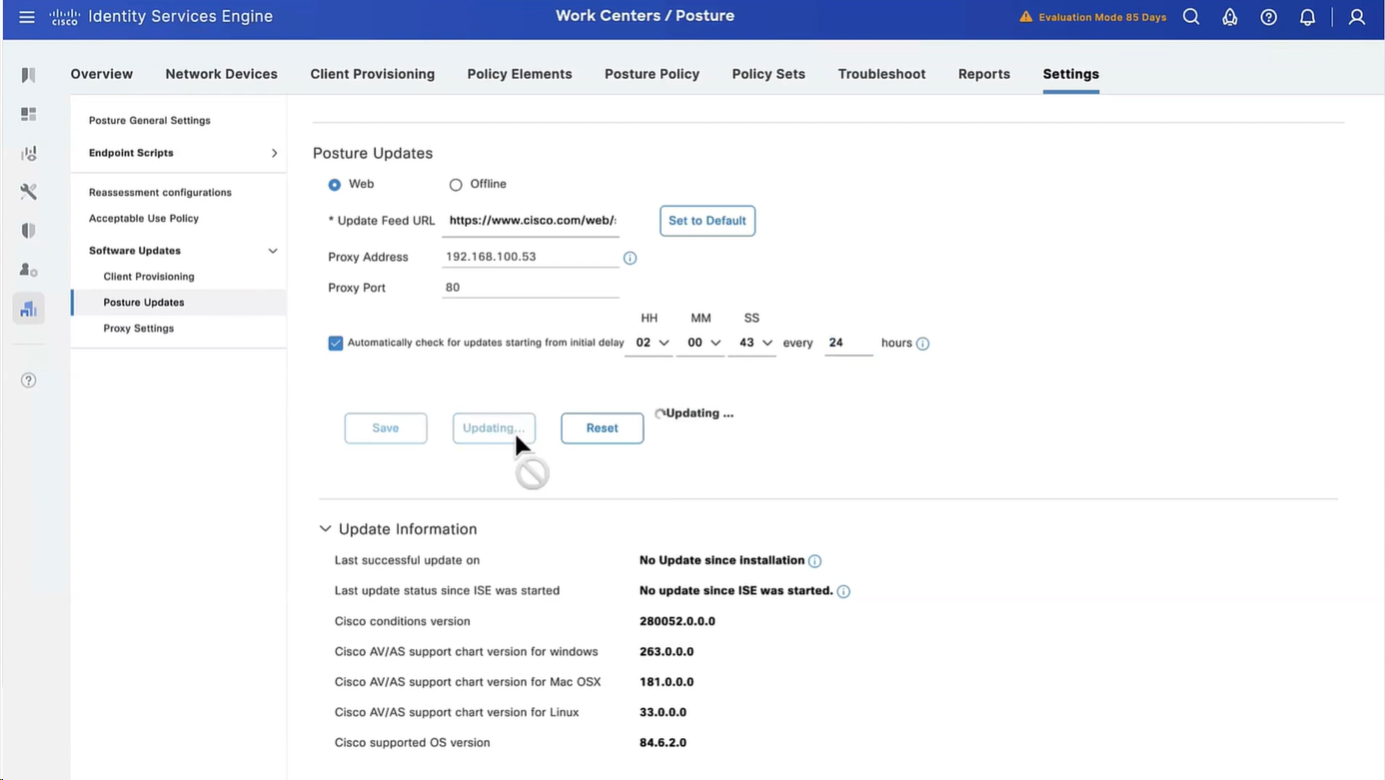
It took 6 minutes to update Support charts
for now we will use these Global default settings for posture, we will deepdive into these settings later
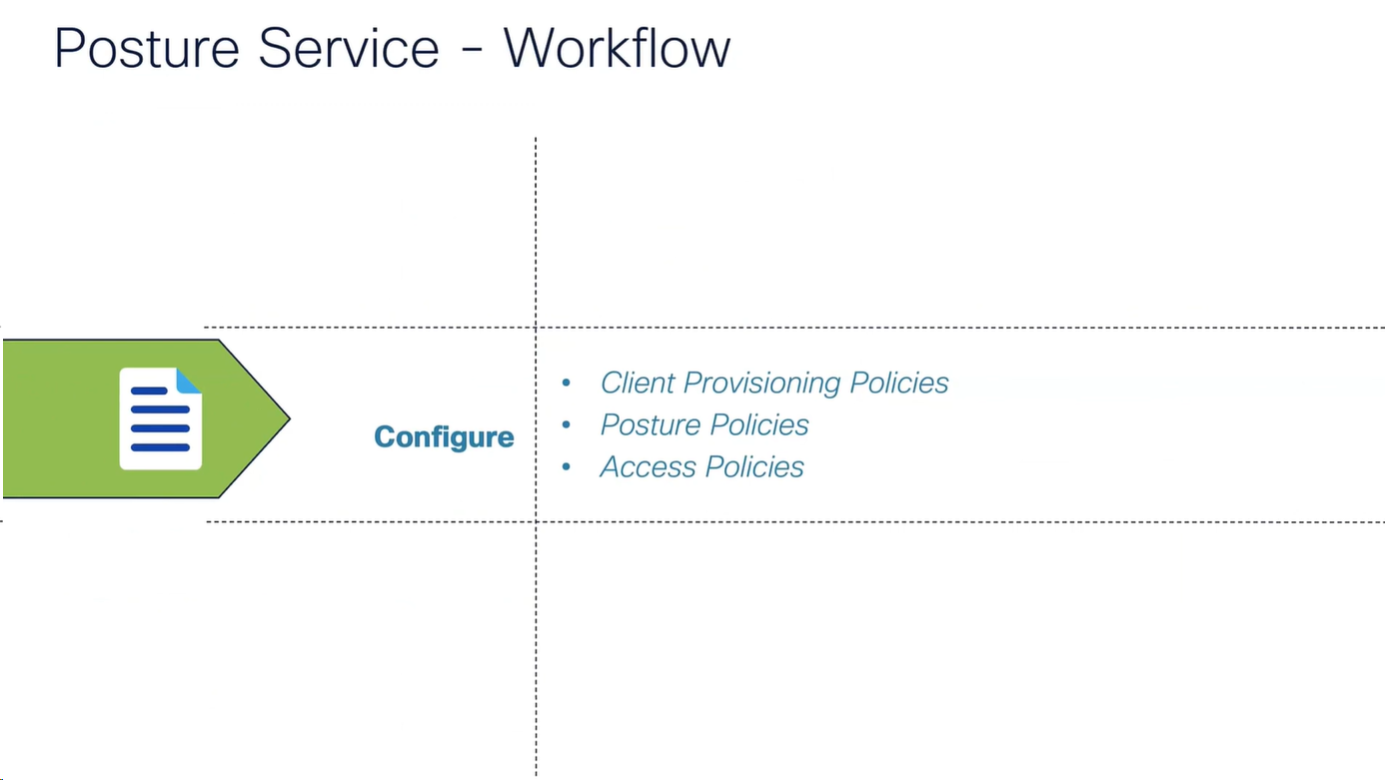
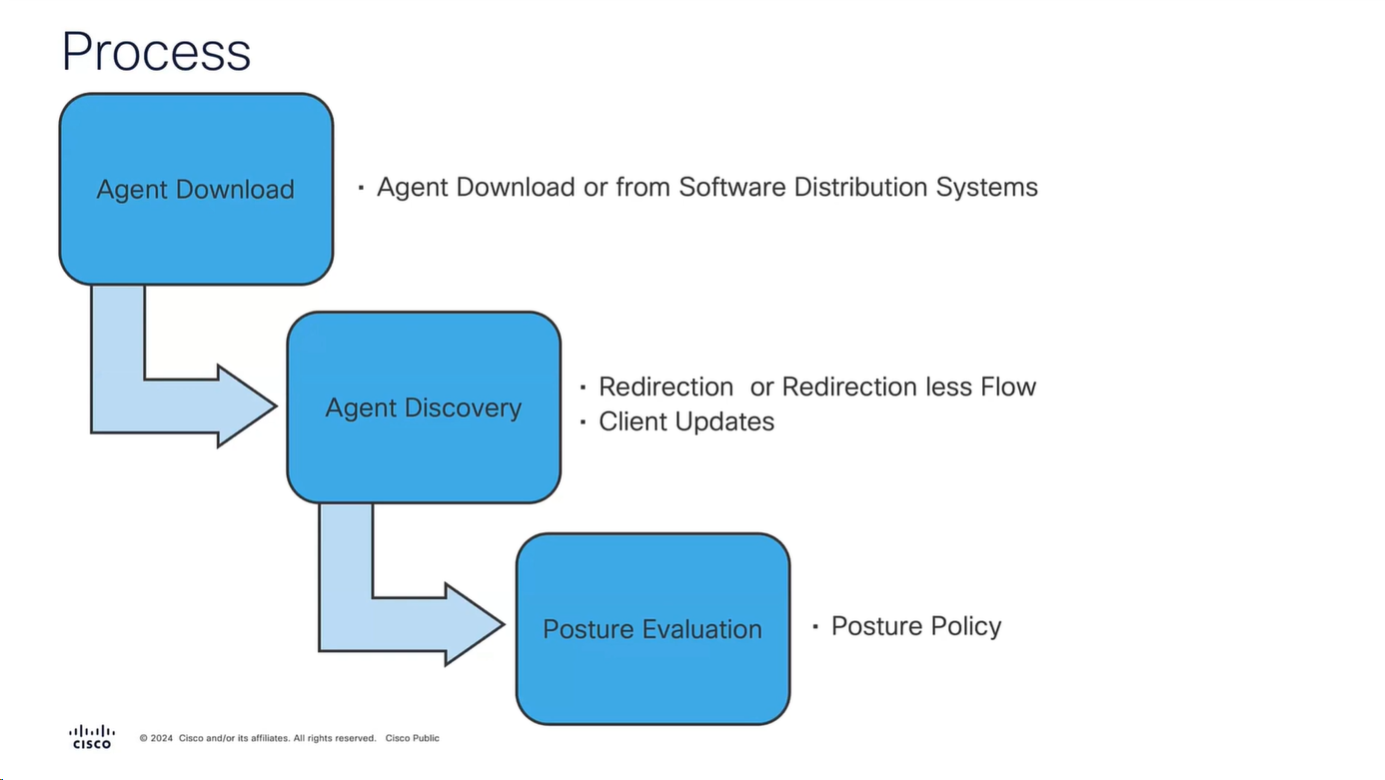
Workflow
It is vital for Anyconnect client to contact or discover the PSN that Authenticated the 802.1x (initially with limited access) in order to download the posture policies from that PSN and then later send it the report, it should not be any PSN, it has to be the PSN that client previously authenticated with and Agent Discovery process helps with that – so anyconnect authenticates and downloads the policies from the same PSN
Agent Discovery can be redirection based or redirectionless
Right after agent discovery process and it finds the right PSN then Anyconnect client if there is an update on that PSN then it will be updated
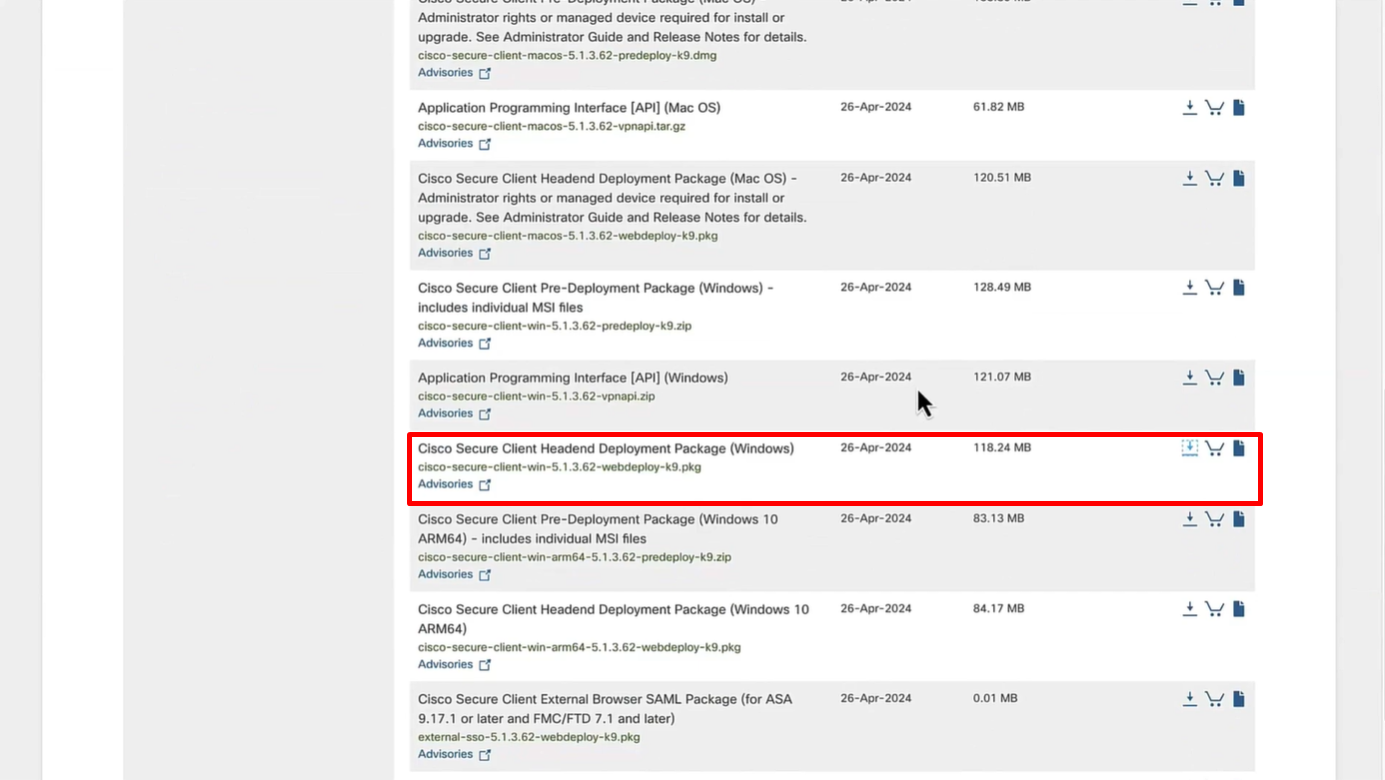
Download Windows Headend deployment pkg file
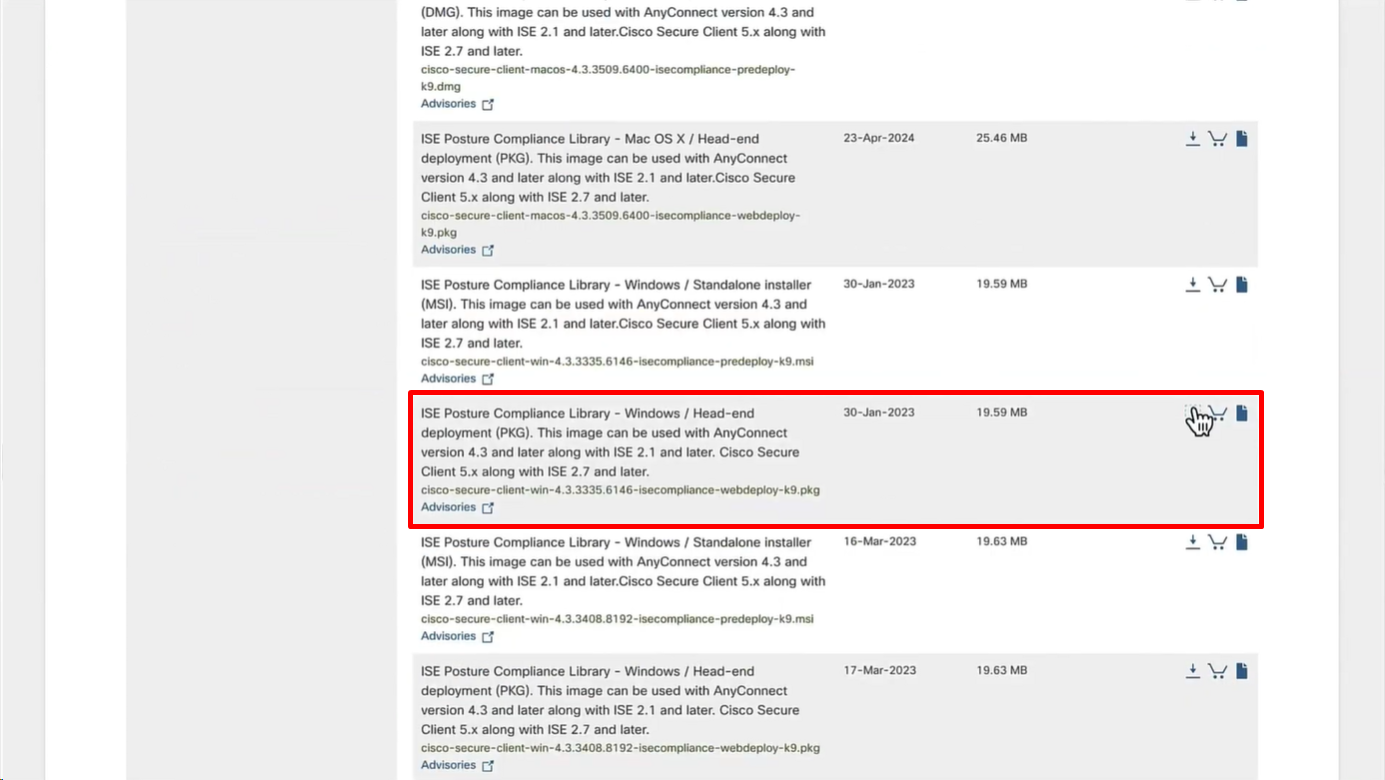
Also download the complaince modules needed
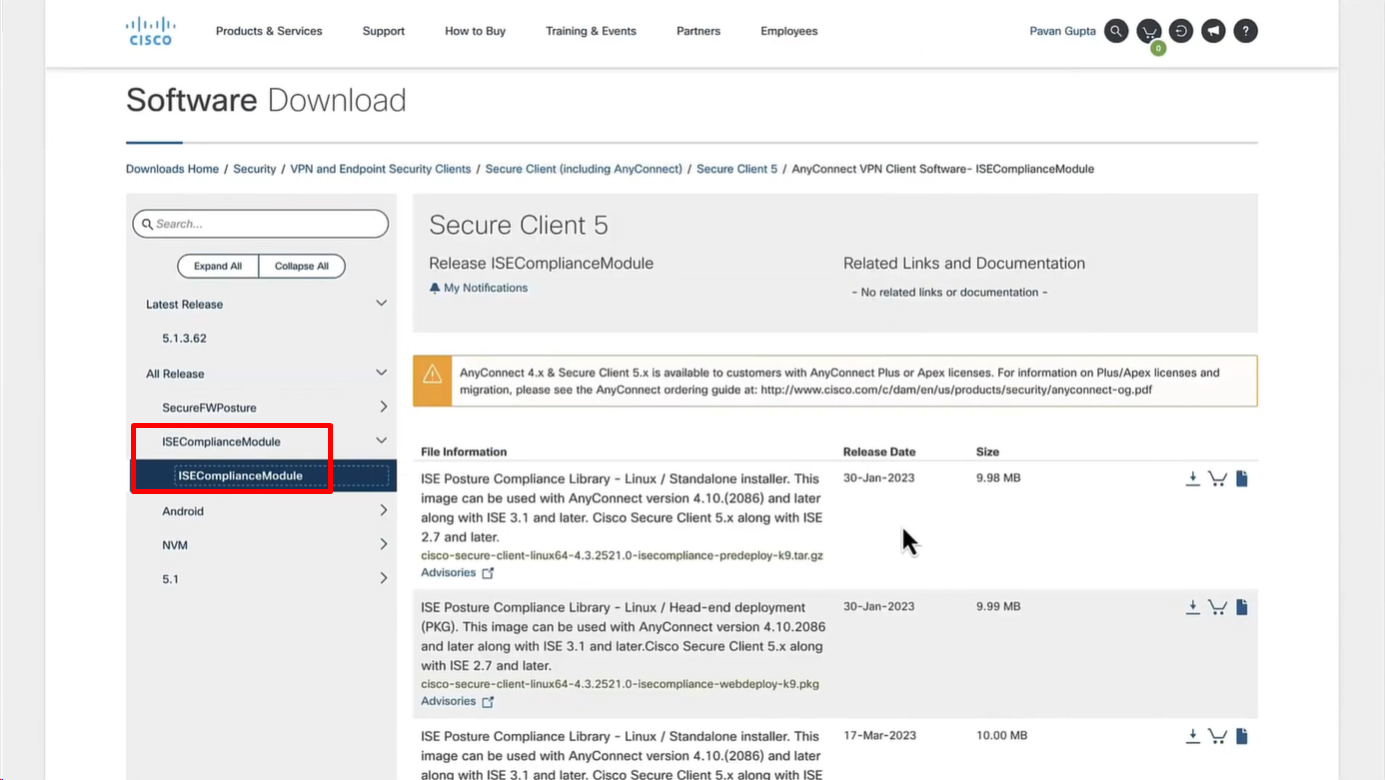
Category “Cisco Provided Packages”
We will upload the Cisco Secure Client
Now upload the compliance module

Now before we can configure Agent Configuration we need Agent Posture profile
we will deep dive into these option later, for now we will configure bare minimum with defaults
but add this server name that agent is allowed to connect to, usually domain name with wildcard works
Configure Agent Configuration
Agent configuration is where it is all tied together
This agent configuration is then called in Client provisioning policy, such as if Operating System (Windows) & Conditions (such as x) then Results = this agent configuration (which contains Agent Client + Compliance module + Client modules that will be installed from this Agent Client + ISE posture profile [ which are agent settings such as Enable Rescan button , Call home list , discovery agents ] )

Save
Now we need to go to Client Provisioning Policy and change default Windows policy to point to Agent configuration (that married everything together)


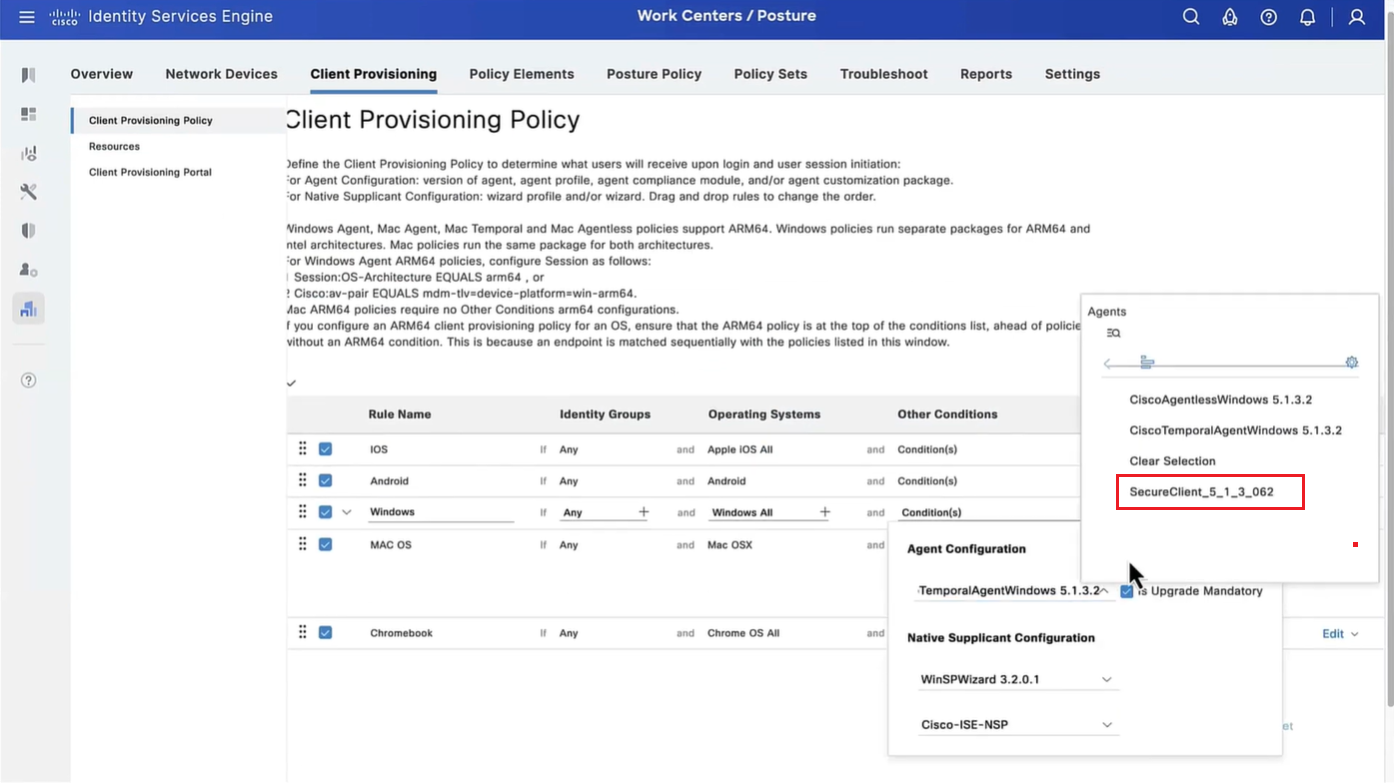

This is same Agent configiuration that was defined earlier with image and Agent Posture Profile etc


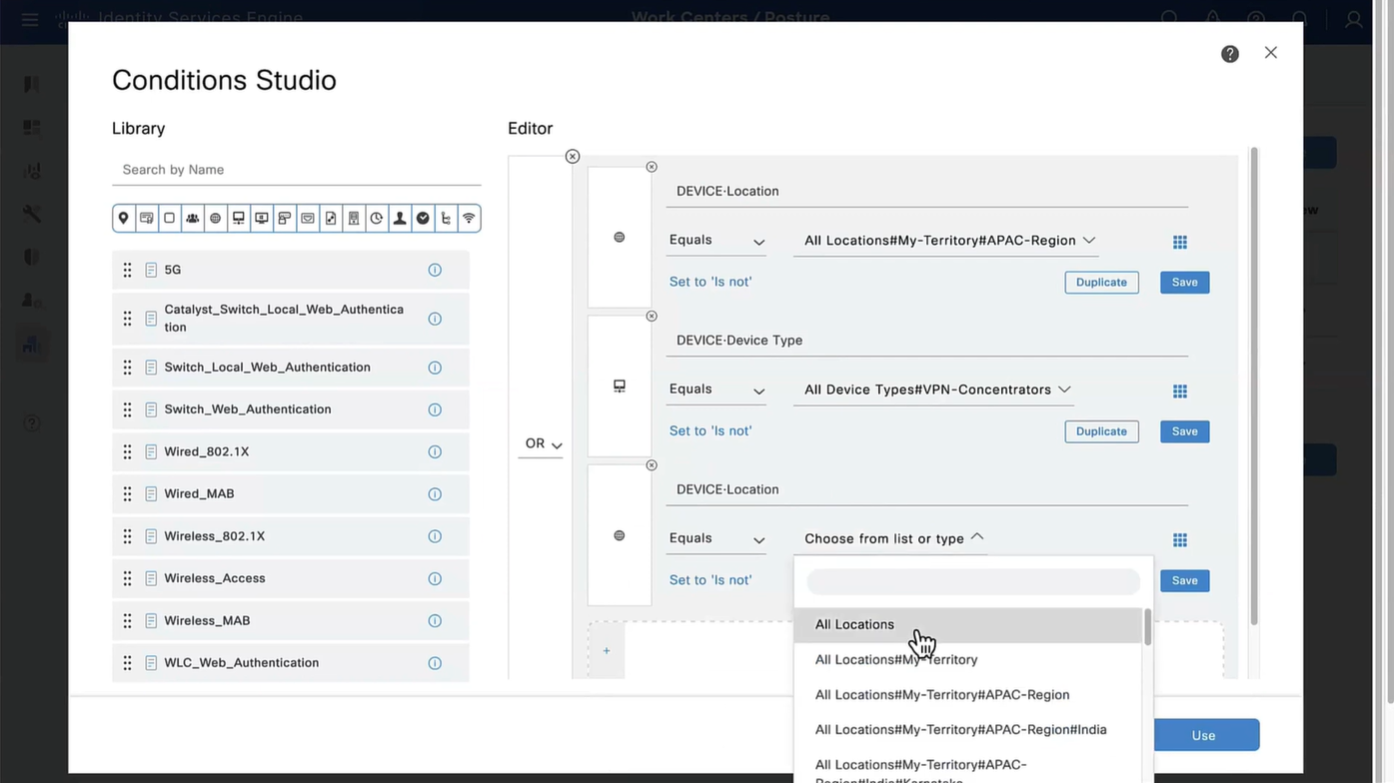

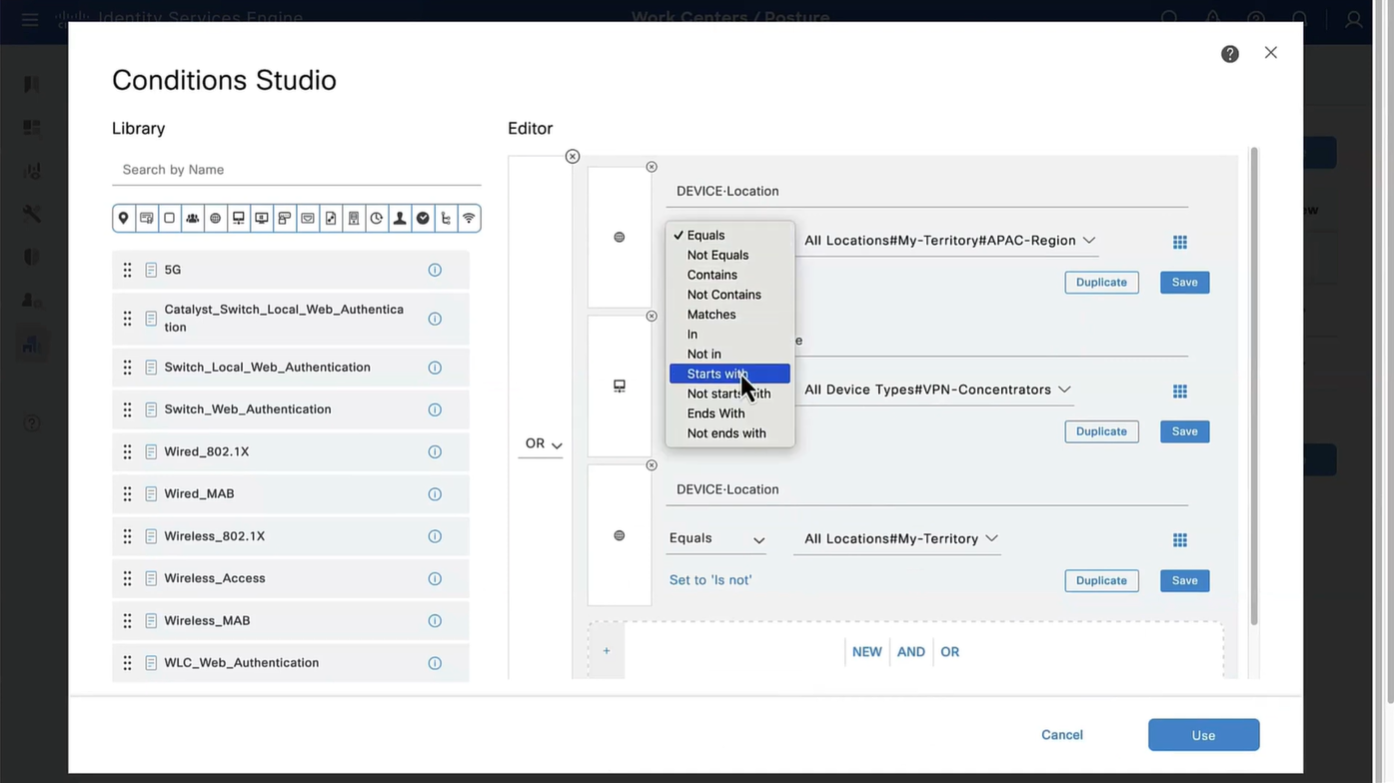
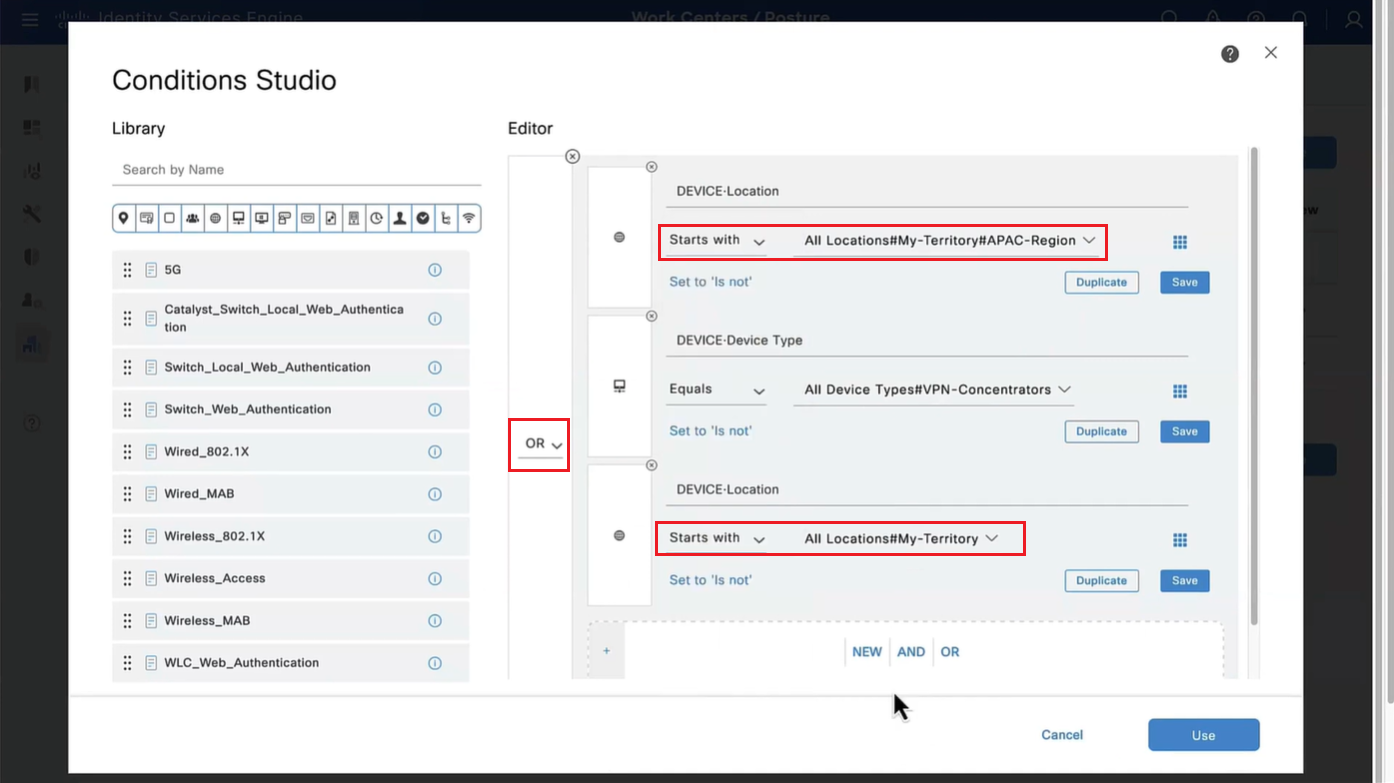
Above logic is, All NADs in AIPAC region , or VPN firewalls , or All NADs from My Territoray
as it is OR conditions with “Starts with”
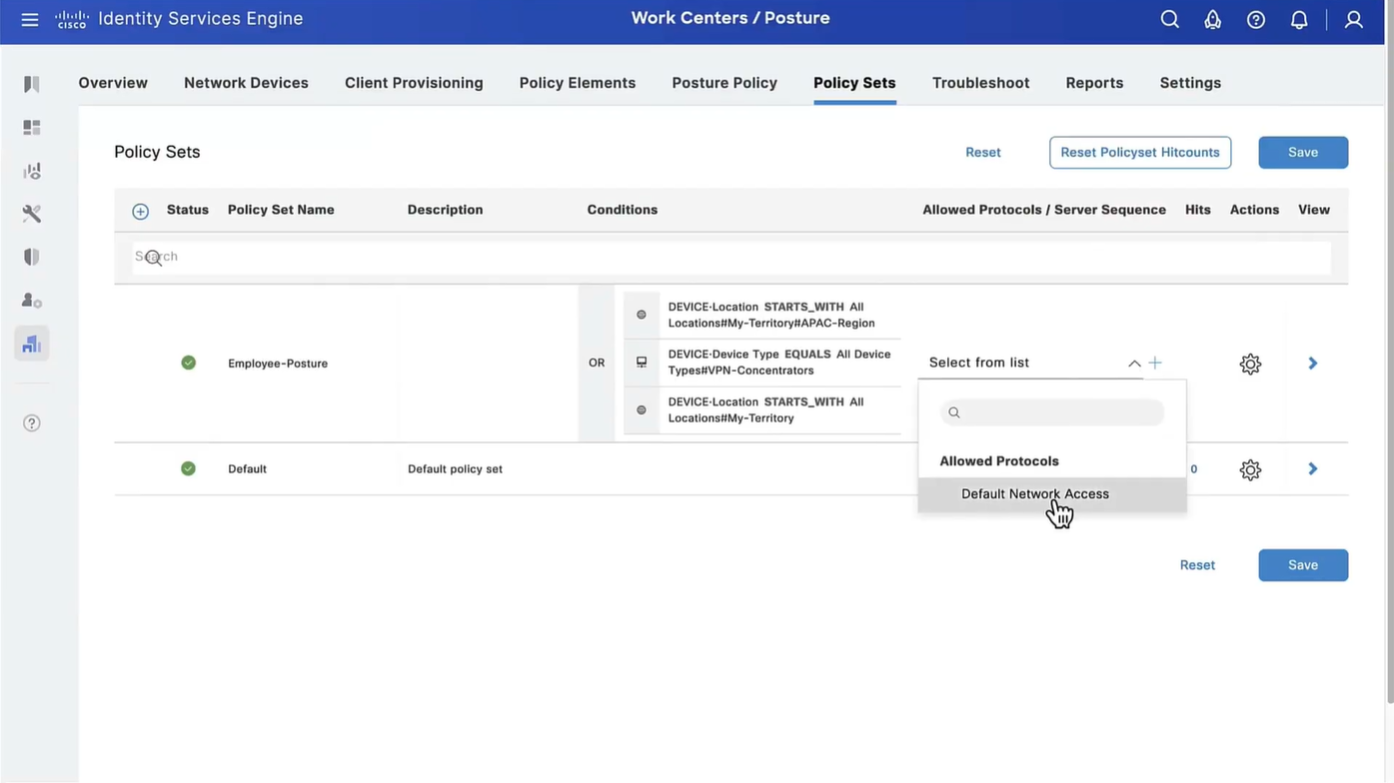
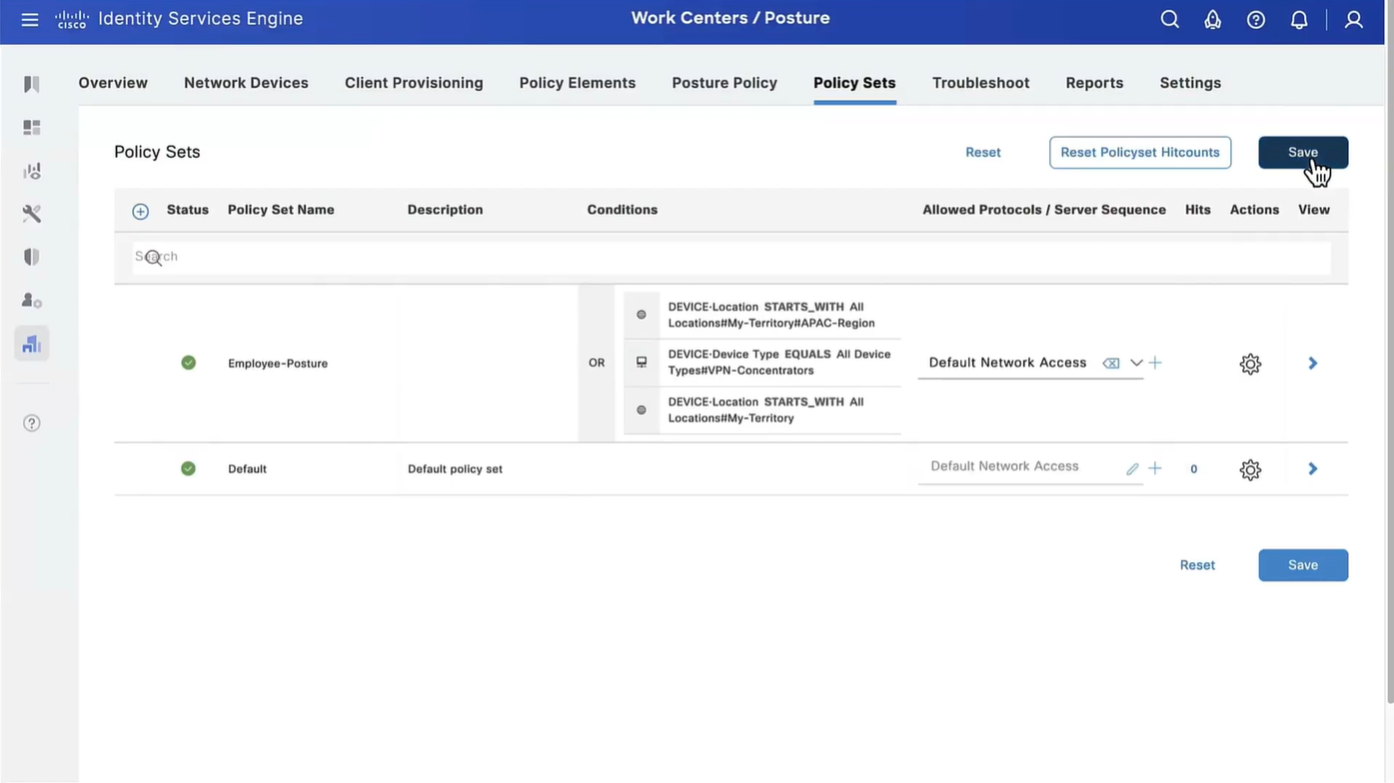
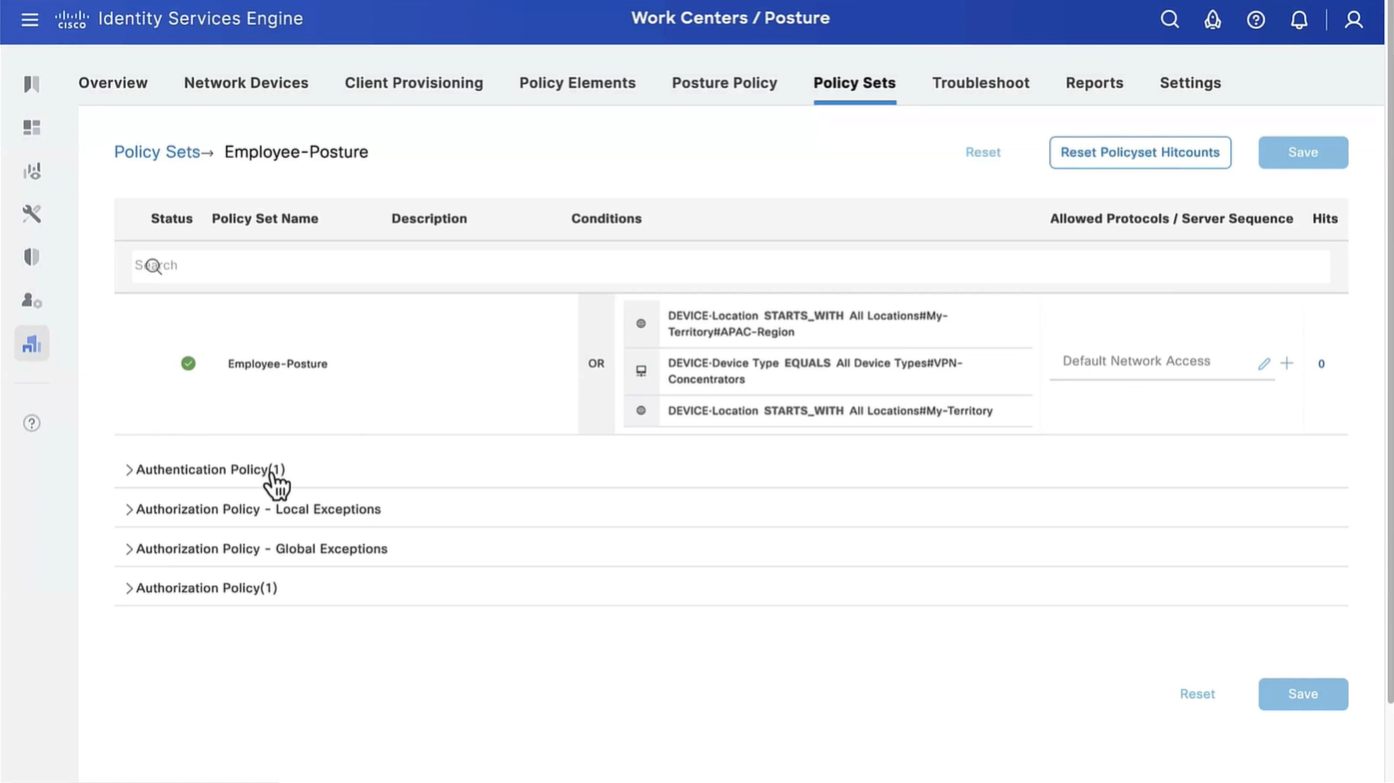


Wired and Wireless 802.1x (from all the above NADs defined in policy set level)
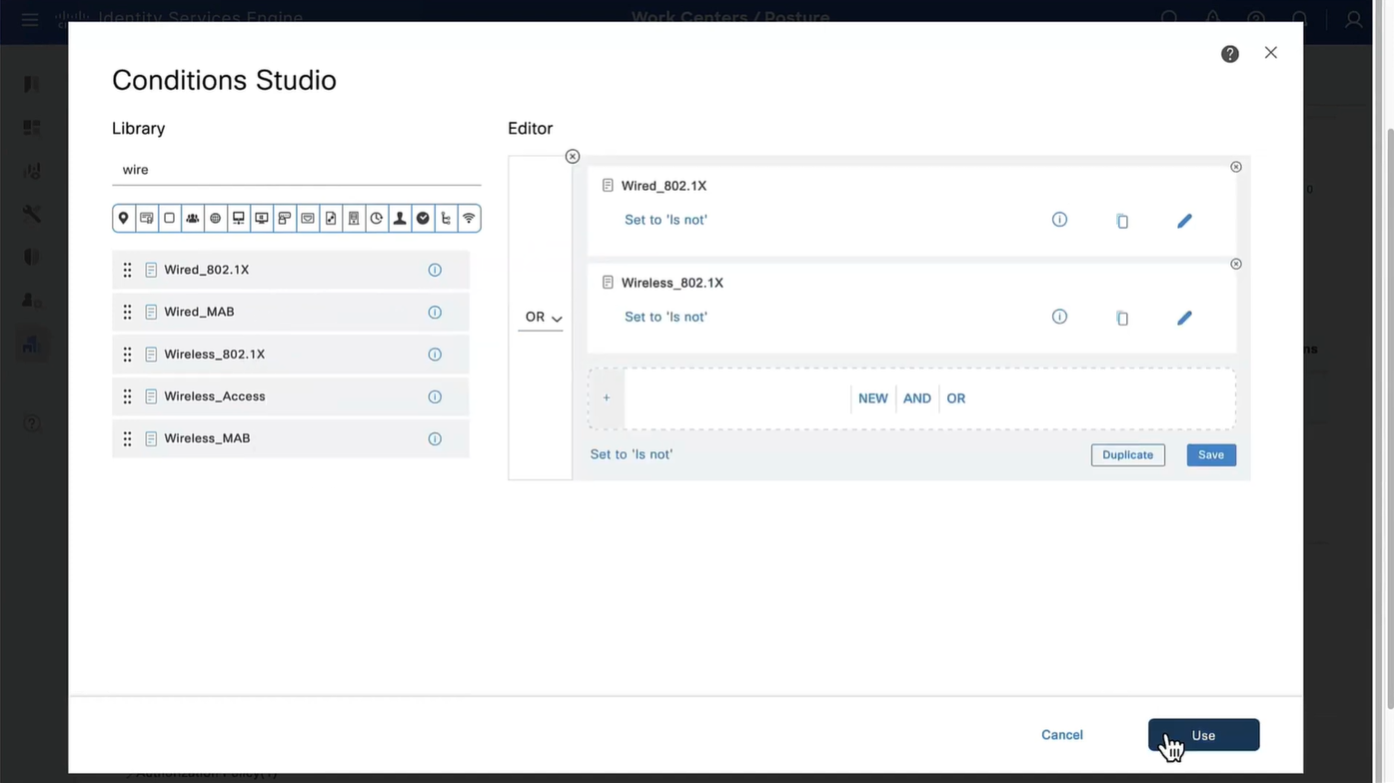


This initial redirect ACL is defined on the switch


Cisco Agent discovery is a process where agent discovers the PSN that originally authenticated the client and this is only relevant if Agent is already deployed on your machine.
These discovery processes are of 2 types:
- Redirection based
- Redirection-less

All these probes are done in parallel at the same time and intention is to get Redirected to the PSN that originally authenticated the client
Redirection here is very similar to how guest wifi portal is looking for port 80 traffic in order to intercept, NAD also wants to intercept port 80 traffic and NAD sends out the redirect URL containing session id, this session id was inserted by NAD, Client picks this URL and dials that URL of ISE with session id and when request lands on ISE session id is used to find the existing session from DB, in response to this posture request, posture policies or new client is updated (if client has been updated)

Probes 1, 2, 3 are port 80 traffic expecting to be intercepted by NAD and NAD to send redirect URL and ACL (from authorization profile)
NAD Inserts the session ID (because NAD builds clients and their session IDs for authenticated clients) but PSN inserts the hostname or IP of the PSN inside URL
https://<PSN-FQDN>:8443/portal/PortalSetup.action?sessionId=...&...When client redirects or goes to URL with that session id as “posture request” (https based), ISE picks up session ID and thinks there is no need to reauthenticate as session is already there and then proceeds to send “posture policies” back to client
Probe 4 uses ConnectionData.xml which is not redirect containing session id in URL but instead direct approach on URL of the ISE in ConnectionData.xml which means that client must have authenticated and postured before.
If things go to probe 4 then PSN will have to lookup active session using IP and MAC just like an analyst checks for a user’s session in ISE

Discovery host if configured will be tried first, if it does not respond then by default Anyconnect sends discovery probes on port 80 to all ISE PSN nodes, this option “Discovery Backup Server List” can be configured to limit the PSNs to send these discovery probes, this option has a reduction function

Stage 2 which is second scenario has probe 1 and probe 2, first probe 1 is done and if probe 1 fails then probe 2 is initiated
Stage 2 is used in “redirectionless”, we can have a “call home” list that allows us to set a specific static PSN to contact, that PSN will then look for session owner PSN, session owner then responds to the client for posturing exchange (not URL with session id)
Probe 2 means that client’s ConnectionData.xml will be used to check last PSNs and use one of the PSN, that PSN will also look for session owner PSN and session owner responds to the client for posturing exchange (not lookup using ip and mac) like stage 1
Redirection-less is superior in terms of end user experience because every time user connects they are not redirected to the portal and user does not have to see the portal each time posturing takes place – This is specially good in case Agent is already deployed on endpoints like most corporate do

After agent discovery comes actual posture exchange

Cisco agent validates and sends it back in a report form back to the posture PSN
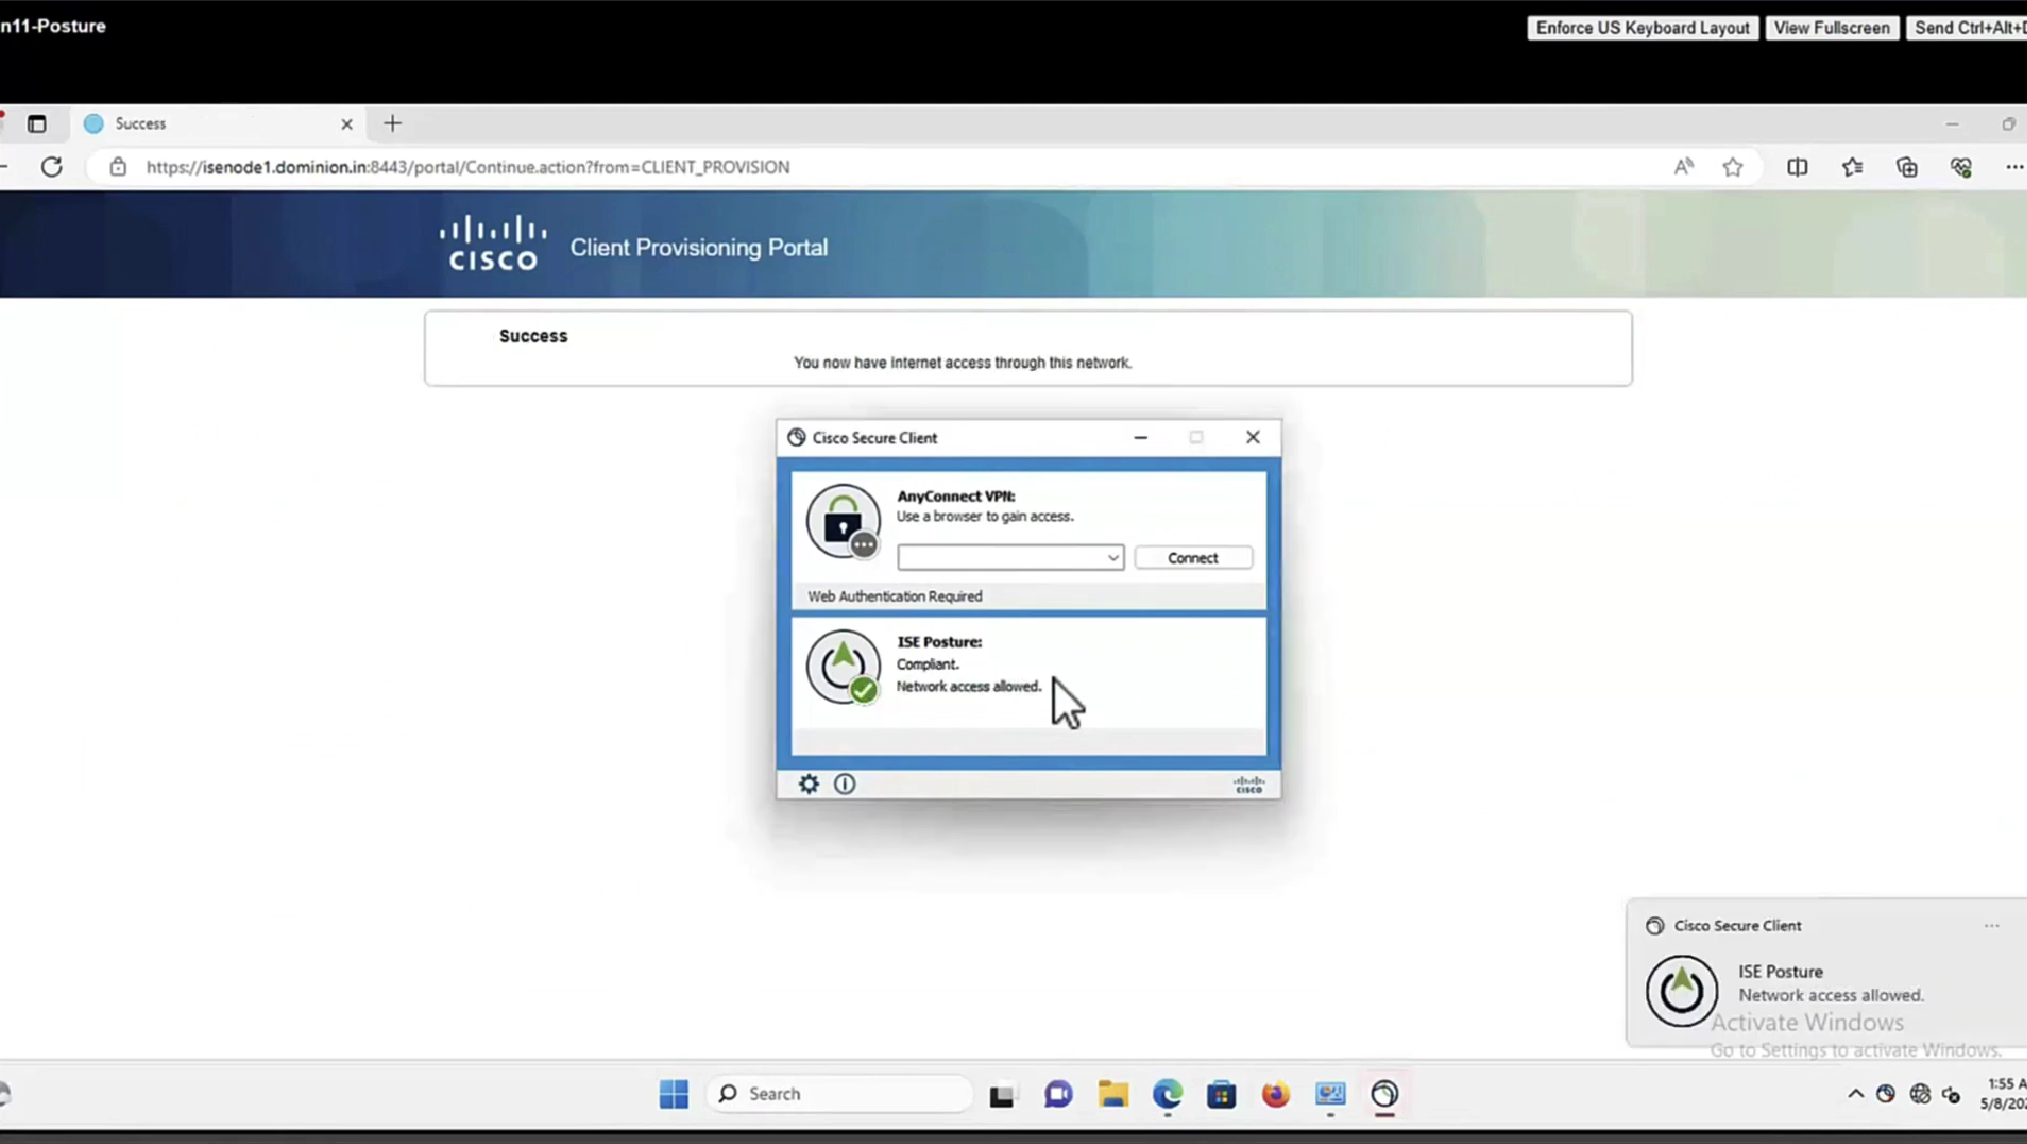
Posture status of the client then changes from unknown to compliant , compliant to non-compliant or non-compliant to compliant, PSN then sends COA RADIUS that contains new attributes from Authorization policy to NAD such as access-accept and complaint ACL that allows network access , in order to allow access


This PC does not have agent deployed


Whenever machine connects to the network (and posture settings is configured to posture on every network connect) client goes to this client provisioning portal
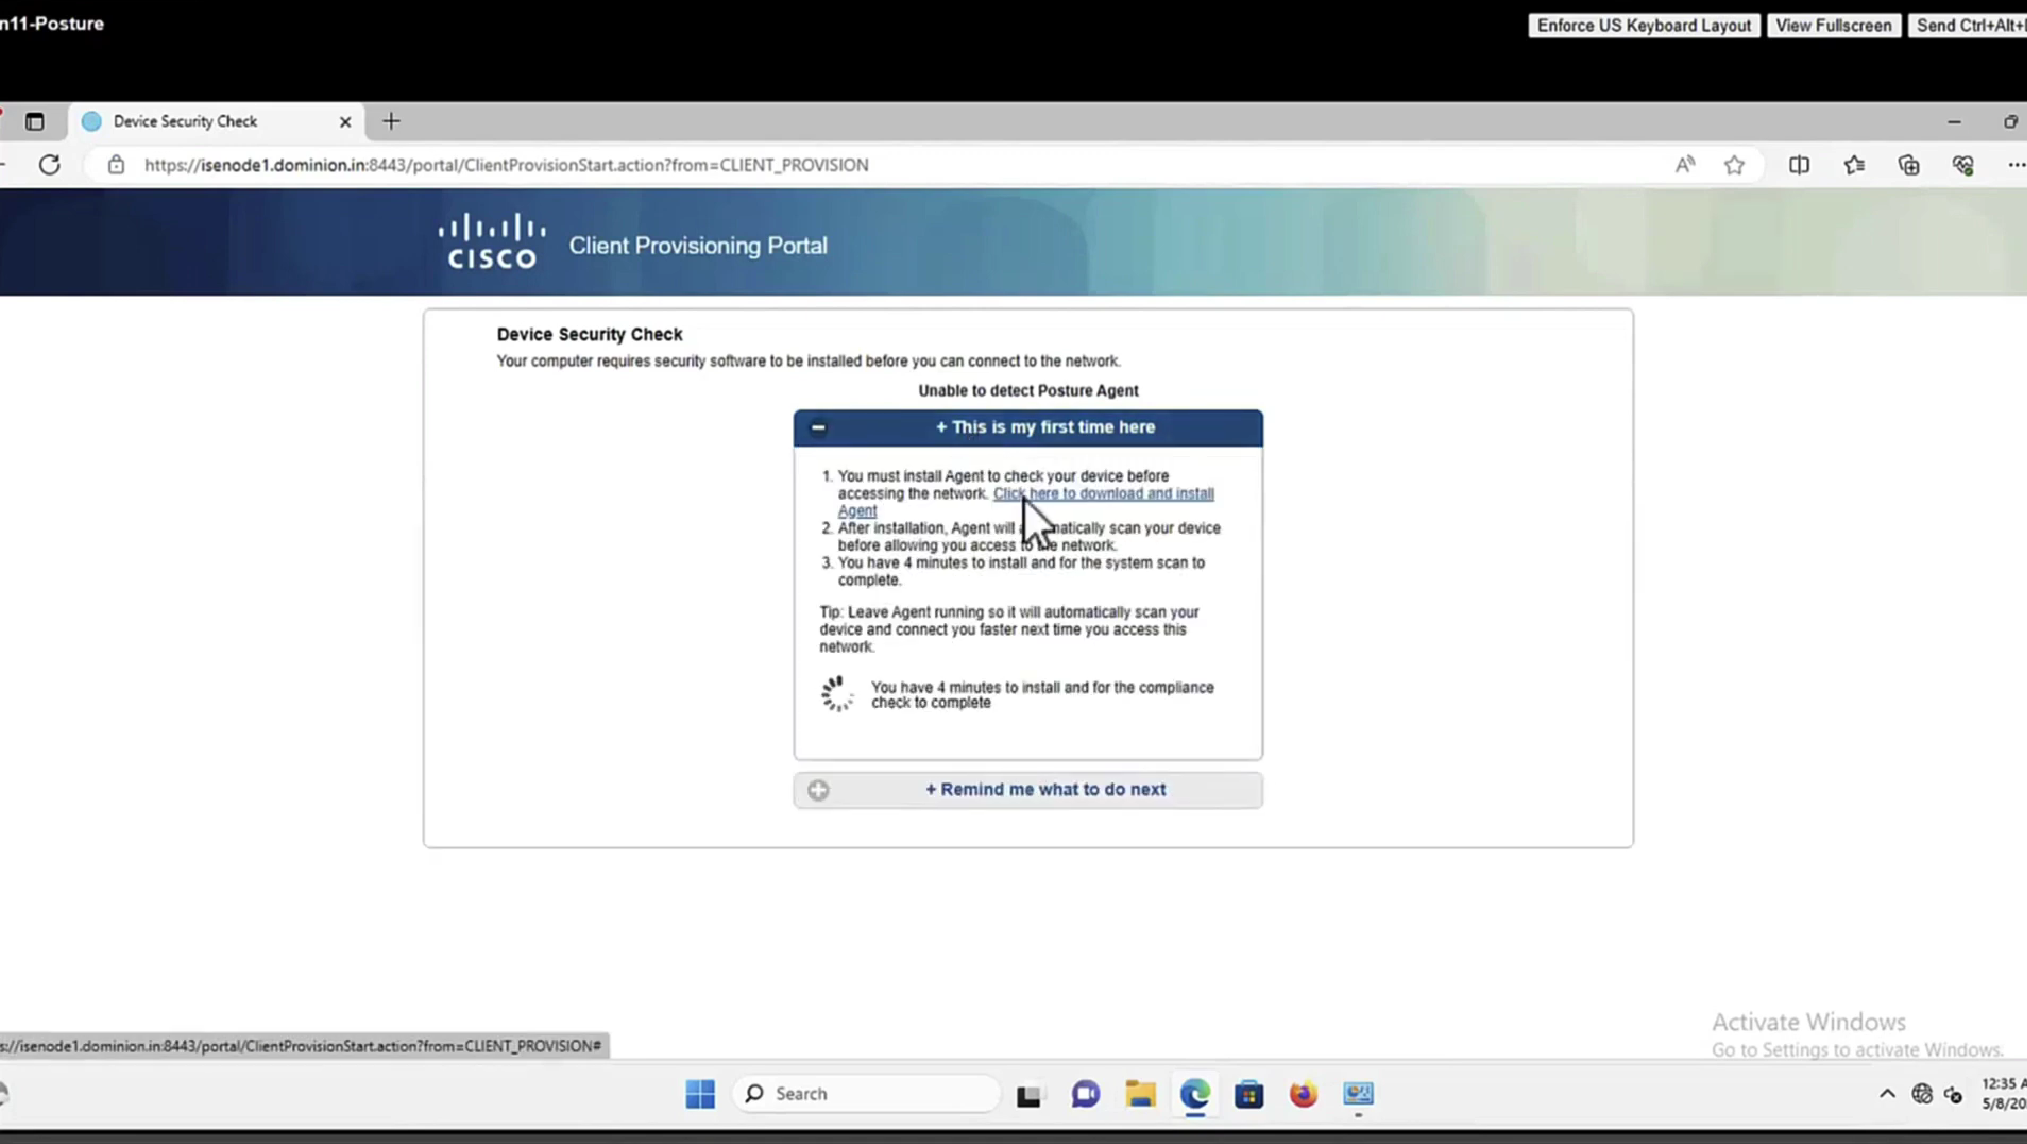


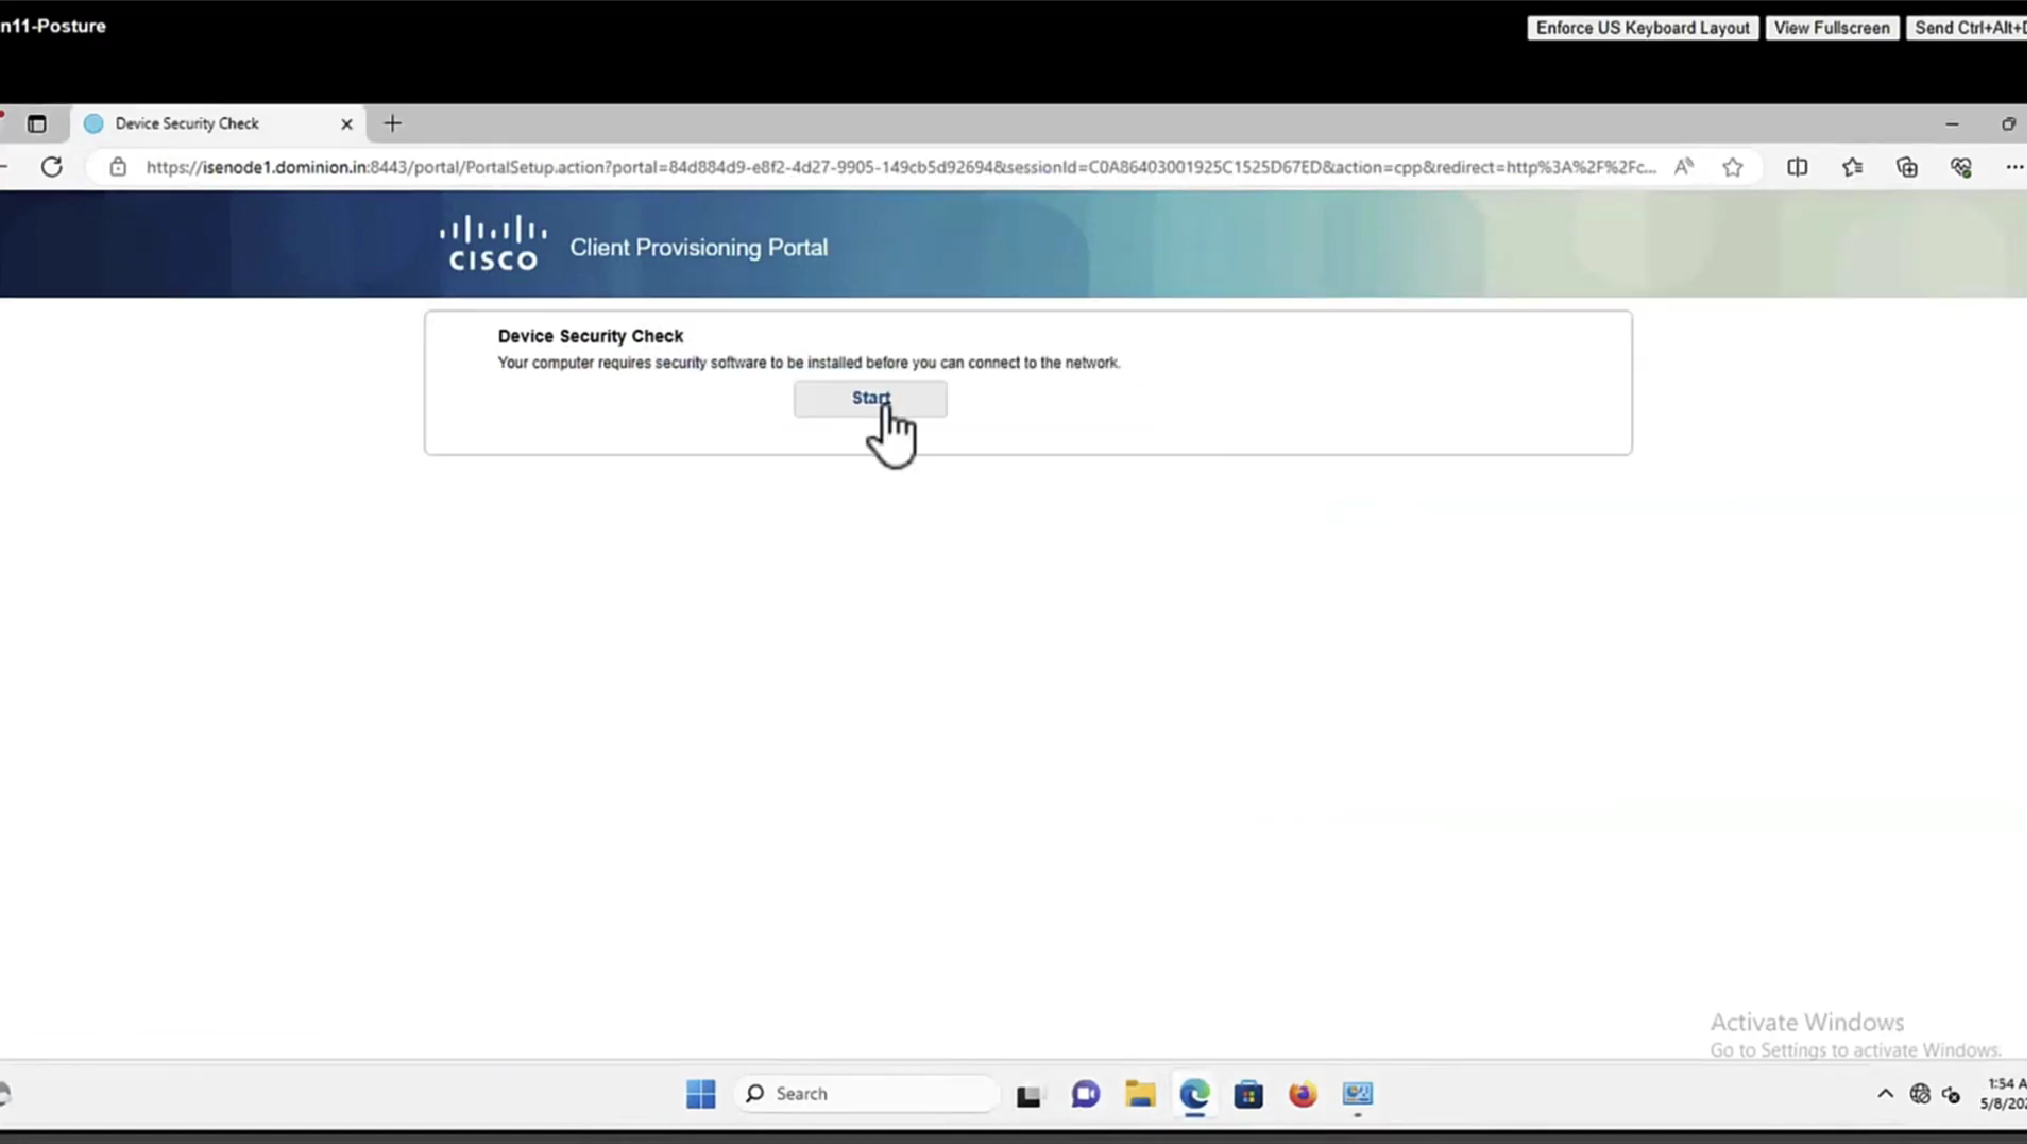


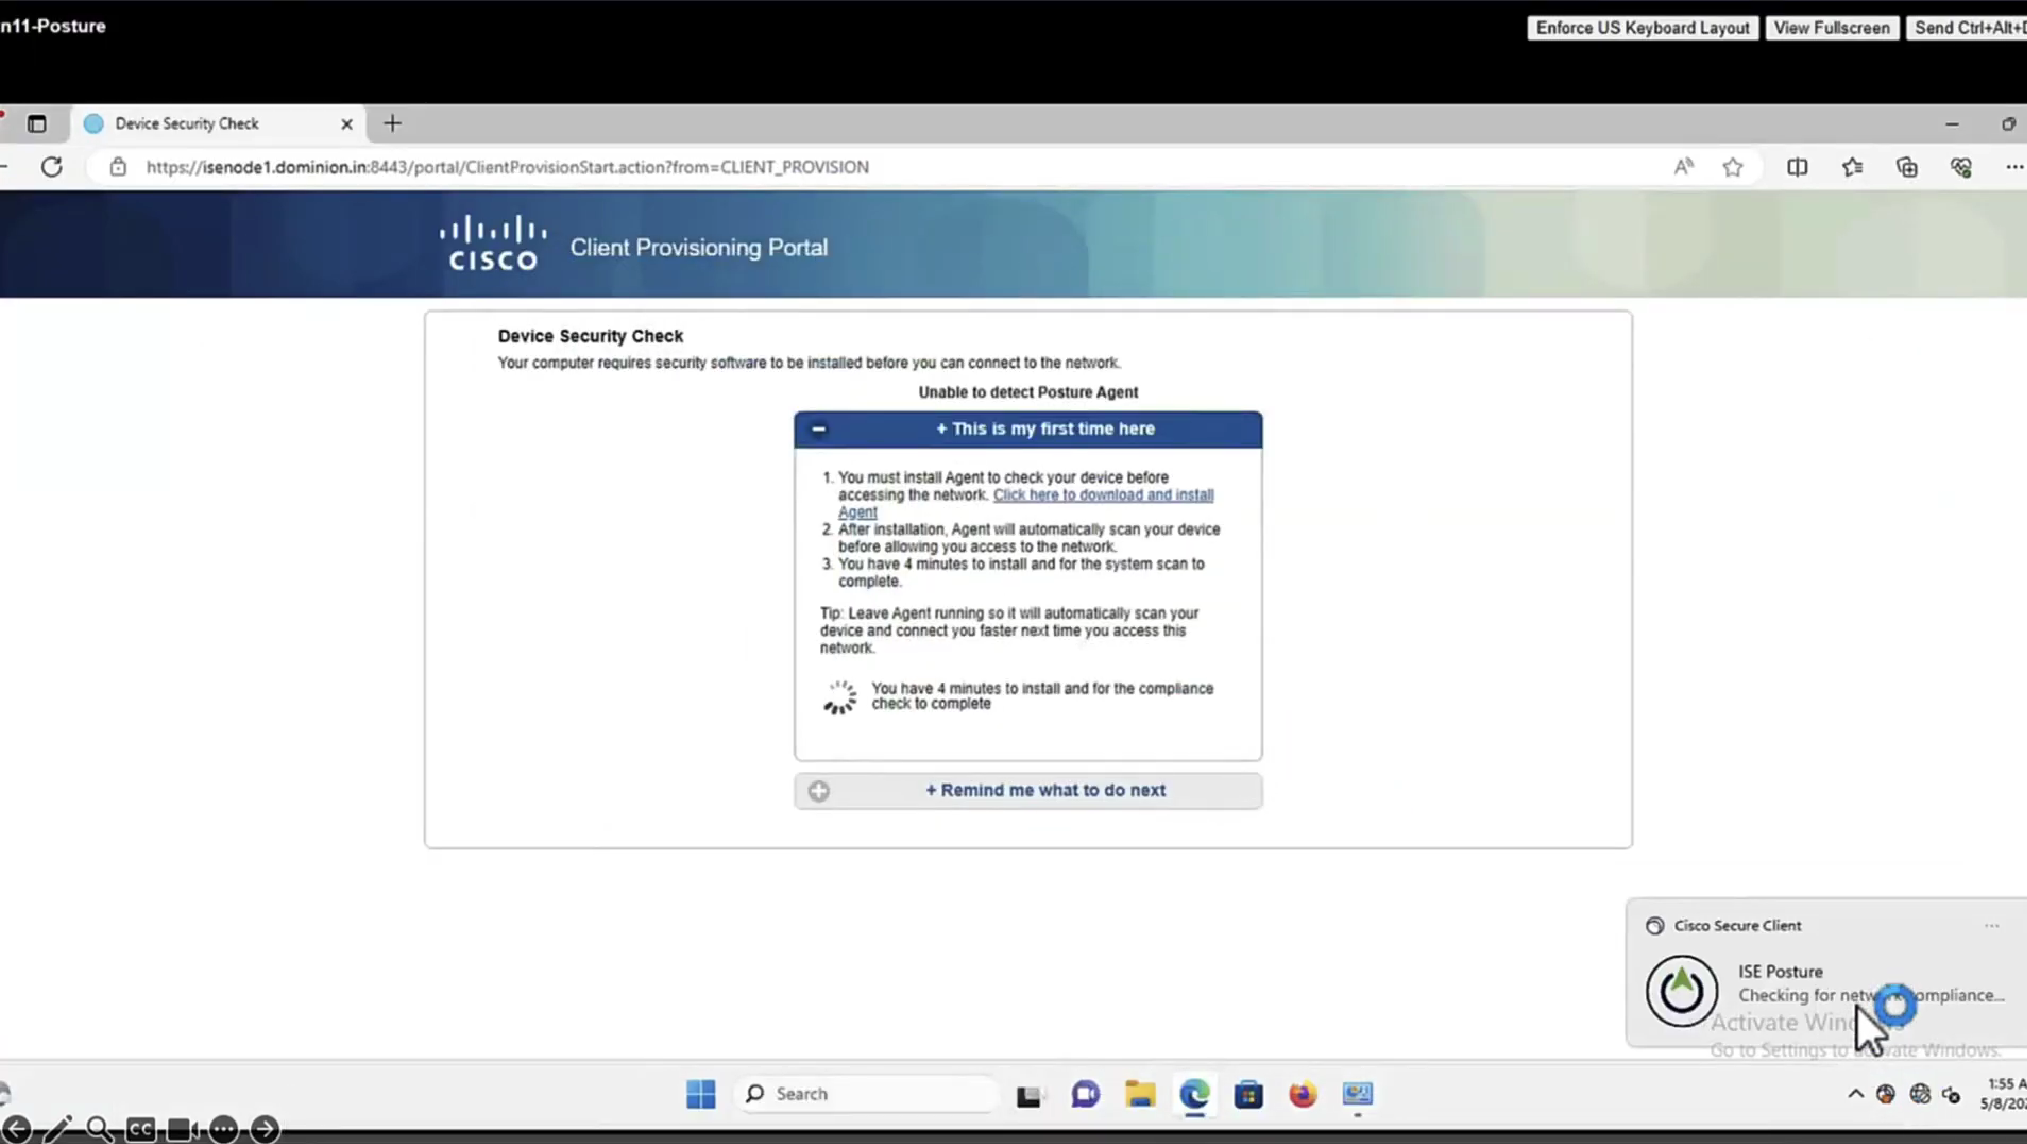


Deployment of agent through software distribution systems like SCCM etc does not require all of this redirect


you can have a situation where ISE thinks that endpoint is compliant but endpoint might be in non-compliant state, this is why “Posture State Synchronization Interval” needs to be set to 60 seconds, because states can be out of sync that is why “synchronisaton”


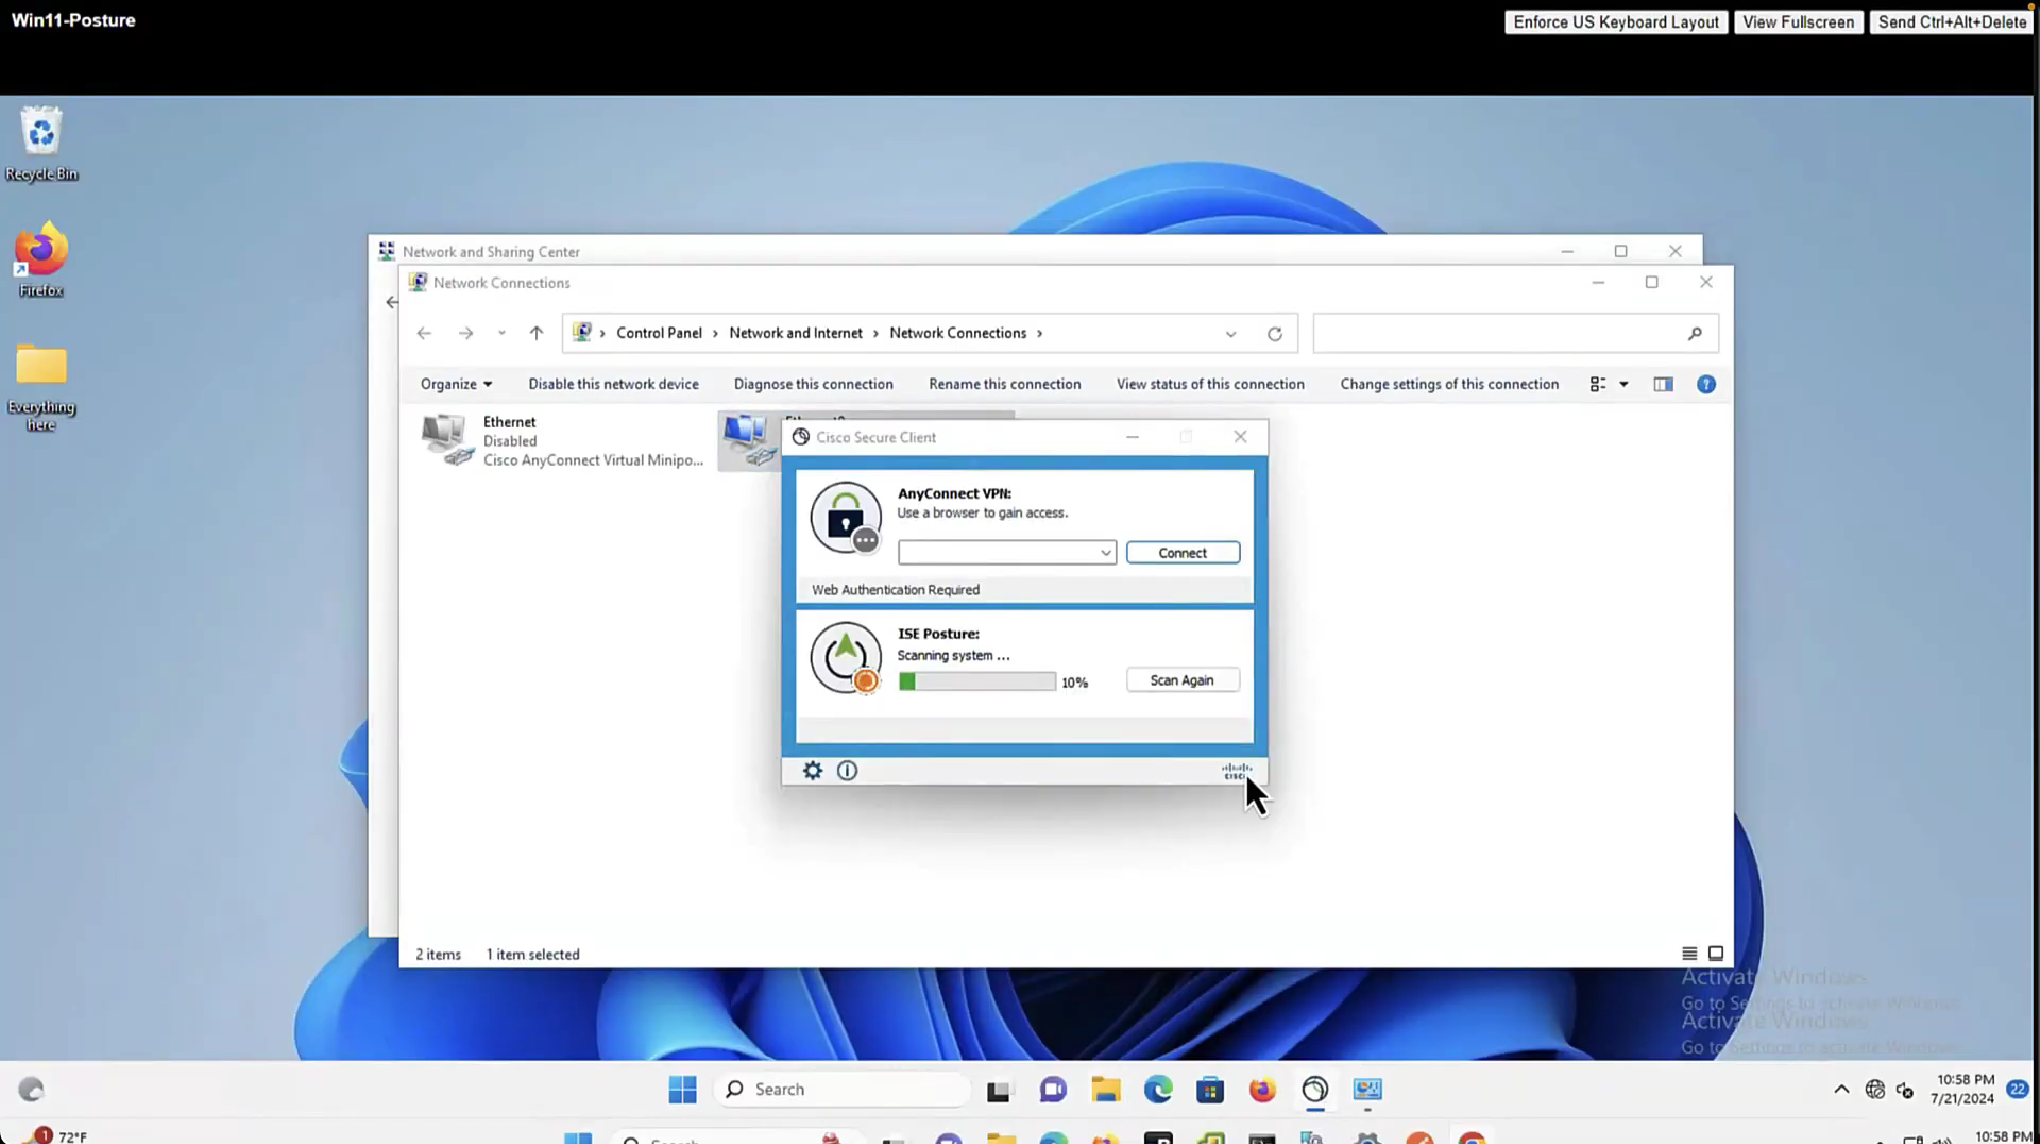
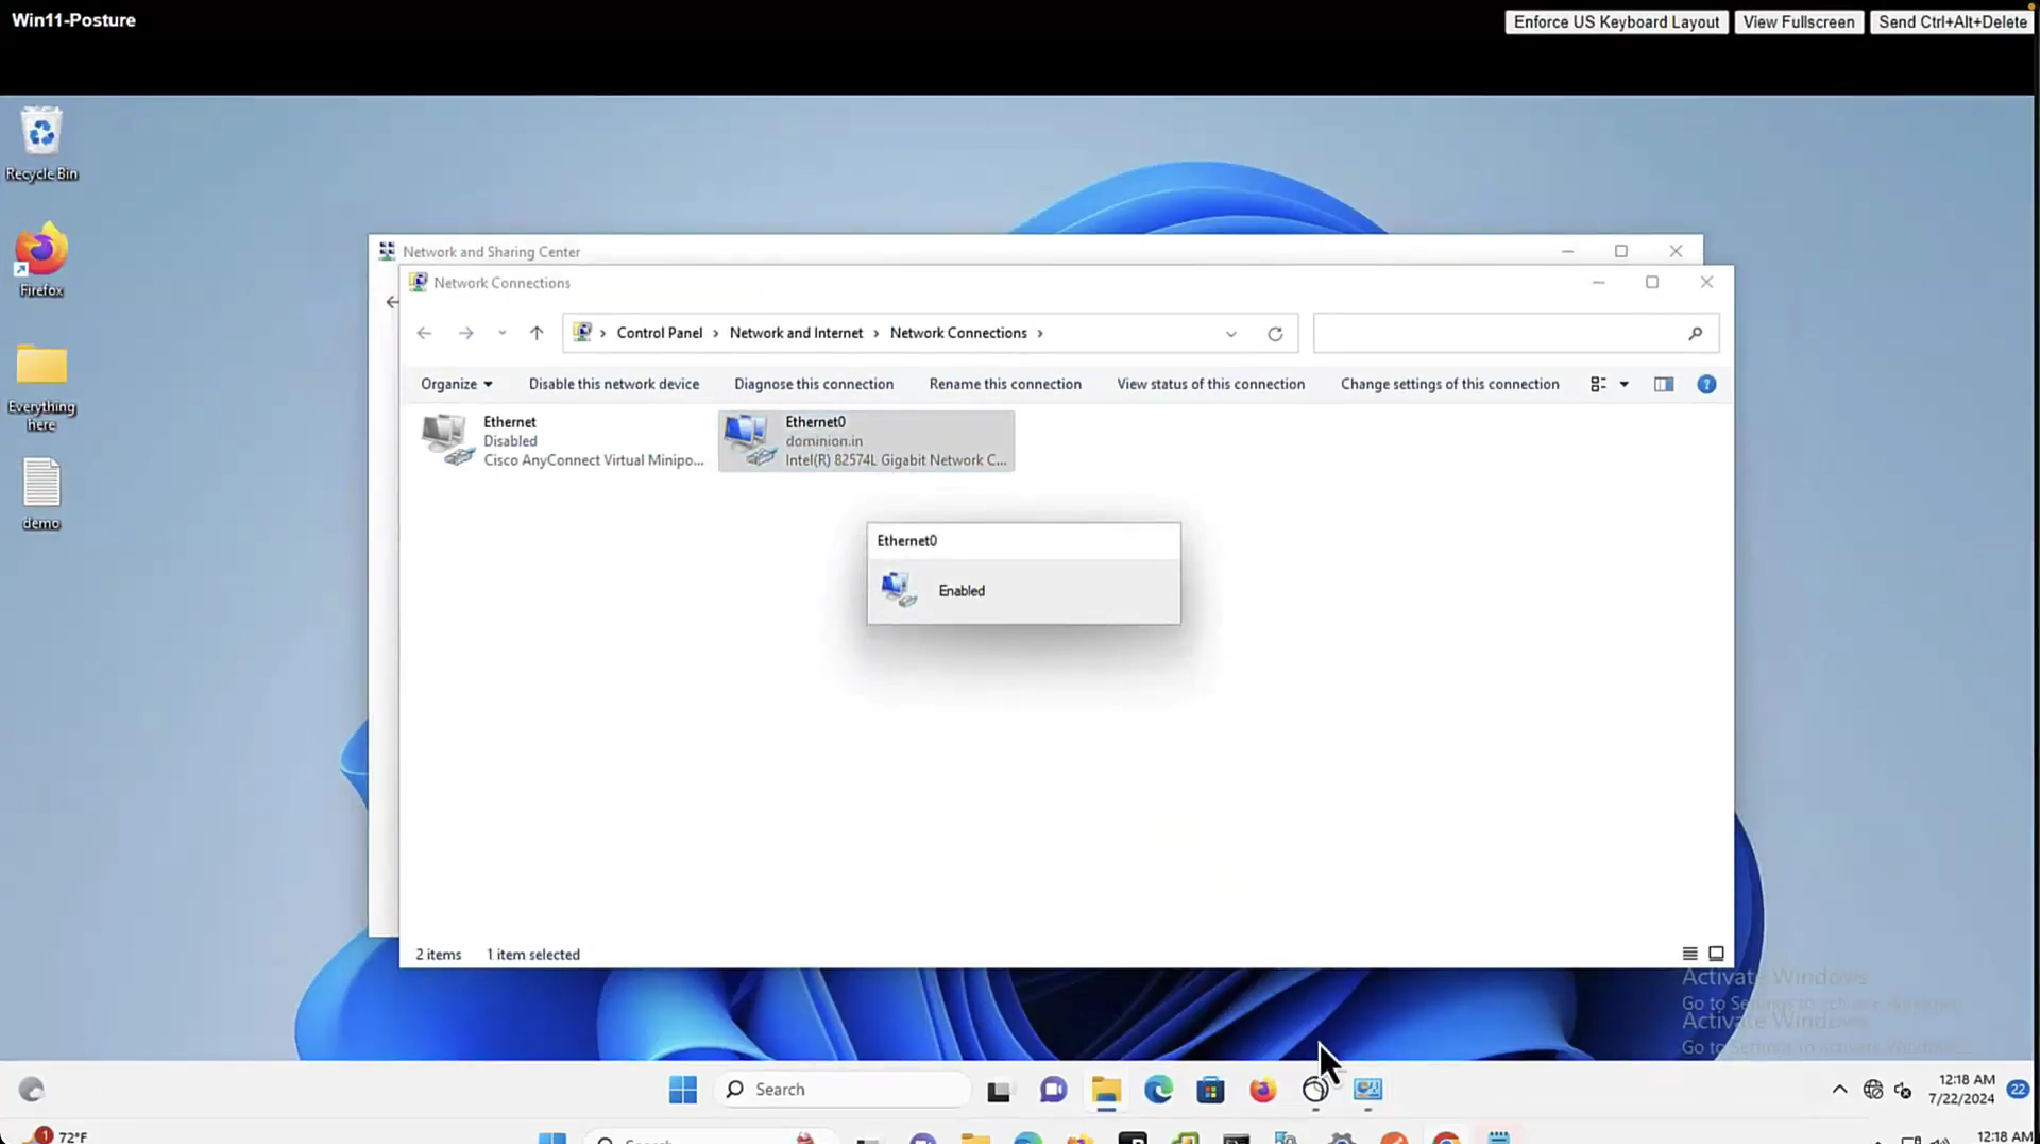
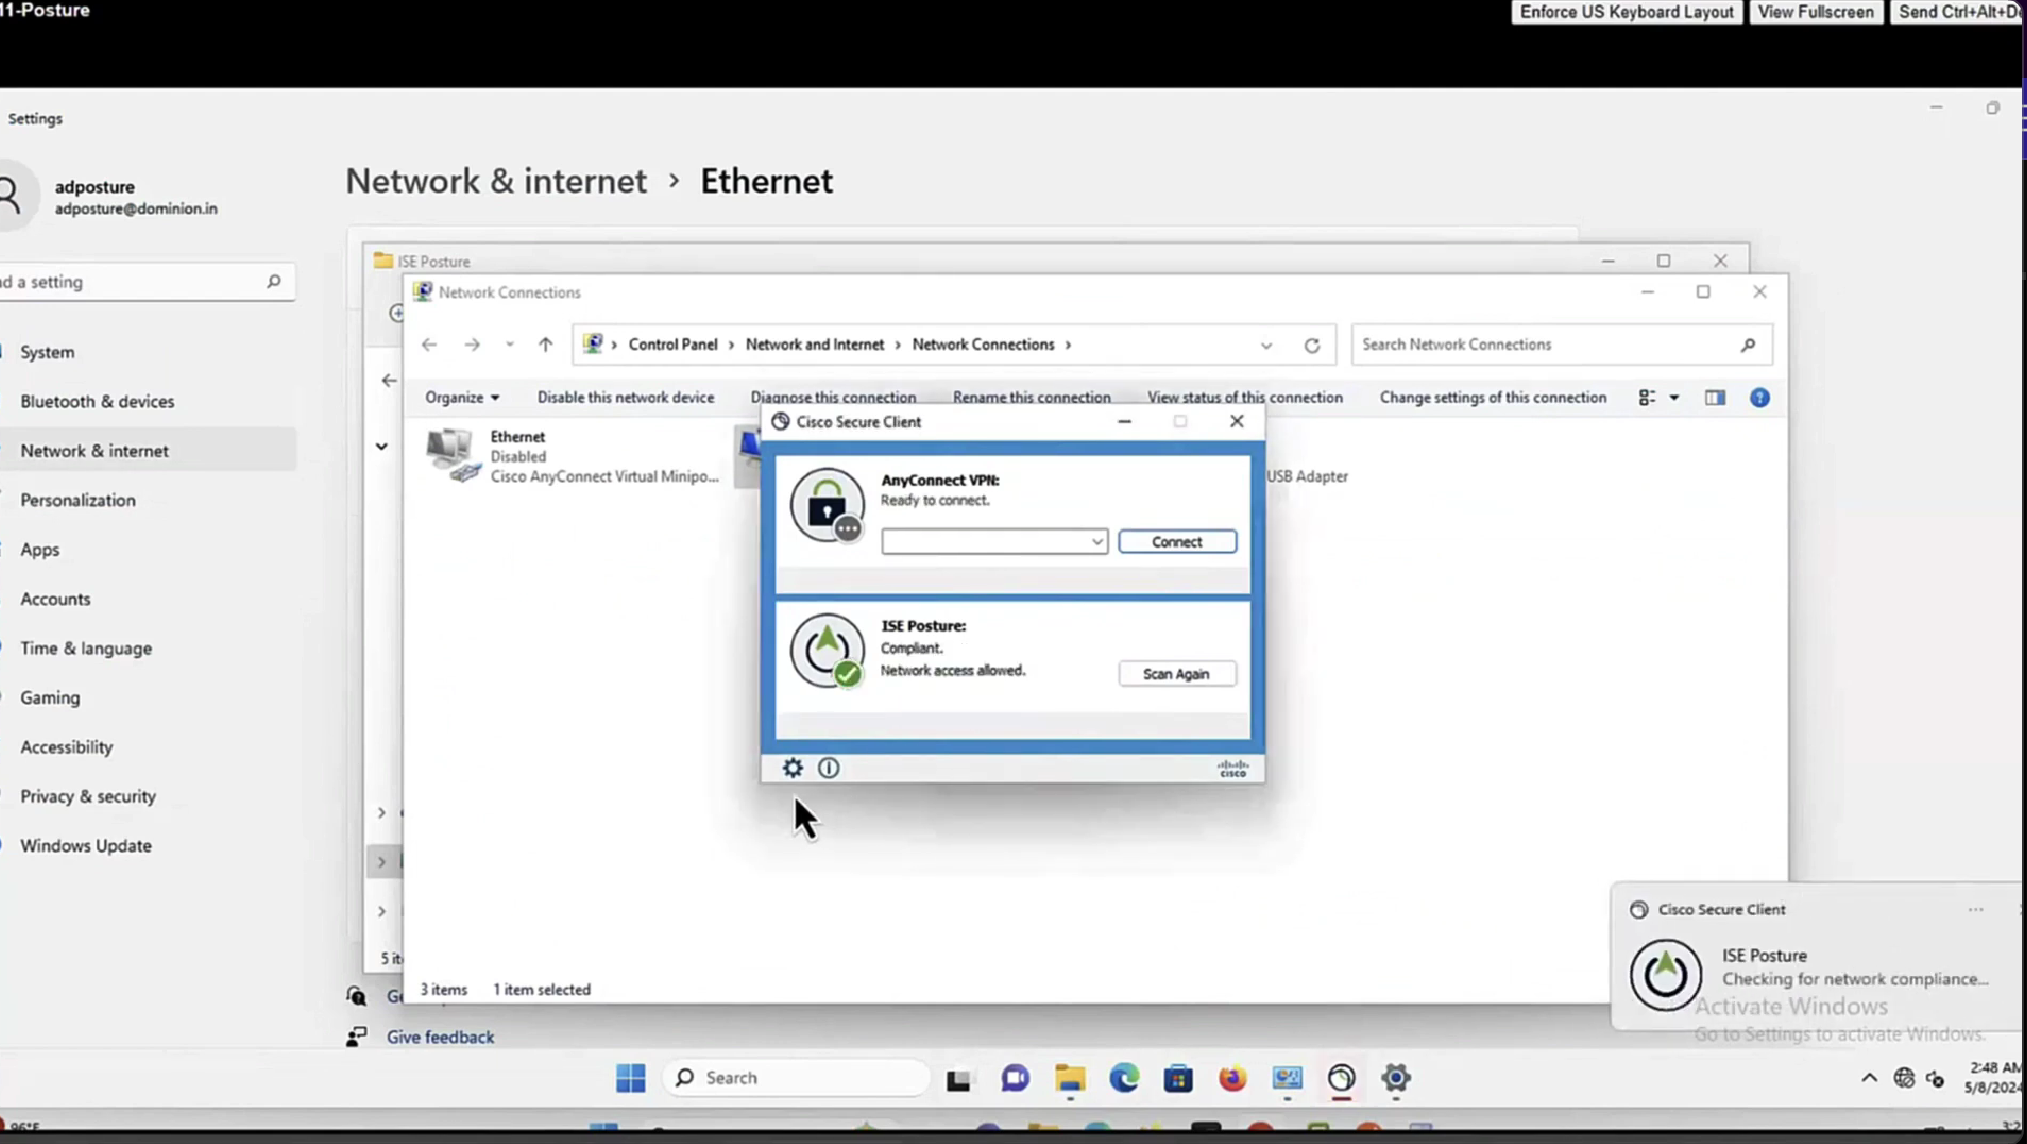
Enable and disable network adapter so Cisco Secure Client can get new posture profile that we configured and you can see that scan again button is now available as new posture profile was downloaded


lets remove URL redirect from the Posture-Unknown-Access Authorization profile (redirectionless mode)

Keeping of ACL initial in Posture-Unknown-Access Authorization profile

From live sessions we will terminate session


Here now stage 2 discovery process is in play


Notice there was no redirect


Notice there is no URL redirect in result

We have not even configured any posture policies yet

If we run report Posture Assessment by Endpoint

Notice in report that Posture policy details section is empty, when agent is requesting posturing policies, they are being delivered empty


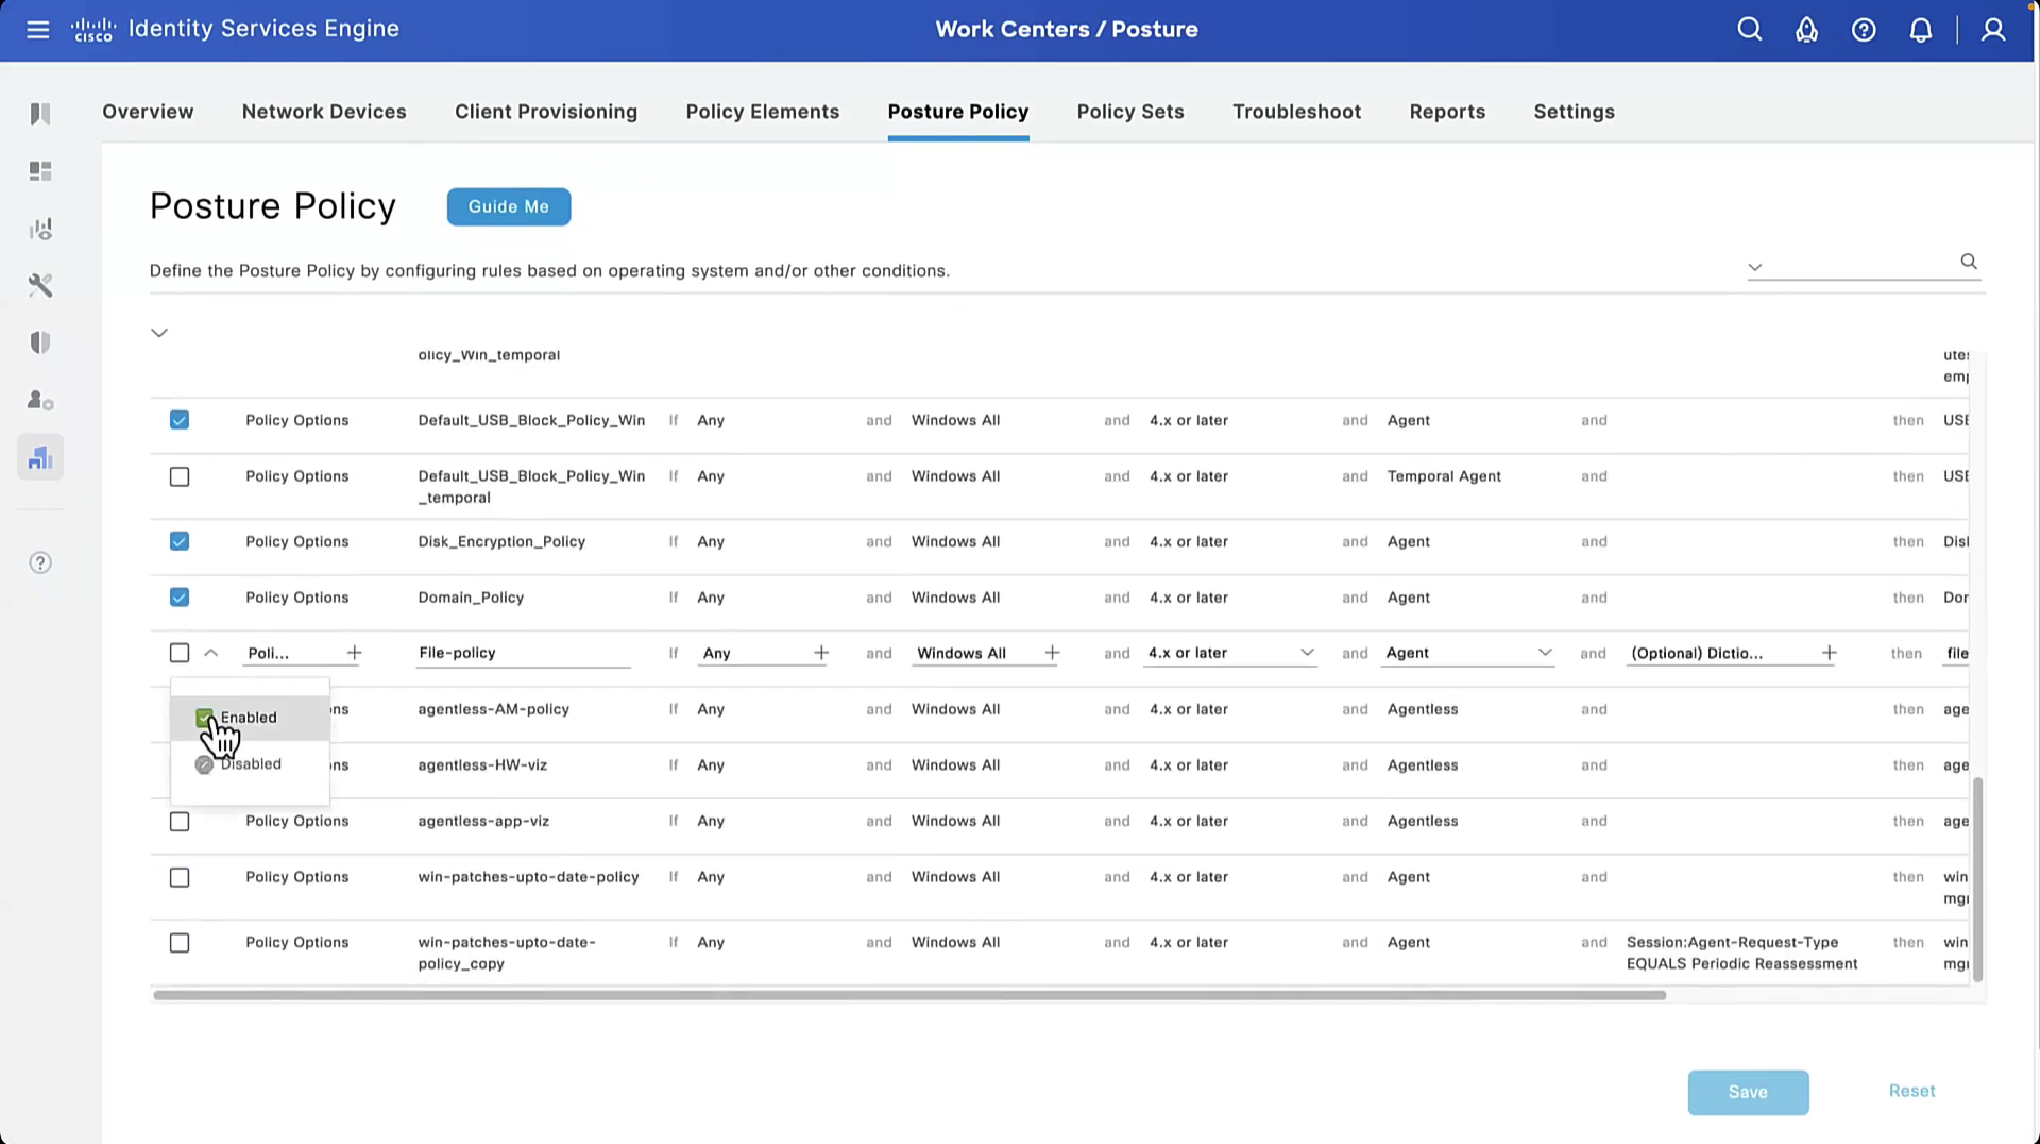
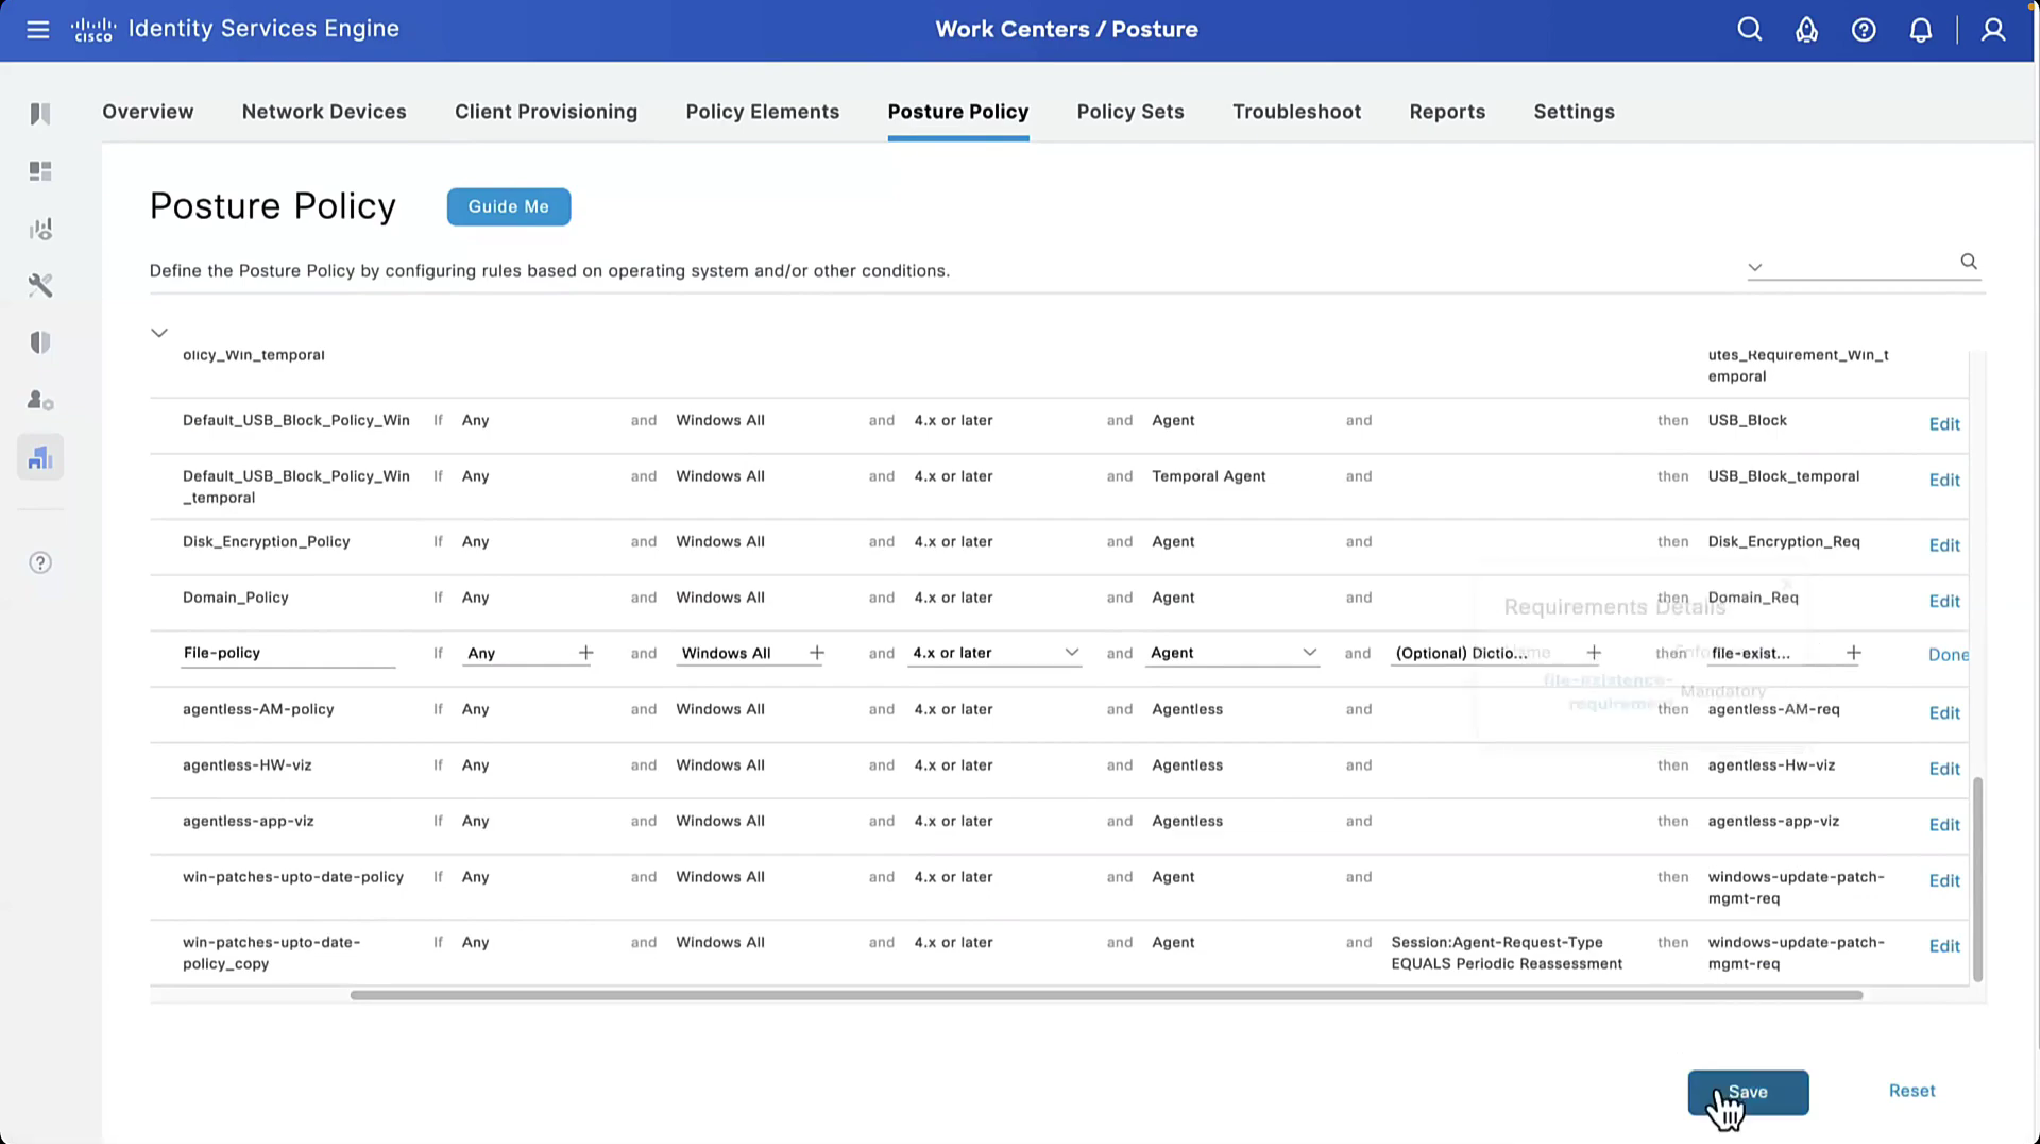
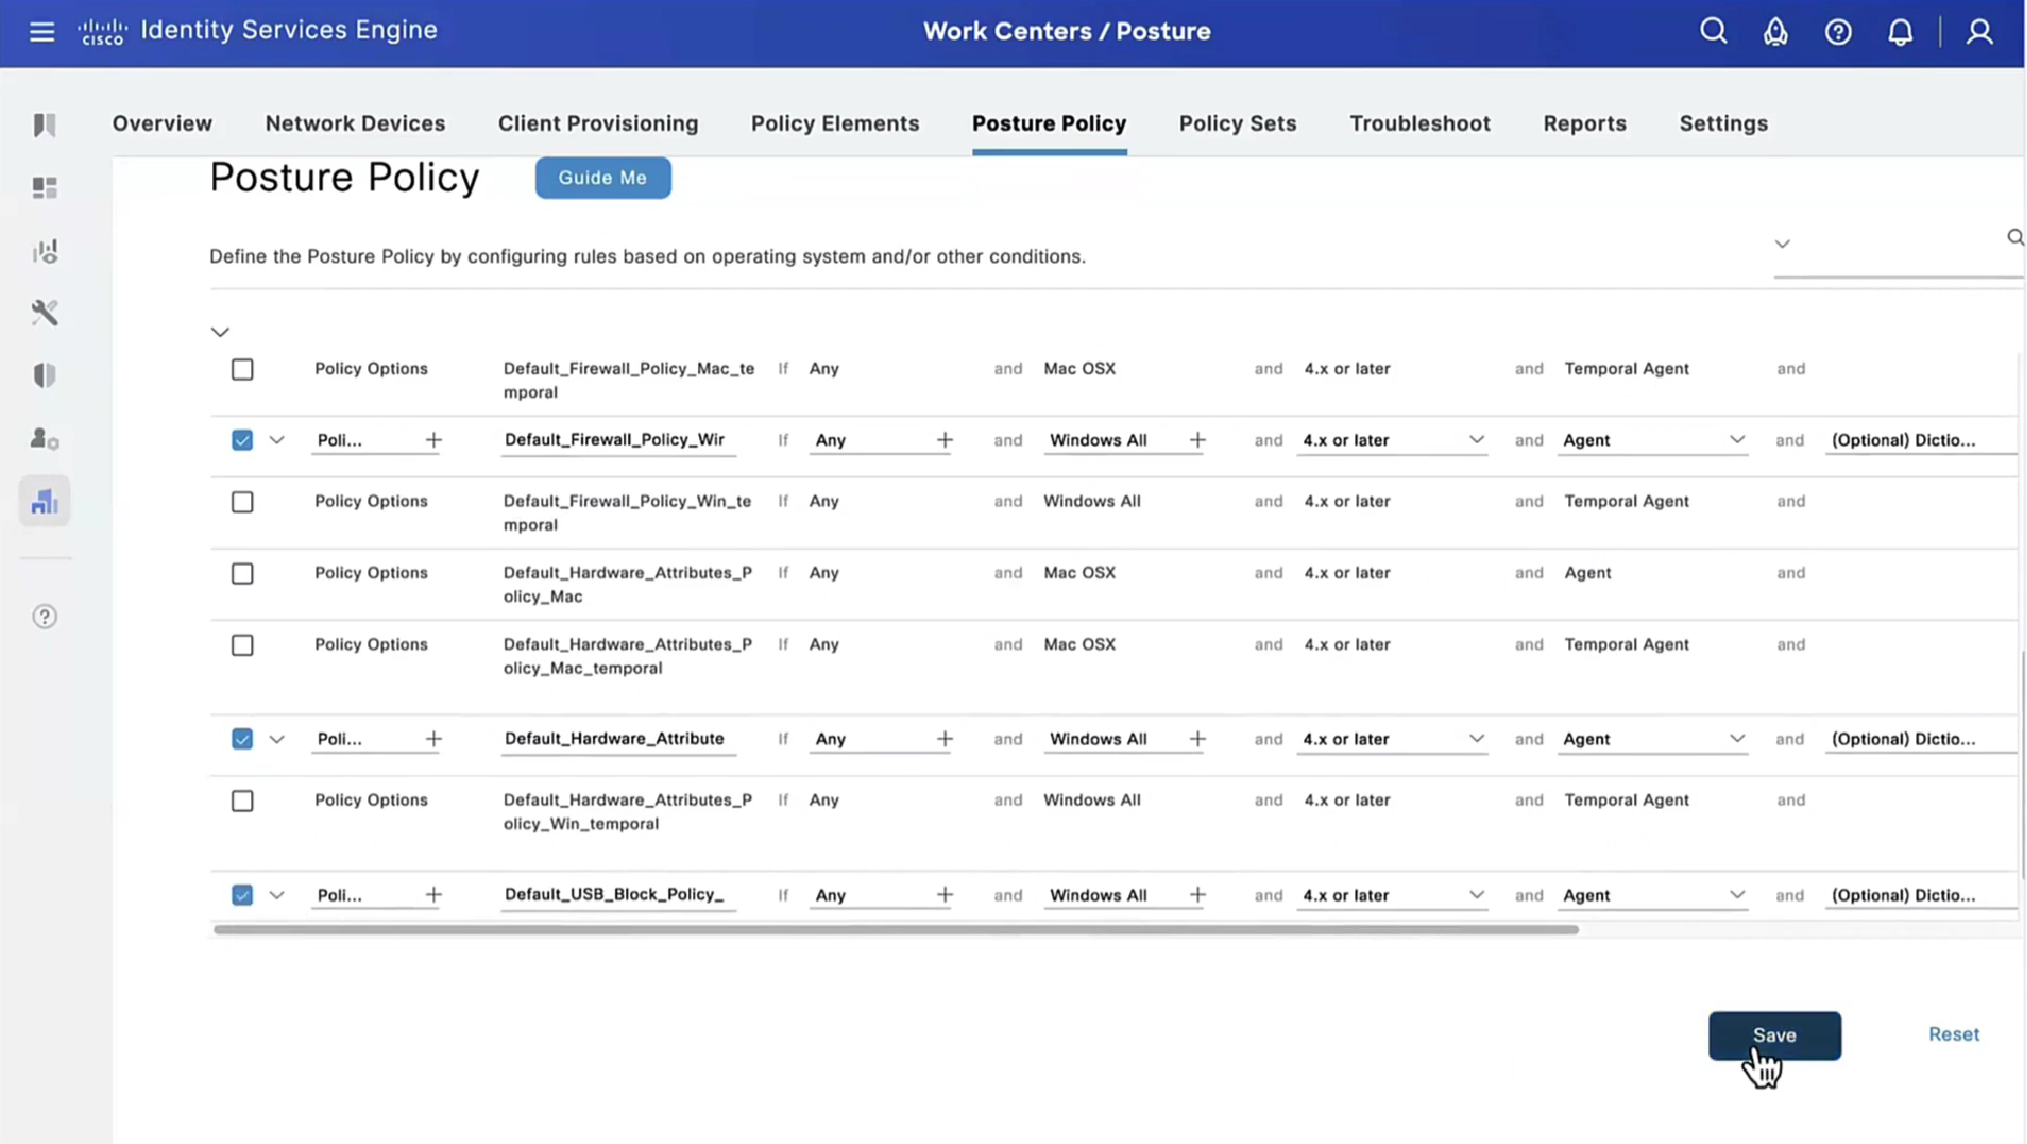
Lets “turn on” first default posture policy
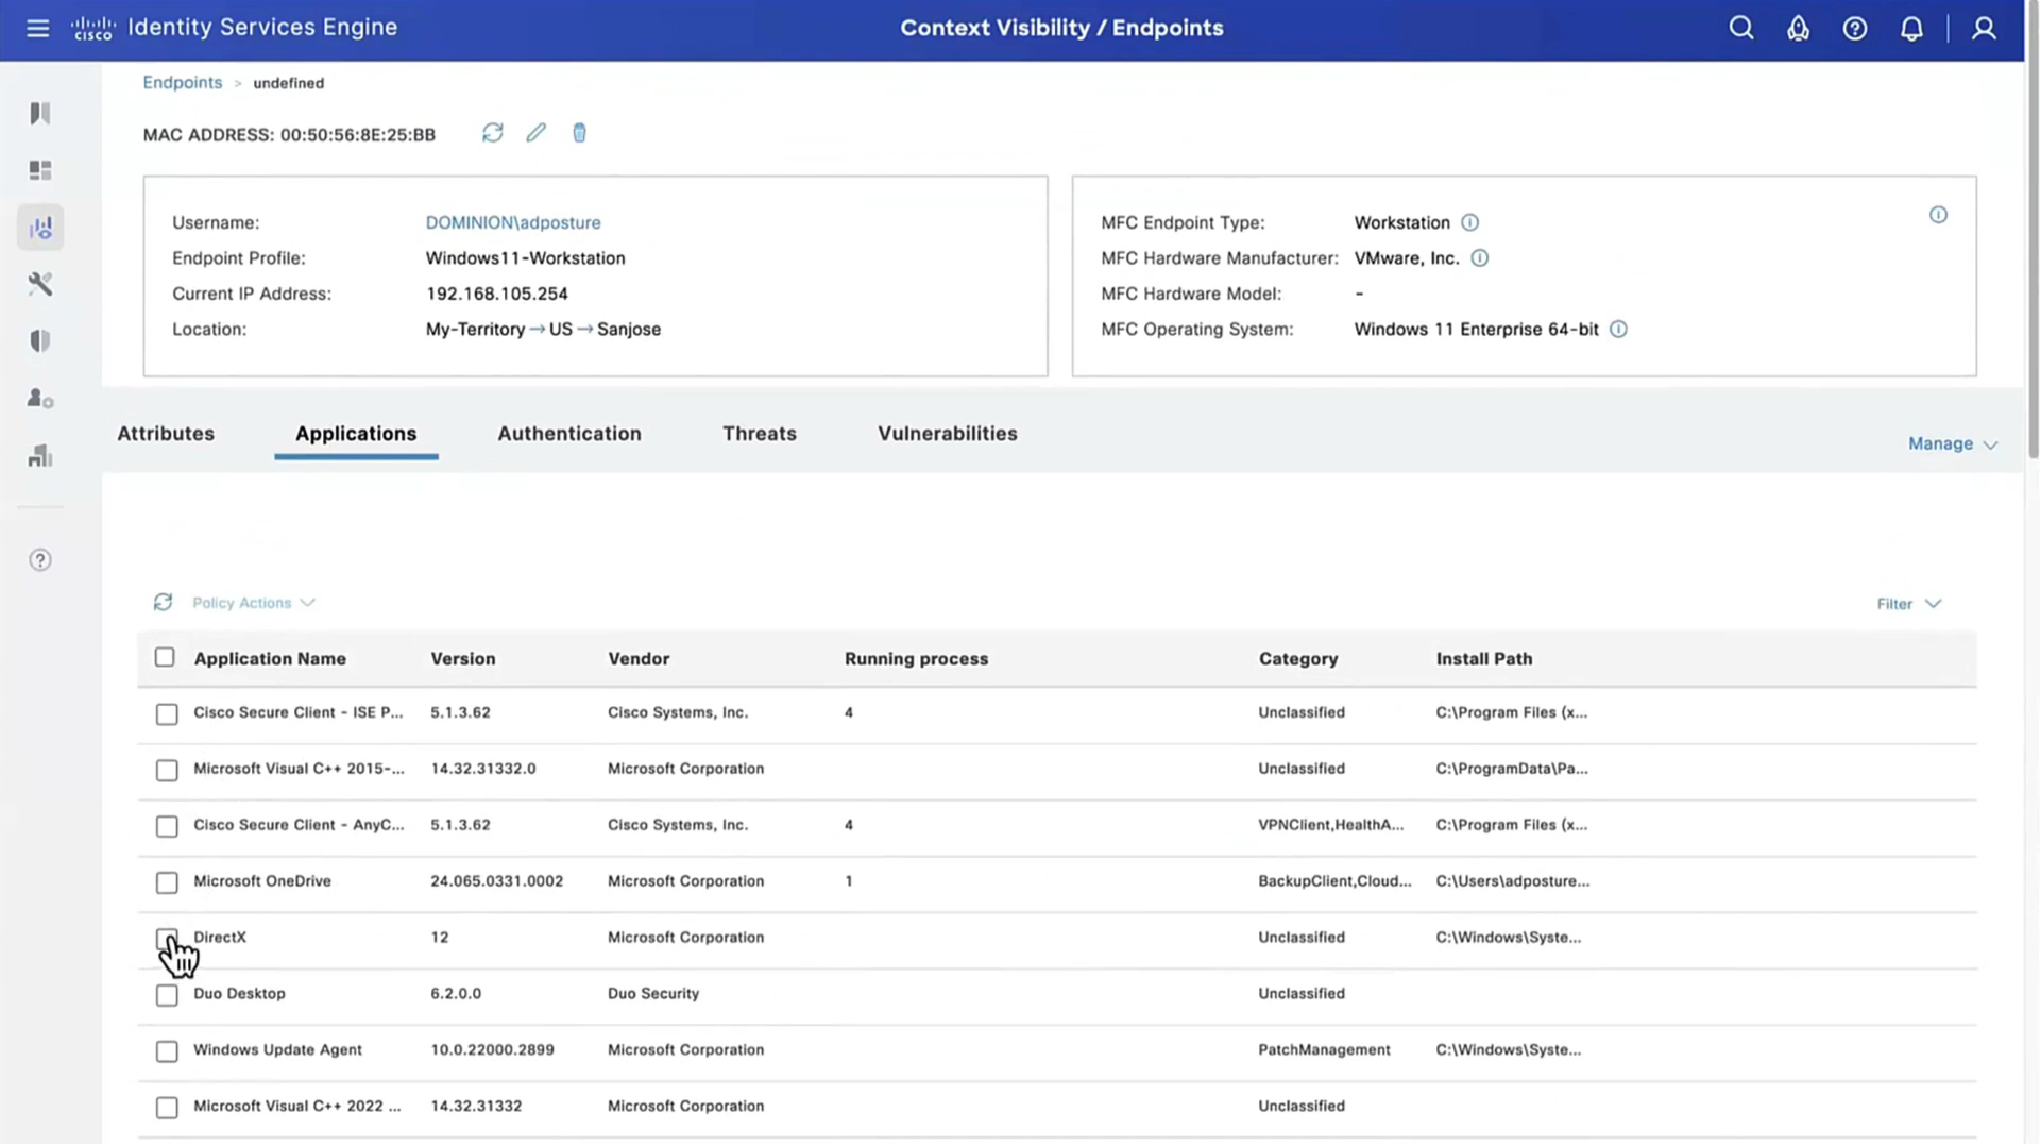
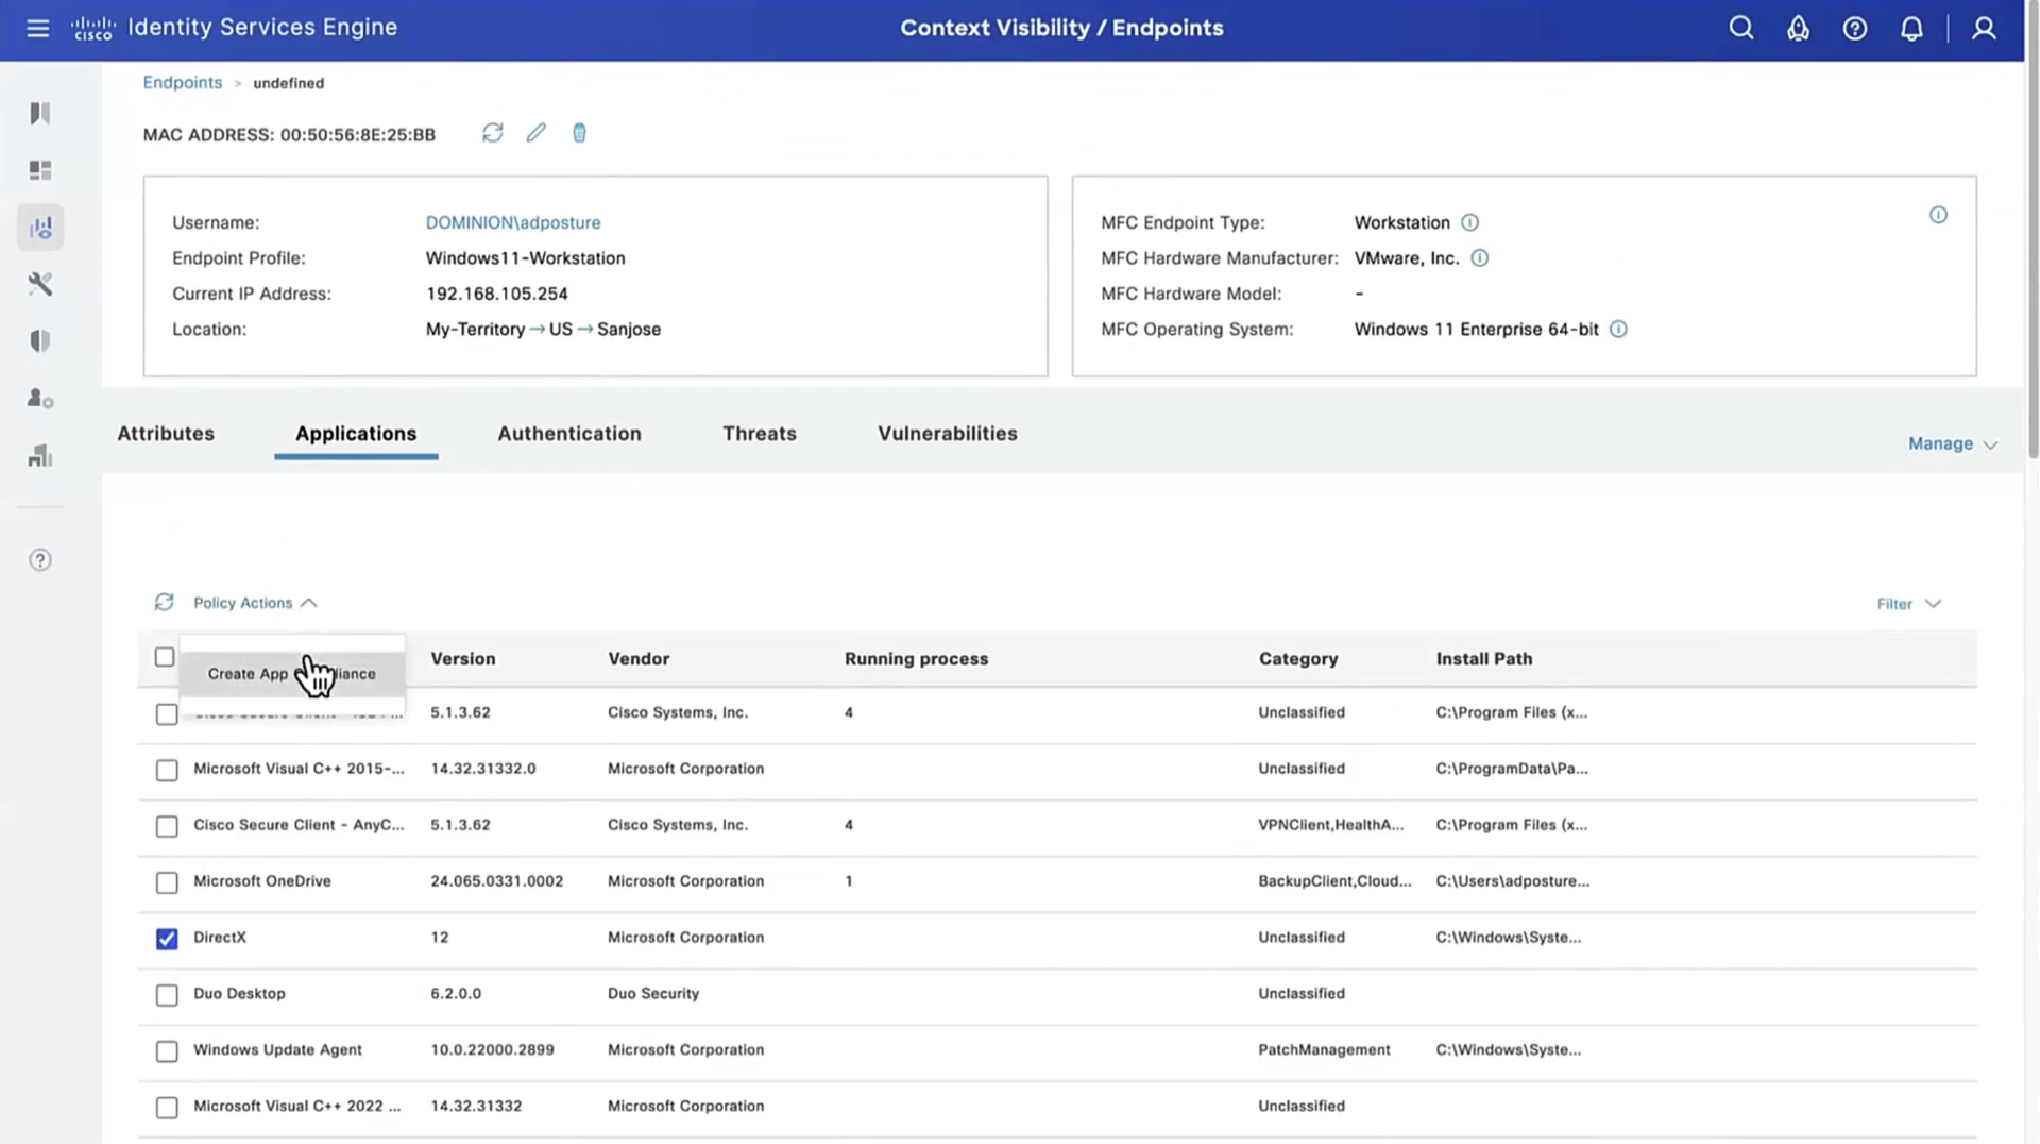
This policy retrieves the applications installed on endpoint just for visibility

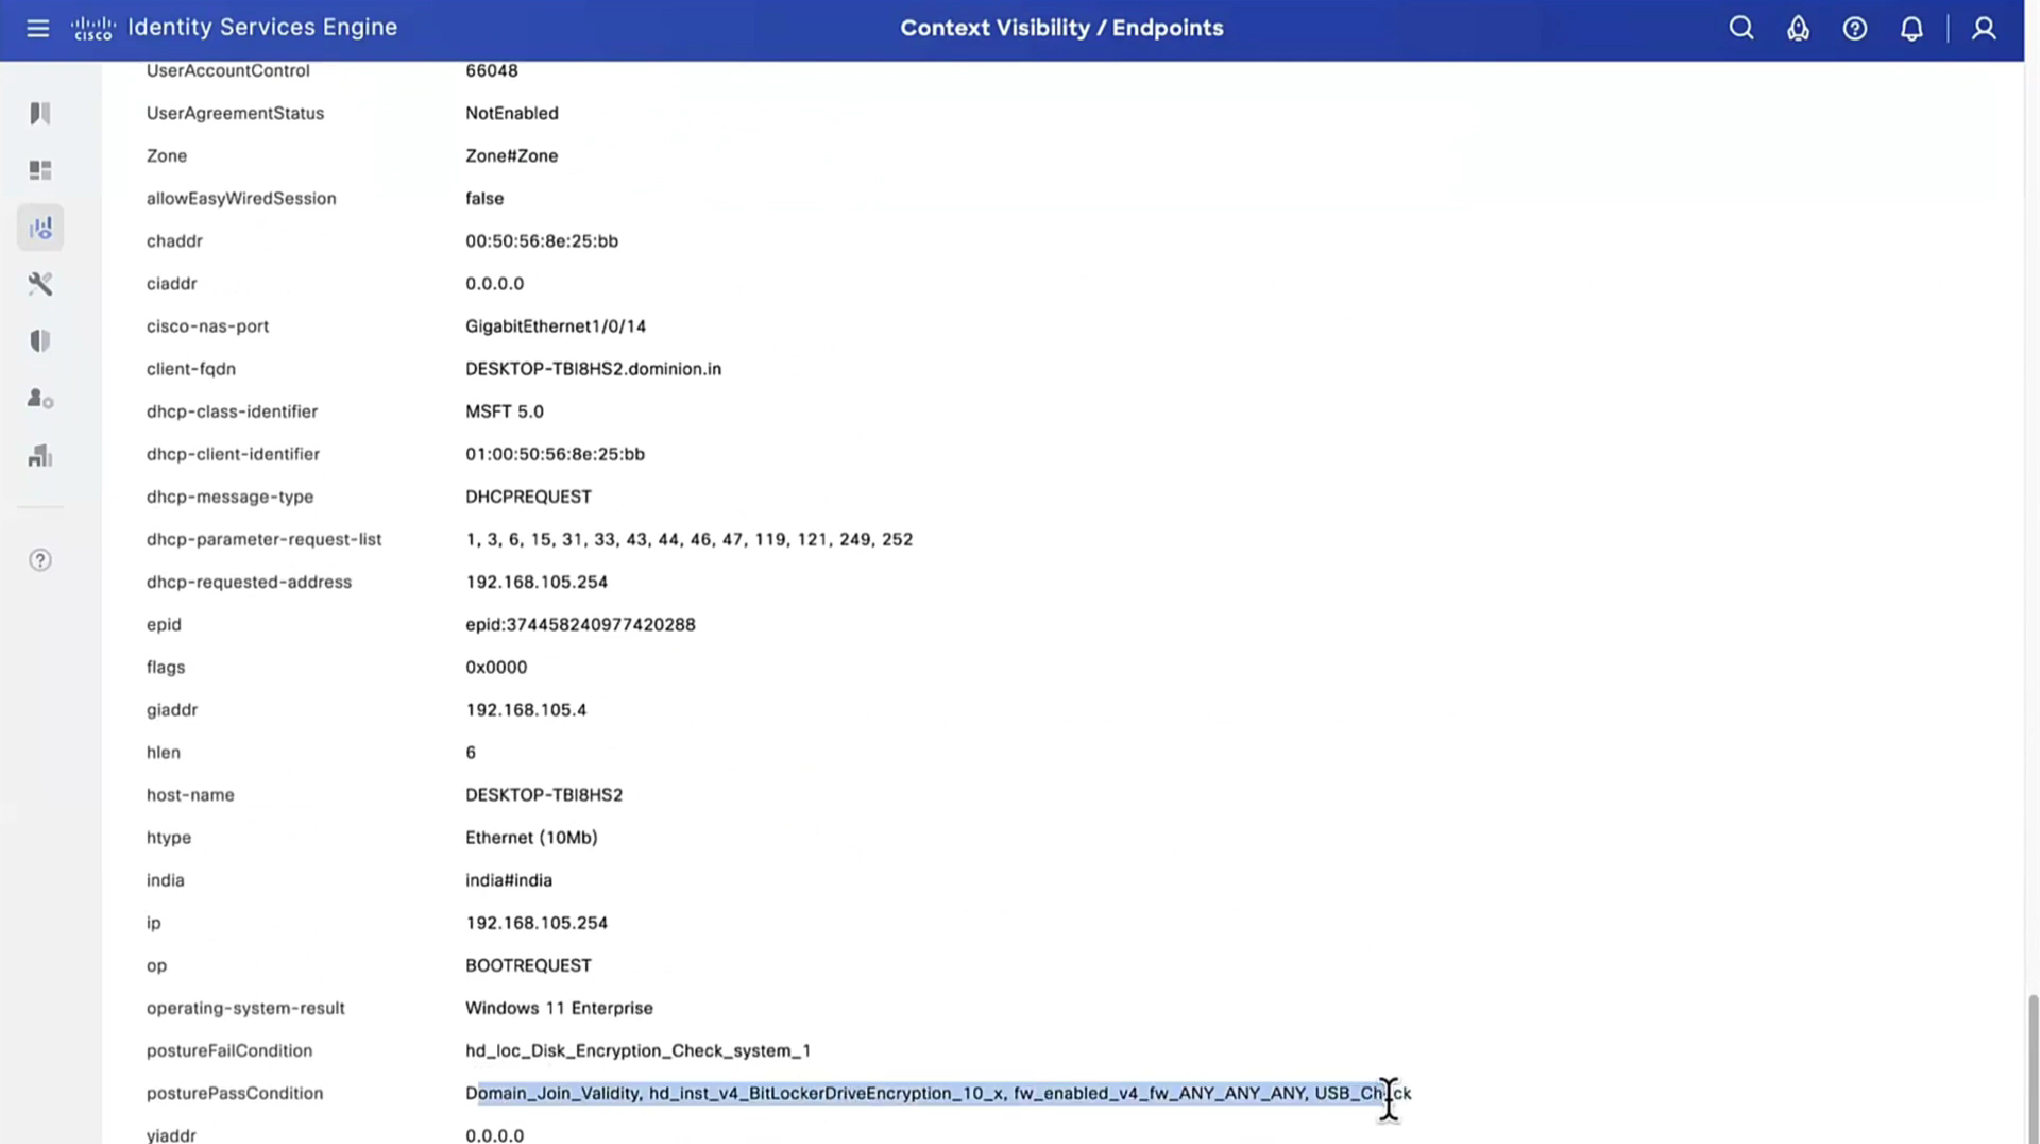
Second one we are turning on is to know if firewall is enabled on endpoint or not (because windows firewall can be disabled)

Third policy we are turning on retrieves hardware attributes on the endpoint just for visibility
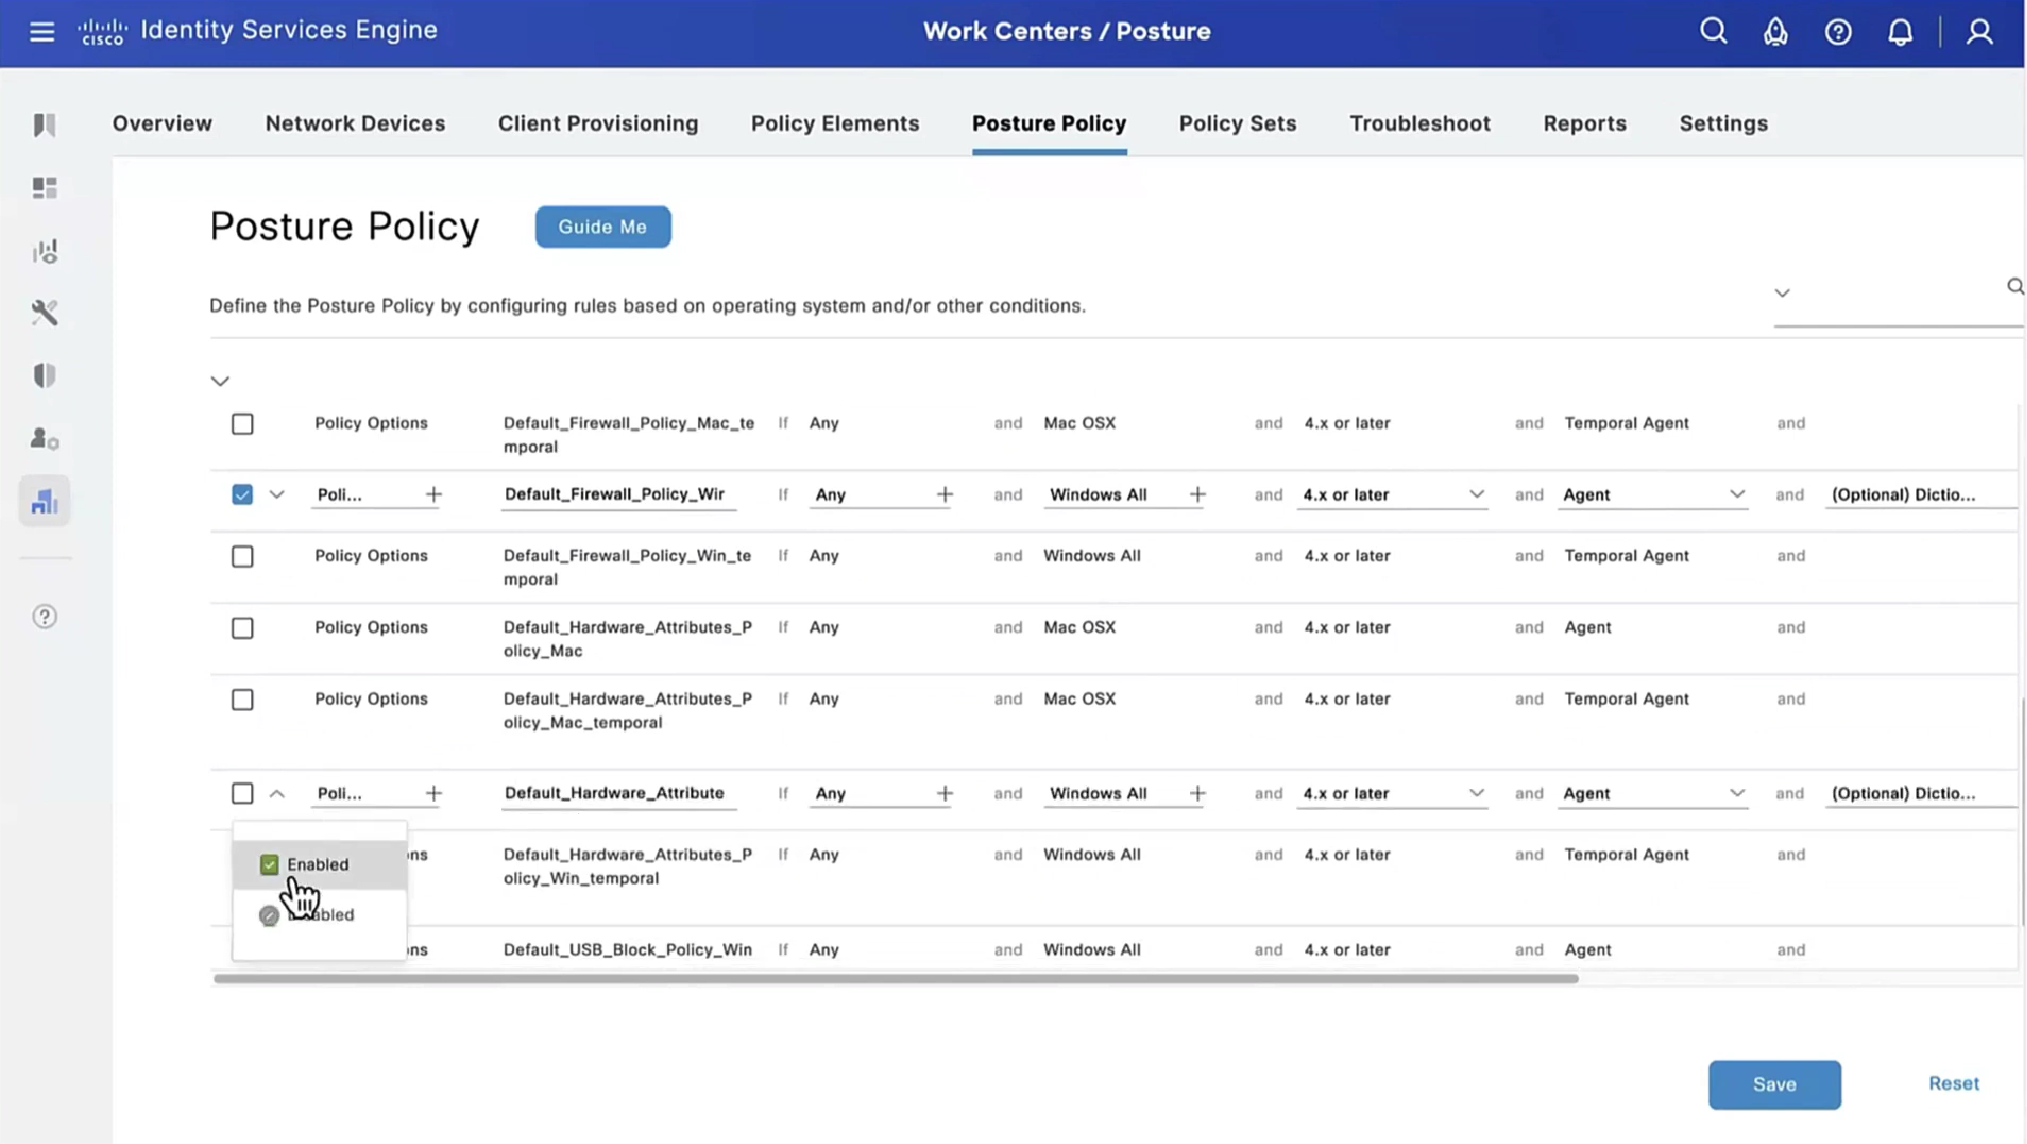
Fourth policy is to know if there is any USB plugged in or not
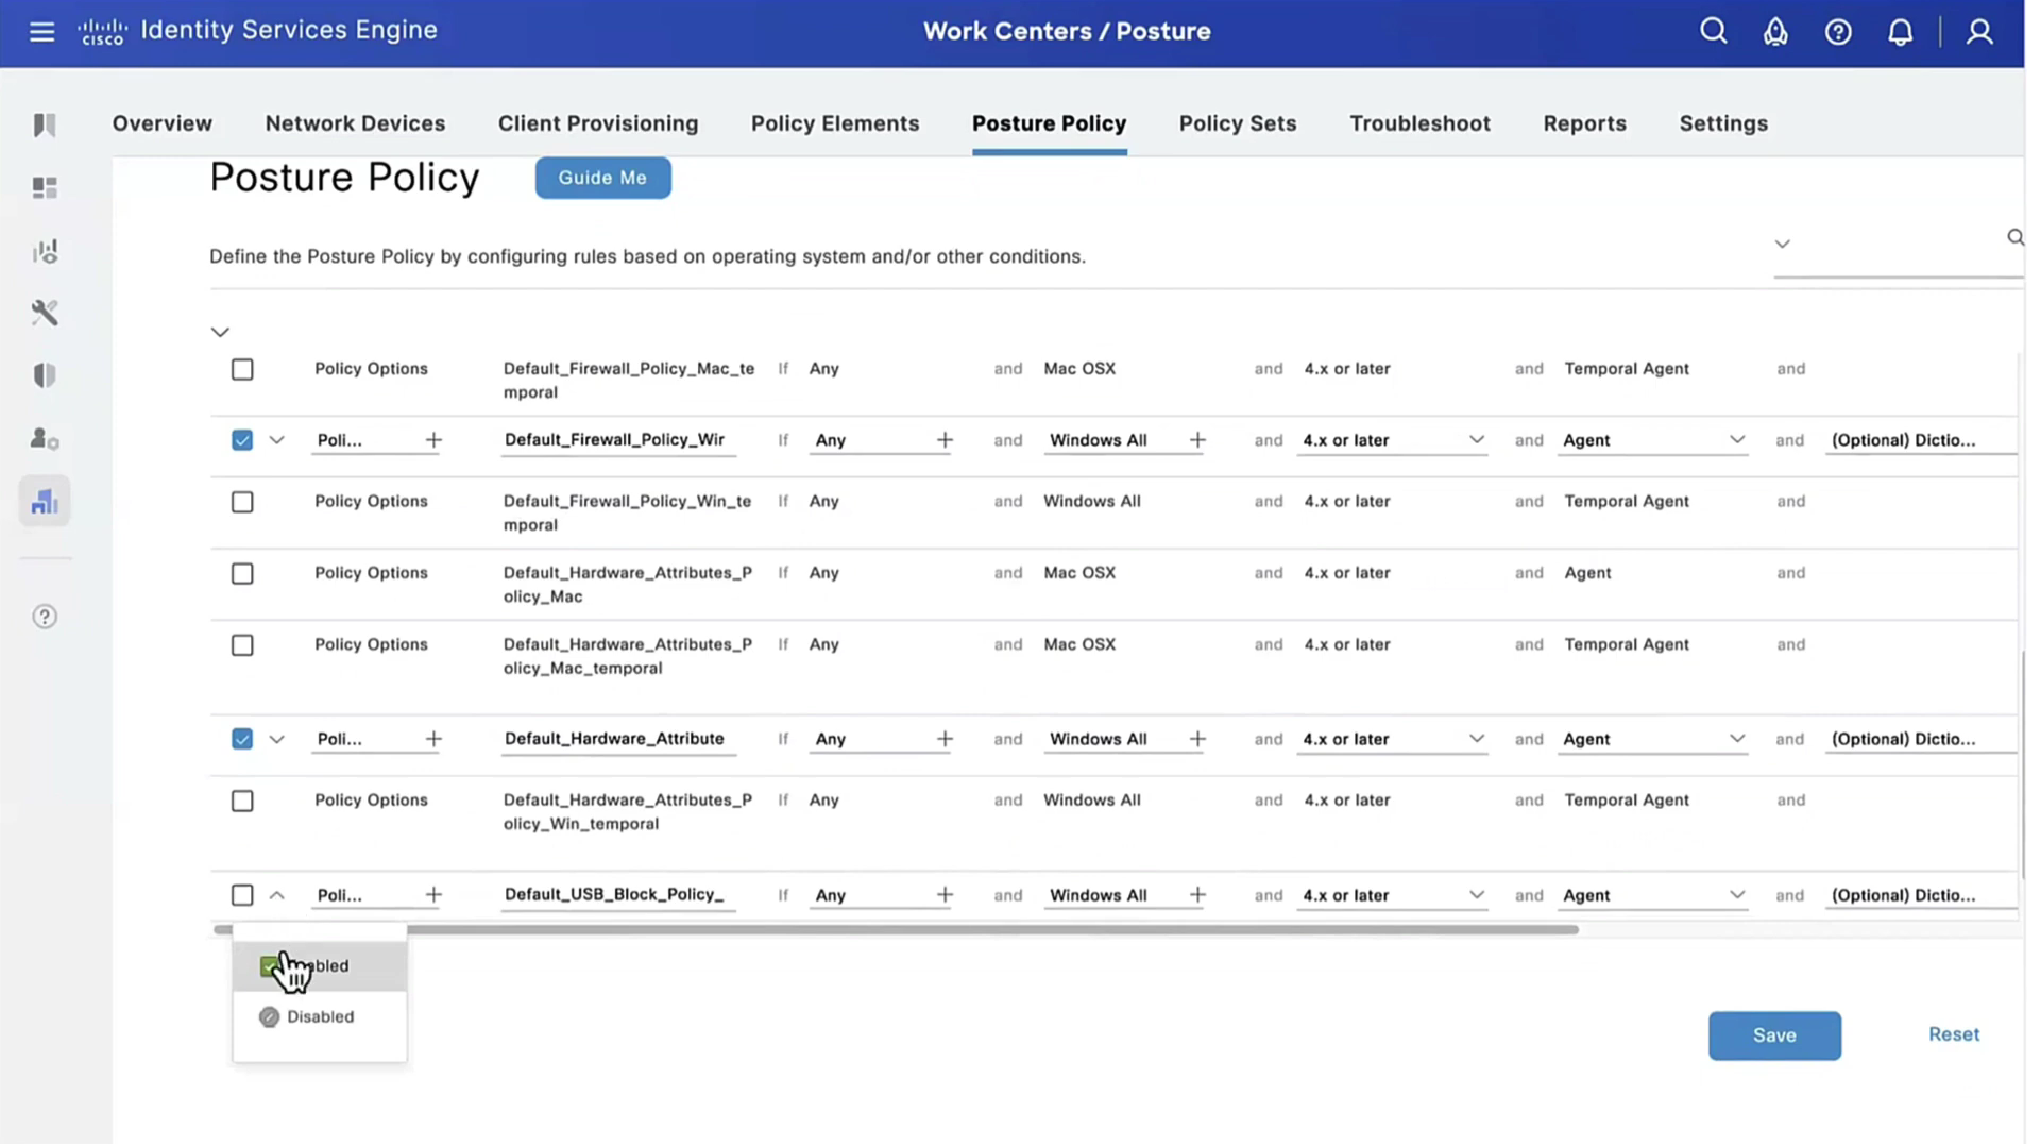

we purposefully disabled windows firewall for scope domain network
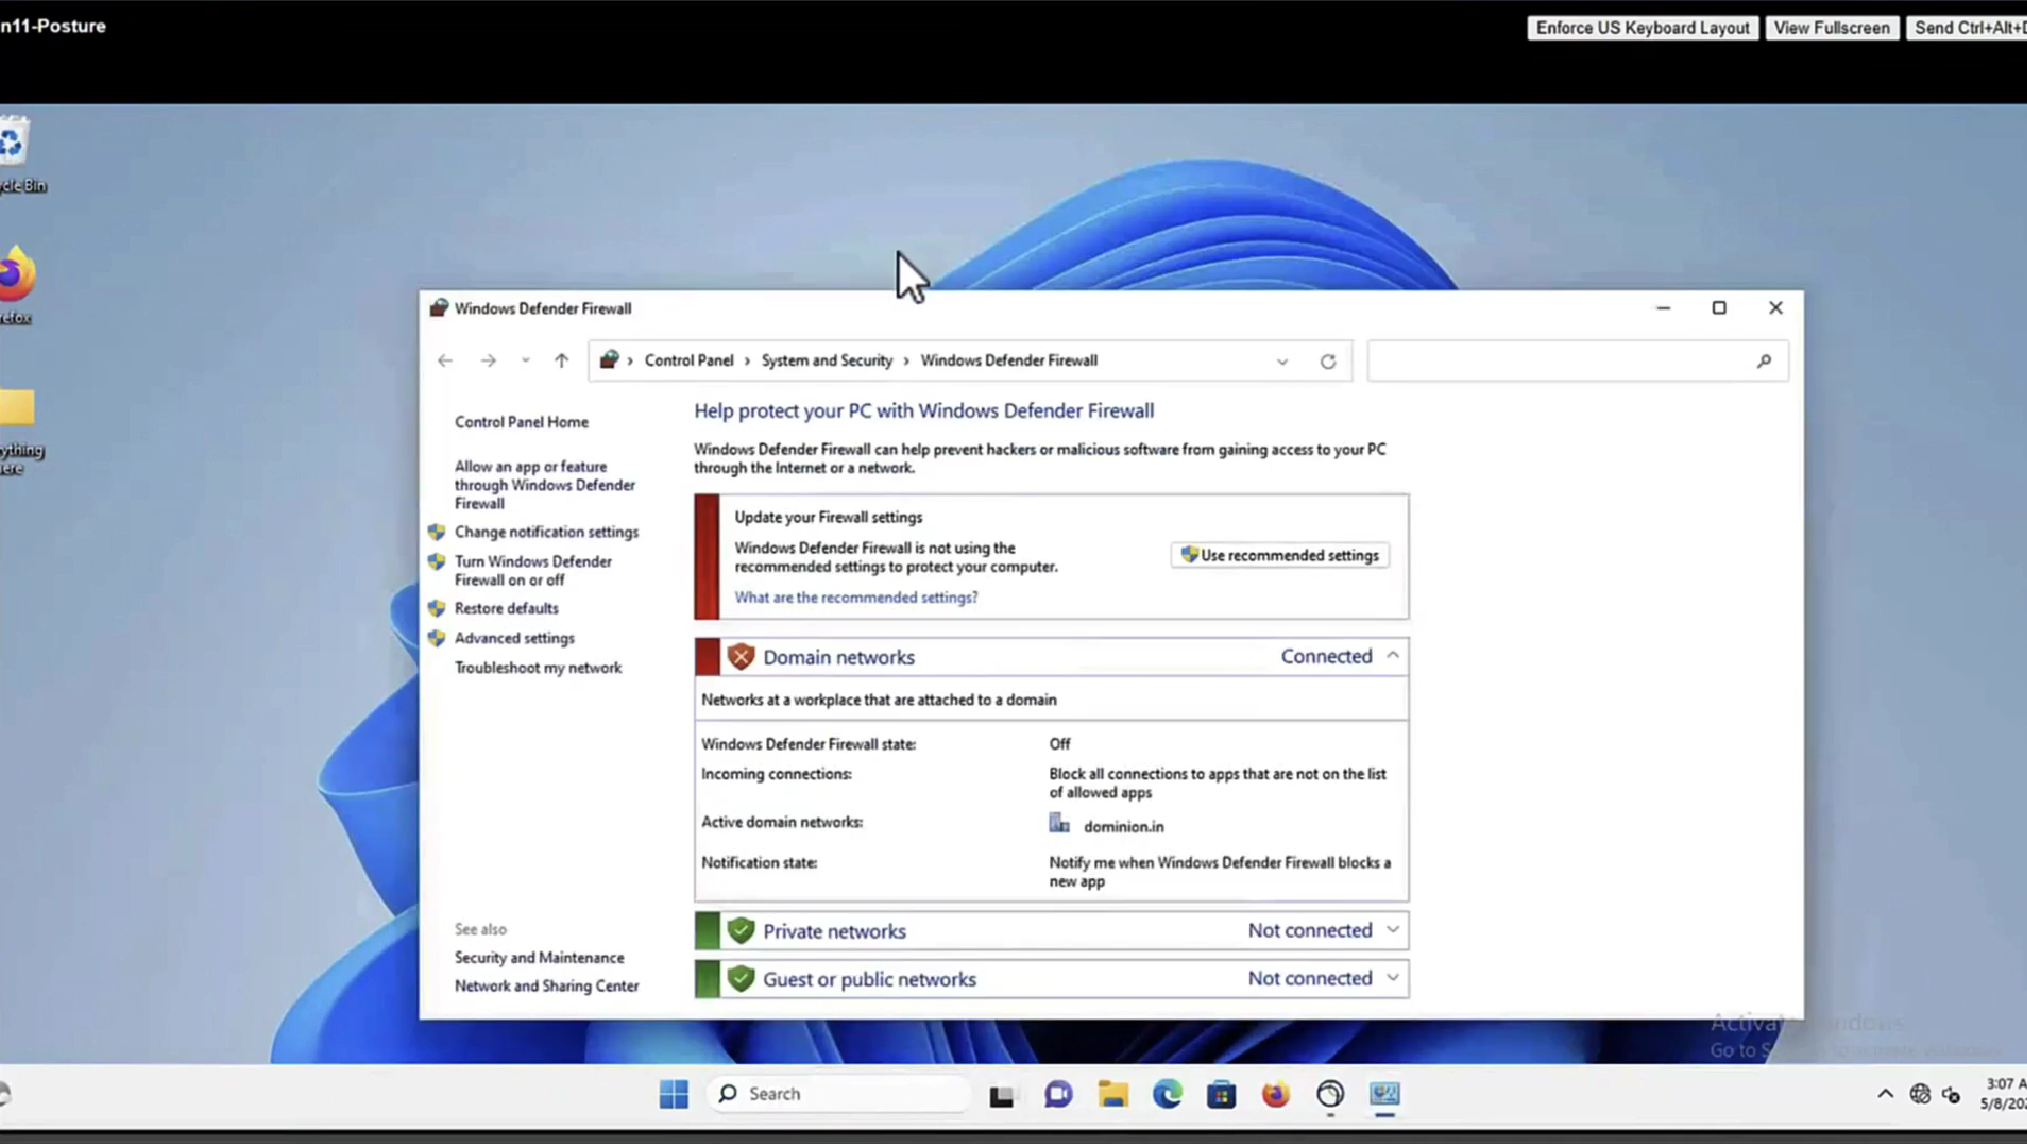


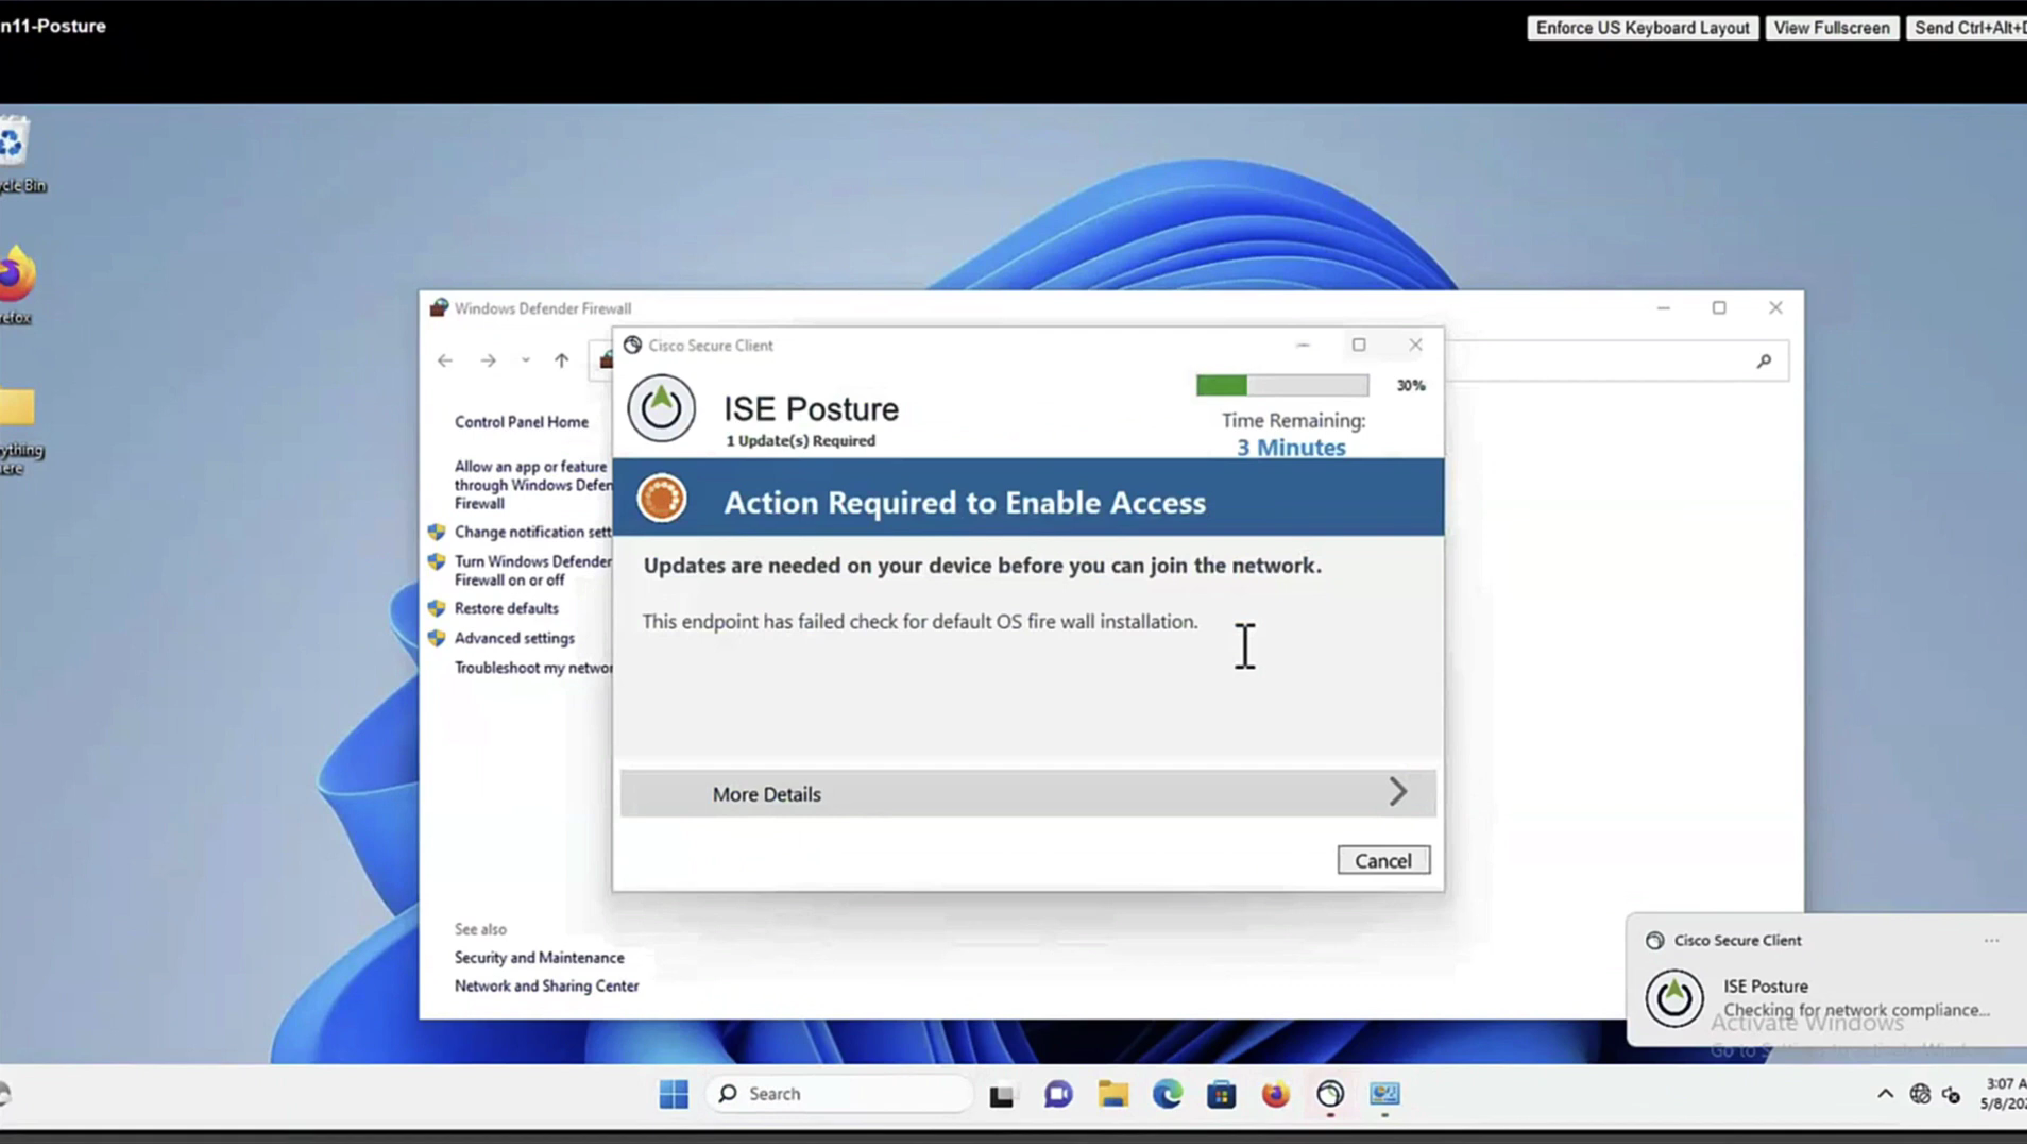
it detected that firewall is not enabled and it automatically enabled it (remediated it)


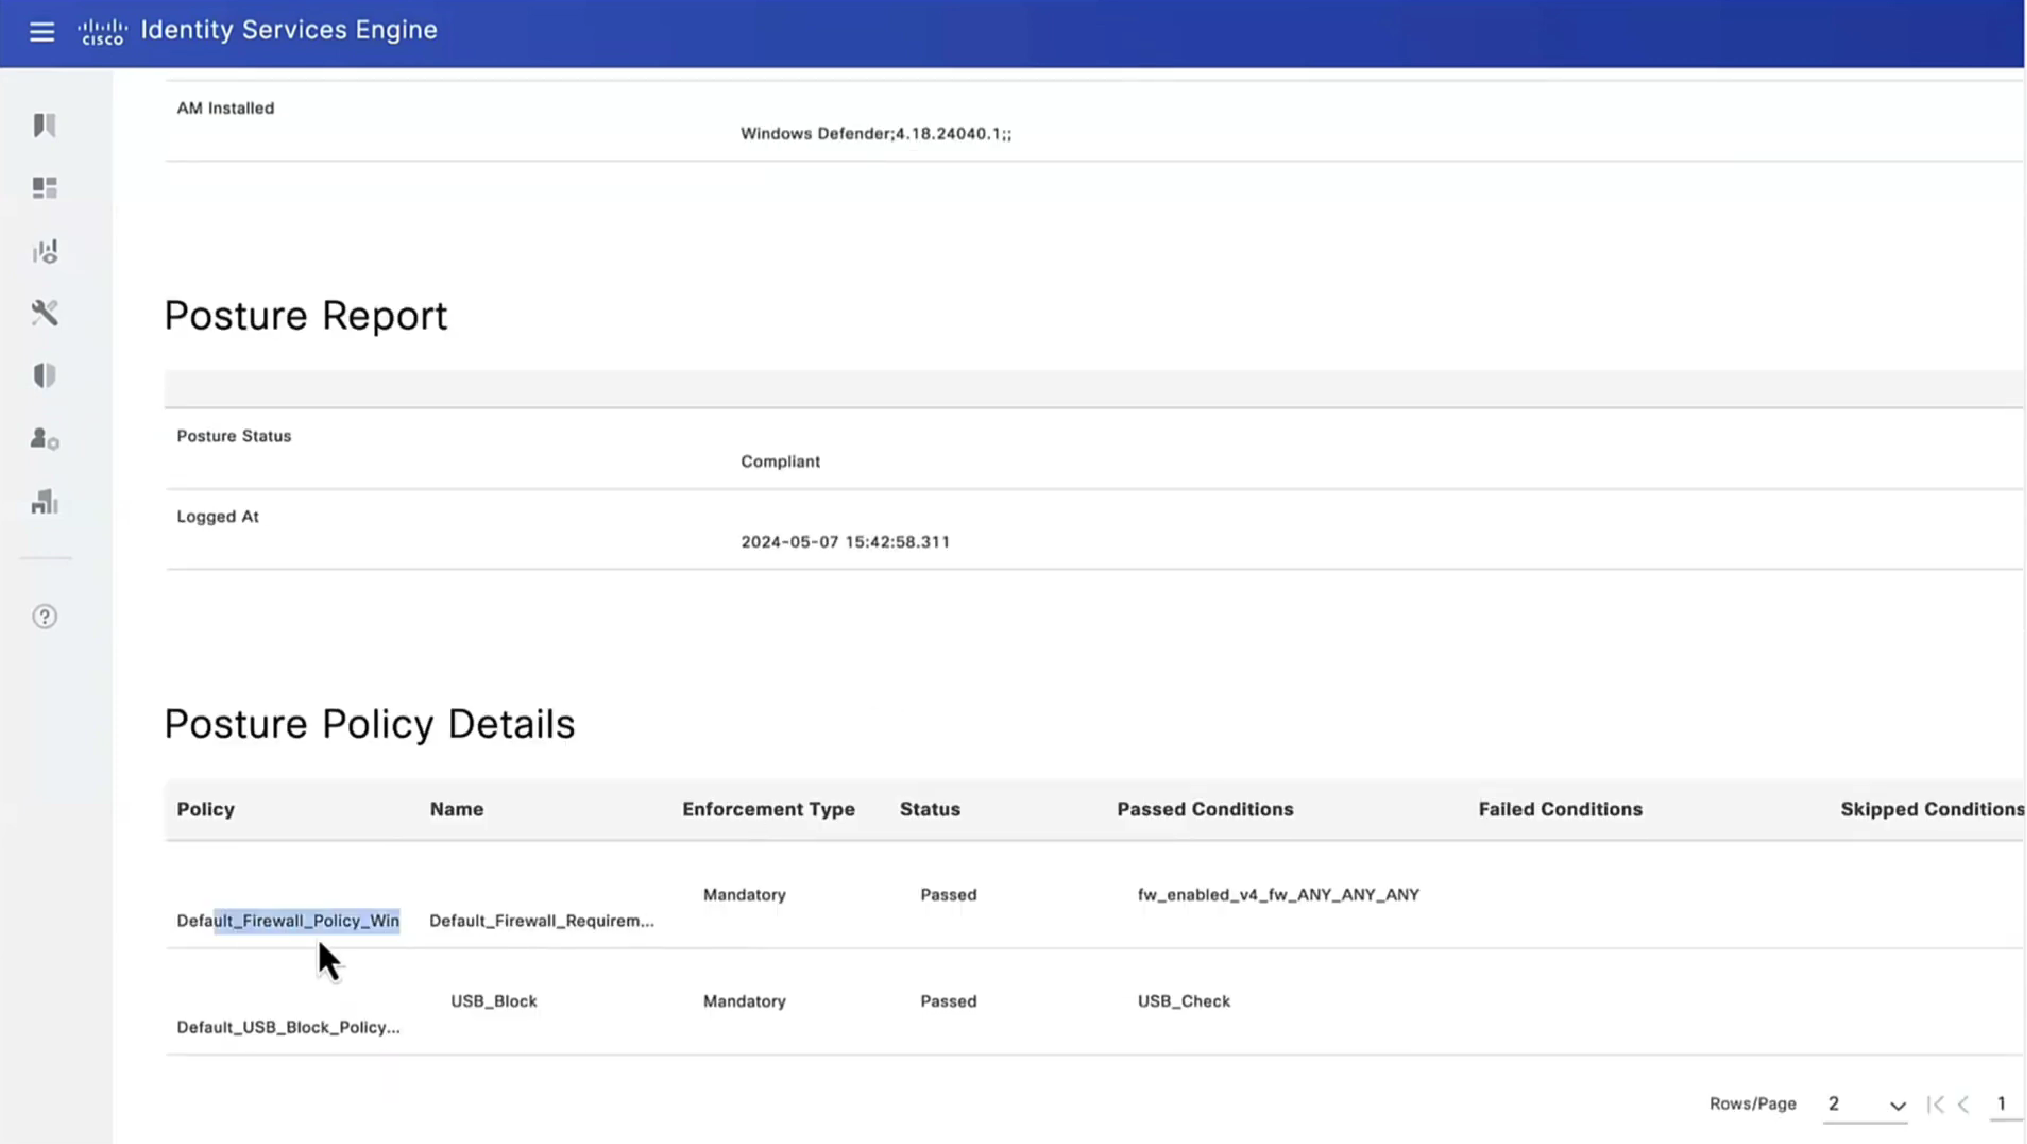
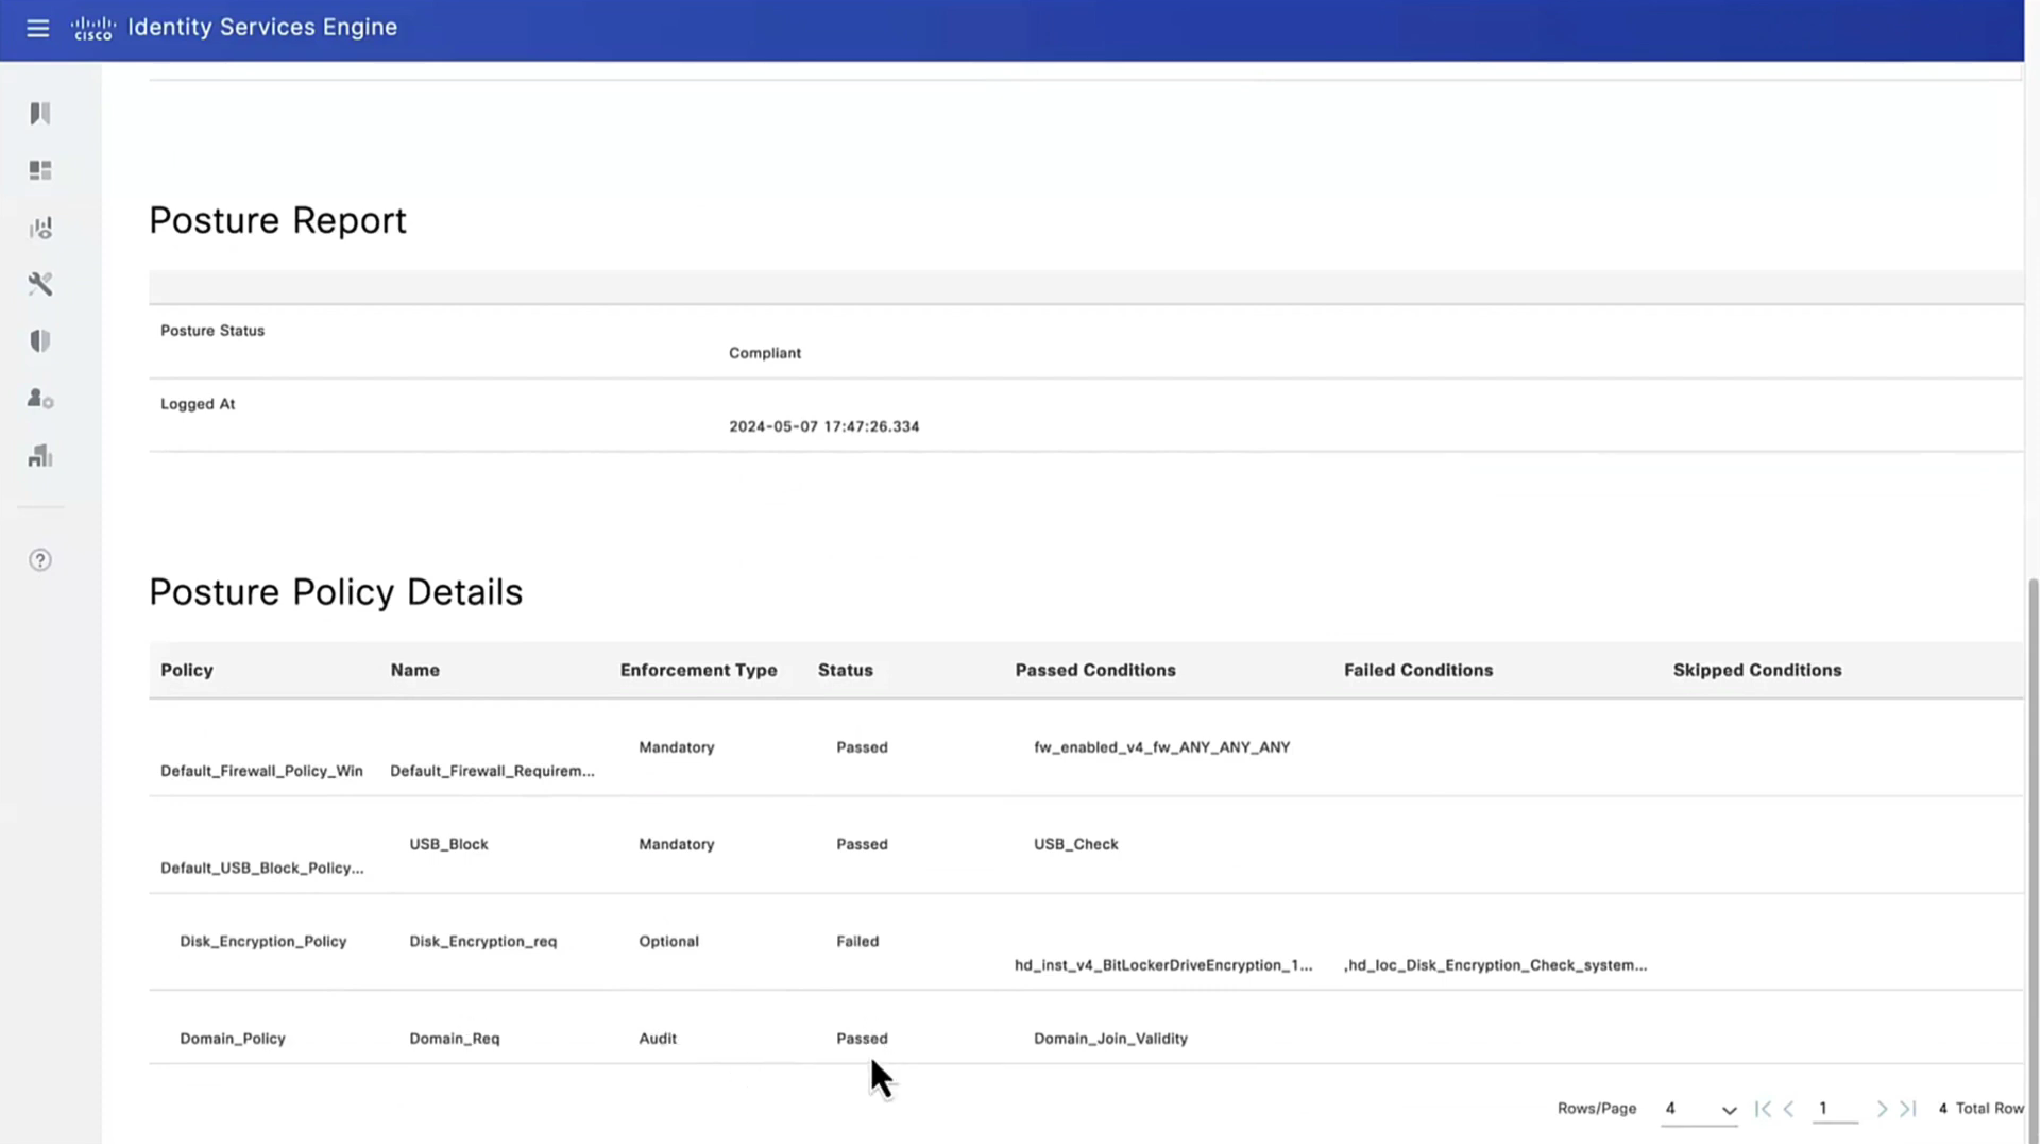
Posture Policy Details section shows 2 policies “Passed” even though we configured 4 policies, that is because 2 of them were only for visibility


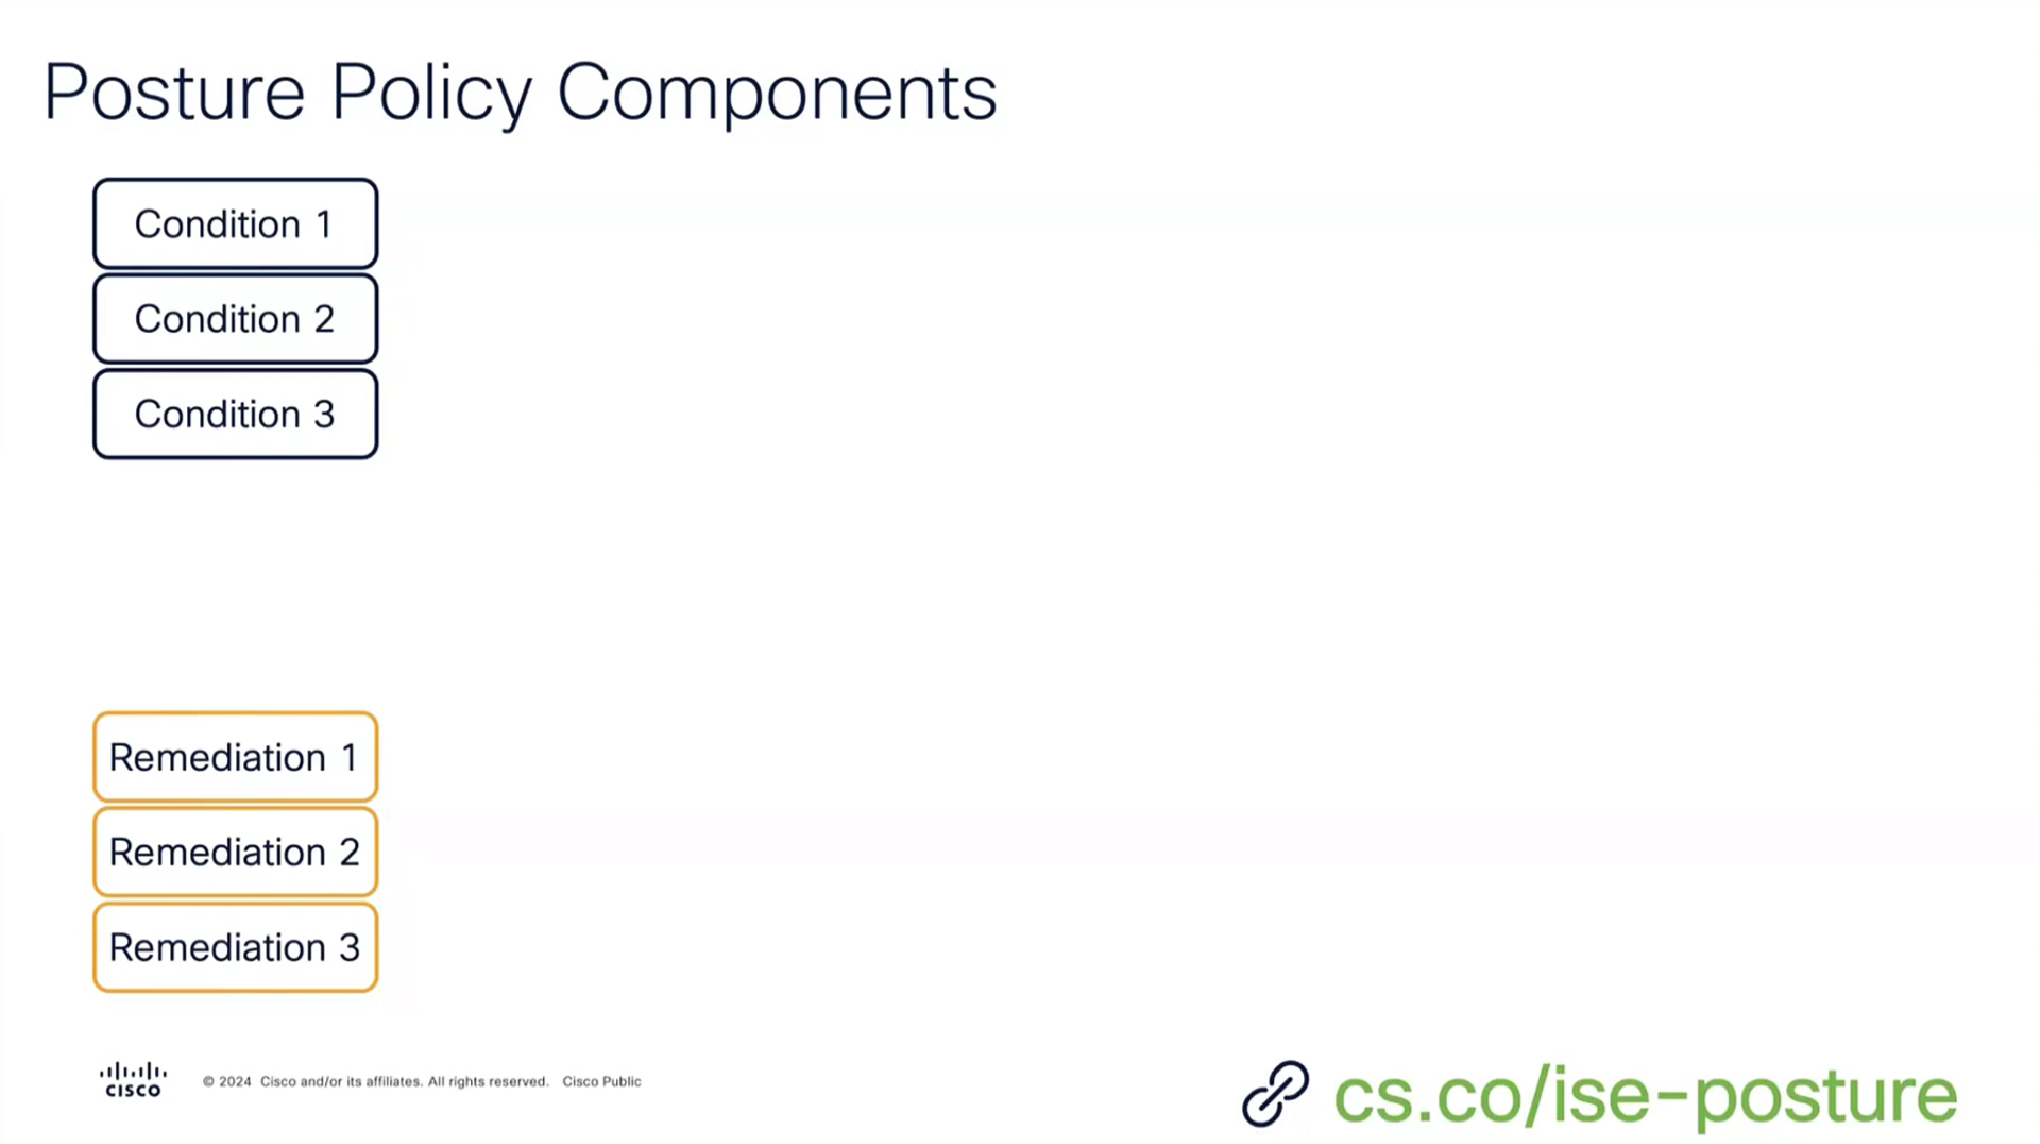
Condition + its remediation are coupled together just like sickness and its remedy are

There are conditions and then there are their remediations ( condition <> remediation )
Those conditions and their remediations are mapped to requirements and those requirements are specified in Posture Policy
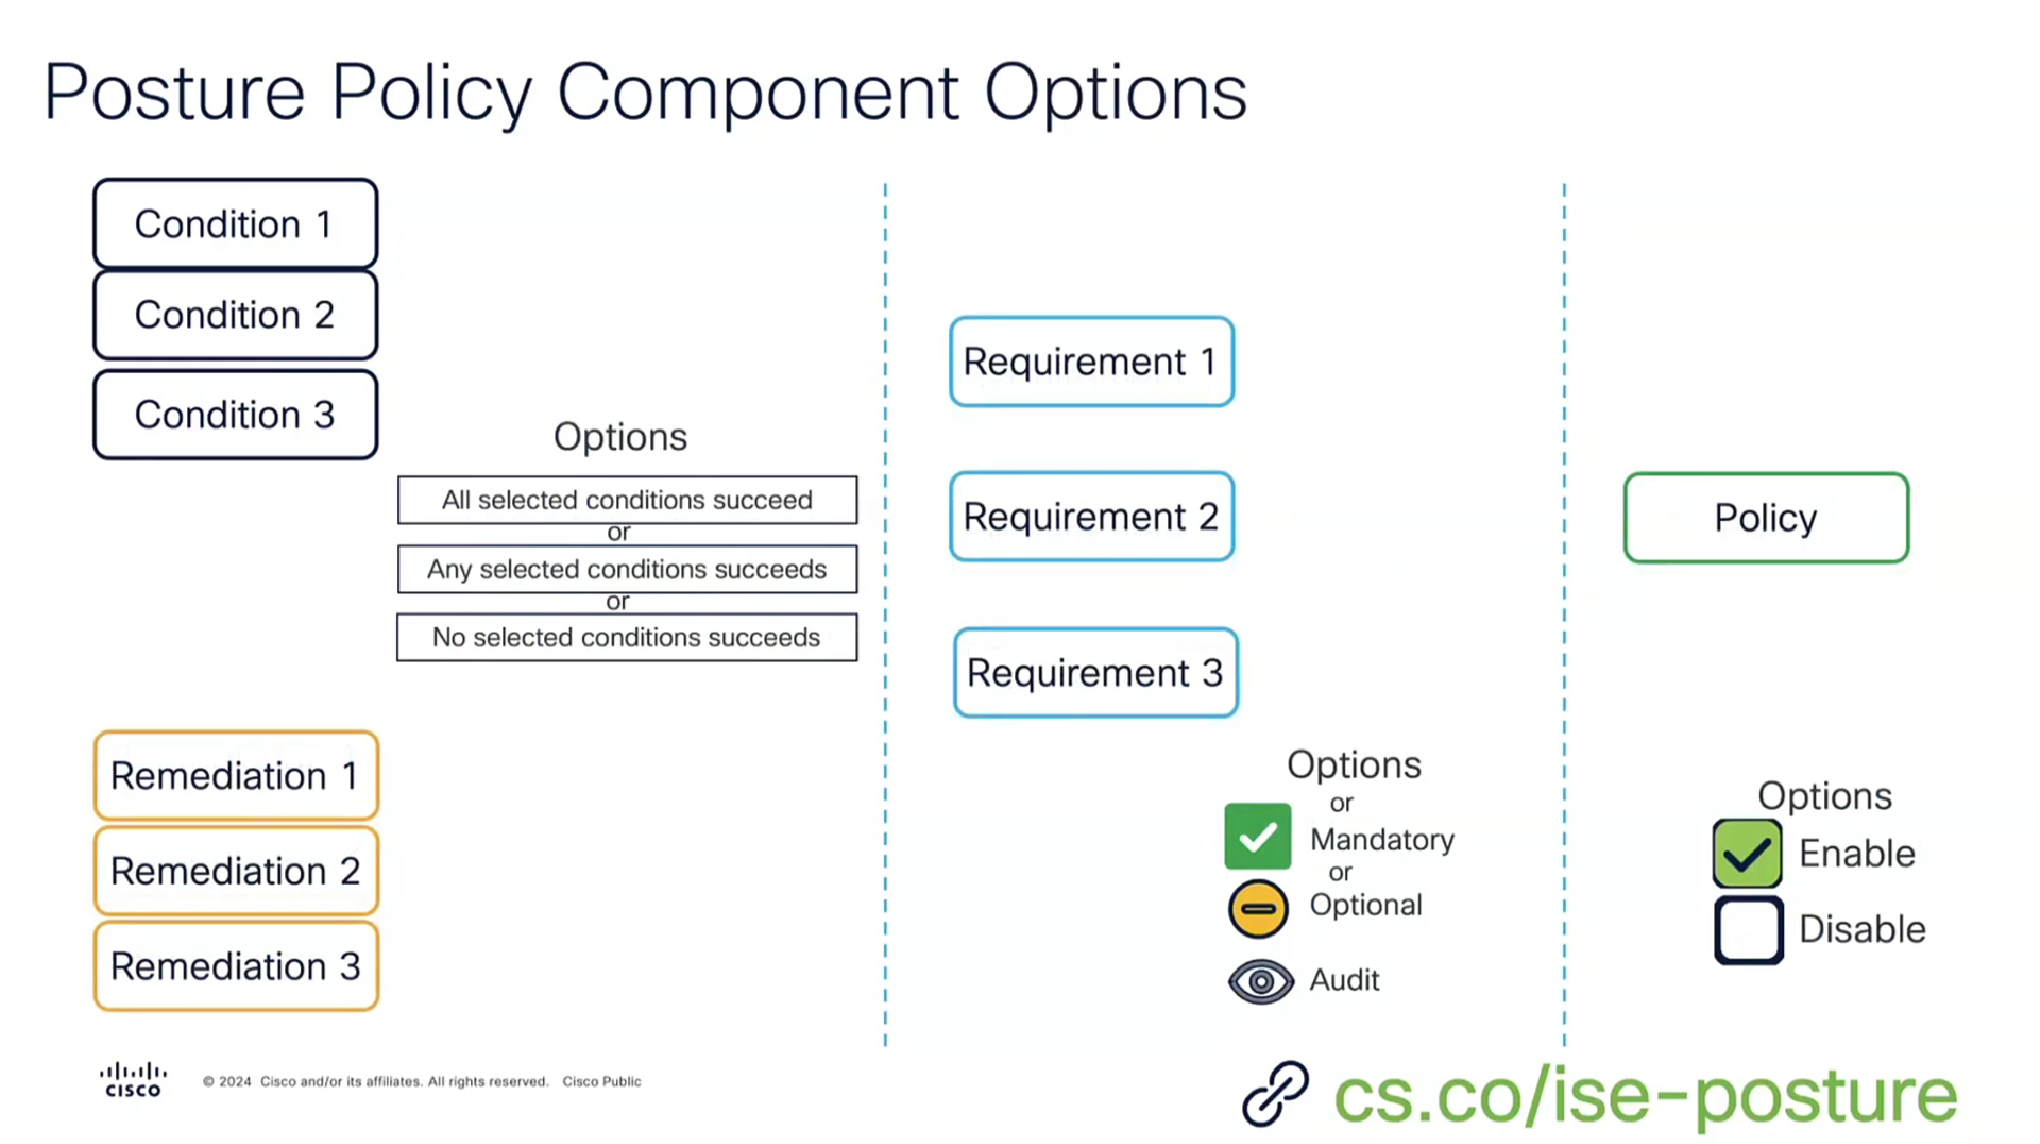
There can be multiple conditions in a requirement with one remediation, and when there are multiple conditions “in a requirement” then we have options “No condition succeed” , “any conditions succeed” , “all conditions succeed” matching with “and” , “or” , “none operator”
Similarly requirements can be “Mandatory” , “Optional” , “Audit” , which can be remembered from phrase “Mandatory Requirements”
Mandatory has to be remediated otherwise client is non-compliant
Optional requirement can be skipped by the end user
Audit mode requirement does not even notify the end user but only flags in ISE
and Policy can be “enabled or disabled”

A combination of a condition x remediation -> requirement applies to and is only for one policy
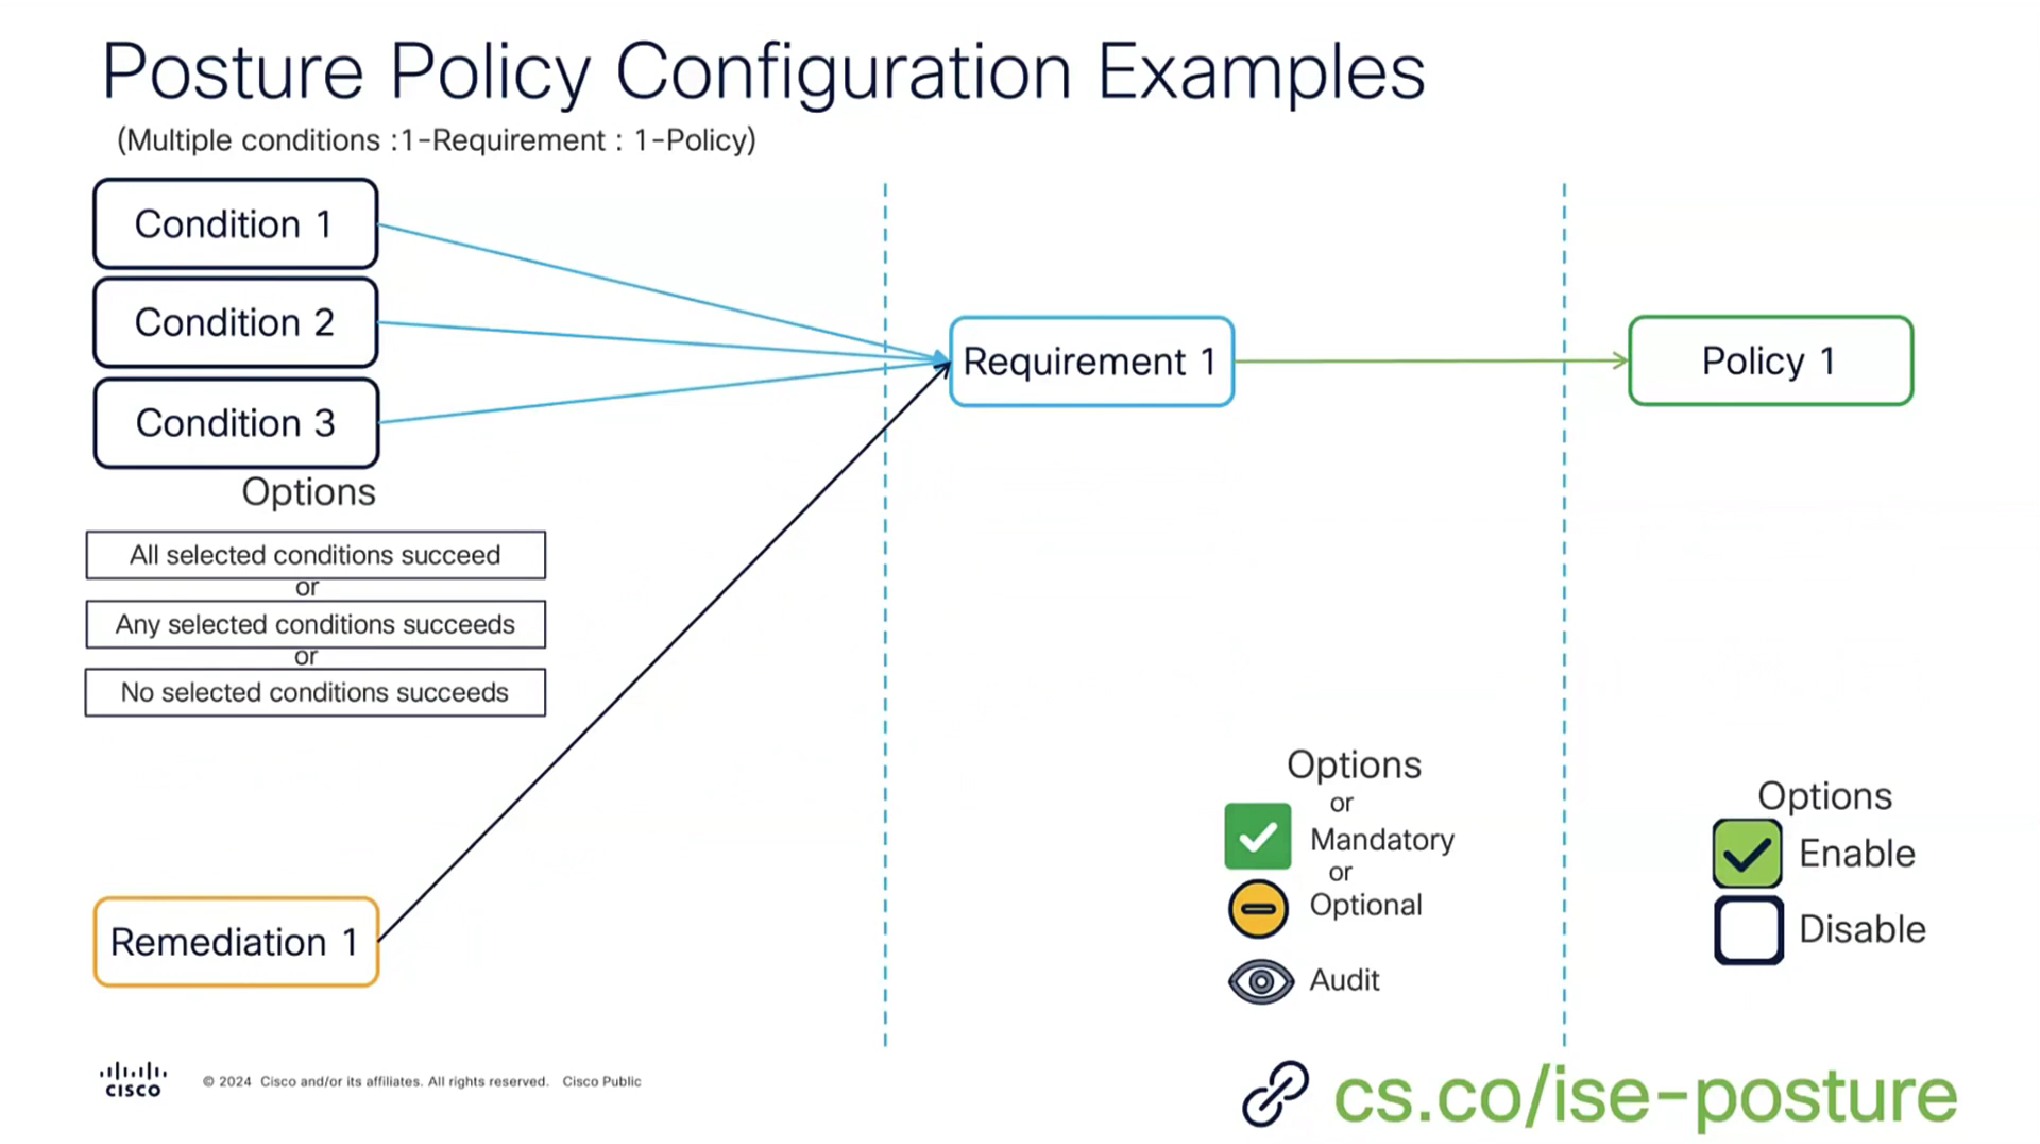
or multiple conditions with one remediation can be part of a single requirement because of “No” condition succeed , “any” conditions succeed , “all” conditions succeed with and , or , none operator


Script based condition can do powershell scripts in order to check something custom


See how requirements for this policy when selected can be put into audit mode


We will make this requirement optional


You will see, because we made Disk encryption “policy”‘s requirement to optional, user can actually skip it

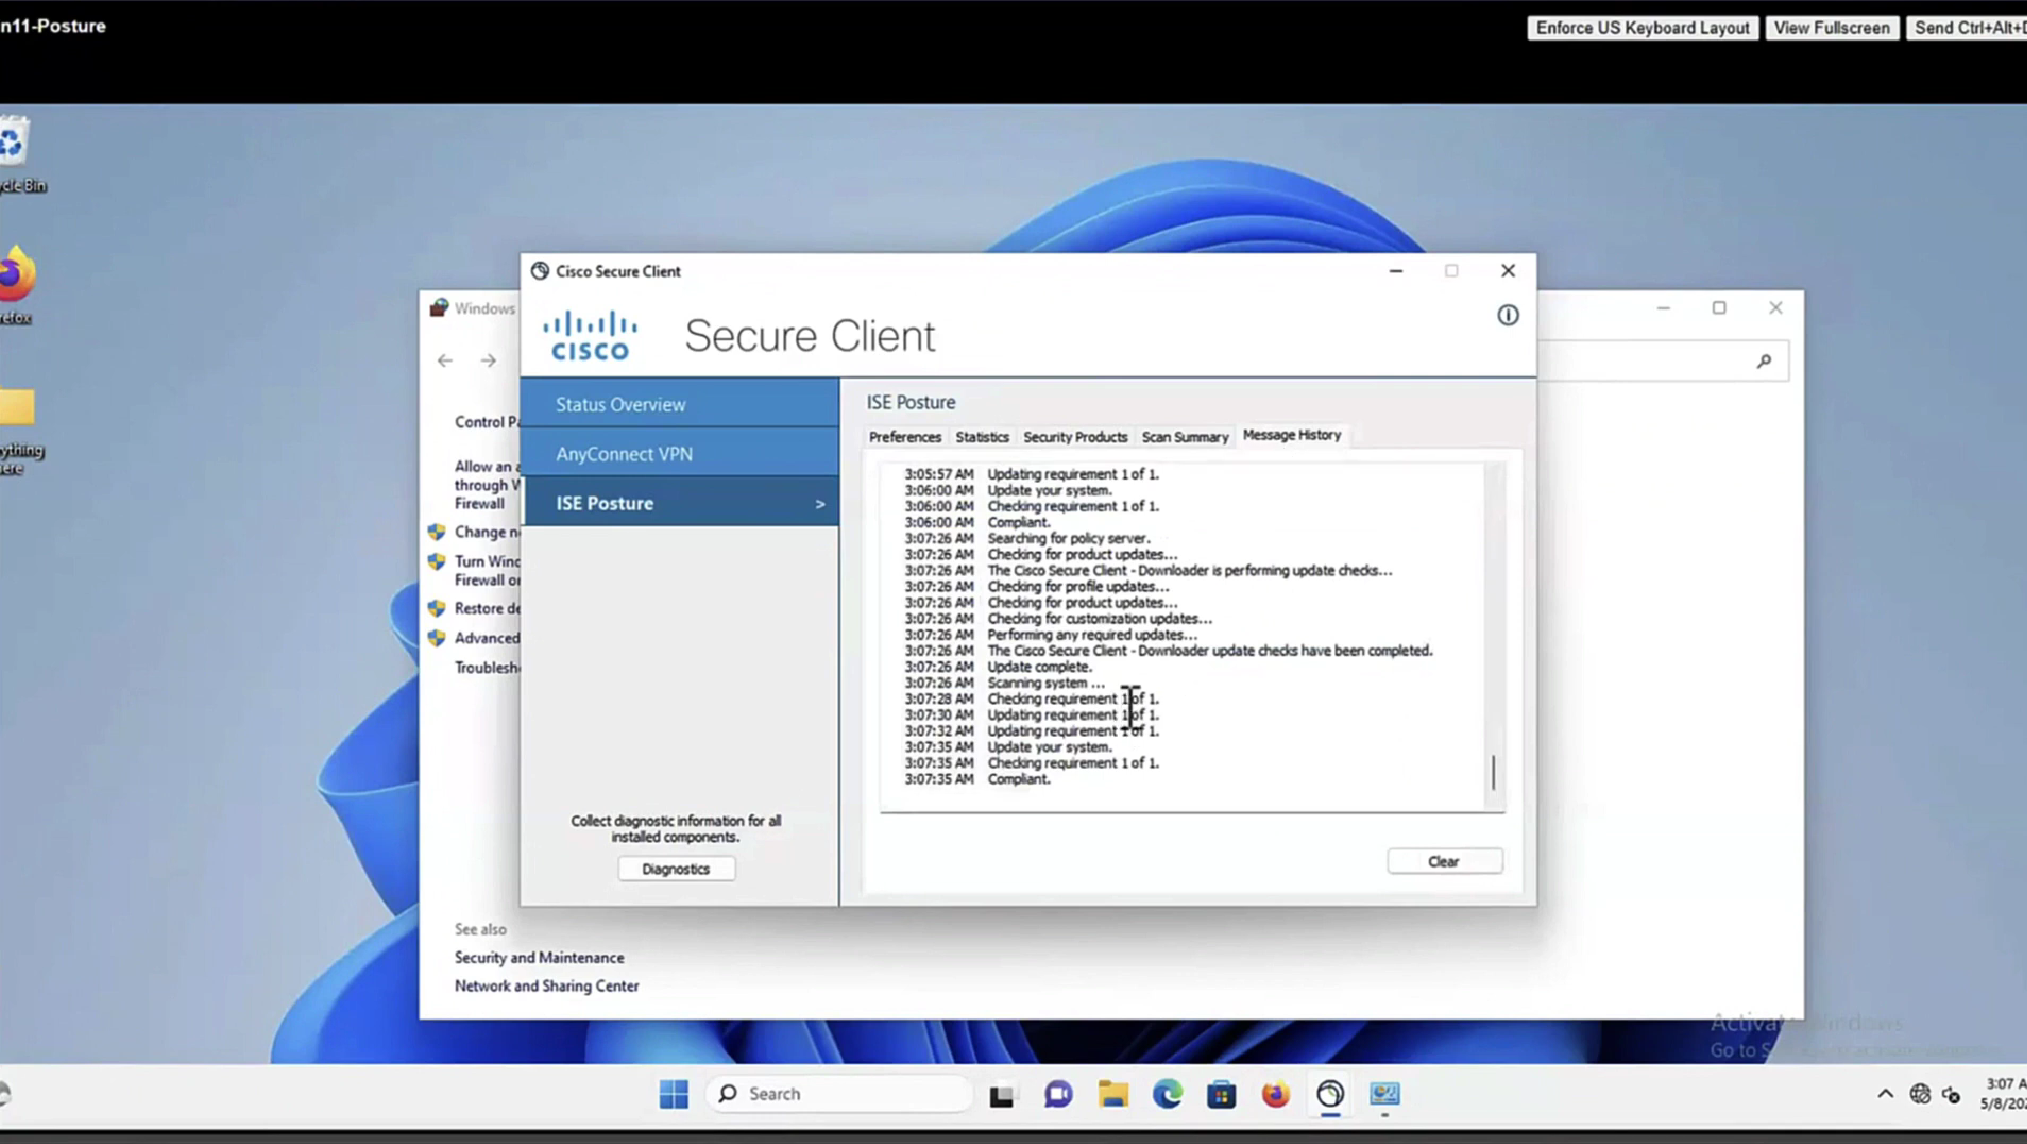
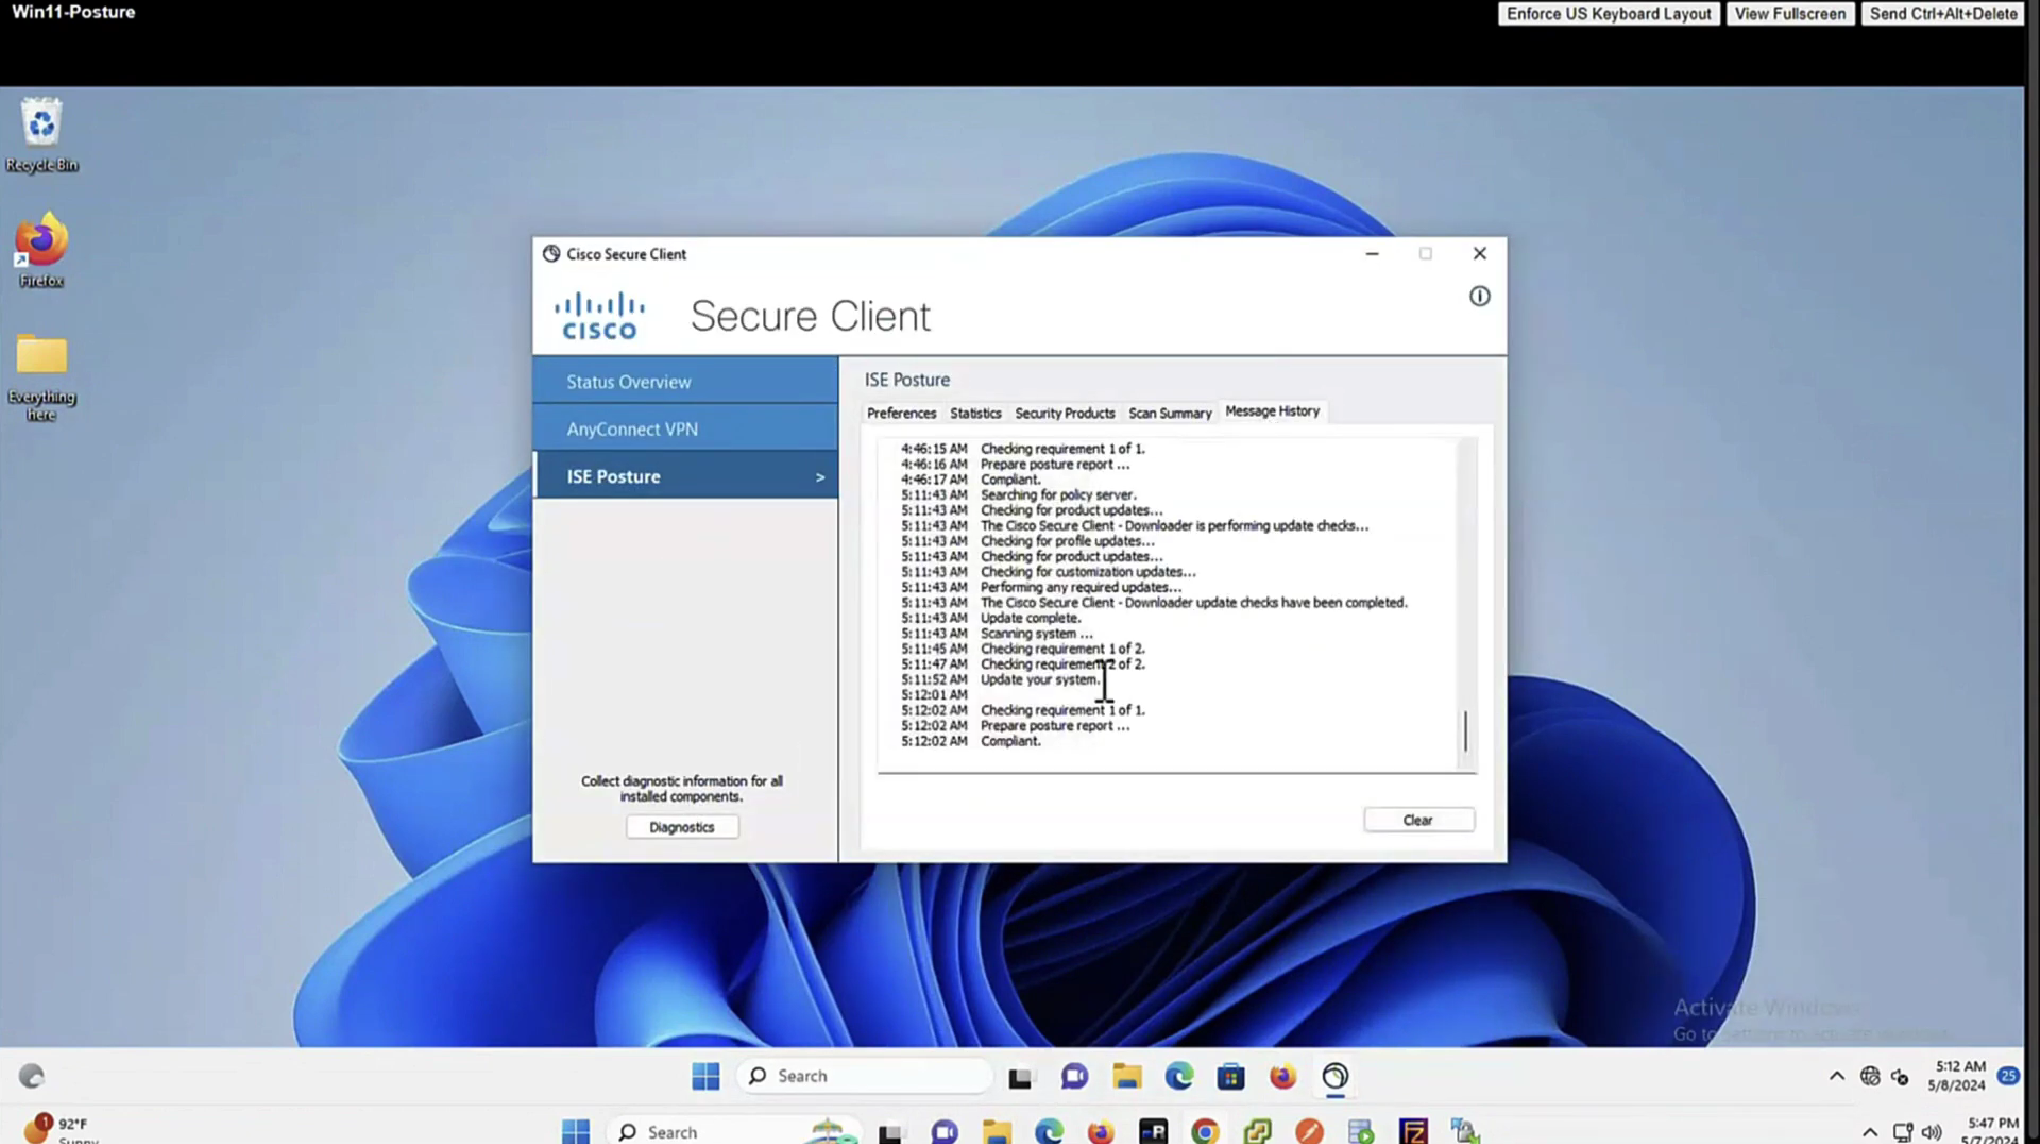
In message history section we can look at actions from agent
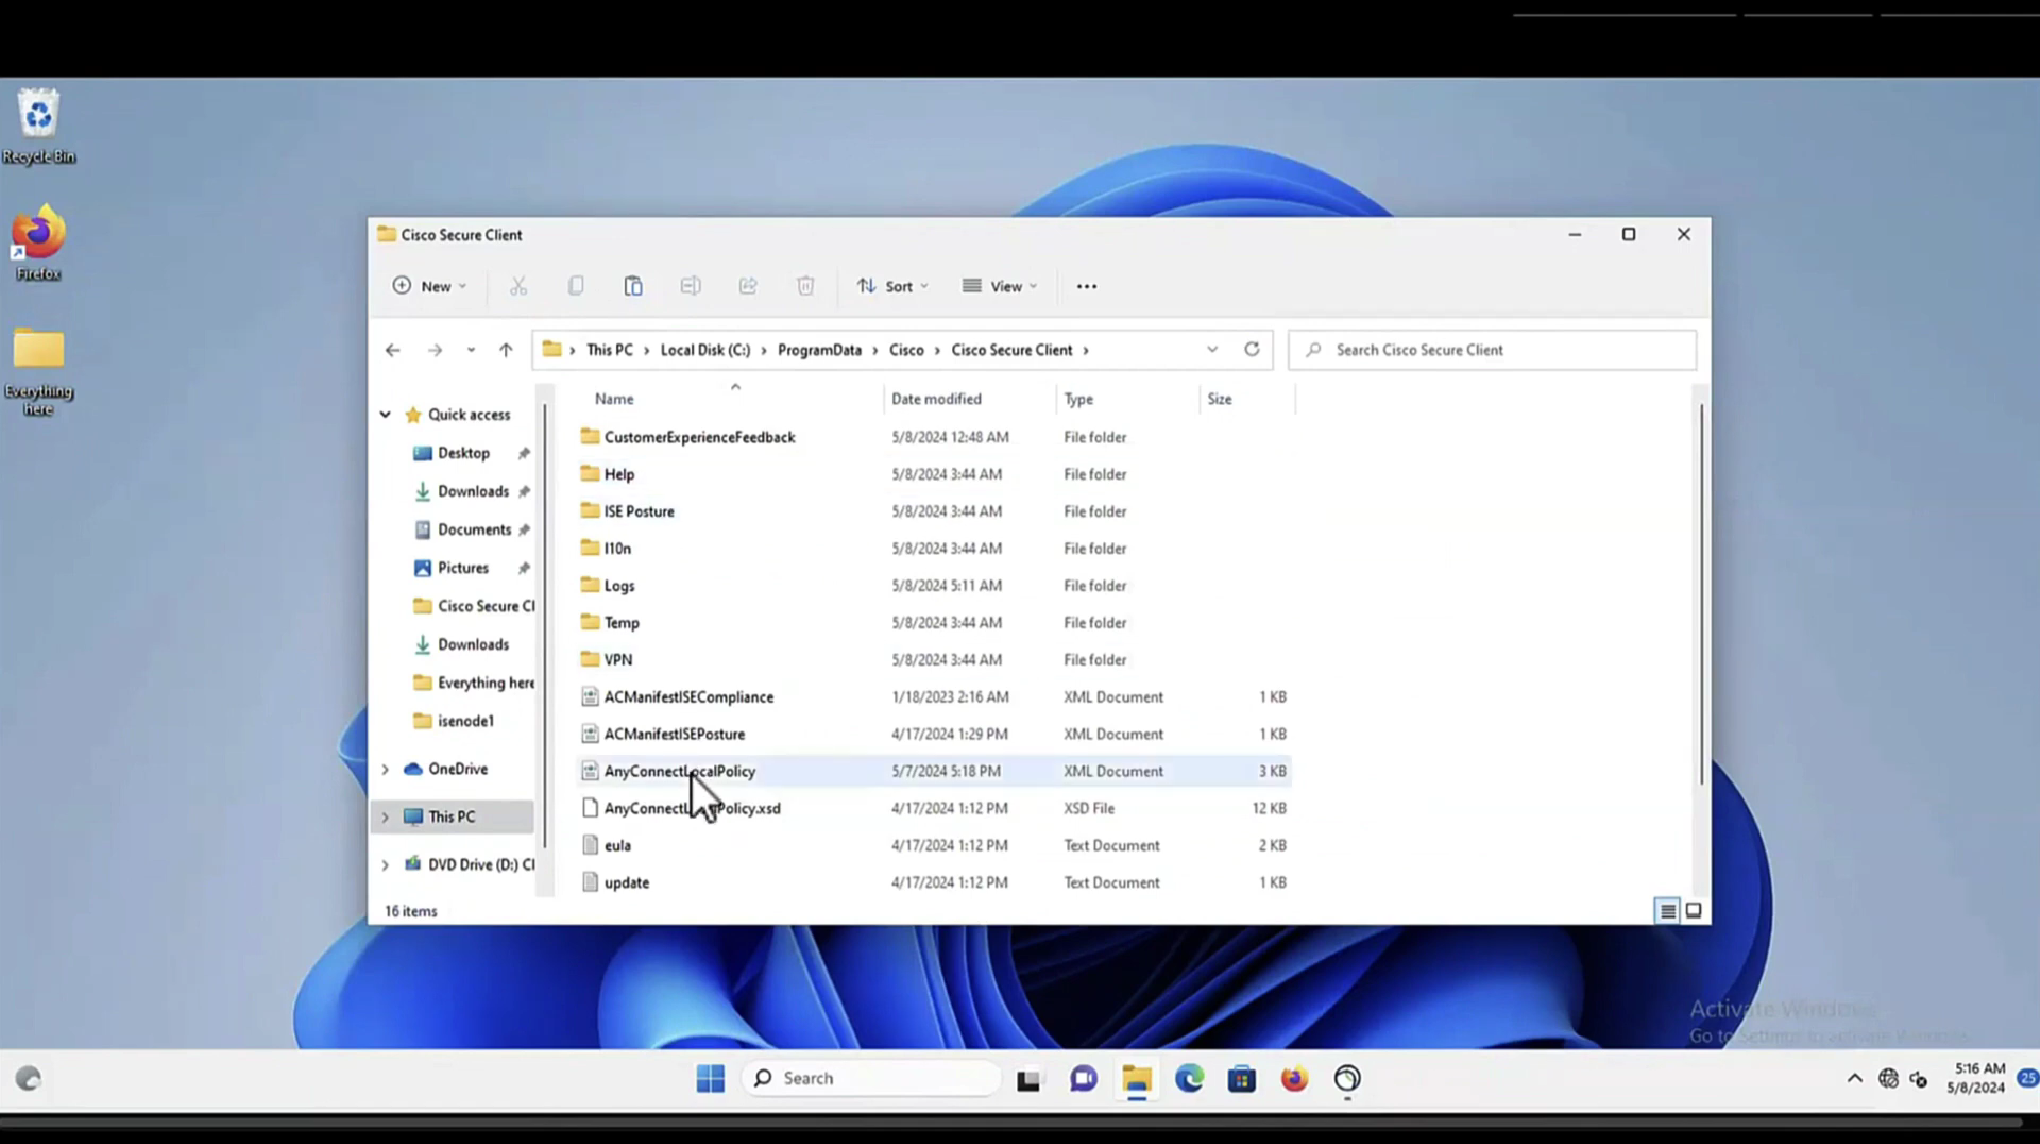
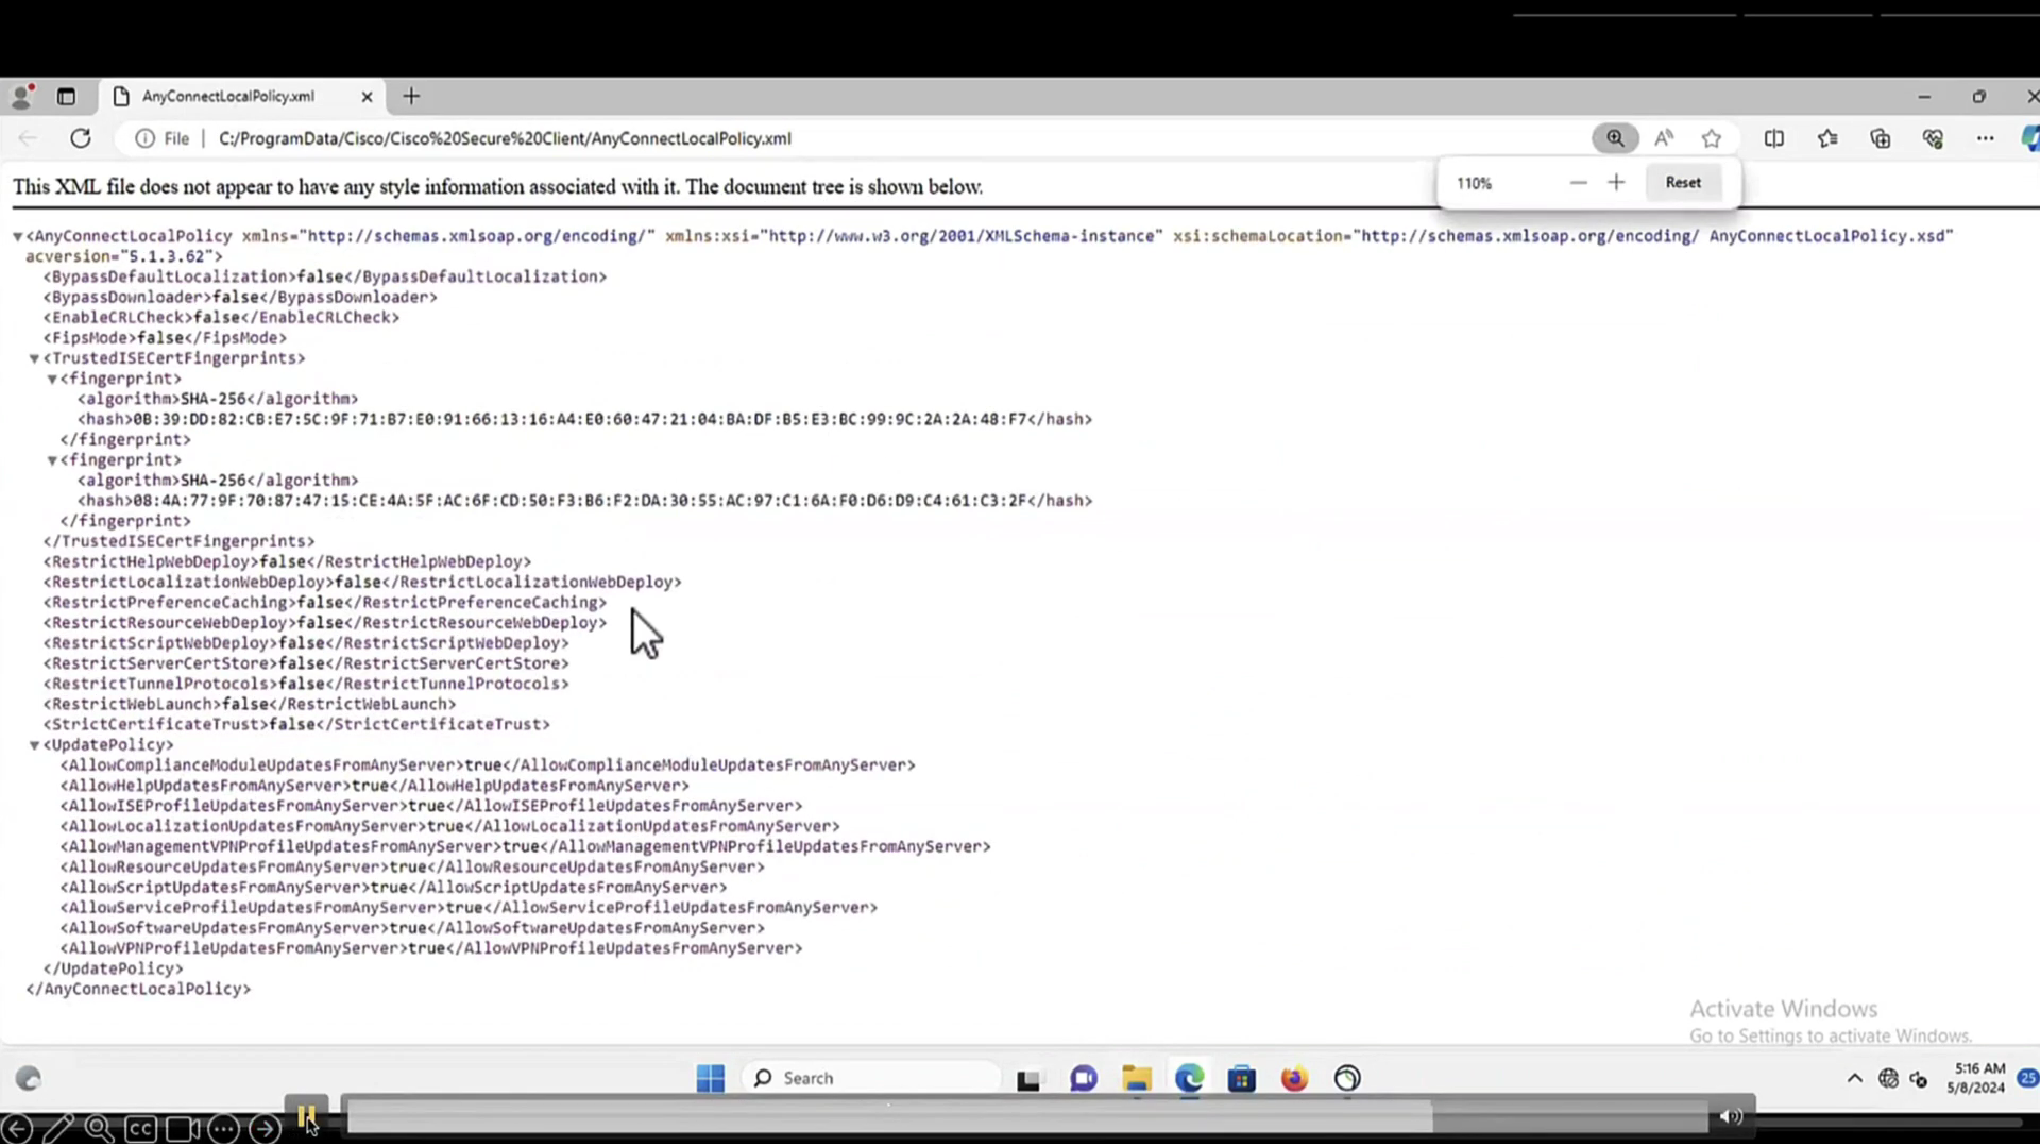
This file AnyConnectLocalPolicy.xml contains SHA-256 fingerprints
and these need to present in this file in order for script based conditions to run, These fingerprints are from certificates of the PSNs, and these have to be added here manually, unfortunately this cannot be done from ISE and has to be done manually, each PSNs fingerprints from certificates need to be added in this file through software distribution systems
If you don’t have that fingerprint configured in AnyConnectLocalPolicy.xml then these script based conditions will not be successful


Report – Posture Assessment by Condition is important to see how many clients are failing which conditions as in a corporate environment you want to know how many endpoints need fix


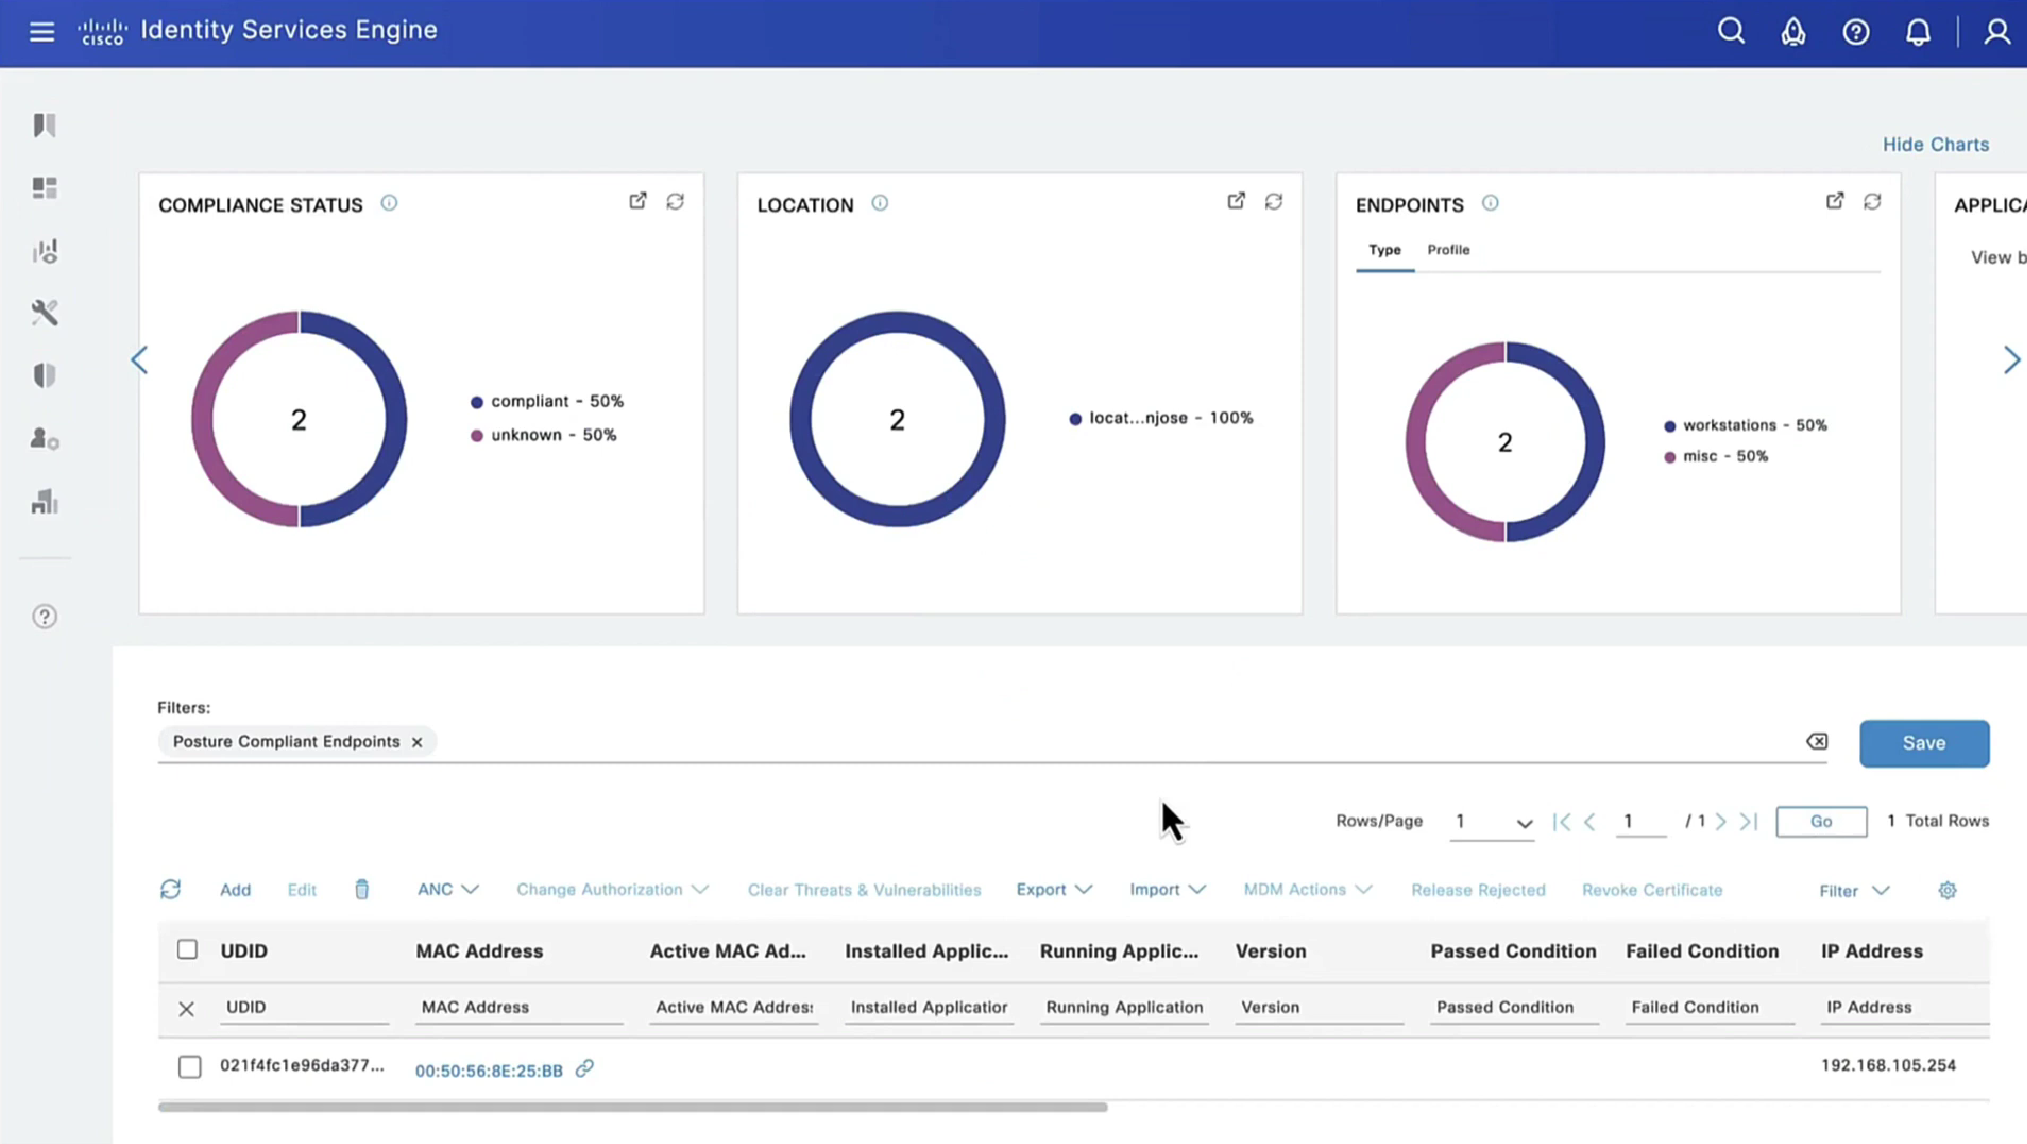
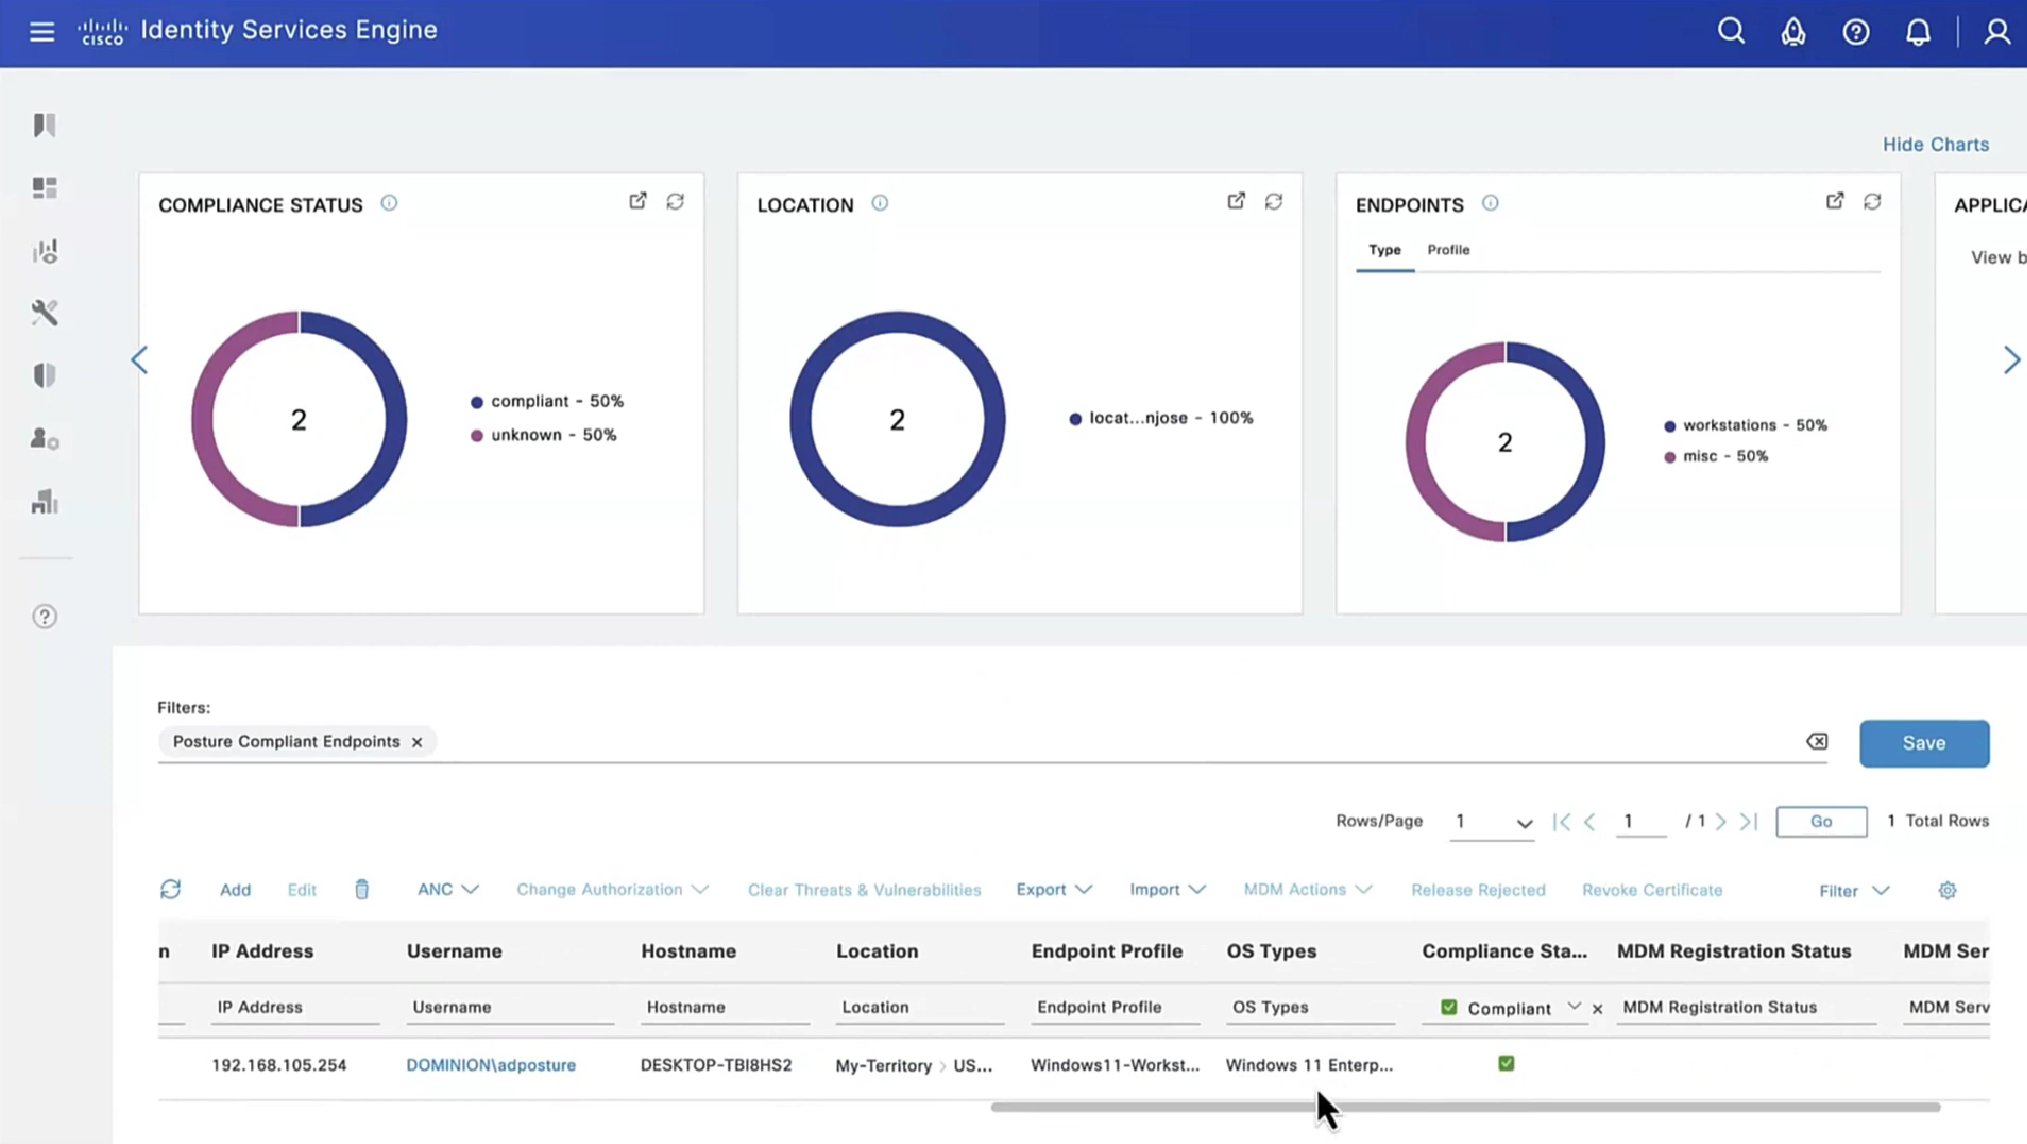
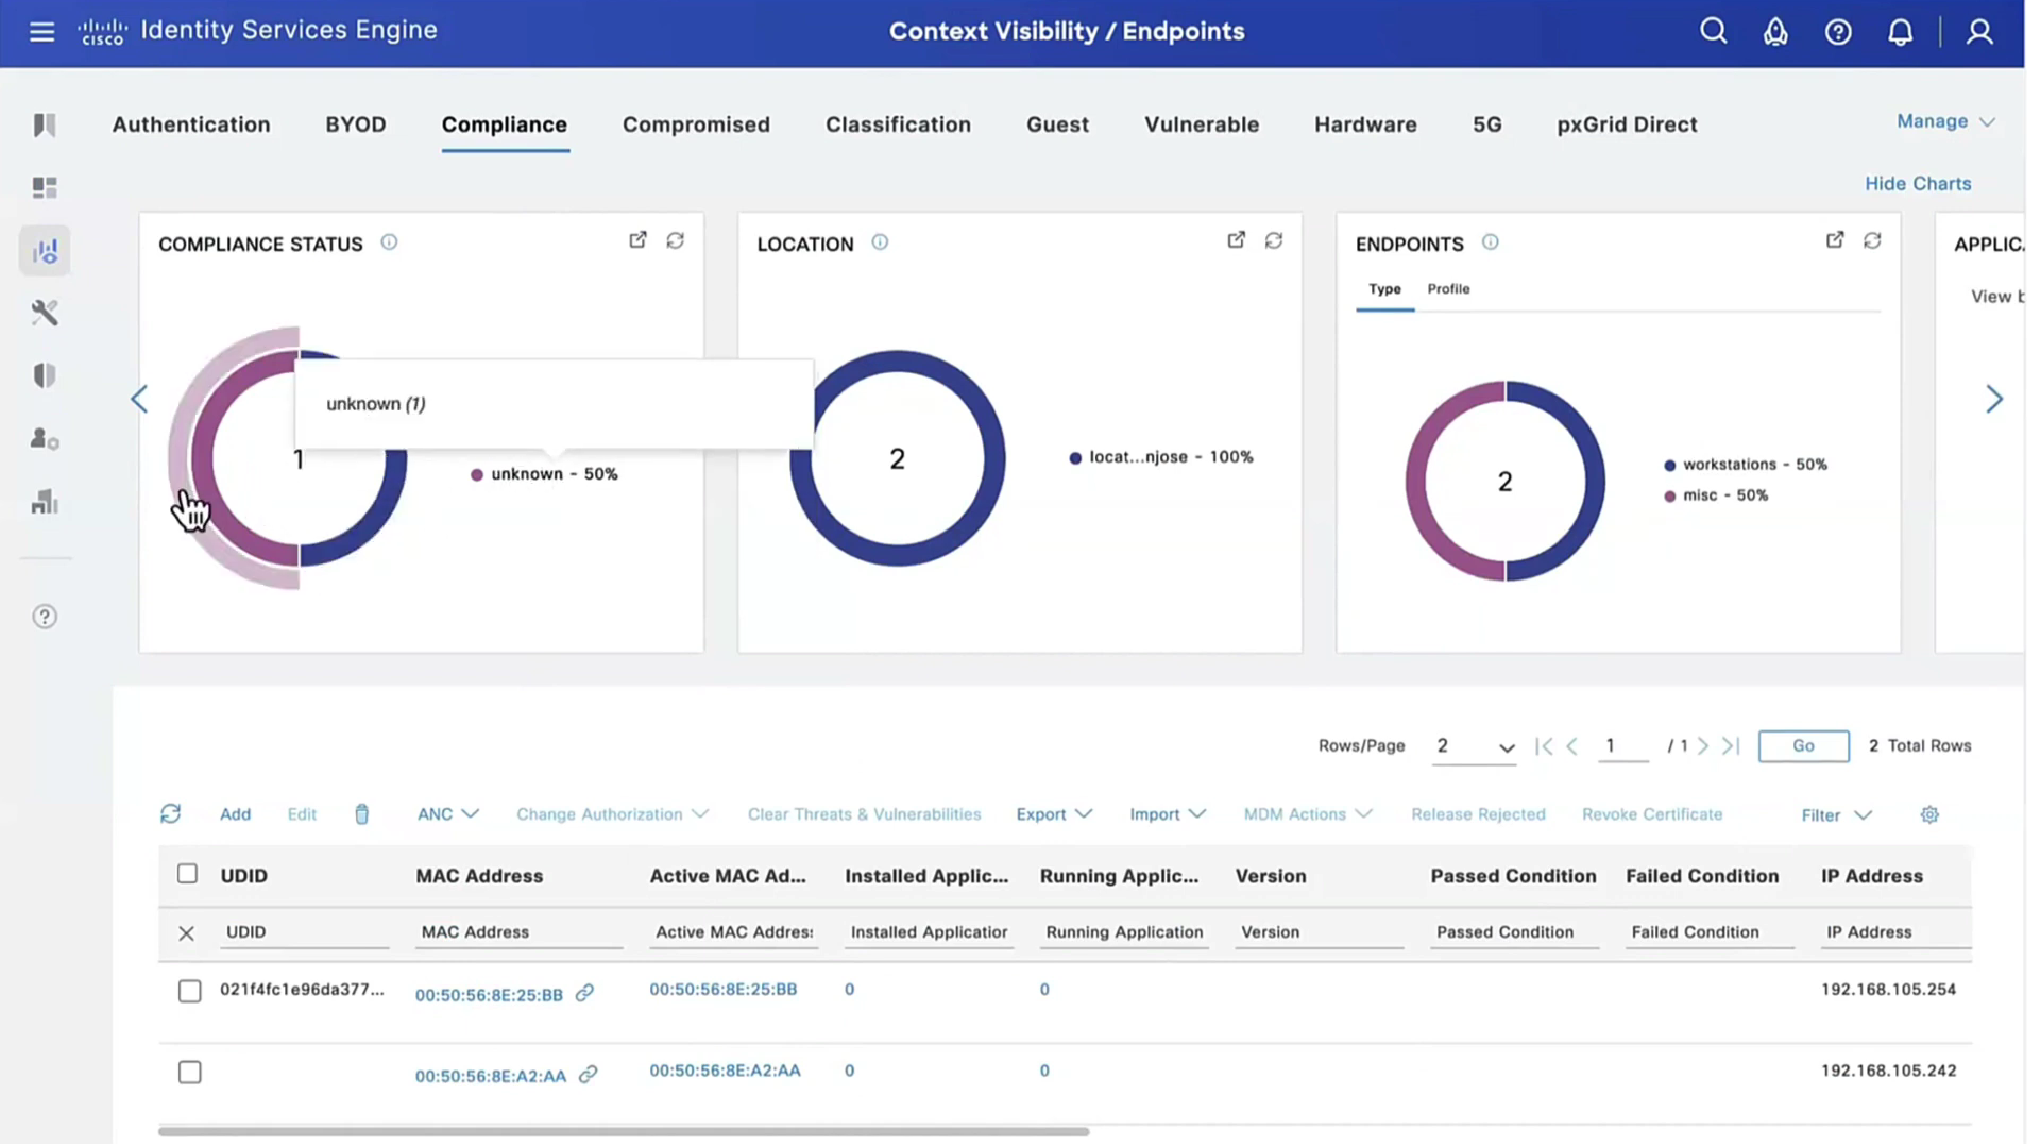
This filter gets applied as we click on compliance numbers on dashboard


Applications installed on endpoint


If you have 3rd party NAD in network, it must support URL redirection with session ID and CoA


next post
Cisco | Compare ISE Posture Redirection Flow to ISE Posture Redirectionless Flow, pre and post ISE 2.2
Redirection vs Redirectionless
A new functionality introduced in Identity Service Engine (ISE) 2.2 that allows ISE to support a posture flow without any kind of redirection on either a Network Access Device (NAD) or ISE.
- ISE as a policy configuration distribution and decision point.
On ISE, you configure
posture policies (what exact conditions must be met to mark a device compliant),
client provisioning policies (what agent software must be installed on what kind of devices), and
authorization policies (what kind of permissions must be assigned to, depends upon their posture status). - A network access device as a policy enforcement point.
On the switch or wlc, actual authorization restrictions are applied at the time of user authentication. ISE provides authorization parameters like Downloaded ACL (dACL)/VLAN/Redirect-URL/Redirect Access Control List (ACL).
Traditionally, in order for posture to happen, NADs are required to support redirection and Change of Authorization (CoA) to reauthenticate the user after the posture status of the endpoint is determined. - Agent receives information about posture requirements from the ISE and provides a report to the ISE about the status of the requirements.
In the pre-ISE 2.2 flow posture, NADs are not only used to authenticate users and restrict access, but also to provide information to agent software about a specific ISE node that must be contacted (through the use of redirect ACL). As part of the redirection process, the information about the ISE node is returned to the agent software.
Historically, redirection support (either on the NAD or ISE side) was an essential requirement for posture implementation. In ISE 2.2 requirement to support redirection is eliminated for both the initial client provisioning and posture process.
Client provisioning without redirection – In ISE 2.2 you can access the Client Provisioning Portal (CPP) directly via the portal Fully Qualified Domain Name (FQDN). This is similar to the way you access Sponsor Portal or MyDevice Portal.
Posture process without redirection – During agent installation from the CPP portal information about ISE servers is saved on the client side which makes direct communication possible.
Posture Flow Pre ISE 2.2
This image shows a step-by-step explanation of the Anyconnect ISE Posture Module flow prior to ISE 2.2:

Step 1. Authentication is the first step of the flow, it can be dot1x, MAB, or VPN.
Step 2. ISE needs to choose an authentication and authorization policy for the user. In the posture scenario, chosen authorization policy must contain a reference to the posture status, which initially must be either unknown or not applicable. To cover both these cases, conditions with posture status unequal compliance can be used.
The authorization profile must contain following:
- Web Redirection- For the posture case, the web redirection type: client provisioning (posture).
- ACL- This section needs to contain the ACL name which is configured on the NAD side. This ACL is used to instruct NAD which traffic must bypass the redirection and which must be actually redirected.
- DACL- It can be used together with redirect access-list but consider that different platforms process DACL and Redirect ACLs in a different order.
For example, ASA always processes DACL before it redirects ACL. At the same time, some switch platforms process it in the same way as ASA, and other switch platforms process Redirect ACL first and then check DACL/Interface ACL if traffic must be dropped or allowed.
Note: After you enable the web redirection option in the authorization profile, the target portal for redirection must be chosen.
Step 3. ISE returns Access-Accept with authorization attributes. Redirect URL in authorization attributes is automatically generated by ISE. It contains these components:
- FQDN of ISE node on which authentication happened. In some cases, dynamic FQDN can be overwritten by Authorization profile configuration (Static IP/Hostname/FQDN) in the Web Redirection section.
If the static value is used it must point to the same ISE node where authentication was processed.
Step 4. NAD applies an authorization policy to the session. Additionally, if DACL is configured, its content is requested before authorization policies are applied.
Important considerations:
- All NADs- Device must have locally configured ACL with the same name as the one received in Access-Accept as redirect-acl.
- Switches- The IP address of the client must be presented in the output of
show authentication session interface detailscommand to successfully apply redirection and ACLs. The client IP address is learned by IP Device Tracking Feature (IPDT).
Step 5. The client sends a DNS request for the FQDN which is entered into the web browser. At this stage, DNS traffic must bypass redirection and the correct IP address must be returned by the DNS server.
Step 6. The client sends TCP SYN to the IP address which is received in the DNS reply. The Source IP address in the packet is the client IP and the Destination IP address is the IP of the requested resource. The destination port equals 80, except for cases when a direct HTTP proxy is configured in the client web browser.
Step 7.NAD intercepts client requests and prepares SYN-ACK packets with a source IP equal to the requested resource IP, destination IP equal to the client IP, and source port equal to 80.
Important considerations:
- NADs must have an HTTP server running on the port on which the client sends requests. By default, it is port 80. For catalyst switch http must be on
- If the client uses a direct HTTP proxy web server, the HTTP server must run on the proxy port on NAS. This scenario is outside of the scope of this document.
- In the cases when NAD does not have a local IP address in the client subnet SYN-ACK is sent with NAD routing table (over management interface usually).
In this scenario, the packet is routed over L3 infrastructure and must be routed back toward the client by an L3 upstream device.
If the L3 device is a stateful firewall, an additional exception must be given for such asymmetric routing.
Step 8. Client finishes TCP three-way handshake by ACK.
Step 9. HTTP GET for the target resource is sent by a client.
Step 10. NAD returns a redirect URL to the client with HTTP code 302 (page moved), on some NADs redirect can be returned inside of the HTTP 200 OK message in the location header.

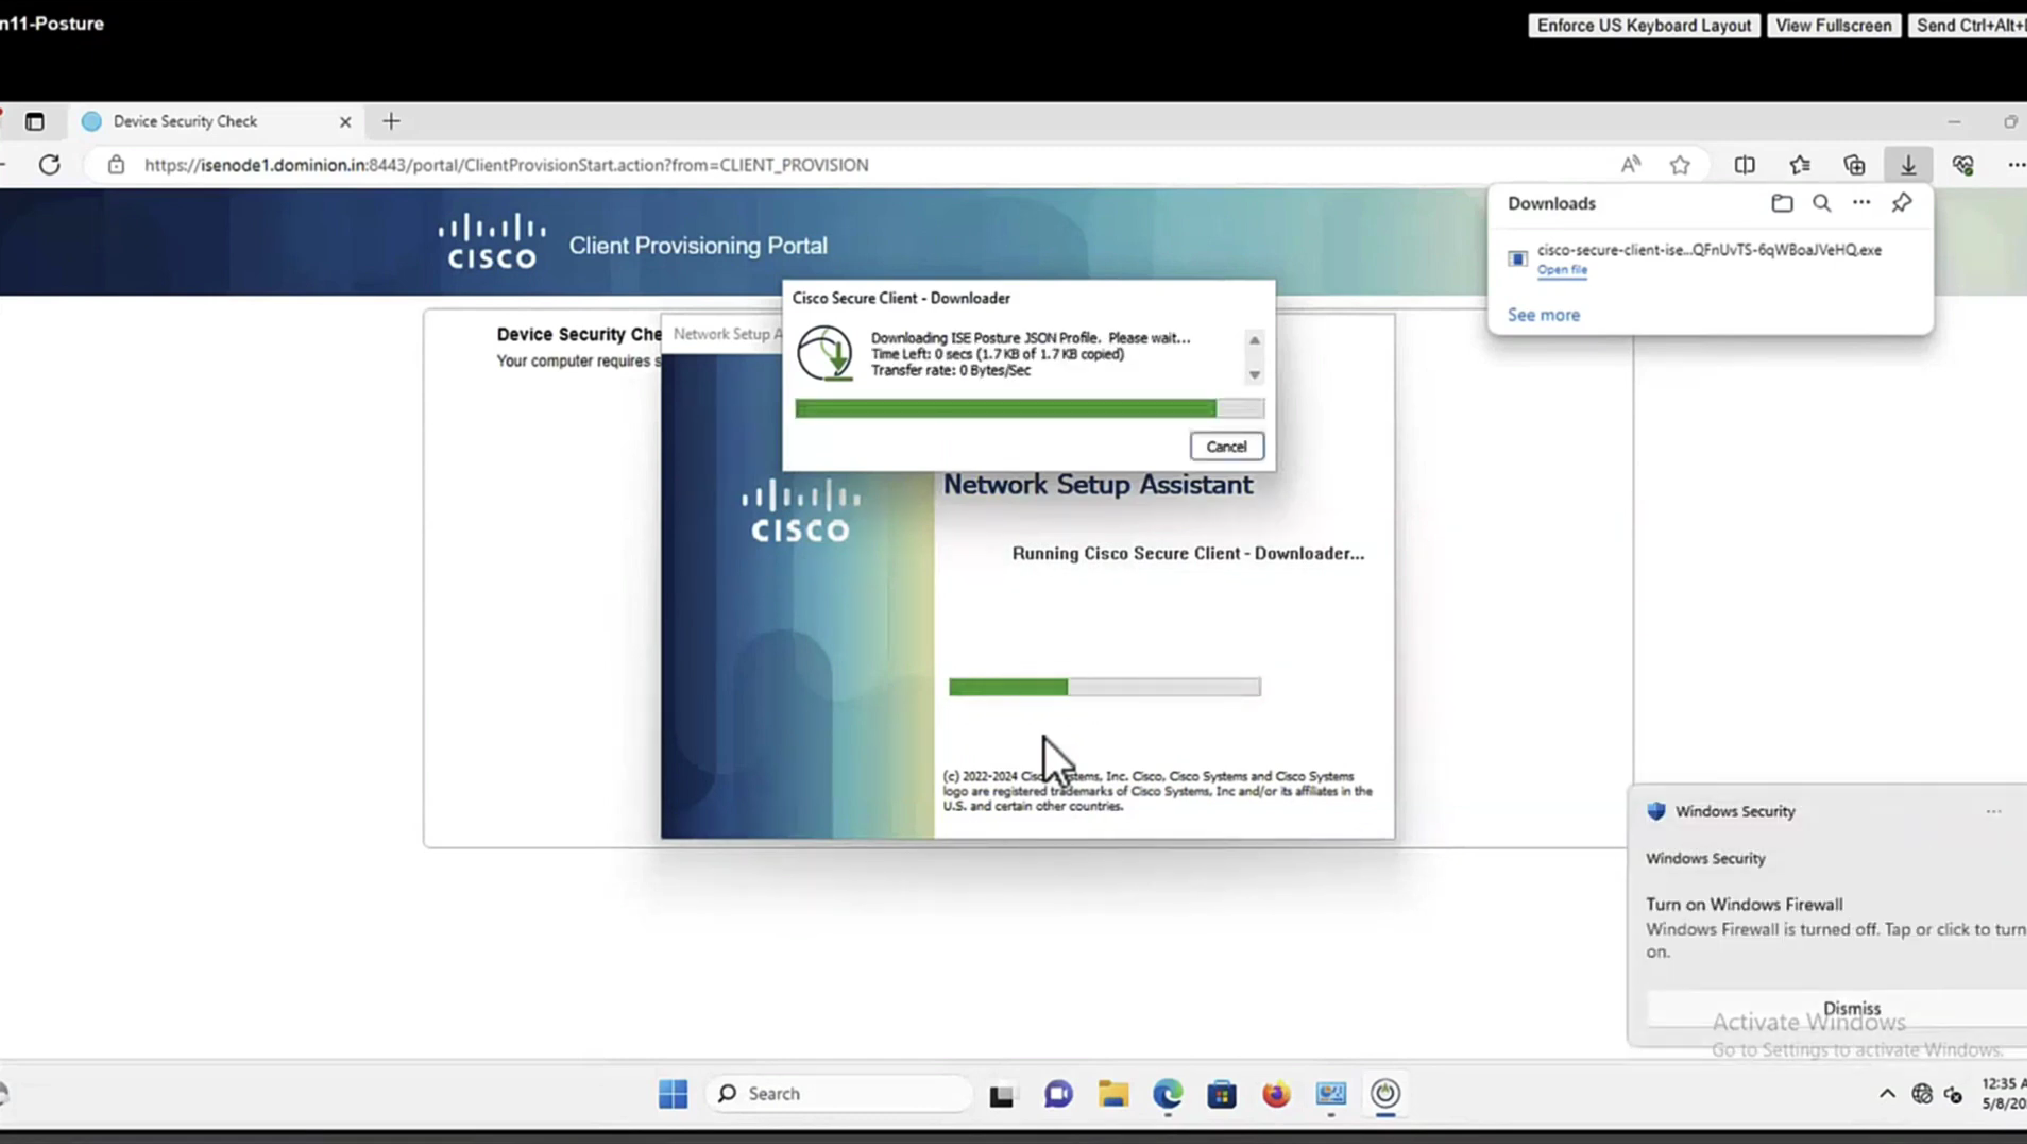
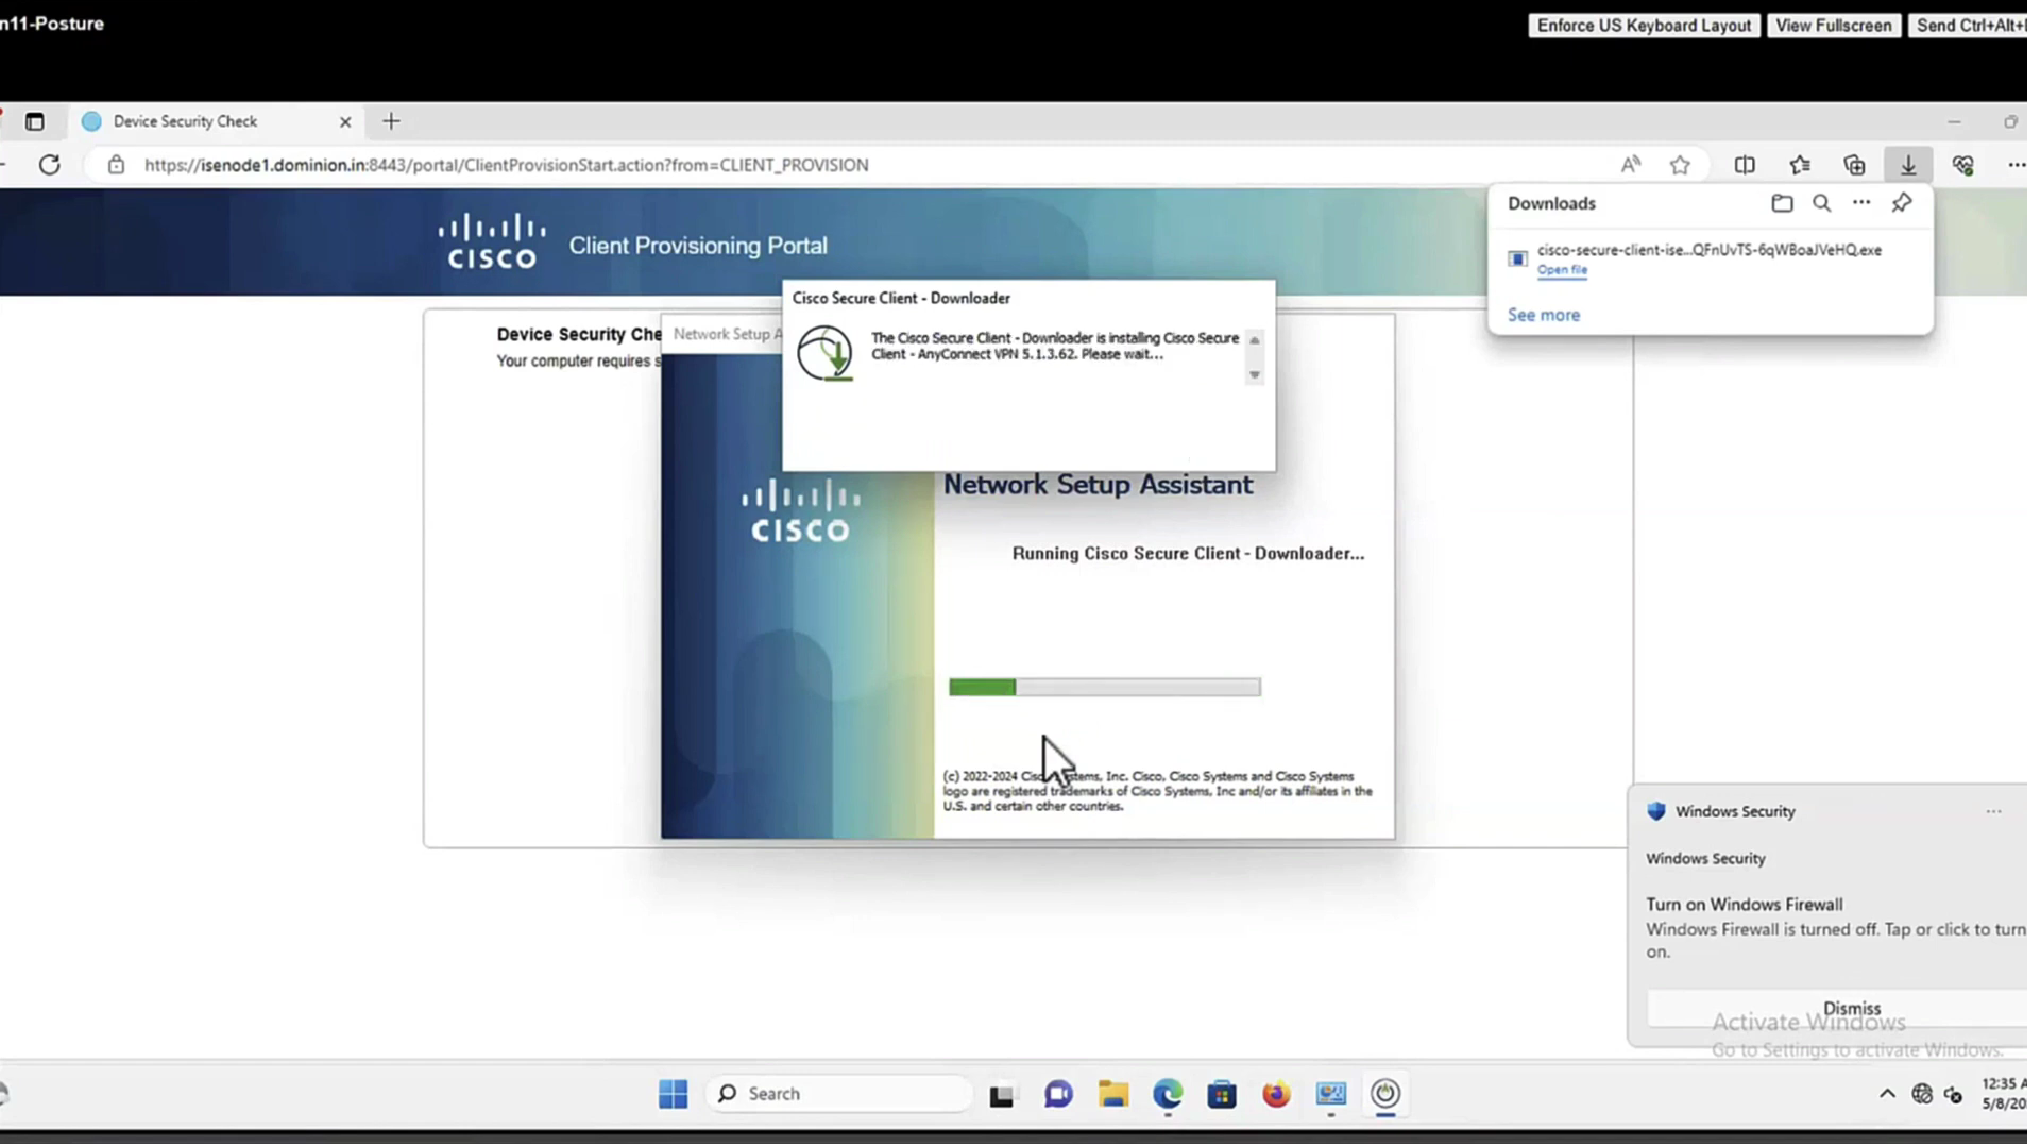
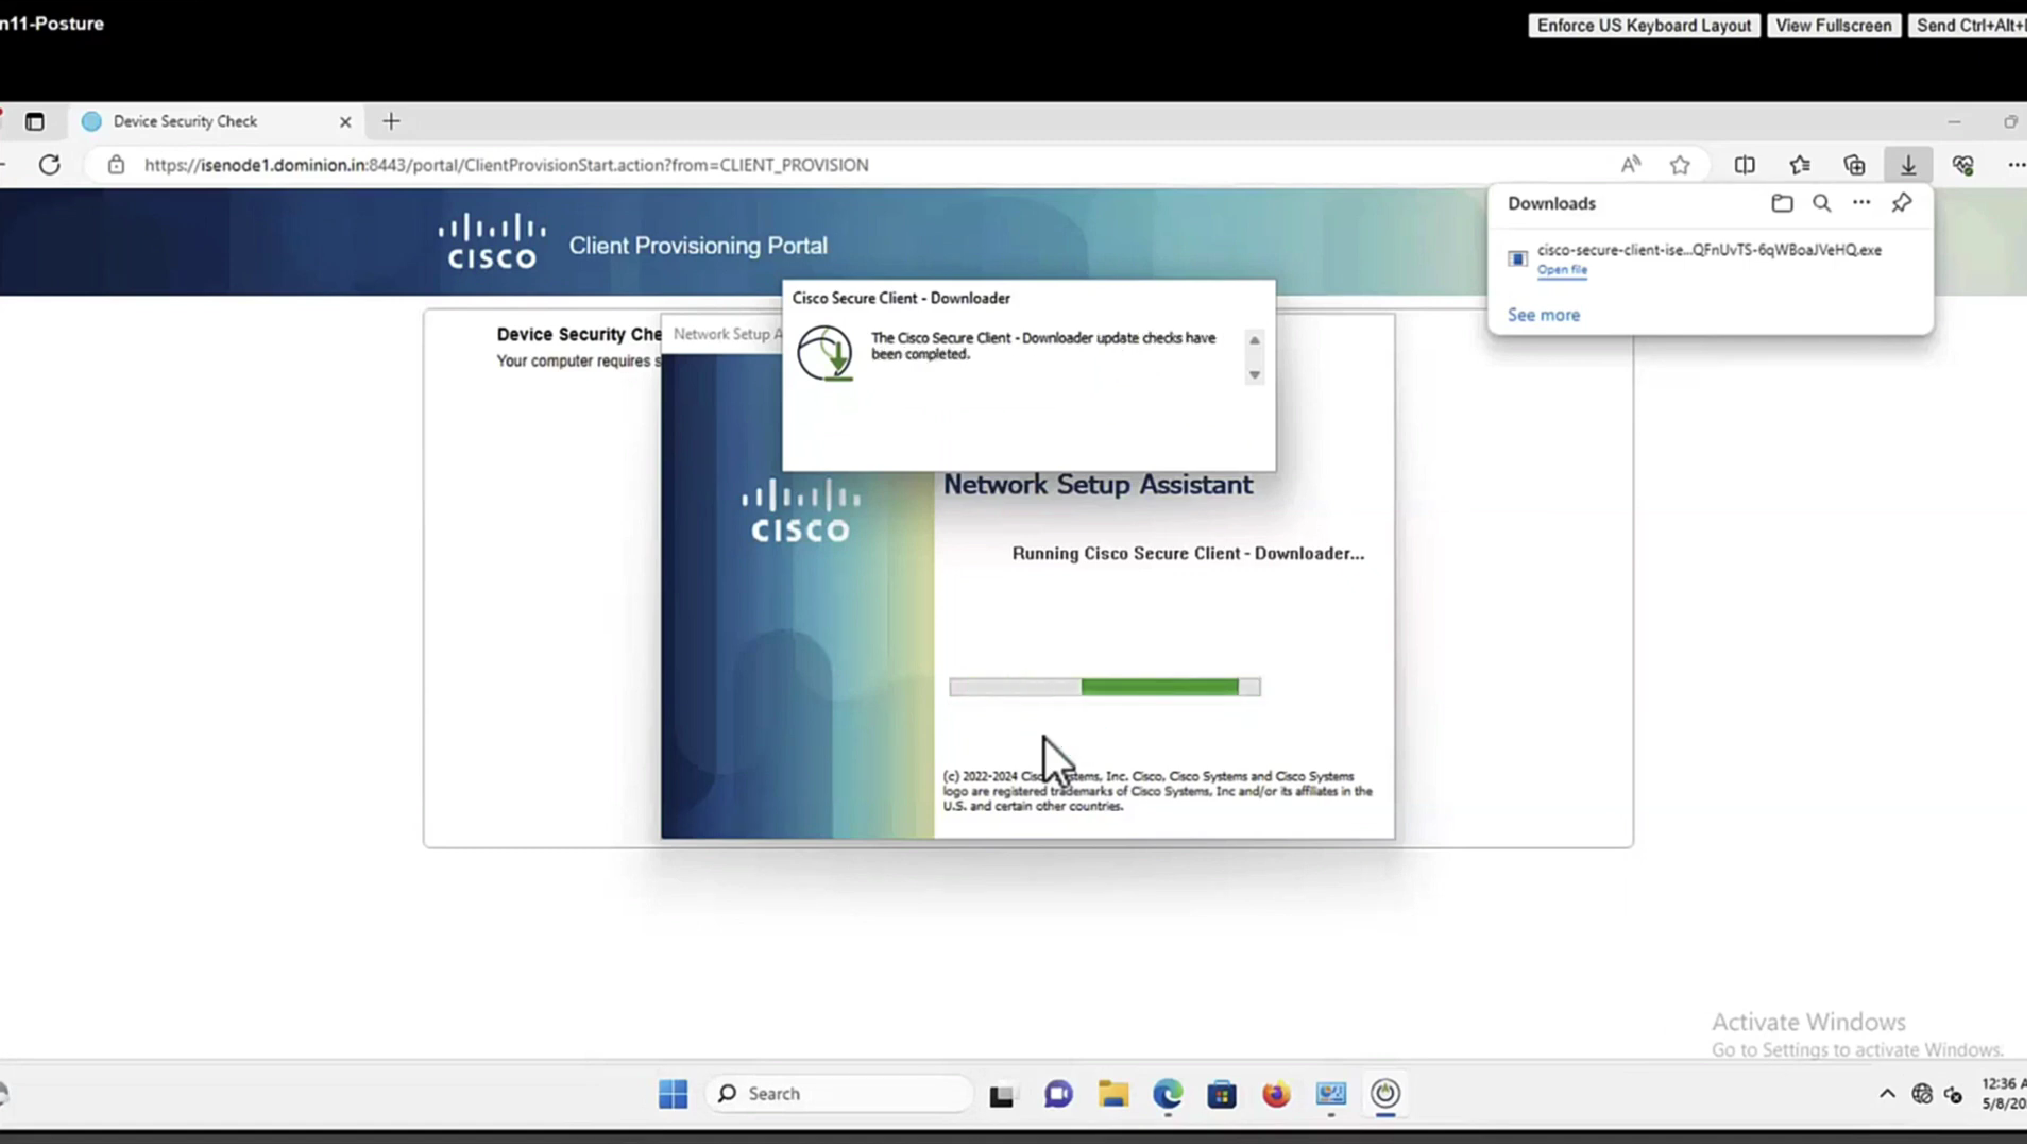
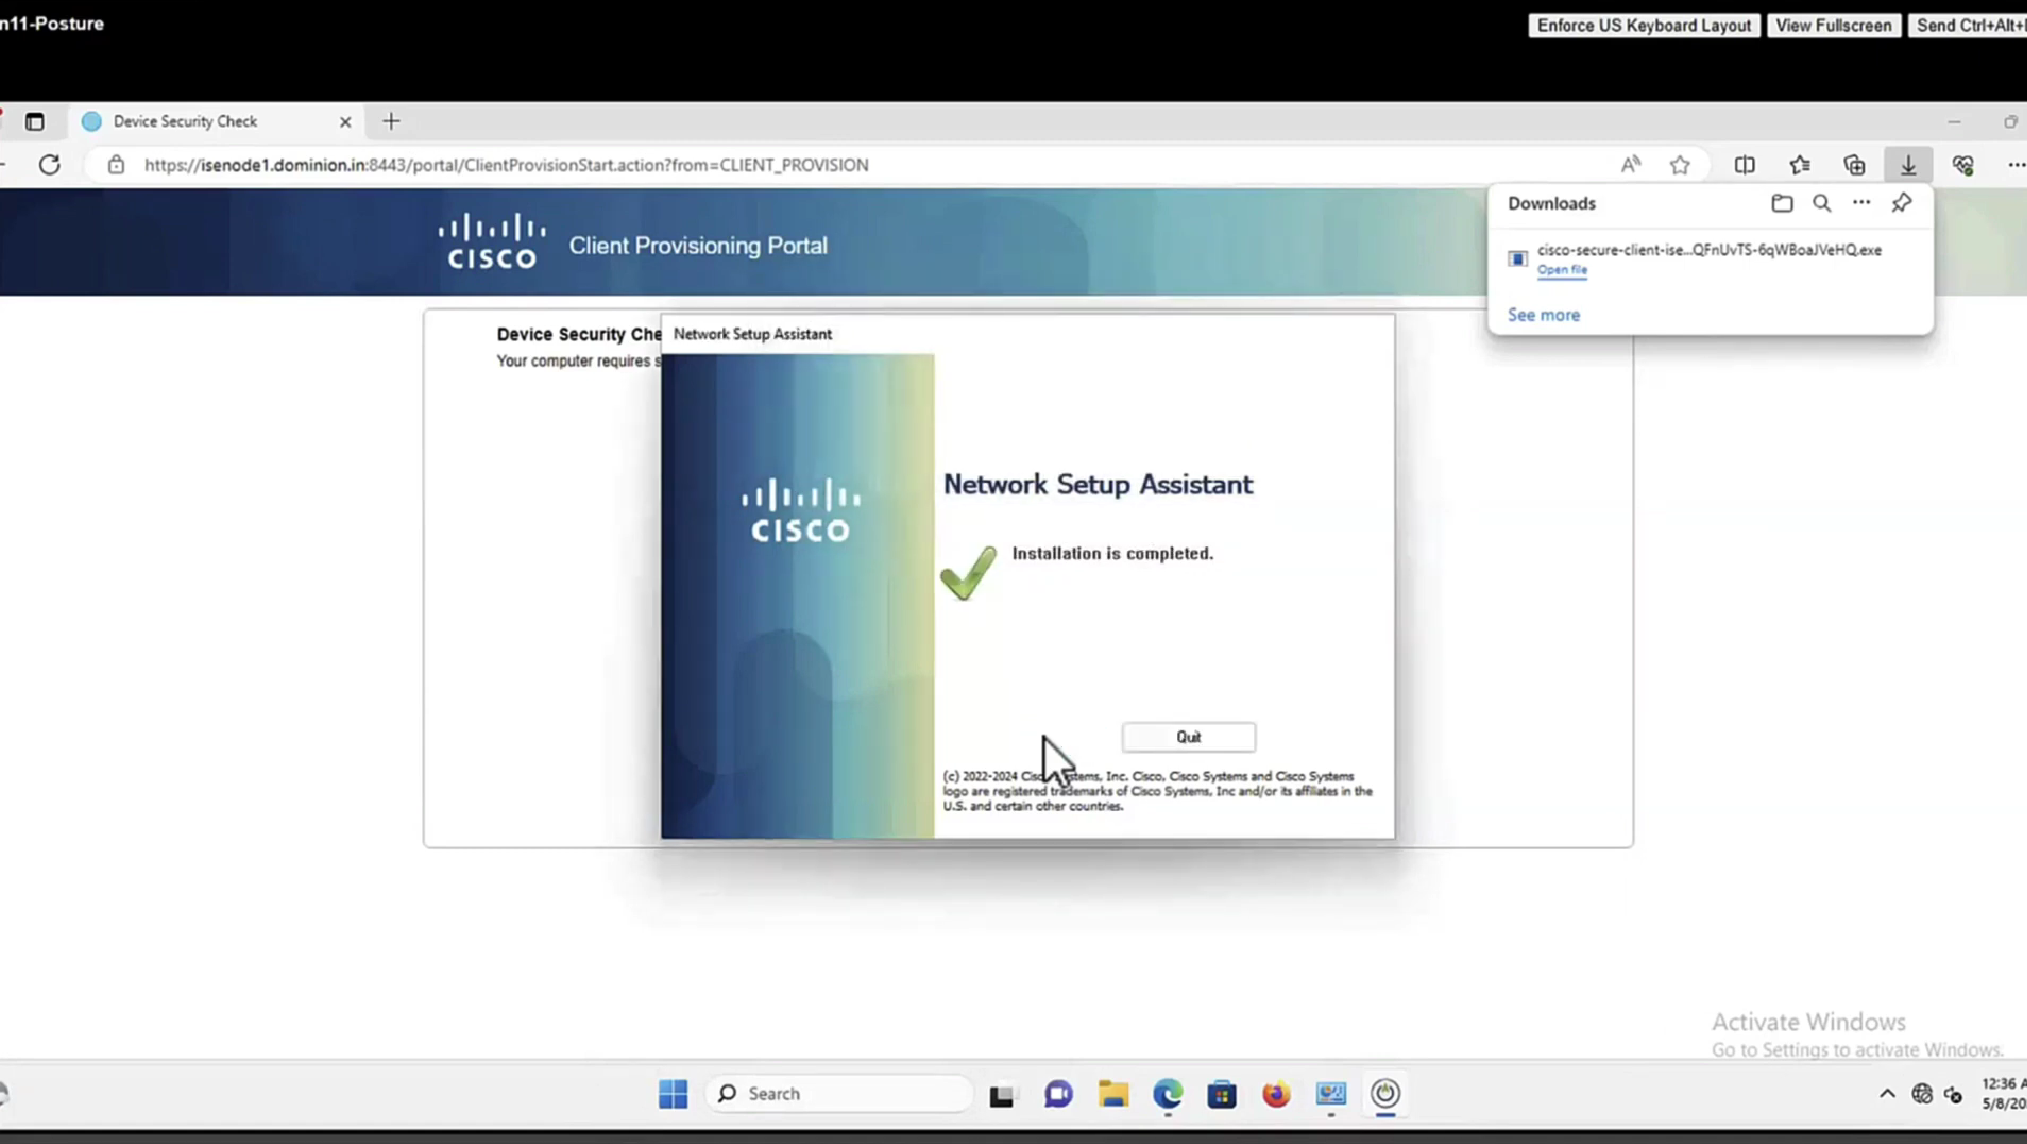
before we proceed below, keep in mind that this section only happens when there is no client detected on computer then redirect URL is for CCP portal and this whole process is only to push Network Setup Assistant from CCP portal to probe the admin portal on port 8905 in order to download the Anyconnect client securely over SSL, if anyconnect client is already provisioned then we can skip directly to “Step 19.Anyconnect ISE posture process is launched.”
Step 11. The client sends a DNS request for the FQDN from the redirect URL. FQDN must be resolvable on the DNS server side.
Step 12. SSL connection over port received in redirect URL is established (default 8443). This connection is protected by a portal certificate from the ISE side. Client Provisioning Portal (CPP) is presented to the user.
Step 13.Before you provide a download option to the client, ISE must pick the target client provisioning (CP) policy. The Operation System (OS) of the client detected from the Browser user-agent and other information required for CPP policy selection are retrieved from the authentication session (like AD/LDAP groups and so on). ISE knows the target session from the session id presented in the redirect URL.
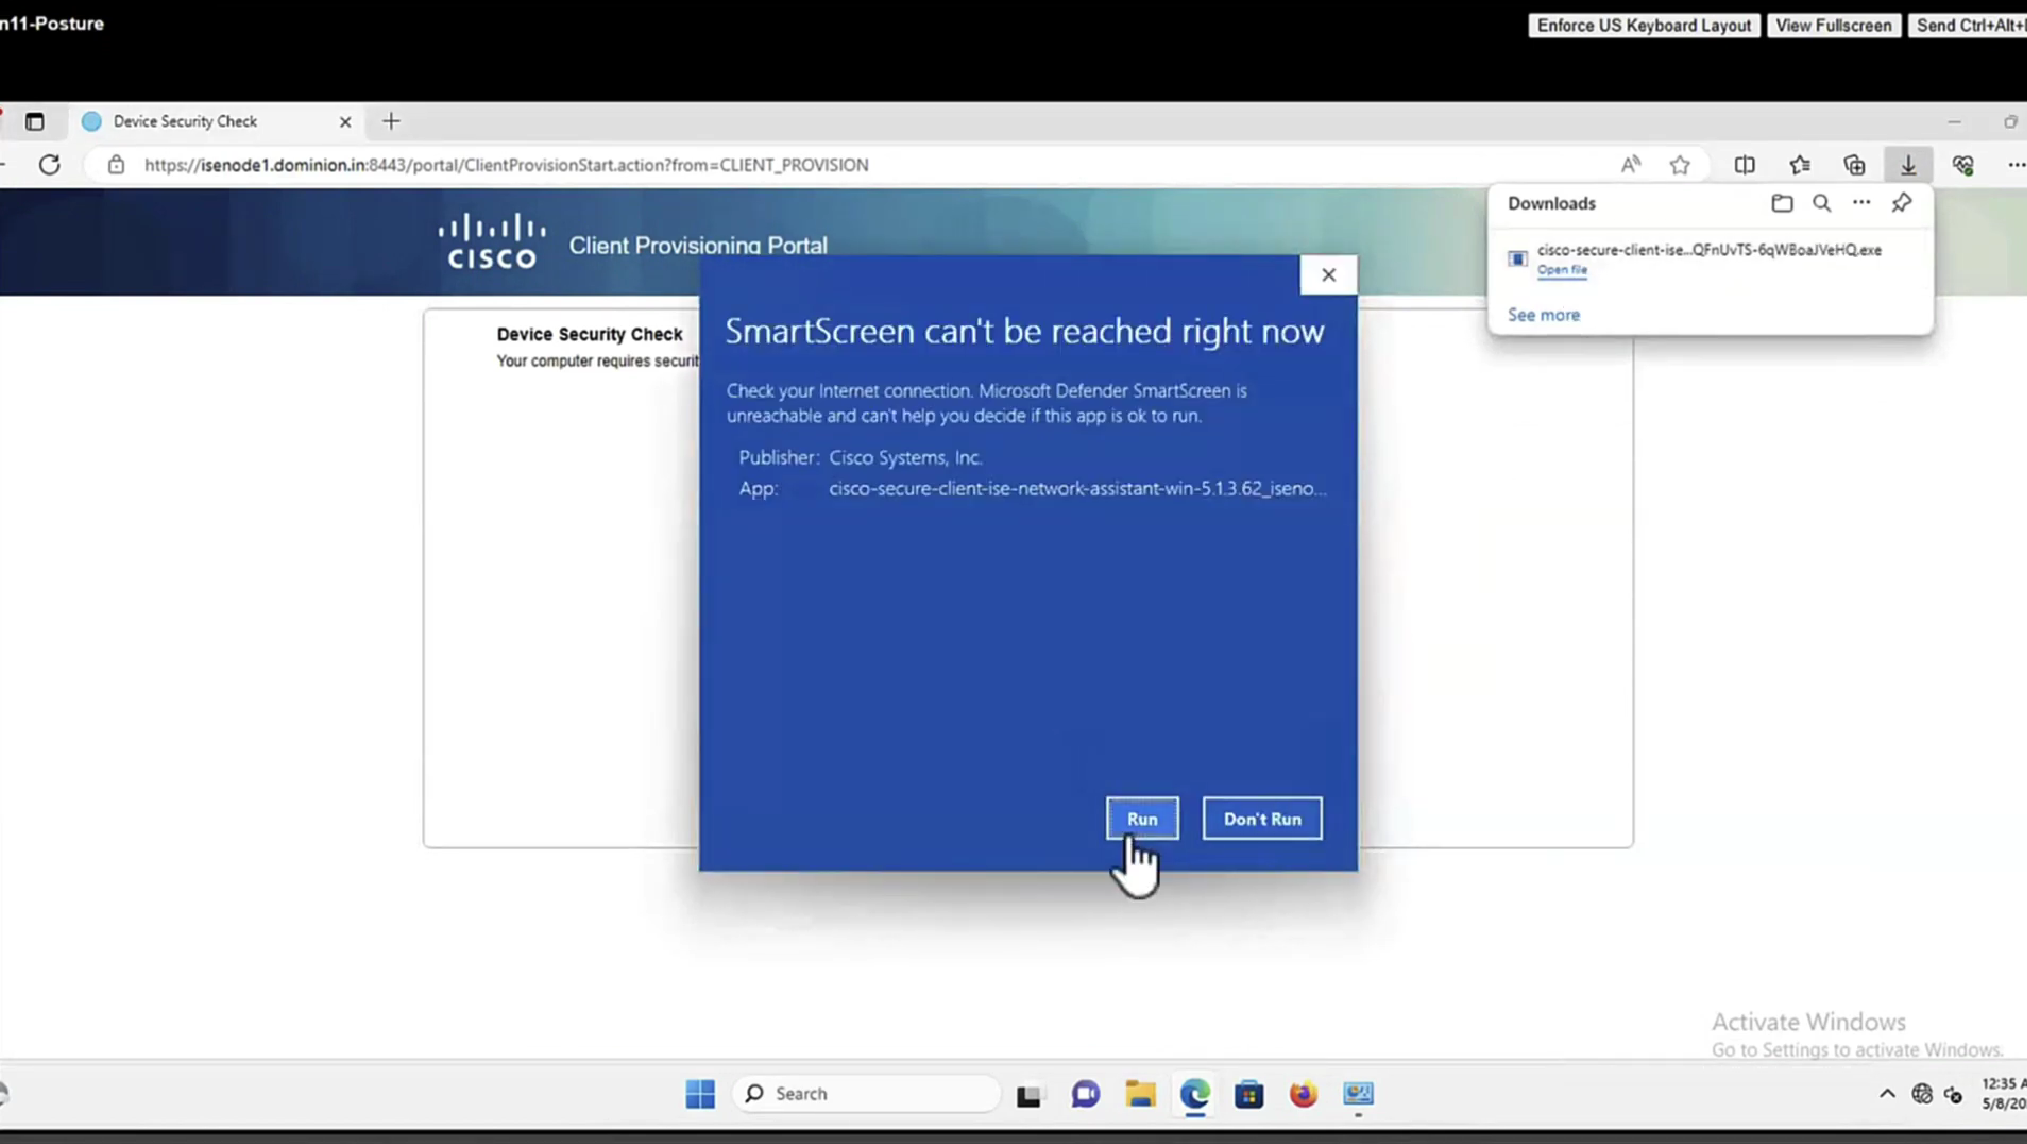
Step 14. Network Setup Assistant (NSA) download link is returned to the client. The client downloads the application.
Note: Normally you can see NSA as part of BYOD flow for Windows and Android but as well this application can be used to install Anyconnect or its components from ISE.
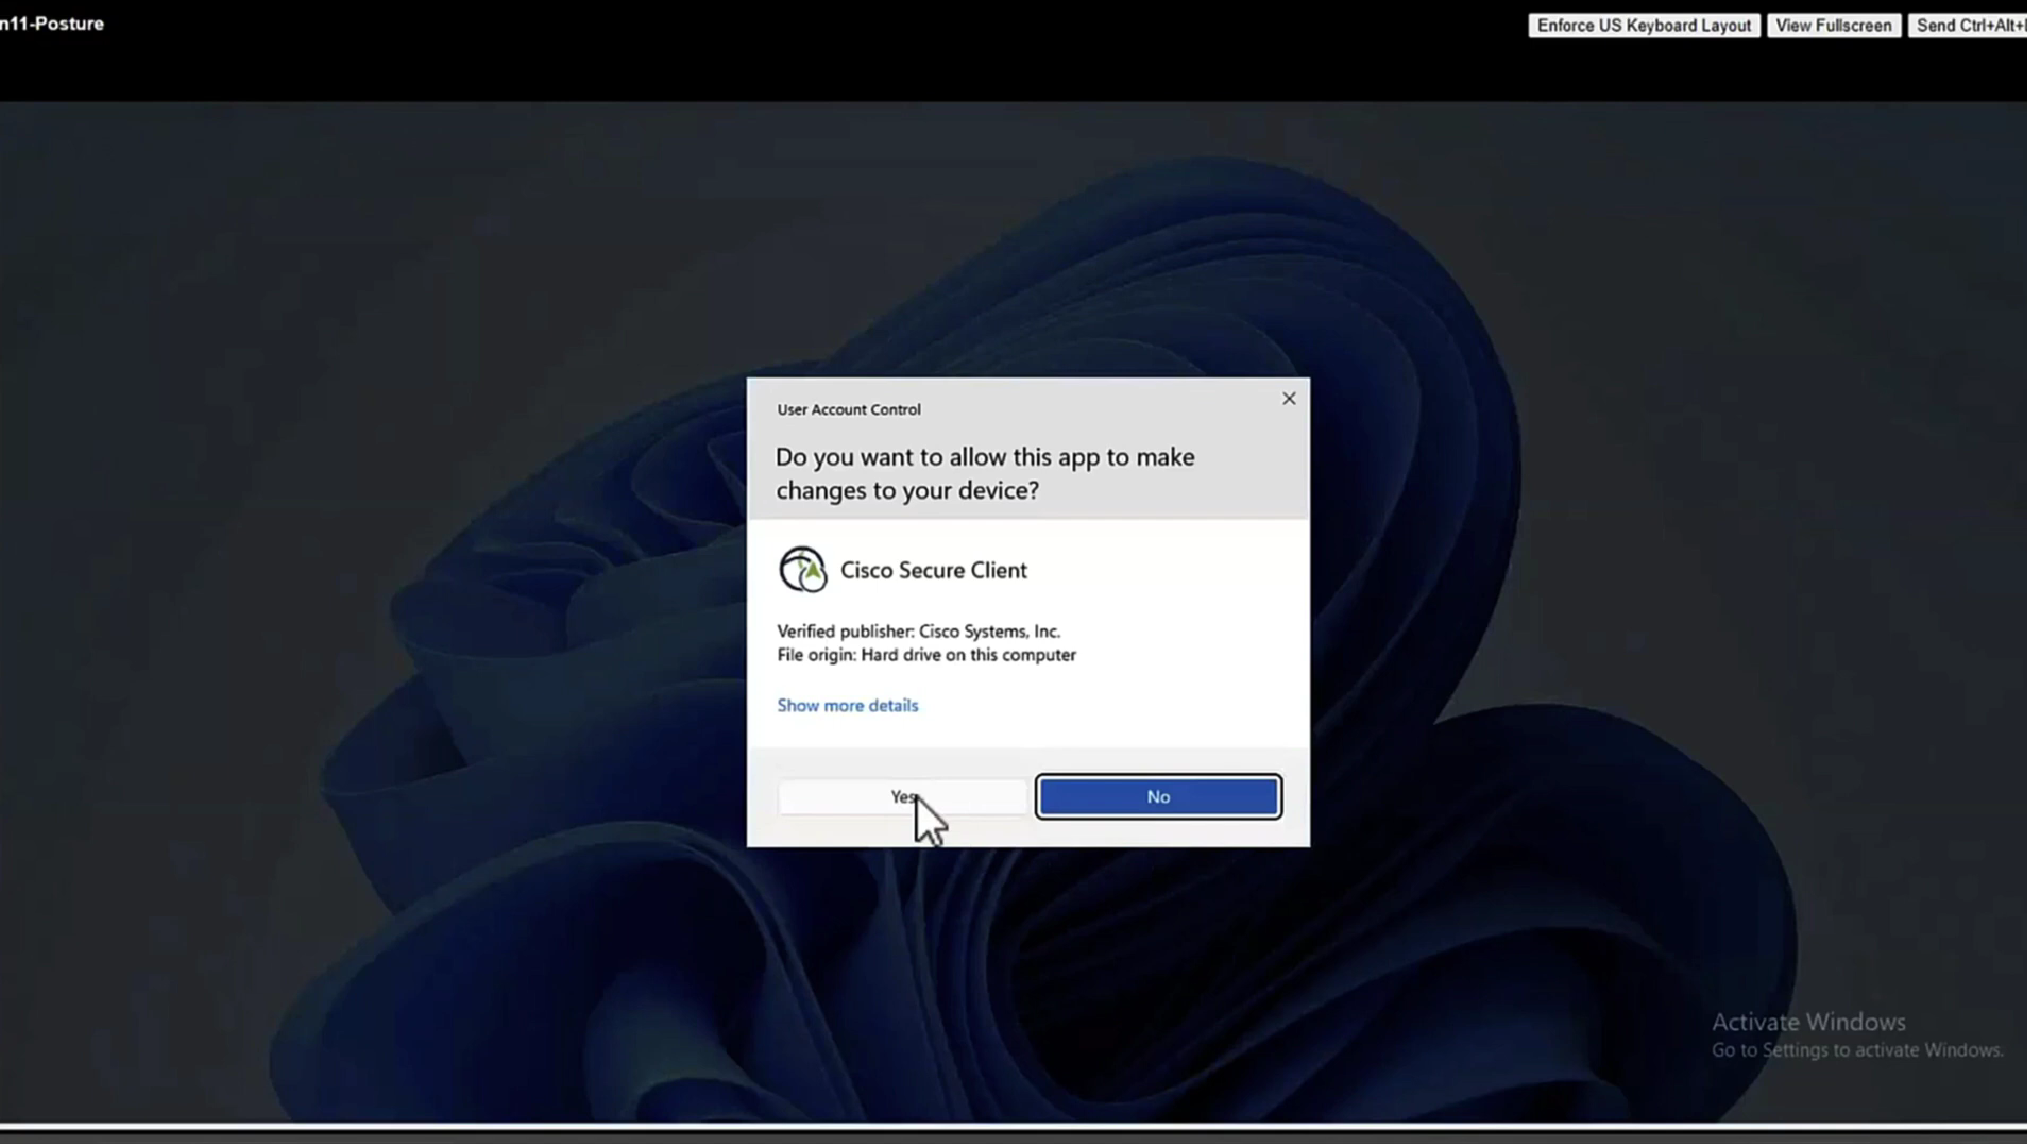
Step 15.The user runs the NSA application.
Step 16. NSA sends the first discovery probe – HTTP /auth/discovery to the Default gateway. NSA expects redirect-url as a result.
Note: For connections over VPN on MAC OS devices this probe is ignored as MAC OS does not have a default gateway on the VPN adapter.
Step 17.NSA sends a second probe if the first one fails. The second probe is an HTTP GET /auth/discovery to enroll.cisco.com. This FQDN must be successfully resolvable by the DNS server. In a VPN scenario with a split tunnel, traffic to enroll.cisco.com must be routed through the tunnel.
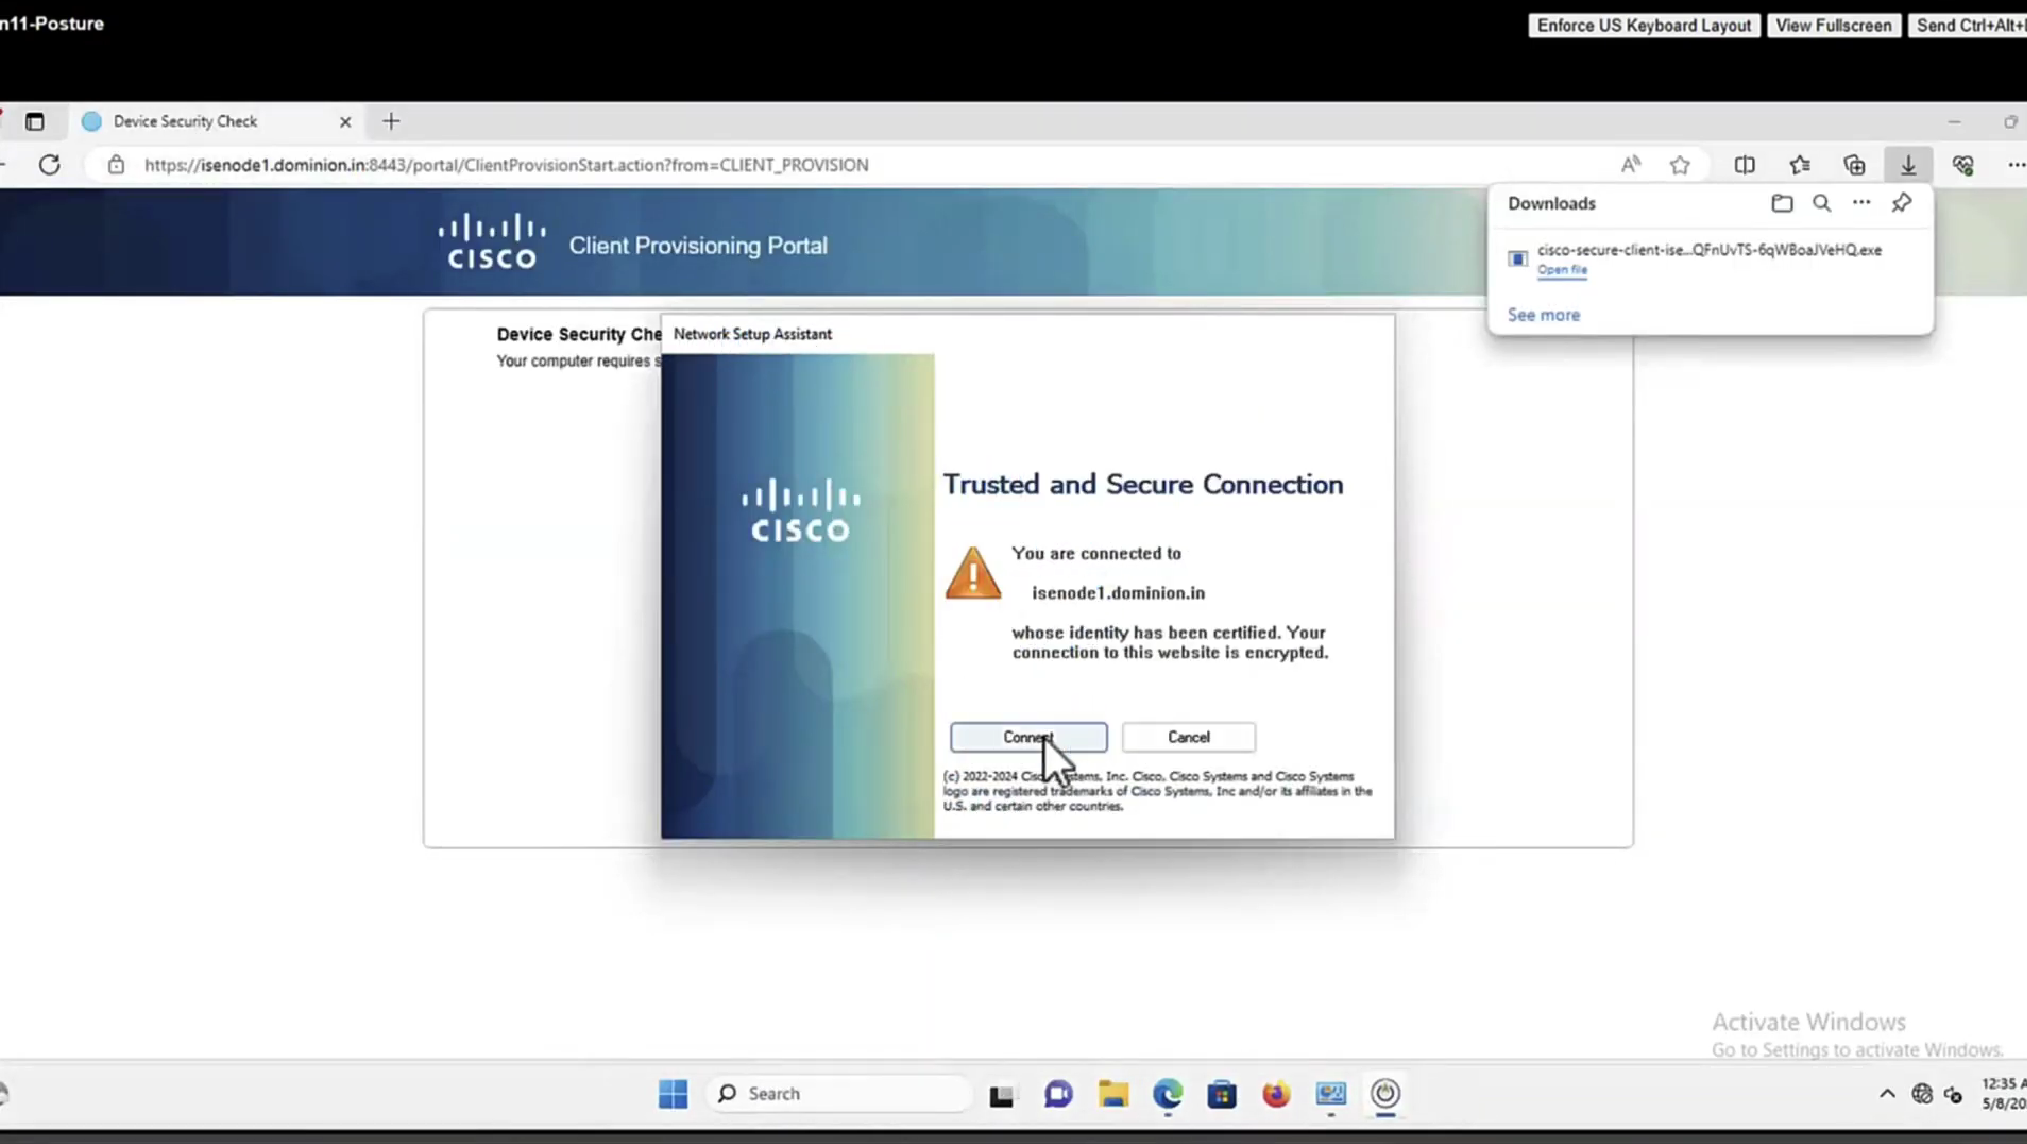
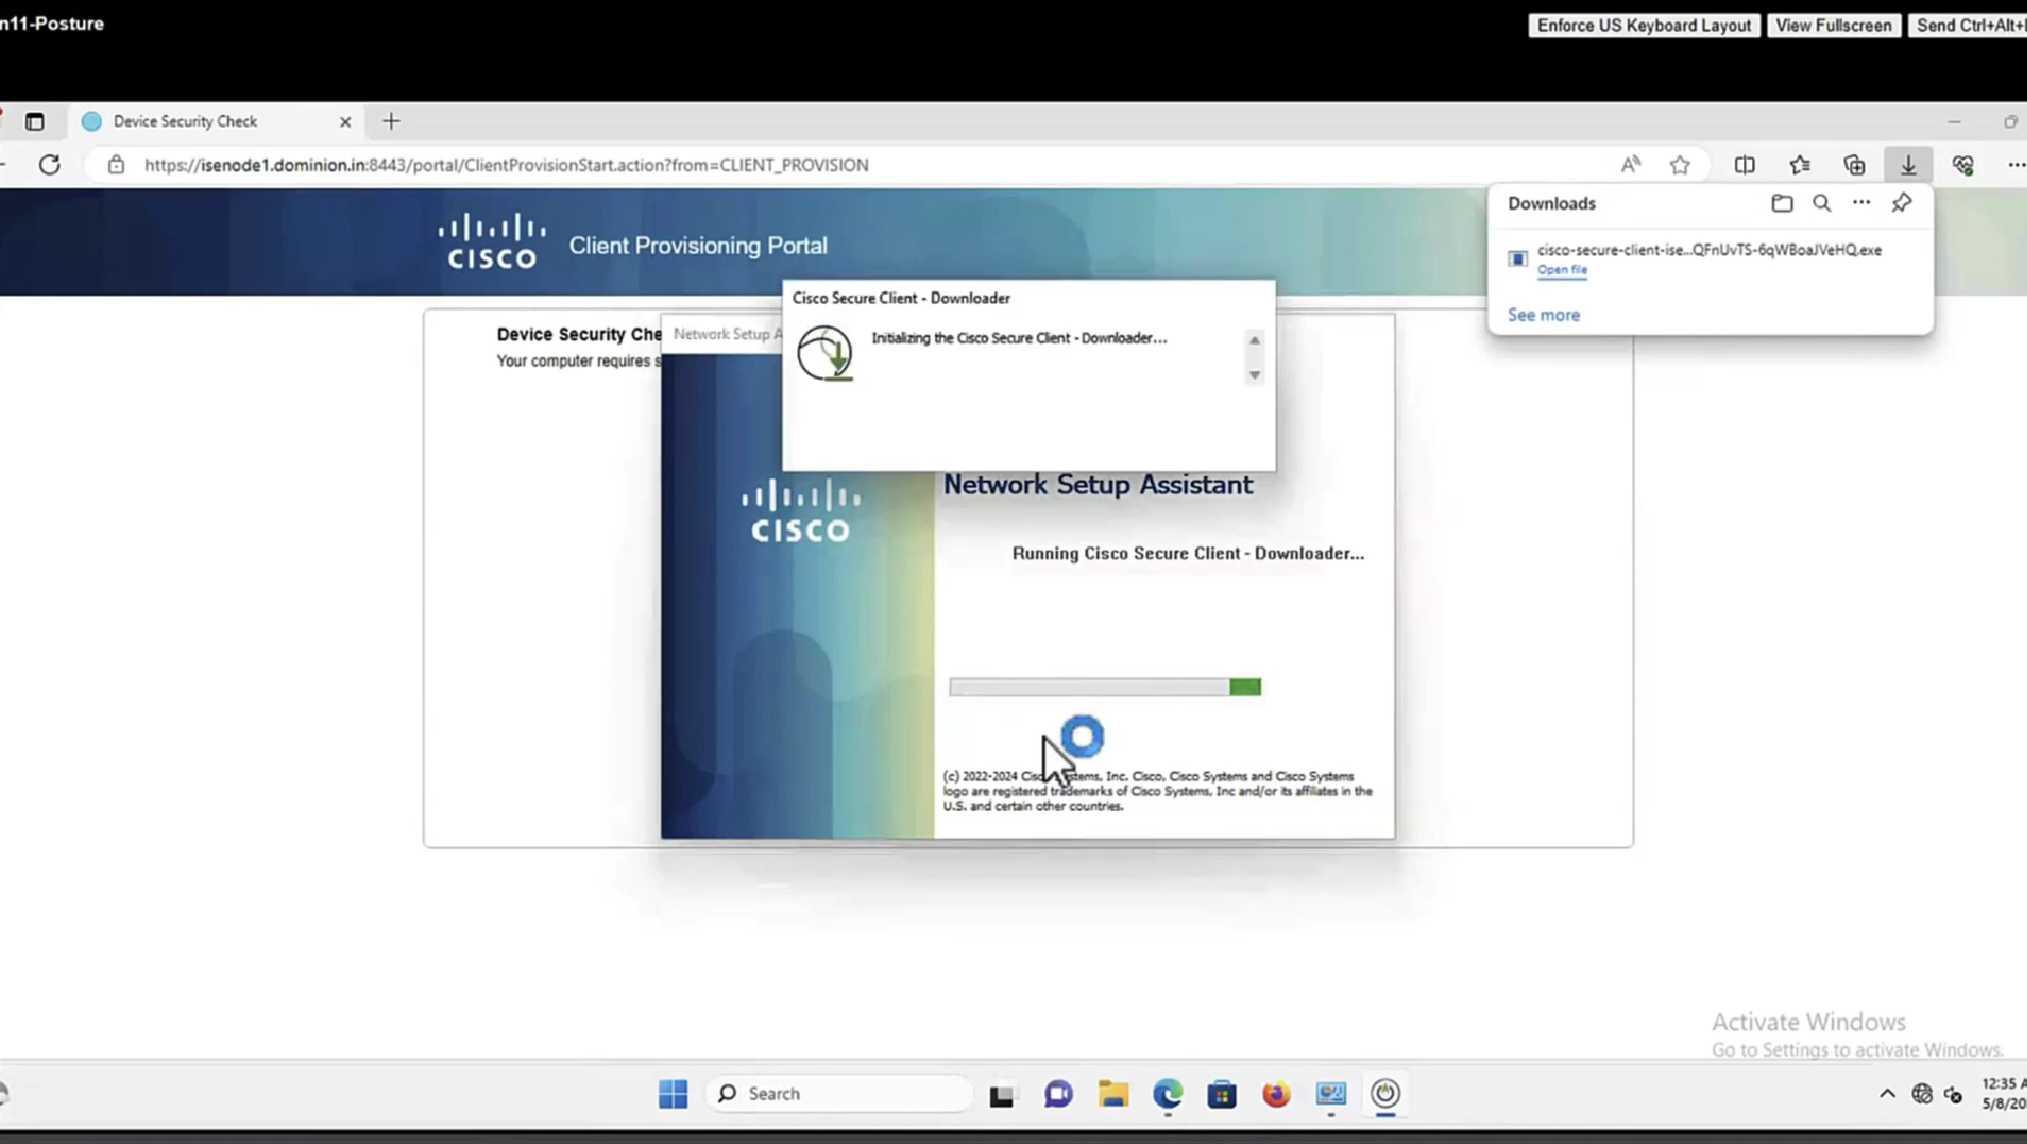
Step 18. If any of the (HTTP) probes succeed, NSA establishes an SSL connection over port 8905 with information obtained from redirect-url. This connection is protected by the ISE admin certificate. Inside this connection NSA downloads Anyconnect.
Important considerations:
- Prior to ISE 2.2 release, SSL communication over port 8905 is a requirement for posture.
- To avoid certificate warnings both portal and admin certificates must be trusted on the client side.
- In multi-interface ISE deployments interfaces other than G0 can be bound to FQDN differently from system FQDN (with the use of
ip hostCLI command). This can cause problems with Subject Name(SN)/Subject Alternative Name (SAN) validation. If the client is redirected to FQDN from interface G1, for example, the system FQDN can differ from the FQDN in the redirect URL for the 8905 communication certificate. As a solution for this scenario, you can add FQDNs of additional interfaces in admin certificate SAN fields, or you can use a wildcard in the admin certificate.
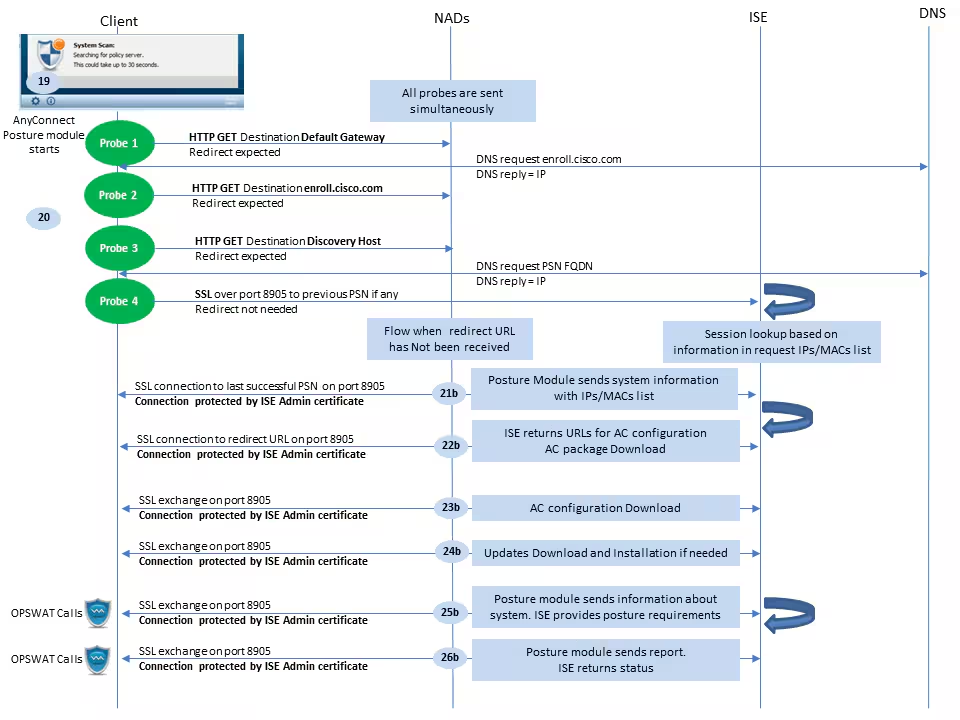
Step 19.Anyconnect ISE posture process is launched.
Anyconnect ISE Posture module starts in any of these situations:
- After installation
- After the default gateway value change
- After the system user login event
- After the system power event
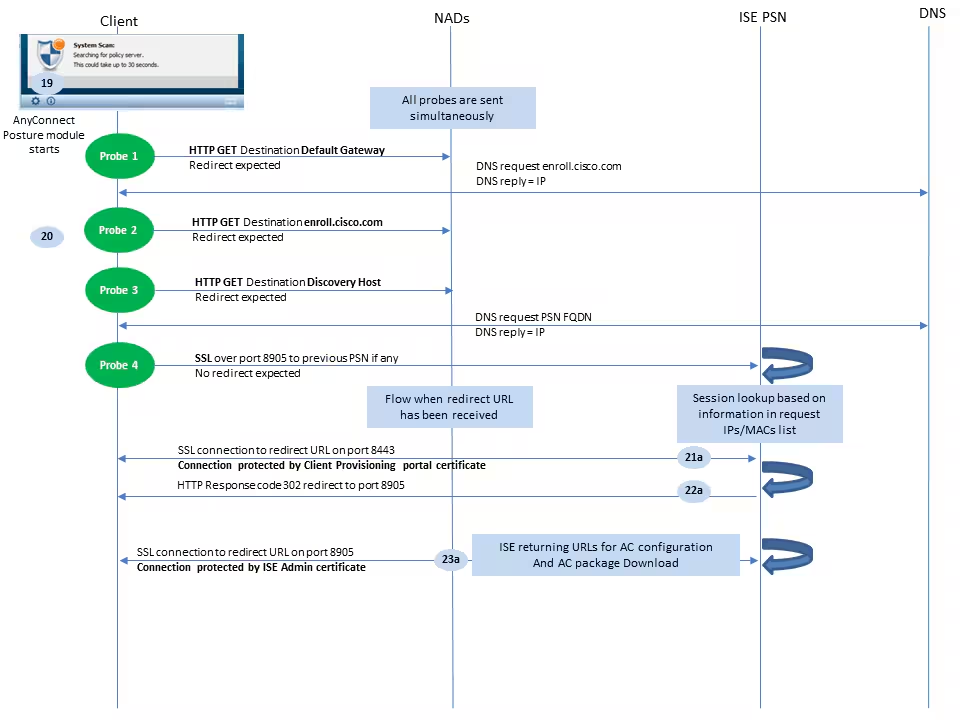
Step 20. At this stage, Anyconnect ISE Posture Module initiates policy server detection. This is accomplished with a series of probes that are sent at the same time (as opposed to Network Setup Assistant that probes one by one) by the Anyconnect ISE Posture module.
for all these probes, aim is to get a URL redirect, just like user’s browser launch caused URL redirect (if no anyconnect client then Network Setup Assistant got redirect from HTTP probes)
- Probe 1 – HTTP get /auth/discovery to default gateway IP [http://10.114.250.1/auth/discovery/]. Consider that MAC OS devices do not have a default gateway on the VPN adapter. The expected result for the probe is redirect-url.
- Probe 2 – HTTP GET /auth/discovery to
enroll.cisco.com[http:enroll.cisco.com/auth/discovery/]. This FQDN needs to be successfully resolvable by the DNS server. In a VPN scenario with a split tunnel, traffic toenroll.cisco.commust be routed through the tunnel. The expected result for the probe is redirect-url. - Probe 3 – HTTP get /auth/discovery to discovery host. The Discovery host value is returned from ISE during installation in the AC posture profile. The expected result for the probe is redirect-url.
- Probe 4 – HTTP GET /auth/status over SSL on port 8905 to previously connected PSN (from xml profile , no redirect is required as this is direct connection to last PSN). This request contains information about client IPs and MACs list for session lookup on the ISE side. This is not presented during the first posture attempt. “Connection is protected by an ISE admin certificate“. As a result of this probe, ISE can return the session ID back to the client if the node where the probe landed is the same node where the user has been authenticated.
Note: As a result of this probe, posture can be done successfully even without working redirection under some circumstances. Successful posture without redirection requires that the current PSN which authenticated the session must be the same as the previously successfully connected PSN. Keep in mind that prior to ISE 2.2, successful posture without redirection is more of an exception rather than a rule.
The next steps describe the posture process in the case when the redirect URL is received (flow marked with letter a) as a result of one of the probes.
Step 21. Anyconnect ISE Posture module / client establishes a connection to the client provisioning portal with the use of a URL retrieved during the discovery phase. At this stage, ISE makes client provisioning policy validation once again with the use of the information from the authenticated sessions (since we are still building on top of original 802.1x (so no body can dial this URL and download AC configuration, AC updates, Posture module) and we need get to the posture state “Compliant” or “non Compliant”) and user agent which anyconnect client.
Step 22.If client provisioning policy is detected, ISE returns redirect to port 8905.
Step 23. Agent establishes a connection to ISE over port 8905. During this connection, ISE returns URLs for the posture profile, compliance module, and anyconnect updates to download.

Step 24.AC ISE Posture module configuration download from ISE.
Step 25.Updates download and installation if required.
Step 26. AC ISE Posture module collects initial information about the system (like OS version, installed security products, and their definition version).
Step 26.a. At this stage, the AC ISE posture module involves OPSWAT API to collect information about security products. The collected data is sent to ISE.
Step 26.b. As a reply to this request, ISE provides a posture requirements list. The requirements list is selected as a result of posture policy processing. To match the correct policy, ISE uses the device OS version (present in the request) and session id value to pick other required attributes (AD/LDAP groups). The session ID value is sent by the client as well.
Step 27. At this step, the client involves OPSWAT calls and other mechanisms to check posture requirements. The final report with the requirements list and their status are sent to ISE. ISE needs to make the final decision about the endpoint compliance status. If the endpoint is marked as non-compliant at this step, a set of remediation actions is returned. For the compliant endpoint, ISE writes compliance status into the session and as well puts the last posture timestamp to the endpoint attributes if Posture Lease is configured. The posture result is sent back to the endpoint. In the case of Posture Reassessment (PRA) time for PRA is put by ISE into this packet as well.
In a non-compliant scenario take these points into account:
- Some remediation actions (like display text messages, link remediation, file remediation, and others) are executed by the posture agent itself.
- Other remediation types (like AV. AS, WSUS, and SCCM) require OPSWAT API communication between the posture agent and the target product. In this scenario posture agent just sends a remediation request to the product. Remediation itself is done by the security products directly.
Note: In case when security product has to communicate with external resources (Internal/External Update servers) such as Antivirus Product Installed on Laptop, you must ensure that this communication is allowed in Redirect-ACL/DACL.
Step 28. ISE sends a COA request to the NAD which must trigger a new authentication for the user. NAD must confirm this request by COA ACK. Keep in mind that for the VPN cases COA push is used, so no new authentication request is sent. Instead, ASA removes previous authorization parameters (redirect URL, redirect ACL, and DACL) from the session and applies new parameters from the COA request.
Step 29. New authentication request for the user.
Important considerations:
- Typically for Cisco NAD COA, reauth is used by ISE, and this instructs NAD to initiate a new authentication request with the previous session ID.
- On the ISE side, the same session ID value is an indication that previously collected session attributes must be reused (complaint status in our case) and a new authorization profile based on those attributes must be assigned.
- In case of a session ID change, this connection is treated as new, and the full posture process is restarted.
- In order to avoid re-posture at each session id change, a posture lease can be used. In this scenario, information about the posture status is stored in the endpoint attributes which stays on the ISE even if the session ID gets changed.
Step 30. A new authorization policy is selected on the ISE side based on posture status.
Step 31. Access-Accept with new authorization attributes is sent to the NAD.
The next flow describes the scenario when the redirect URL is not retrieved (marked with letter b) by any posture probe and the previously connected PSN has been queried by the last probe. All steps here are exactly the same as in the case with redirect URL except the replay which is returned by PSN as a result of Probe 4. If this probe landed on the same PSN which is an owner for the current authentication session, the replay contains the session id value which is later used by the posture agent to finish the process. In case when previously connected headend is not the same as the current session owner, session lookup fails and an empty response is returned to the AC ISE posture module. As an ultimate result of this, the No Policy Server Detected message is returned to the end user.
In Diagram above if probe 4 is successful because of last succesful connection to PSN (as none of the Probes worked), direct connection (without redirect) to last PSN from xml file is established on port 8905 over SSL, Anyconnect client sends IP and MAC over SSL so PSN can lookup existing session exactly like we analyst lookup existing session during troubleshooting
Posture Flow Post ISE 2.2
ISE 2.2 and newer versions support both redirection and redirectionless flows simultaneously. This is the detailed explanation for redirectionless posture flow:
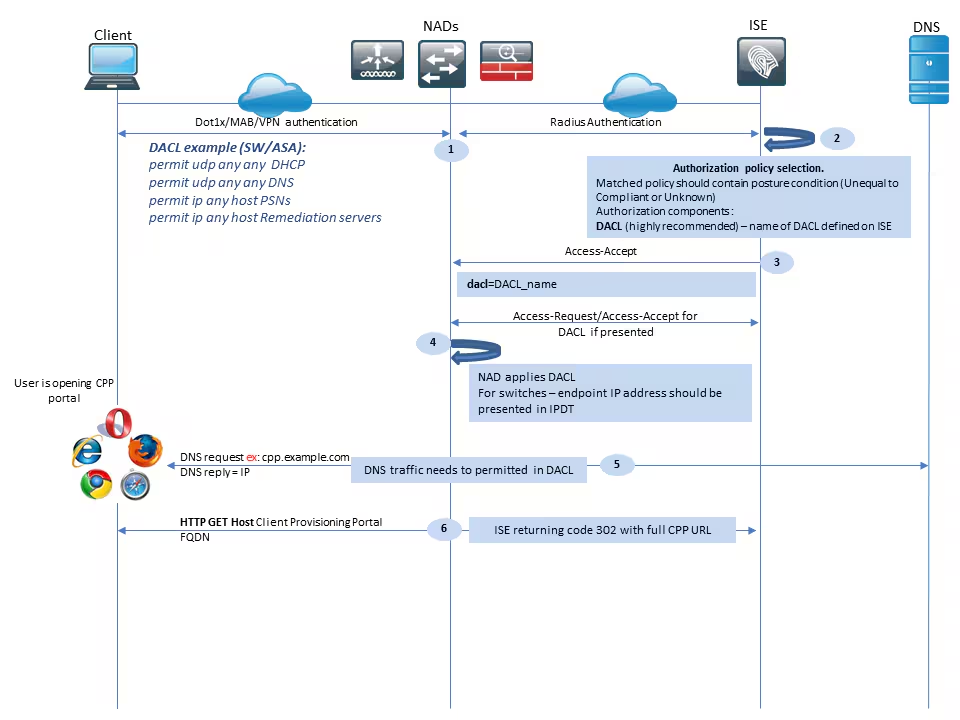
Step 1.Authentication is the first step of the flow. It can be dot1x, MAB, or VPN.
Step 2.ISE has to choose the authentication and authorization policy for the user. In posture, the scenario chosen authorization policy must contain a reference to the posture status, which initially must be either unknown or not applicable. To cover both these cases, conditions with posture status unequal compliance can be used. For a posture with no redirection, there is no need to use any Web Redirection configuration in the authorization profile. You can still consider the use of a DACL or Airspace ACL to limit user access at the stage when posture status is not available.
Step 3.ISE returns Access-Accept with authorization attributes.
Step 4. If the DACL name is returned in Access-Accept, NAD initiates DACL content download and applies the authorization profile to the session after it is obtained.
Step 5. The new approach assumes that redirection is not possible, so the user must enter the client provisioning portal FQDN manually. FQDN of the CPP portal must be defined in the portal configuration on the ISE side. From the DNS server perspective, A-record must point to the ISE server with the PSN role enabled.
Step 6. The client sends HTTP to get to the client provisioning portal FQDN, this request is parsed on the ISE side and the full portal URL is returned back to the client.

Step 7.SSL connection over port received in redirect URL is established (default 8443). This connection is protected by a portal certificate from the ISE side. The Client Provisioning Portal (CPP) is presented to the user.
Step 8. At this step two events occur on ISE:
- Single Sign On (SSO) – ISE attempts to look up previous successful authentication. ISE uses the source IP address from the packet as a search filter for live radius sessions.
Note: Session is retrieved based on a match between the source IP in the packet and Framed IP address in the session. The framed IP address is normally retrieved by ISE from the interim accounting updates, so it is required to have accounting enabled on the NAD side. Also, you must remember that SSO is only possible on the node which owns the session. If, for example, the session is authenticated on PSN 1, but the FQDN itself points to PSN2, the SSO mechanism fails.
- Client provisioning policy lookup – in case of a successful SSO, ISE can use data from authenticated session and User-agent from the client browser. In case of an unsuccessful SSO, the user must provide credentials and after user authentication information is retrieved from Internal and External Identity stores (AD/LDAP/Internal groups), it can be used for client provisioning policy check.
Note: Due to the Cisco bug ID CSCvd11574, you can see an error at the time of client provisioning policy selection for the non-SSO cases when the external user is a member of multiple AD/LDAP groups added in external identity store configuration. The mentioned defect is fixed that starts from ISE 2.3 FCS and the fix requires to use of CONTAINS in condition with AD group instead of EQUAL.
Step 9. After the client provisioning policy selection, ISE displays the agent download URL to the user. After you click on download NSA, the application is pushed to the user. NSA filename contains the FQDN of the CPP portal.
Step 10.At this step, NSA runs probes to establish a connection to the ISE. Two probes are classic ones, and the third one is designed to allow ISE discovery in environments without url redirection.
- NSA sends the first discovery probe – HTTP /auth/discovery to the Default gateway. NSA expects redirect-url as a result.
- NSA sends a second probe if the first one fails. The second probe is an HTTP GET /auth/discovery to
enroll.cisco.com. This FQDN must be successfully resolvable by the DNS server. In a VPN scenario with a split tunnel, traffic toenroll.cisco.commust be routed through the tunnel. - NSA sends the third probe over the CPP portal port to the client provisioning portal FQDN. This request contains information about the portal session-id which allows ISE to identify which resources have to be provided.
Step 11. NSA downloads Anyconnect and/or specific modules. The download process is done over the client provisioning portal port.

Step 12. In ISE 2.2, the posture process is divided into two stages. The first stage contains a set of traditional posture discovery probes to support backward compatibility with deployments that rely on the url redirect.
Step 13. The first stage contains all traditional posture discovery probes. To get more details about the probes, review Step 20. in the pre-ISE 2.2 posture flow.
Step 14.Stage two contains two discovery probes that allow the AC ISE posture module to establish a connection to the PSN where the session is authenticated in environments where redirection is not supported. During stage two, all probes are sequential.
- Probe 1 – During the first probe, the AC ISE posture module tries to establish with IP/FQDNs from the ‘Call Home List’. A list of the targets for the probe must be configured in the AC posture profile on the ISE side. You can define IPs/FQDNs separated by commas, with a colon you can define the port number for each Call Home destination. This port must be equal to the port on which the client provisioning portal run. On the client side information about call home servers is located in
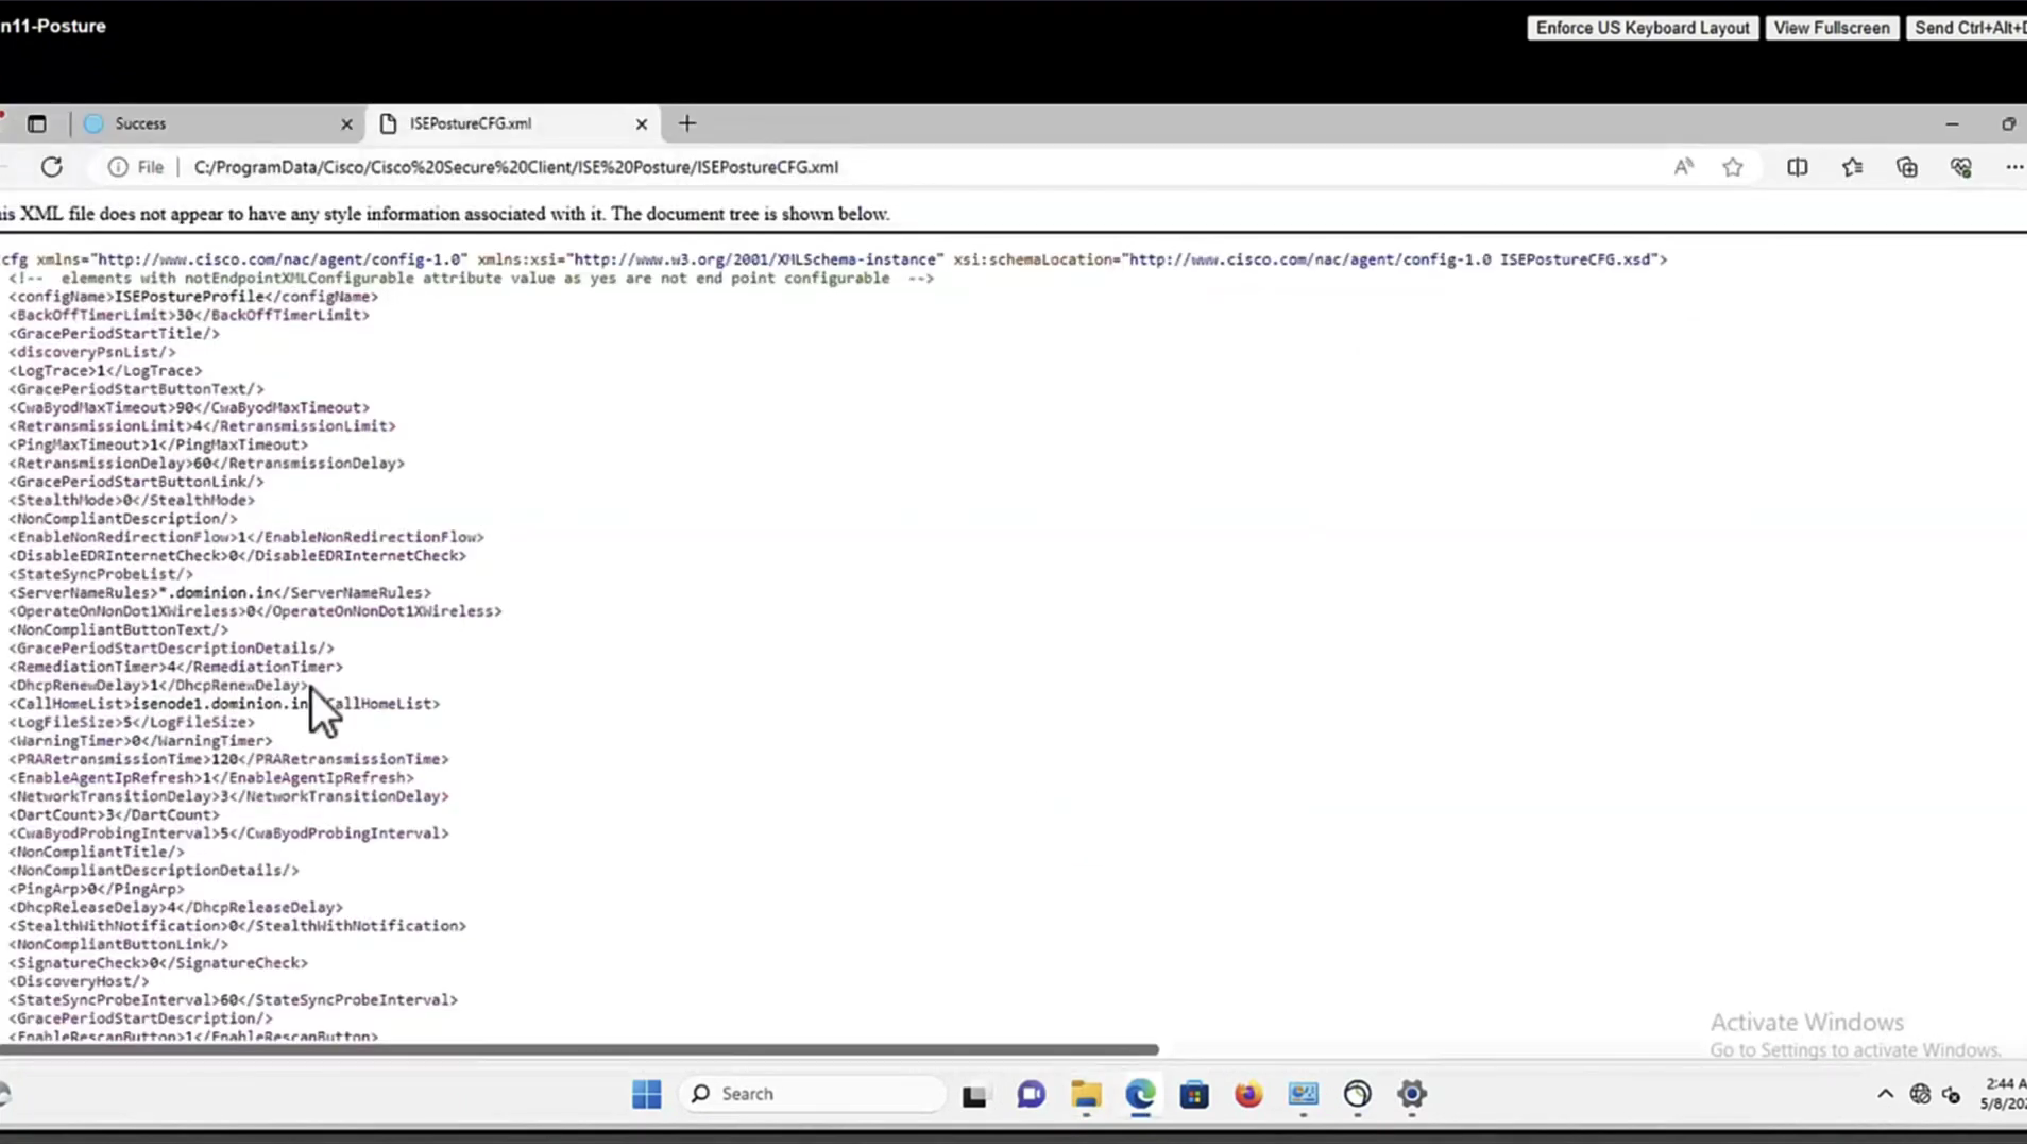
ISEPostureCFG.xml, this file can be found in the folder –C:\ProgramData\Cisco\Cisco AnyConnect Secure Mobility Client\ISE Posture\.
In case the call home target does not own the session, a lookup for the owner is needed at this stage. AC ISE Posture module instructs ISE to start owner lookup with the use of a special target URL –/auth/ng-discoveryrequest. It also contains the client IPs and MACs list. After this message is received by the PSN session, a lookup is first done locally (this lookup uses both IPs and MACs from the request sent by the AC ISE posture module). If the session is not found, PSN initiates an MNT node query. This request contains only the MACs list, as a result, the FQDN of the owner must be obtained from the MNT. After this, PSN returns owners FQDN back to the client. The next request from the client is sent to session owner FQDN with auth/status in URL and list of IPs and MACs. - Probe 2 – At this stage, the AC ISE posture module tries PSN FQDNs which are located in
ConnectionData.xml. You can find this file inC:\Users\<current user>\AppData\Local\Cisco\Cisco AnyConnect Secure Mobility Client\. AC ISE Posture module creates this file after the first posture attempt. The file contains a list of ISE PSNs FQDNs. The content of the list can be dynamically updated during the next connection attempts. The end goal of this probe is to get the FQDN of the current session owner. Implementation is identical to Probe 1. with the only difference in probe destination selection.
The file itself is located in the folder of the current user in case the device is used by multiple users. Different user is not able to use information from this file. This can lead users to the chicken and egg problem in environments without redirection when Call home targets are not specified.
Step 15. After information about the session owner is obtained, all subsequent steps are identical to the pre-ISE 2.2 flow.
Configure
For this document, ASAv is used as a network access device. All tests are conducted with posture over VPN. ASA configuration for posture over VPN support is outside of the scope of the document. For more details refer to ASA Version 9.2.1 VPN Posture with ISE Configuration Example.
Note: For Deployment with VPN users, the recommended setting is redirection-based posture. Configuration of callhomelist is not recommended. For all non-vpn-based users, ensure DACL is applied such that they do not talk to PSN where posture is configured.
Network Diagram

This topology is used in tests. With ASA, it is possible to easily simulate the scenario when the SSO mechanism for the Client Provisioning portal fails on the PSN side, because of the NAT feature. In the case of regular posture flow over VPN, SSO must work fine since NAT is normally not enforced for VPN IPs when users enter the corporate network.
Configurations
Client Provisioning Configuration
These are the steps to prepare the Anyconnect configuration.
Step 1. Anyconnect package download. Anyconnect package itself is not available for direct download from ISE so before you begin, ensure that AC is available on your PC. This link can be used for AC download – https://www.cisco.com/site/us/en/products/security/secure-client/index.html. In this document, anyconnect-win-4.4.00243-webdeploy-k9.pkg package is used.
Step 2. In order to upload the AC package to ISE, navigate to Policy > Policy Elements > Results > Client Provisioning > Resourcesand click Add. Choose Agent resources from the local disk. In the new window, choose Cisco Provided Packages, click browse and choose the AC package on your PC.

Click Submit to finish the import.
Step 3. The compliance module must be uploaded to ISE. On the same page, click Add and choose the Agent resources from Cisco site. In the resource list, you must check a compliance module. For this document, the AnyConnectComplianceModuleWindows 4.2.508.0 compliance module is used.
Step 4. Now AC posture profile must be created. Click Add and choose the NAC agent or Anyconnect posture profile.

- Choose the type of profile. AnyConnect must be used for this scenario.
- Specify profile name. Navigate to the
Posture Protocolsection of the profile.
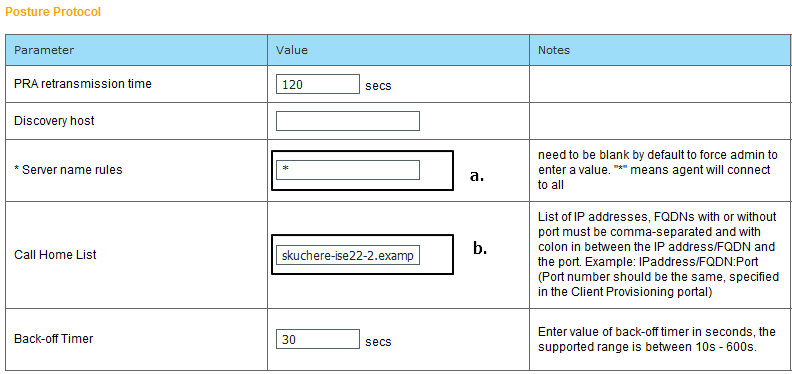
- Specify the
Server Name Rules, this field cannot be empty. The field can contain FQDN with wildcard which restricts AC ISE posture module connection to PSNs from the appropriate namespace. Put a star if any FQDN must be allowed. - Names and IPs specified here are in use during stage 2 of posture discovery. You can separate names by coma as well port numbers can be added after FQDN/IP with the use of the colon. In case the AC deployed out-of-band (not from the ISE client provisioning portal) with the use of the GPO or any other software provisioning system presence of Call Home addresses become essential since this is only one probe that can reach ISE PSN successfully. This means that in the case of Out-Of-Band AC provisioning, the administrator must create an AC ISE posture profile with the use of the AC profile editor and provision this file along with AC installation.
Note: Keep in mind that the presence of Call home addresses is critical for multiuser PCs. Review Step 14. in Posture flow post-ISE 2.2.
Step 5.Create AC configuration. Navigate to Policy > Policy Elements > Results > Client Provisioning > Resources, click Add, then choose AnyConnect Configuration.

- Choose the AC package.
- Provide AC configuration name.
- Choose the compliance module version.
- Choose the AC posture configuration profile from the drop-down list.
Step 6. Configure client provisioning policy. Navigate to Policy > Client Provisioning. In the case of the initial configuration, you can fill empty values in the policy presented with defaults. If you need to add a policy to the posture configuration that exists, navigate to the policy that can be reused and choose Duplicate Above or Duplicate Below . A brand-new policy can also be created.
This is an example of the policy used in the document.

Choose your AC configuration in the result section. Keep in mind, that in case of SSO failure ISE can have only attributes from login to portal. These attributes are limited to information that can be retrieved about users from internal and external identity stores. In this document, the AD group is used as a condition in the Client Provisioning policy.
Posture Policies and Conditions
A simple posture check is used. ISE is configured to check the status of the Window Defender service on the end device side. Real-life scenarios can be much more complicated but general configuration steps are the same.
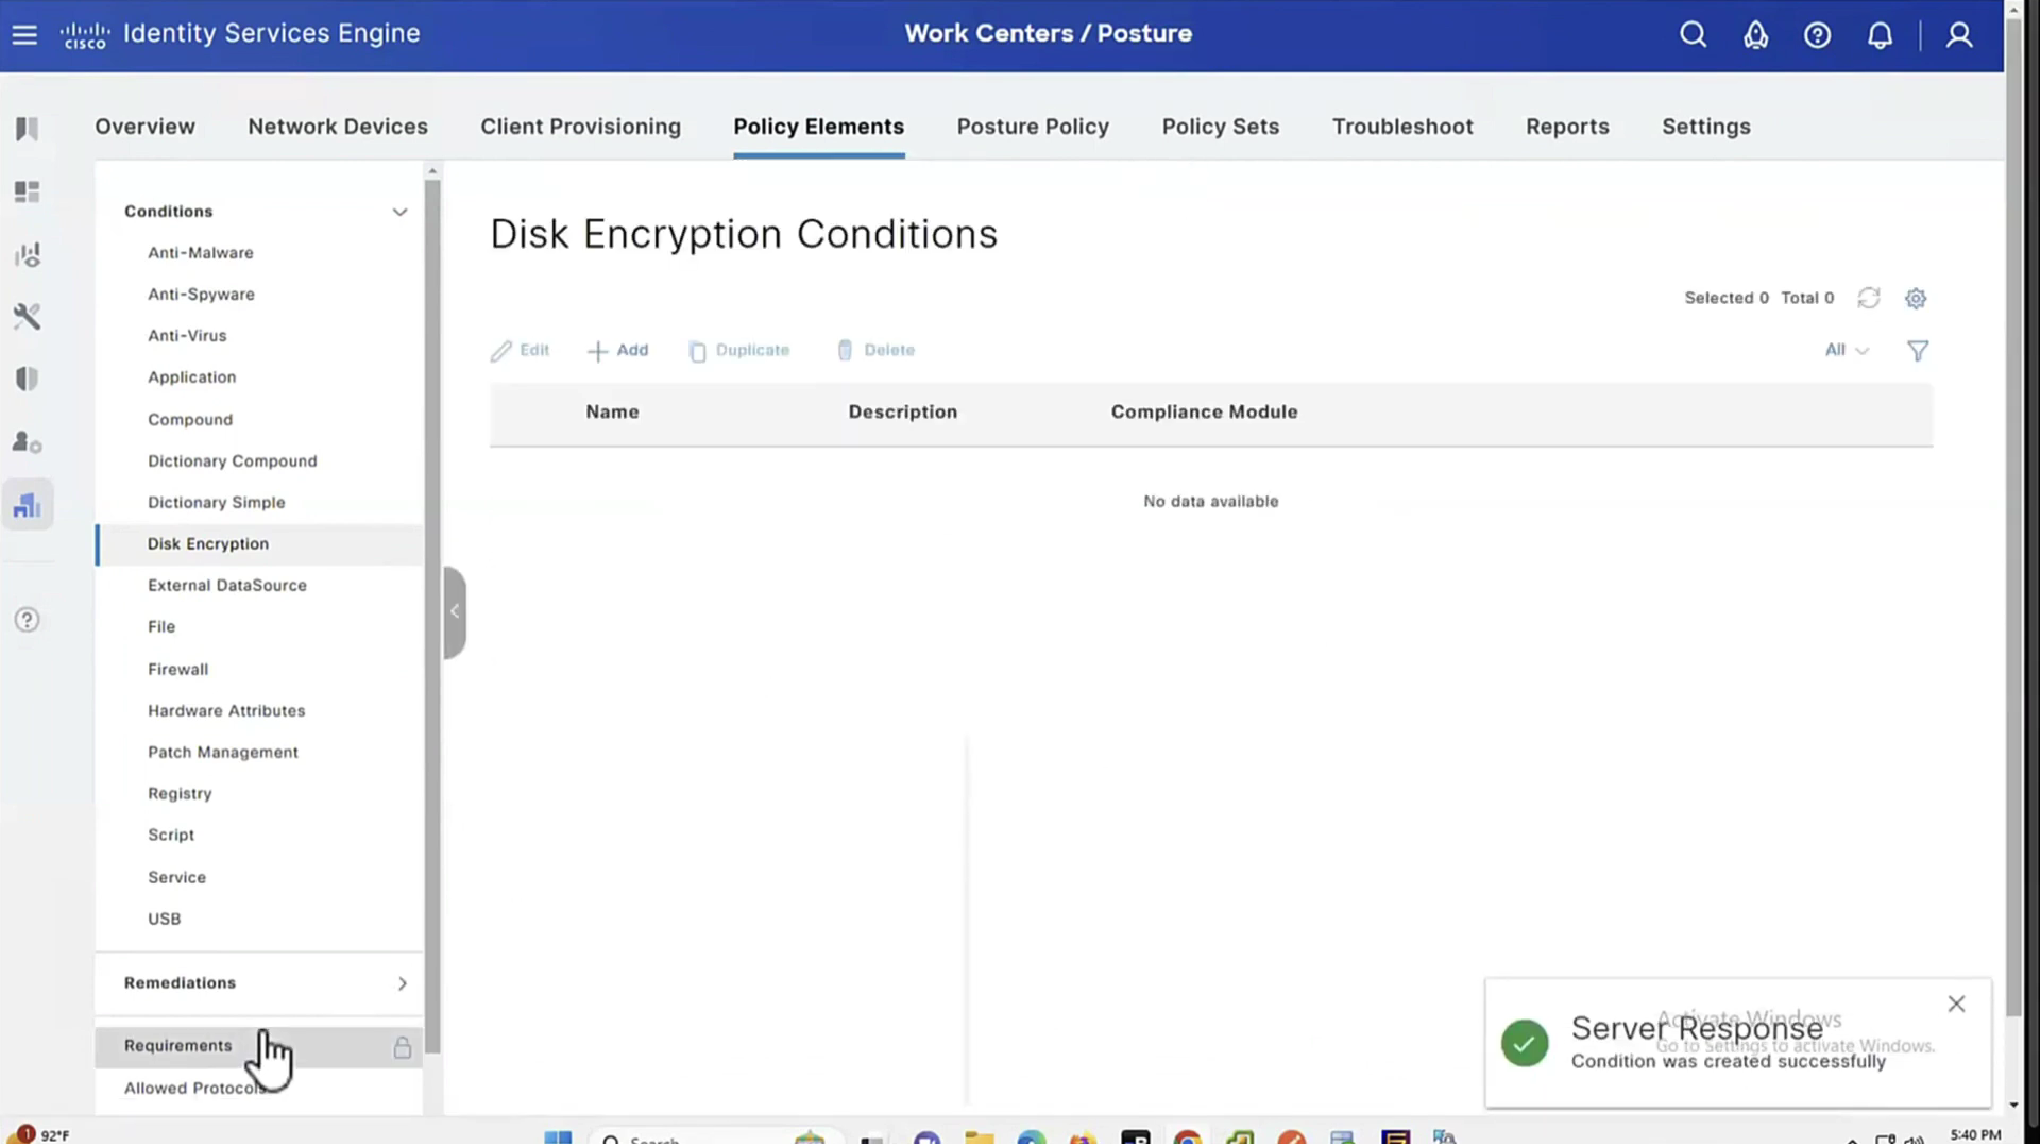
Step 1. Create posture condition. Posture conditions are located in Policy > Policy Elements > Conditions > Posture. Choose the type of posture condition. Here is an example of a Service condition that must check if the Windows Defender service is running.

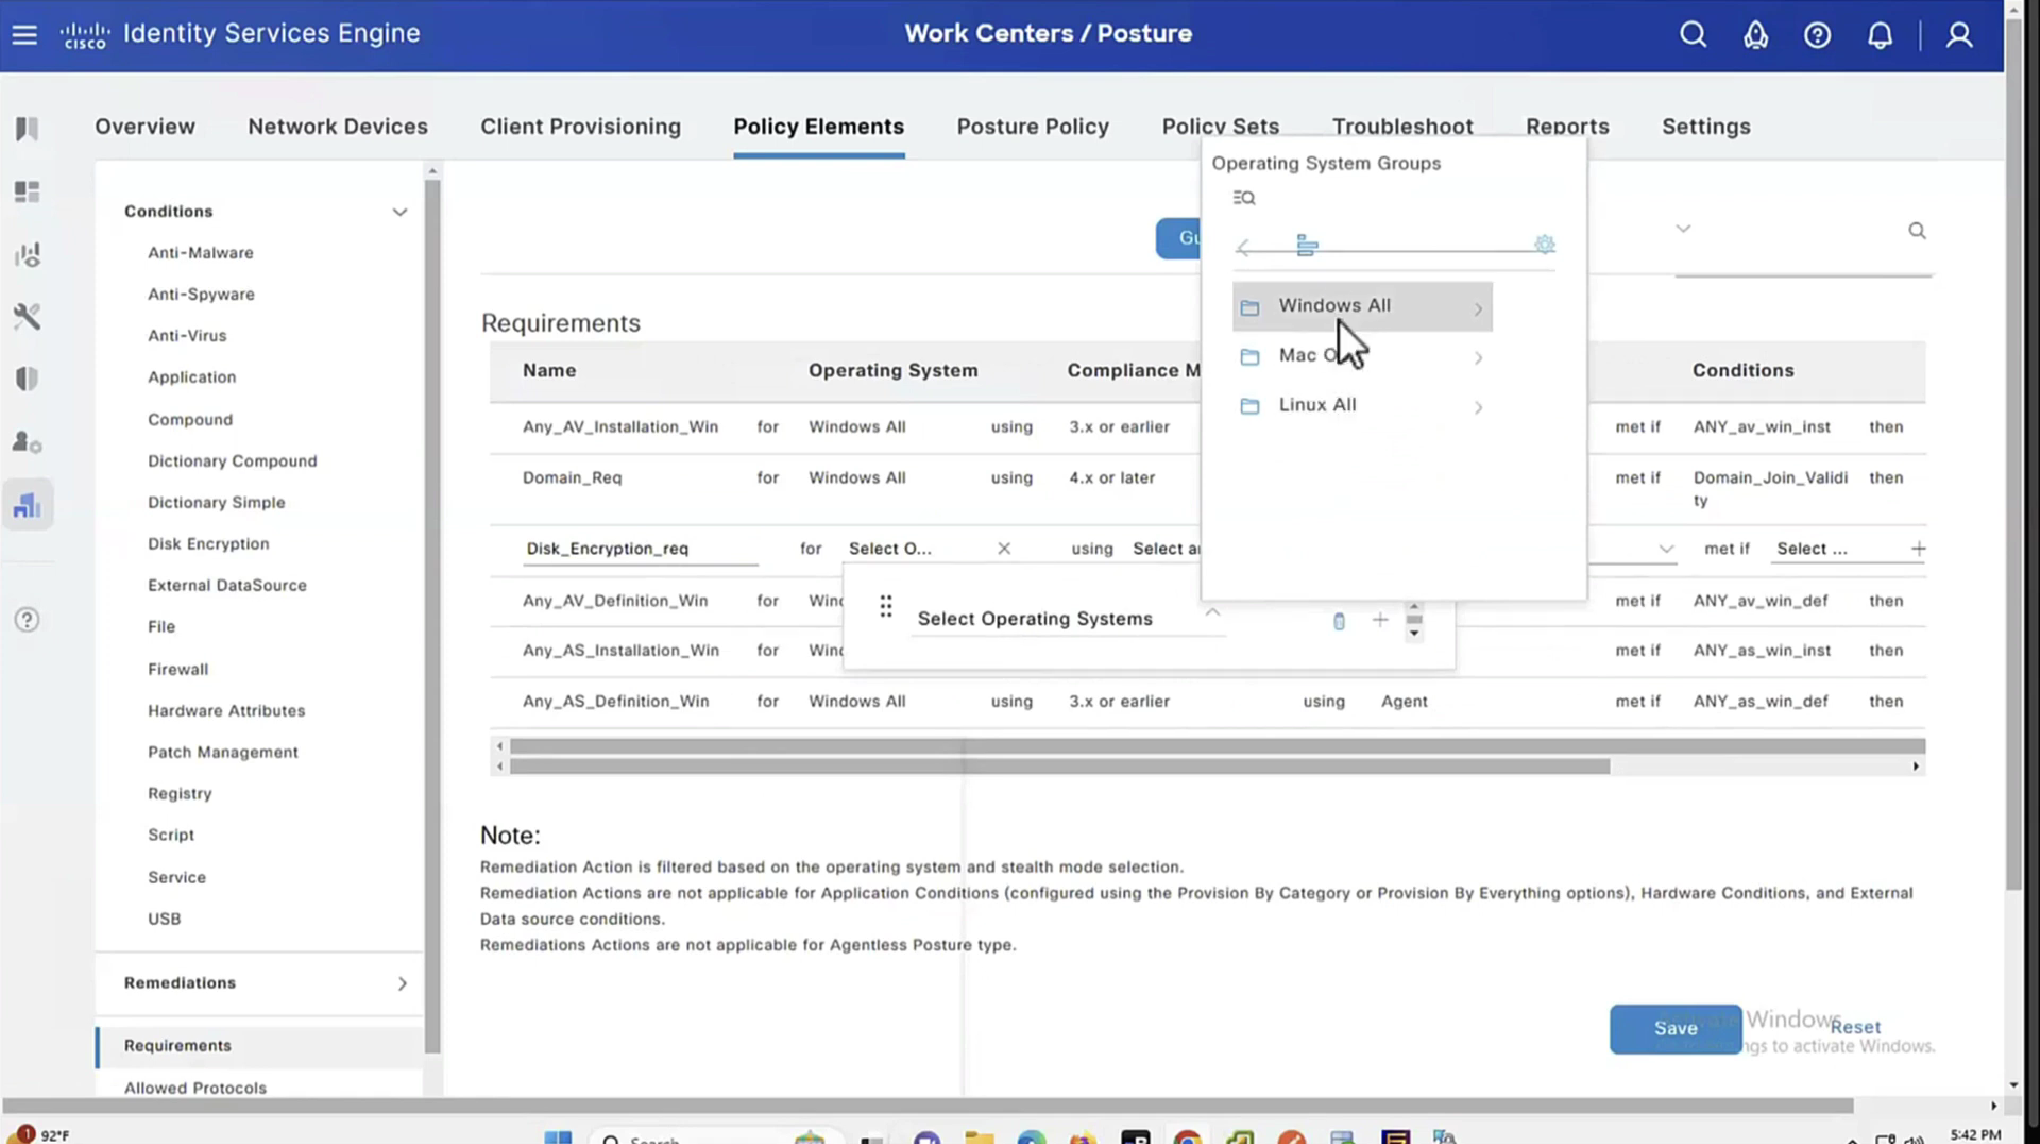
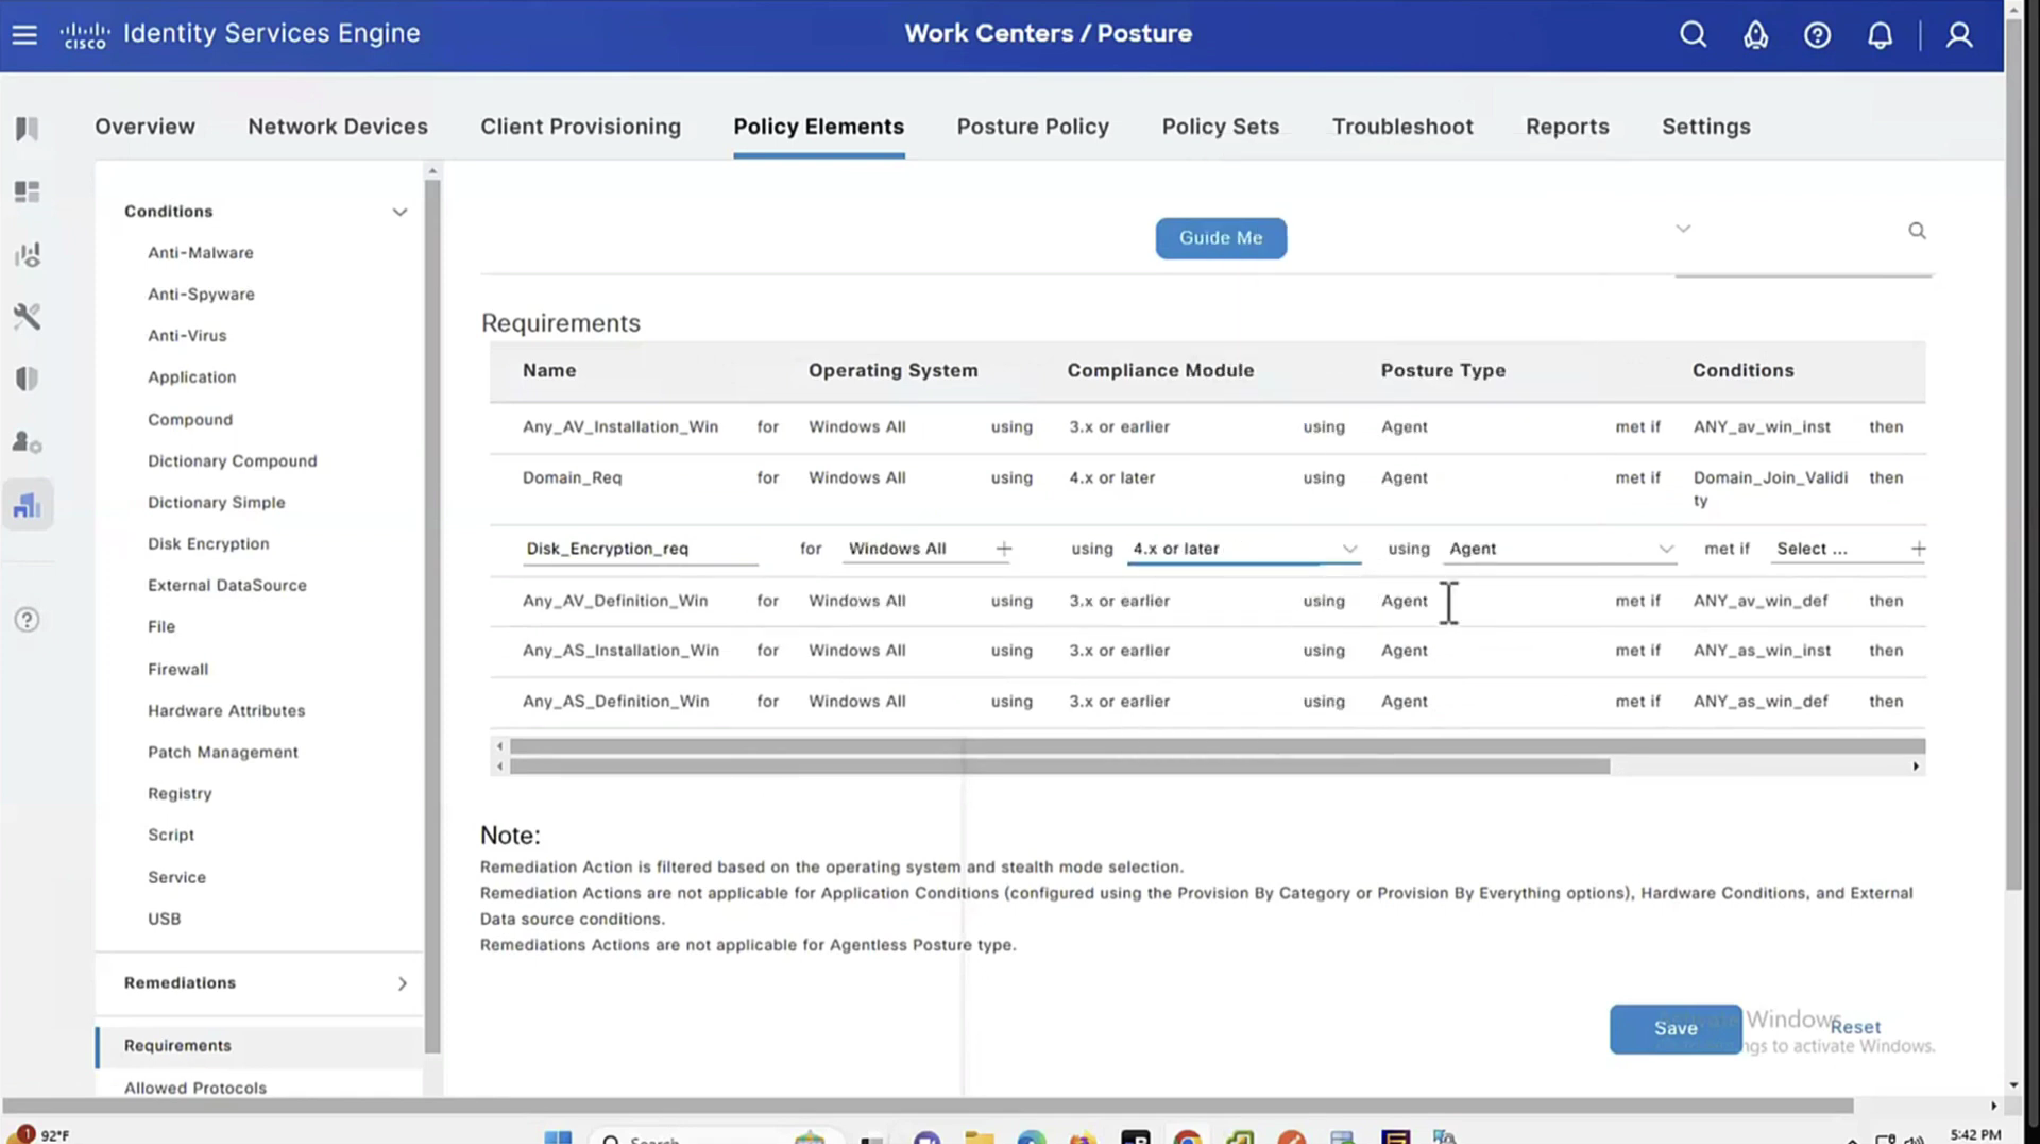
Step 2.Posture requirements configuration. Navigate to Policy > Policy Elements > Results > Posture > Requirements. This is an example of a Window Defender check:

Choose your posture condition in the new requirement and specify remediation action.
Step 3. Posture policy configuration. Navigate to Policy > Posture. Here, you can find an example of the policy used for this document. The policy has Windows Defender requirement assigned as mandatory and only contains external AD group name as a condition.

Configure the Client Provisioning Portal
For posture without redirection, the configuration of the client provisioning portal must be edited. Navigate to Administration > Device Portal Management > Client Provisioning.You can either use the default portal or create your own. The same portal can be used for both postures with and without redirection.
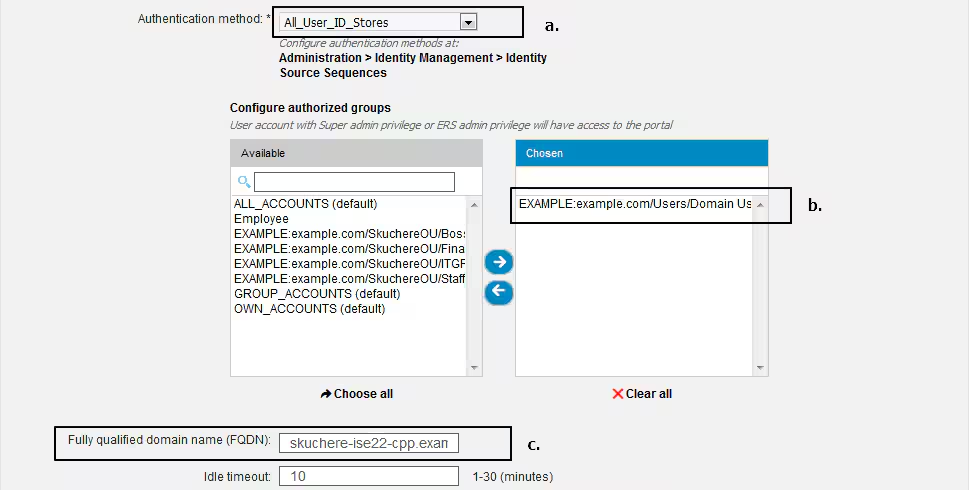
These settings must be edited in the portal configuration for the non-redirection scenario:
- In Authentication, specify Identity Source Sequence that must be used if SSO cannot locate a session for the user.
- As per the selected Identity Source Sequence list of available groups is populated. At this point, you must select groups that are authorized for portal login.
- FQDN of the client provisioning portal must be specified for scenarios when AC needs to be deployed from the client provisioning portal. This FQDN must be resolvable to ISE PSNs IPs. Users must be instructed to specify the FQDN in the web browser during the first connection attempt.
Configure Authorization Profiles and Policies
Initial access for clients when posture status is not available must be restricted. This can be achieved in multiple ways:
- DACL Assignment – During the restricted access phase, DACL can be assigned to the user to limit access. This approach can be used for Cisco Network Access Devices.
- VLAN Assignment – Before successful posture users can be put in restricted VLAN, this approach must work fine for almost any NAD vendor.
- Radius Filter-Id – With this attribute, ACL locally defined on NAD can be assigned to the user with unknown posture status. As this is a standard RFC attribute, this approach must work well for all NAD vendors.
Step 1. Configure DACL. Since this example is based on ASA, a NAD DACL can be used. For real-life scenarios, you must consider VLAN or Filter-ID as possible options.
In order to create DACL, navigate to Policy > Policy Elements > Results > Authorization > Downloadable ACLsand click Add.
During the unknown posture state, at least these permissions must be provided:
- DNS traffic
- DHCP traffic
- Traffic to ISE PSNs (ports 80 and 443 for a possibility to open friendly FQDN of portal. Port on which CP portal is running is 8443 by default and port 8905 for backward compatibility)
- Traffic to remediation servers if needed
This is an example of DACL without remediation servers:
Step 2. Configure authorization profile.
As usual for posture two authorization profiles are required. The first one must contain any kind of network access restrictions (profile with DACL used in this example). This profile can be applied to the authentications for which posture status is not equal to compliant. The second authorization profile can contain just permit access and can be applied for sessions with posture status equal to compliance.
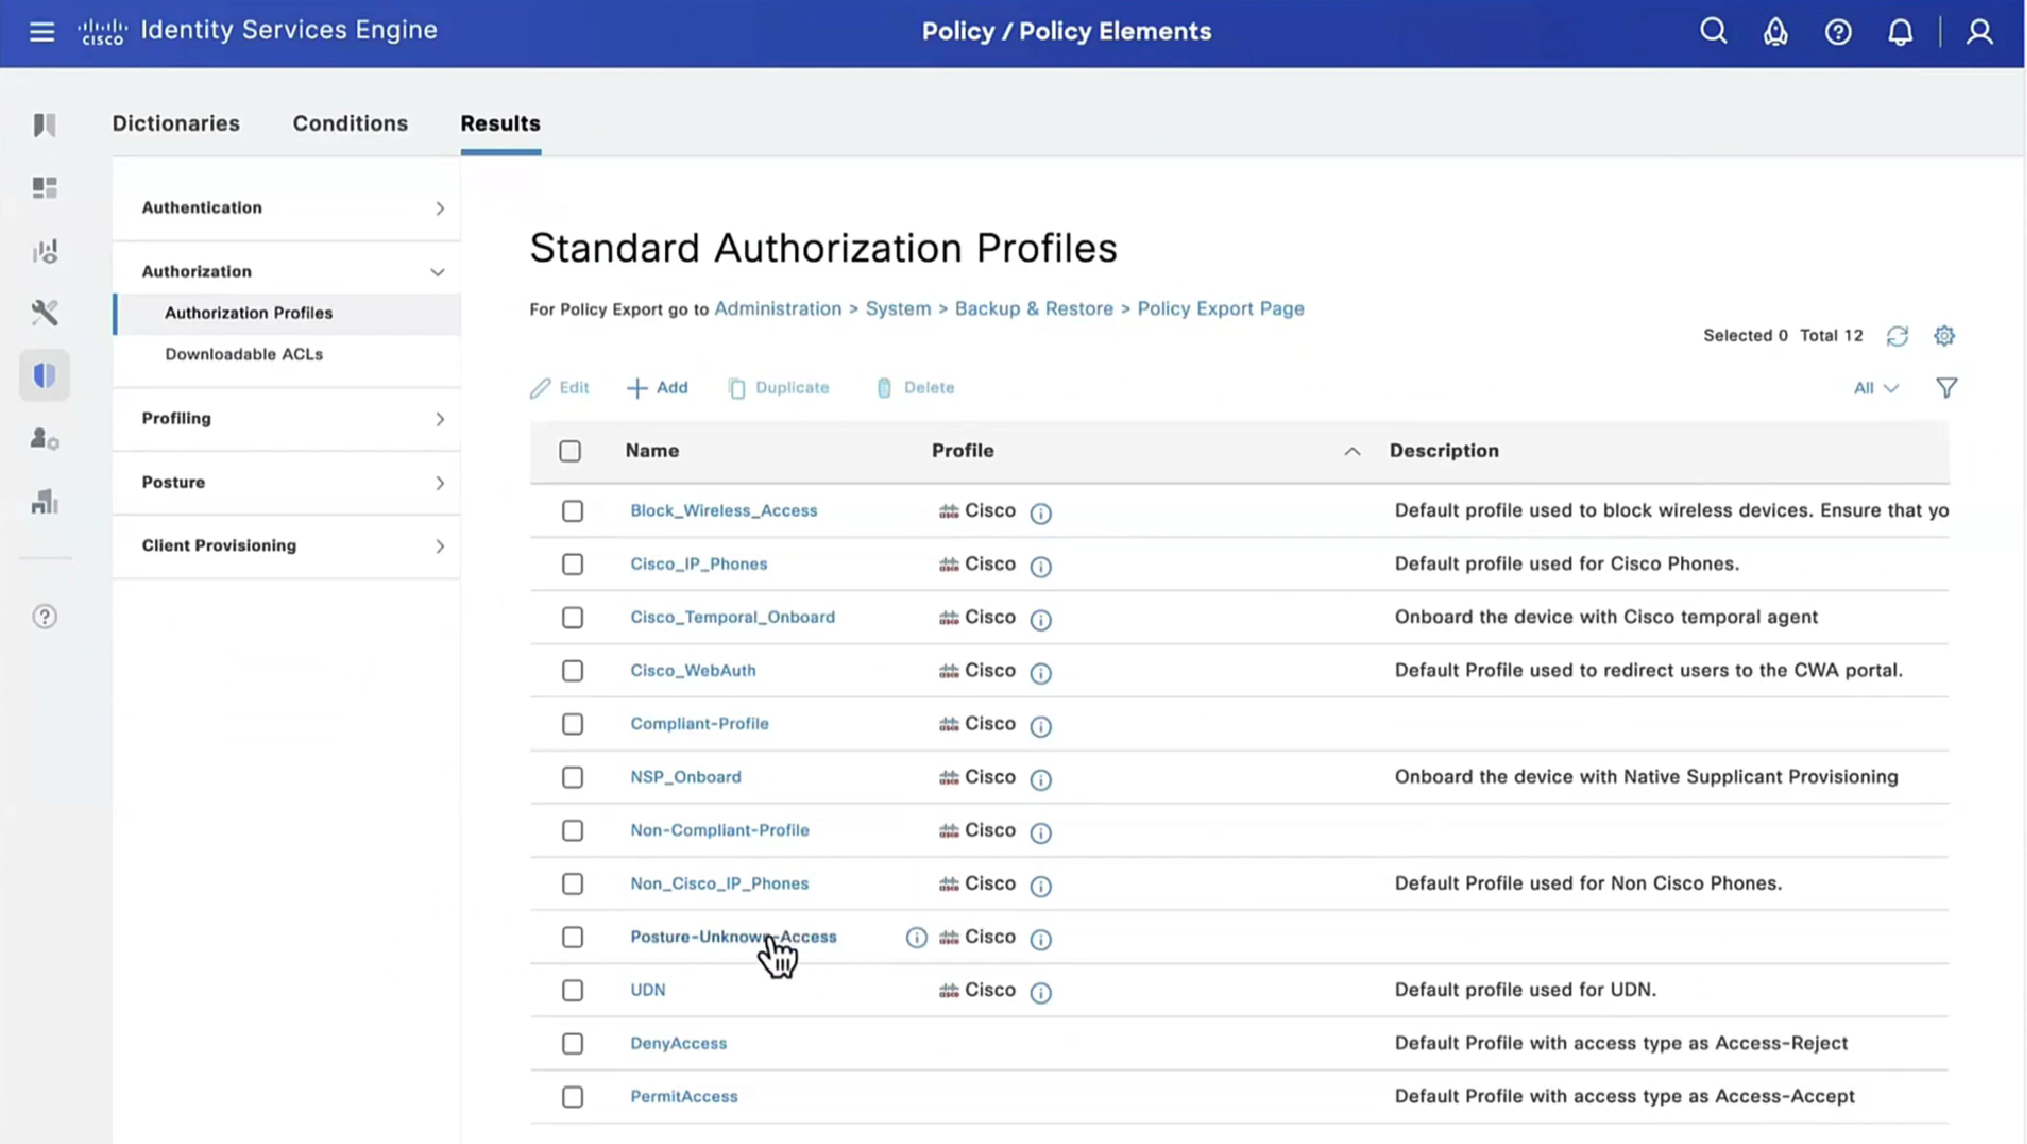
To create an authorization profile navigate to Policy > Policy Elements > Results > Authorization > Authorization Profiles.
Example of the restricted access profile:
In this example, the default ISE profile PermitAccess is used for the session after a successful posture status check.
Step 3. Configure authorization policy. During this step, two authorization policies must be created. One is to match the initial authentication request with unknown posture status and the second one is to assign full access after a successful posture process.
This is an example of simple authorization policies for this case:
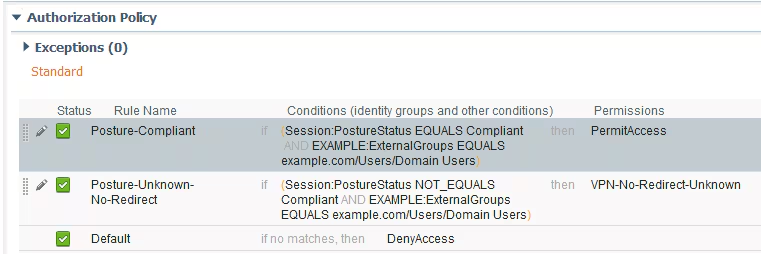
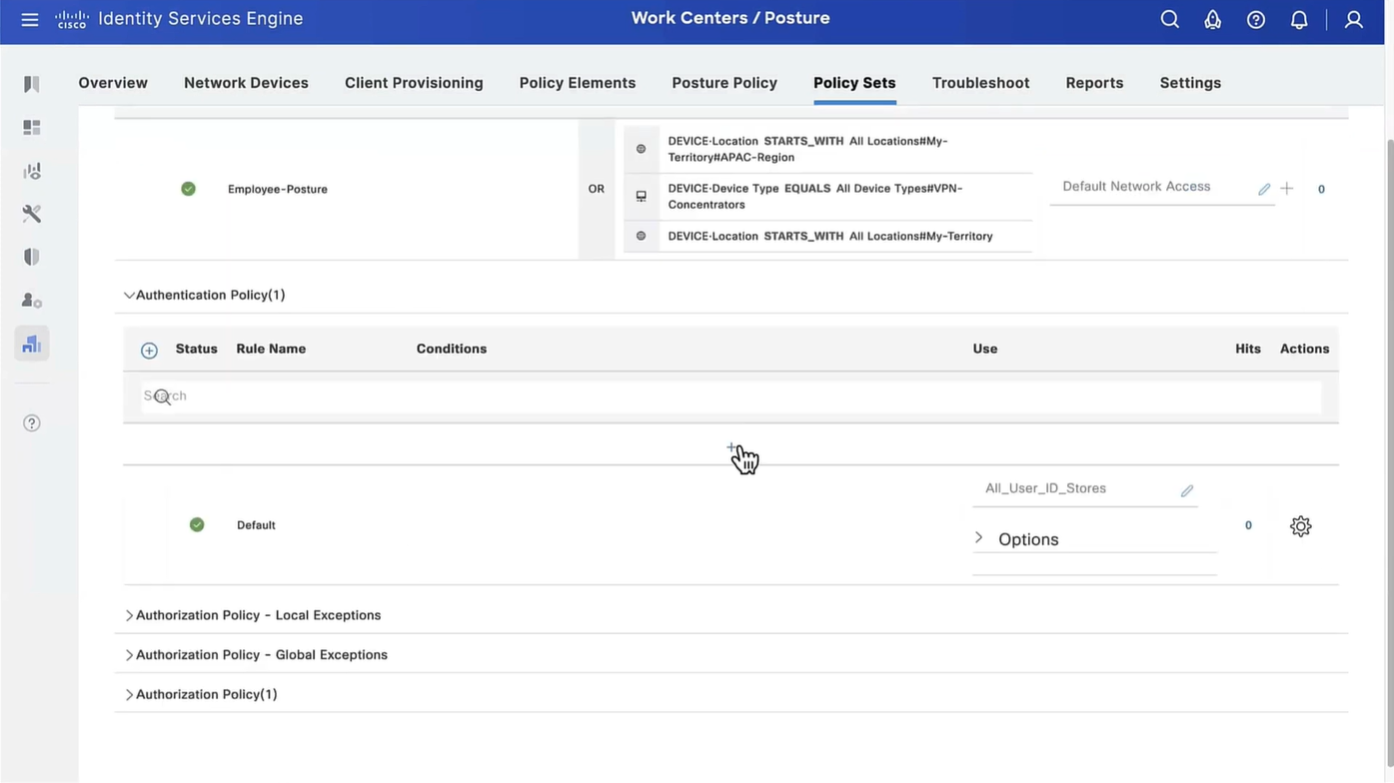
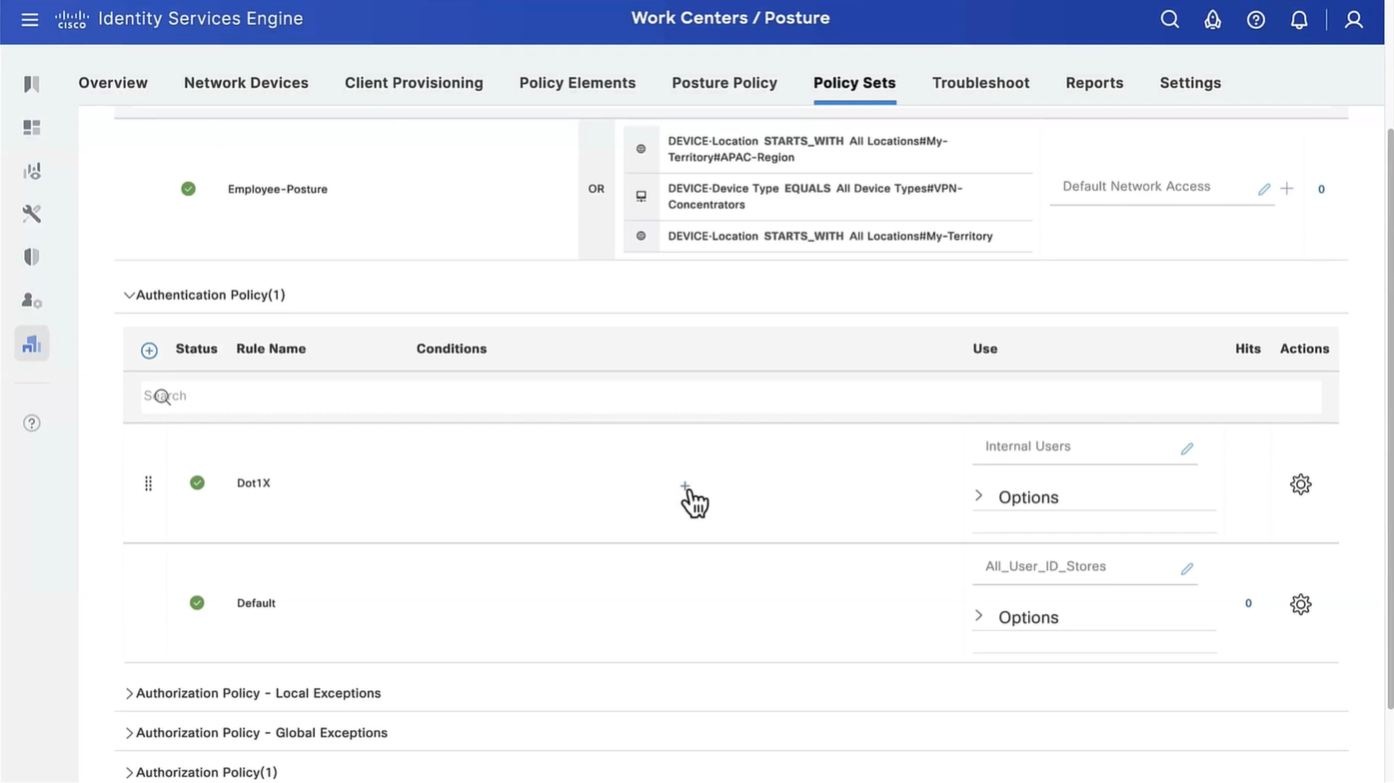
Configuration of Authentication policy is not a part of this document but you must keep in mind that before authorization policy processing successful authentication must happen.
Verify
Basic verification of the flow can consist of three main steps:
Step 1. Authentication flow verification.

- Initial authentication. For this step, you can be interested in the validation of which the authorization profile has been applied. If an unexpected authorization profile has been applied, investigate a detailed authentication report. You can open this report with a click on the magnifying glass in the Details column. You can compare attributes in detailed authentication reports with conditions in the authorization policy which you expect to match.
- DACL download event. This string is presented only in the case when the authorization profile selected for the initial authentication contains a DACL name.
- Portal authentication – This step in the flow indicates that the SSO mechanism failed to locate the user session. This can happen due to multiple reasons:
- NAD is not configured to send accounting messages or Framed IP address is not present in them
- CPP portal FQDN has been resolved to the IP of the ISE node different from the node where the initial authentication has been processed
- The client is located behind the NAT
- Session data change. In this particular example, the session state has changed from Unknown to Compliant.
- COA to the network access device. This COA must be successful to push new authentication from the NAD side and new authorization policy assignments on the ISE side. If COA has failed, you can open a detailed report to investigate the reason. The most common issues with COA can be:
- COA timeout – In such case either the PSN which has sent the request is not configured as a COA client on the NAD side, or the COA request has been dropped somewhere on the way.
- COA negative ACK – Indicate that COA has been received by NAD but due to some reason COA operation cannot be confirmed. For this scenario, a detailed report must contain a more detailed explanation.
As ASA is used as a NAD for this example, you can see no subsequent authentication request for the user. This happens due to the fact ISE uses COA push for ASA which avoids VPN service interruption. In such a scenario, COA itself contains new authorization parameters, so reauthentication is not needed.
Step 2.Client provisioning policy selection verification – For this, you can run a report on ISE which can help you to understand which client provisioning policies were applied for the user.
Navigate to Operations > Reports Endpoint and Users > Client Provisioning and run the report for the date which you need.
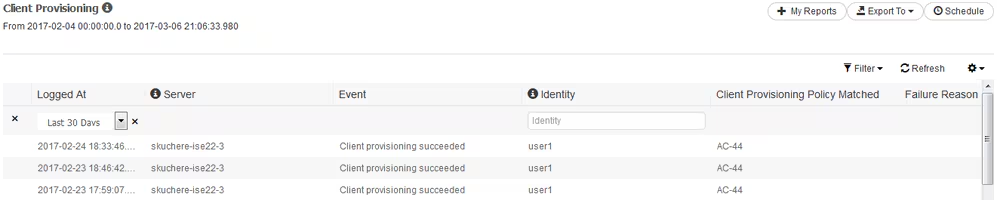
With this report, you can verify what client provisioning policy was selected. Also, in case of failure, reasons must be presented in the Failure Reason column.
Step 3.Posture report verification – Navigate to Operations > Reports Endpoint and Users > Posture Assessment by Endpoint.

You can open a detailed report from here for each particular event to check, for example, to which session ID this report belongs, which exact posture requirements were selected by ISE for the endpoint and the status for each requirement.
Troubleshoot
General Information
For posture process troubleshooting, these ISE components must be enabled to debug on the ISE nodes where the posture process can happen:
client-webapp– The component responsible for agent provisioning. Target log filesguest.logandise-psc.log.guestacess– The component responsible for client provisioning portal component and session owner lookup (when the request comes to the wrong PSN). Target log file –guest.log.provisioning– The component responsible for client provisioning policy processing. Target log file –guest.log.posture– All posture-related events. Target log file –ise-psc.log.
For client-side troubleshooting, you can use these:
acisensa.log-In case of client provisioning failure on the client side, this file is created in the same folder to which NSA has been downloaded (downloads directory for Windows normally).AnyConnect_ISEPosture.txt– This file can be found in the DART bundle in the directoryCisco AnyConnect ISE Posture Module. All information about ISE PSN discovery and general steps of posture flow is logged into this file.
Troubleshooting Common Problems
SSO Related Issues
In case of a successful SSO, you can see these messages in the ise-psc.log, this set of messages indicates that session lookup has finished successfully and authentication on the portal can be skipped.
2016-11-09 15:07:35,951 DEBUG [http-bio-10.48.30.40-8443-exec-12][] cisco.cpm.posture.runtime.PostureRuntimeFactory -::::- looking for Radius session with input values : sessionId: null, MacAddr: null, ipAddr: 10.62.145.121
2016-11-09 15:07:35,989 DEBUG [http-bio-10.48.30.40-8443-exec-12][] cisco.cpm.posture.runtime.PostureRuntimeFactory -::::- looking for session using session ID: null, IP addrs: [10.62.145.121], mac Addrs [null]
2016-11-09 15:07:35,989 DEBUG [http-bio-10.48.30.40-8443-exec-12][] cisco.cpm.posture.runtime.PostureRuntimeFactory -::::- looking for session using IP 10.62.145.121
2016-11-09 15:07:35,989 DEBUG [http-bio-10.48.30.40-8443-exec-12][] cisco.cpm.posture.runtime.PostureRuntimeFactory -::::- nasPortType = 5
2016-11-09 15:07:35,989 DEBUG [http-bio-10.48.30.40-8443-exec-12][] cisco.cpm.posture.runtime.PostureRuntimeFactory -::::- nasPortType equal to 5 ( 5 is virtual NAS_PORT_TYPE for VPN ). Found a VPN session null using ip address 10.62.145.121
2016-11-09 15:07:35,989 DEBUG [http-bio-10.48.30.40-8443-exec-12][] cisco.cpm.posture.runtime.PostureRuntimeFactory -::::- Found session c0a801010002600058232bb8 using ipAddr 10.62.145.121
You can use the endpoint IP address as a search key to find this information.
A bit later in the guest log, you must see that authentication has been skipped:
2016-11-09 15:07:35,989 DEBUG [http-bio-10.48.30.40-8443-exec-12][] guestaccess.flowmanager.step.cp.CPInitStepExecutor -::- SessionInfo is not null and session AUTH_STATUS = 1
2016-11-09 15:07:35,989 DEBUG [http-bio-10.48.30.40-8443-exec-12][] com.cisco.ise.portalSessionManager.PortalSession -::- Putting data in PortalSession with key and value: Radius.Session c0a801010002600058232bb8
2016-11-09 15:07:35,989 DEBUG [http-bio-10.48.30.40-8443-exec-12][] com.cisco.ise.portalSessionManager.PortalSession -::- Putting data in PortalSession with key : Radius.Session
2016-11-09 15:07:35,989 DEBUG [http-bio-10.48.30.40-8443-exec-12][] guestaccess.flowmanager.step.cp.CPInitStepExecutor -::- Login step will be skipped, as the session =c0a801010002600058232bb8 already established for mac address null , clientIPAddress 10.62.145.121
2016-11-09 15:07:36,066 DEBUG [http-bio-10.48.30.40-8443-exec-12][] cpm.guestaccess.flowmanager.processor.PortalFlowProcessor -::- After executeStepAction(INIT), returned Enum: SKIP_LOGIN_PROCEED
In case the SSO does not work, the ise-psc log file contains information about session lookup failure:
2017-02-23 17:59:00,779 DEBUG [http-bio-10.48.17.249-8443-exec-2][] cisco.cpm.posture.runtime.PostureRuntimeFactory -::::- looking for Radius session with input values : sessionId: null, MacAddr: null, ipAddr: 10.62.145.44
2017-02-23 17:59:00,779 DEBUG [http-bio-10.48.17.249-8443-exec-2][] cisco.cpm.posture.runtime.PostureRuntimeFactory -::::- looking for session using session ID: null, IP addrs: [10.62.145.44], mac Addrs [null]
2017-02-23 17:59:00,779 DEBUG [http-bio-10.48.17.249-8443-exec-2][] cisco.cpm.posture.runtime.PostureRuntimeFactory -::::- looking for session using IP 10.62.145.44
2017-02-23 17:59:00,779 DEBUG [http-bio-10.48.17.249-8443-exec-2][] cisco.cpm.posture.runtime.PostureRuntimeFactory -::::- nasPortType = null
2017-02-23 17:59:00,779 DEBUG [http-bio-10.48.17.249-8443-exec-2][] cisco.cpm.posture.runtime.PostureRuntimeFactory -::::- nasPortType == null or is not a virtual NAS_PORT_TYPE ( 5 ).
2017-02-23 17:59:00,779 DEBUG [http-bio-10.48.17.249-8443-exec-2][] cisco.cpm.posture.runtime.PostureRuntimeFactory -::::- No Radius session found
In the guest.log in such a case, you must see full user authentication on the portal:
2017-02-23 17:59:00,779 DEBUG [http-bio-10.48.17.249-8443-exec-2][] cpm.guestaccess.flowmanager.step.StepExecutor -::- Find Next Step=LOGIN
2017-02-23 17:59:00,779 DEBUG [http-bio-10.48.17.249-8443-exec-2][] cpm.guestaccess.flowmanager.step.StepExecutor -::- Step : LOGIN will be visible!
2017-02-23 17:59:00,779 DEBUG [http-bio-10.48.17.249-8443-exec-2][] cpm.guestaccess.flowmanager.step.StepExecutor -::- Returning next step =LOGIN
2017-02-23 17:59:00,780 INFO [http-bio-10.48.17.249-8443-exec-2][] cpm.guestaccess.flowmanager.step.StepExecutor -::- Radius Session ID is not set, assuming in dry-run mode
In case of authentication failures on the portal, you must focus on the portal configuration verification – Which identity store is in use? Which groups are authorized for login?
Troubleshoot Client Provisioning Policy Selection
In case of client provisioning policies failures or incorrect policy processing, you can check the guest.log file for more details:
2017-02-23 17:59:07,080 DEBUG [http-bio-10.48.17.249-8443-exec-2][] guestaccess.flowmanager.step.guest.ClientProvStepExecutor -:user1:- In Client Prov : userAgent =Mozilla/5.0 (Windows NT 6.1; WOW64; rv:51.0) Gecko/20100101 Firefox/51.0, radiusSessionID=null, idGroupName=S-1-5-21-70538695-790656579-4293929702-513, userName=user1, isInUnitTestMode=false
2017-02-23 17:59:07,080 DEBUG [http-bio-10.48.17.249-8443-exec-2][] cpm.guestaccess.common.utils.OSMapper -:user1:- UserAgent : Mozilla/5.0 (Windows NT 6.1; WOW64; rv:51.0) Gecko/20100101 Firefox/51.0
2017-02-23 17:59:07,080 DEBUG [http-bio-10.48.17.249-8443-exec-2][] cpm.guestaccess.common.utils.OSMapper -:user1:- Client OS: Windows 7 (All)
2017-02-23 17:59:07,080 DEBUG [http-bio-10.48.17.249-8443-exec-2][] guestaccess.flowmanager.step.guest.ClientProvStepExecutor -:user1:- Retrieved OS=Windows 7 (All)
2017-02-23 17:59:07,080 DEBUG [http-bio-10.48.17.249-8443-exec-2][] guestaccess.flowmanager.step.guest.ClientProvStepExecutor -:user1:- Updating the idGroupName to NAC Group:NAC:IdentityGroups:S-1-5-21-70538695-790656579-4293929702-513
2017-02-23 17:59:07,080 DEBUG [http-bio-10.48.17.249-8443-exec-2][] guestaccess.flowmanager.step.guest.ClientProvStepExecutor -:user1:- User Agent/Radius Session is empty or in UnitTestMode
2017-02-23 17:59:07,080 DEBUG [http-bio-10.48.17.249-8443-exec-2][] guestaccess.flowmanager.step.guest.ClientProvStepExecutor -:user1:- Calling getMatchedPolicyWithNoRedirection for user=user1
2017-02-23 17:59:07,505 DEBUG [http-bio-10.48.17.249-8443-exec-2][] guestaccess.flowmanager.step.guest.ClientProvStepExecutor -:user1:- CP Policy Status =SUCCESS, needToDoVlan=false, CoaAction=NO_COA
In the first string, you can see how information about the session is injected into the policy selection engine, in case of no policy match or incorrect policy match, you can compare attributes from here with your client provisioning policy configuration. The last string indicates the policy selection status.
Troubleshoot Posture Process
On the client side, you must be interested in the investigation of the probes and their results. This is an example of a successful stage 1 probe:
******************************************

Date : 02/23/2017
Time : 17:59:57
Type : Unknown
Source : acise

Description : Function: Target::Probe
Thread Id: 0x4F8
File: SwiftHttpRunner.cpp
Line: 1415
Level: debug

PSN probe skuchere-ise22-cpp.example.com with path /auth/status, status is -1..

******************************************
At this stage, PSN returns to AC information about the session owner. You can see these couple of messages later:
******************************************

Date : 02/23/2017
Time : 17:59:58
Type : Unknown
Source : acise

Description : Function: Target::probeRecentConnectedHeadEnd
Thread Id: 0xBE4
File: SwiftHttpRunner.cpp
Line: 1674
Level: debug

Target skuchere-ise22-2.example.com, posture status is Unknown..

******************************************
Session owners return to the agent all the required information:
******************************************

Date : 02/23/2017
Time : 17:59:58
Type : Unknown
Source : acise

Description : Function: SwiftHttpRunner::invokePosture
Thread Id: 0xFCC
File: SwiftHttpRunner.cpp
Line: 1339
Level: debug

MSG_NS_SWISS_NEW_SESSION, <?xml version="1.0" ?>
<root>
 <IP></IP>
 <FQDN>skuchere-ise22-2.example.com</FQDN>
 <PostureDomain>posture_domain</PostureDomain>
 <sessionId>c0a801010009e00058af0f7b</sessionId>
 <configUri>/auth/anyconnect?uuid=106a93c0-9f71-471c-ac6c-a2f935d51a36</configUri>
 <AcPackUri>/auth/provisioning/download/81d12d4b-ff58-41a3-84db-5d7c73d08304</AcPackUri>
 <AcPackPort>8443</AcPackPort>
 <AcPackVer>4.4.243.0</AcPackVer>
 <PostureStatus>Unknown</PostureStatus>
 <PosturePort>8443</PosturePort>
 <PosturePath>/auth/perfigo_validate.jsp</PosturePath>
 <PRAConfig>0</PRAConfig>
 <StatusPath>/auth/status</StatusPath>
 <BackupServers>skuchere-ise22-1.example.com,skuchere-ise22-3.example.com</BackupServers>
</root>
.

******************************************
From the PSN side, you can focus on these messages in the guest.log when you expect the initial request that comes to the node does not own the session:
2017-02-23 17:59:56,345 DEBUG [http-bio-10.48.17.249-8443-exec-10][] cisco.cpm.client.posture.NextGenDiscoveryServlet -::- Got http request from 10.62.145.44 user agent is: Mozilla/4.0 (compatible; WINDOWS; 1.2.1.6.1.48; AnyConnect Posture Agent v.4.4.00243)
2017-02-23 17:59:56,345 DEBUG [http-bio-10.48.17.249-8443-exec-10][] cisco.cpm.client.posture.NextGenDiscoveryServlet -::- mac_list from http request ==> 00:0B:7F:D0:F8:F4,00:0B:7F:D0:F8:F4
2017-02-23 17:59:56,345 DEBUG [http-bio-10.48.17.249-8443-exec-10][] cisco.cpm.client.posture.NextGenDiscoveryServlet -::- iplist from http request ==> 172.16.31.12,10.62.145.95
2017-02-23 17:59:56,345 DEBUG [http-bio-10.48.17.249-8443-exec-10][] cisco.cpm.client.posture.NextGenDiscoveryServlet -::- Session id from http request - req.getParameter(sessionId) ==> null
2017-02-23 17:59:56,345 DEBUG [http-bio-10.48.17.249-8443-exec-10][] cpm.client.provisioning.utils.ProvisioningUtil -::- the input ipAddress from the list currently being processed in the for loop ==> 172.16.31.12
2017-02-23 17:59:56,345 DEBUG [http-bio-10.48.17.249-8443-exec-10][] cpm.client.provisioning.utils.ProvisioningUtil -::- the input ipAddress from the list currently being processed in the for loop ==> 10.62.145.95
2017-02-23 17:59:56,368 DEBUG [http-bio-10.48.17.249-8443-exec-10][] cisco.cpm.client.posture.NextGenDiscoveryServlet -::- Found Client IP null and corresponding mac address null
2017-02-23 17:59:56,369 ERROR [http-bio-10.48.17.249-8443-exec-10][] cpm.client.provisioning.utils.ProvisioningUtil -::- Session Info is null
2017-02-23 17:59:56,369 DEBUG [http-bio-10.48.17.249-8443-exec-10][] cisco.cpm.client.posture.NextGenDiscoveryServlet -::- Not able to find a session for input values - sessionId : null, Mac addresses : [00:0B:7F:D0:F8:F4, 00:0B:7F:D0:F8:F4], client Ip : [172.16.31.12, 10.62.145.95]
2017-02-23 17:59:56,369 DEBUG [http-bio-10.48.17.249-8443-exec-10][] cisco.cpm.client.posture.NextGenDiscoveryServlet -::- clientMac is null/ empty, will go over the mac list to query MNT for active session
2017-02-23 17:59:56,369 DEBUG [http-bio-10.48.17.249-8443-exec-10][] cisco.cpm.client.posture.NextGenDiscoveryServlet -::- Performing MNT look up for macAddress ==> 00-0B-7F-D0-F8-F4
2017-02-23 17:59:56,539 DEBUG [http-bio-10.48.17.249-8443-exec-10][] cisco.cpm.client.posture.NextGenDiscoveryServlet -::- Performed MNT lookup, found session 0 with session id c0a801010009e00058af0f7b
2017-02-23 17:59:56,539 DEBUG [http-bio-10.48.17.249-8443-exec-10][] cpm.client.provisioning.utils.ProvisioningUtil -::- getting NIC name for skuchere-ise22-cpp.example.com
2017-02-23 17:59:56,541 DEBUG [http-bio-10.48.17.249-8443-exec-10][] cpm.client.provisioning.utils.ProvisioningUtil -::- local interface 0 addr 10.48.17.249 name eth0
2017-02-23 17:59:56,541 DEBUG [http-bio-10.48.17.249-8443-exec-10][] cpm.client.provisioning.utils.ProvisioningUtil -::- Nic name for local host: skuchere-ise22-cpp.example.com is: eth0
2017-02-23 17:59:56,541 DEBUG [http-bio-10.48.17.249-8443-exec-10][] cpm.client.provisioning.utils.ProvisioningUtil -::- getting host FQDN or IP for host skuchere-ise22-2 NIC name eth0
2017-02-23 17:59:56,545 DEBUG [http-bio-10.48.17.249-8443-exec-10][] cpm.client.provisioning.utils.ProvisioningUtil -::- hostFQDNOrIP for host skuchere-ise22-2 nic eth0 is skuchere-ise22-2.example.com
2017-02-23 17:59:56,545 DEBUG [http-bio-10.48.17.249-8443-exec-10][] cisco.cpm.client.posture.NextGenDiscoveryServlet -::- PDP with session of 00-0B-7F-D0-F8-F4 is skuchere-ise22-2, FQDN/IP is: skuchere-ise22-2.example.com
2017-02-23 17:59:56,545 DEBUG [http-bio-10.48.17.249-8443-exec-10][] cisco.cpm.client.posture.NextGenDiscoveryServlet -::- Redirecting the request to new URL: https://skuchere-ise22-2.example.com:8443/auth/status
2017-02-23 17:59:56,545 DEBUG [http-bio-10.48.17.249-8443-exec-10][] cisco.cpm.client.posture.NextGenDiscoveryServlet -::- Session info is null. Sent an http response to 10.62.145.44.
2017-02-23 17:59:56,545 DEBUG [http-bio-10.48.17.249-8443-exec-10][] cpm.client.provisioning.utils.ProvisioningUtil -::- header X-ISE-PDP-WITH-SESSION value is skuchere-ise22-2.example.com
2017-02-23 17:59:56,545 DEBUG [http-bio-10.48.17.249-8443-exec-10][] cpm.client.provisioning.utils.ProvisioningUtil -::- header Location value is https://skuchere-ise22-2.example.com:8443/auth/status
Here you can see that PSN first tries to find a session locally, and after failure initiates a request to MNT with the use of the IPs and MACs list to locate the session owner.
A little bit later you must see a request from the client on the correct PSN:
2017-02-23 17:59:56,790 DEBUG [http-bio-10.48.30.41-8443-exec-8][] cisco.cpm.posture.runtime.PostureRuntimeFactory -::::- looking for session using session ID: null, IP addrs: [172.16.31.12, 10.62.145.95], mac Addrs [00:0B:7F:D0:F8:F4, 00:0B:7F:D0:F8:F4]
2017-02-23 17:59:56,790 DEBUG [http-bio-10.48.30.41-8443-exec-8][] cisco.cpm.posture.runtime.PostureRuntimeFactory -::::- looking for session using IP 172.16.31.12
2017-02-23 17:59:56,791 DEBUG [http-bio-10.48.30.41-8443-exec-8][] cisco.cpm.posture.runtime.PostureRuntimeFactory -::::- nasPortType = 5
2017-02-23 17:59:56,792 DEBUG [http-bio-10.48.30.41-8443-exec-8][] cisco.cpm.posture.runtime.PostureRuntimeFactory -::::- nasPortType equal to 5 ( 5 is virtual NAS_PORT_TYPE for VPN ). Found a VPN session null using ip address 172.16.31.12
2017-02-23 17:59:56,792 DEBUG [http-bio-10.48.30.41-8443-exec-8][] cisco.cpm.posture.runtime.PostureRuntimeFactory -::::- Found session c0a801010009e00058af0f7b using ipAddr 172.16.31.12
As a next step, PSN performs client provisioning policy lookup for this session:
2017-02-23 17:59:56,793 DEBUG [http-bio-10.48.30.41-8443-exec-8][] com.cisco.cpm.swiss.SwissServer -::::- null or empty value for hostport obtained from SwissServer : getHostNameBySession()
2017-02-23 17:59:56,793 DEBUG [http-bio-10.48.30.41-8443-exec-8][] cisco.cpm.posture.runtime.PostureRuntimeFactory -::::- looking for Radius session with input values : sessionId: c0a801010009e00058af0f7b, MacAddr: 00-0b-7f-d0-f8-f4, ipAddr: 172.16.31.12
2017-02-23 17:59:56,793 DEBUG [http-bio-10.48.30.41-8443-exec-8][] cisco.cpm.posture.runtime.PostureRuntimeFactory -::::- looking for session using session ID: c0a801010009e00058af0f7b, IP addrs: [172.16.31.12], mac Addrs [00-0b-7f-d0-f8-f4]
2017-02-23 17:59:56,793 DEBUG [http-bio-10.48.30.41-8443-exec-8][] cisco.cpm.posture.runtime.PostureRuntimeFactory -::::- Found session using sessionId c0a801010009e00058af0f7b
2017-02-23 17:59:56,795 DEBUG [http-bio-10.48.30.41-8443-exec-8][] cisco.cpm.posture.runtime.PosturePolicyUtil -::::- User user1 belongs to groups NAC Group:NAC:IdentityGroups:Endpoint Identity Groups:Profiled:Workstation,NAC Group:NAC:IdentityGroups:Any
2017-02-23 17:59:58,203 DEBUG [http-bio-10.48.30.41-8443-exec-8][] com.cisco.cpm.swiss.SwissServer -::::- null or empty value for hostport obtained from SwissServer : getHPortNumberBySession()
2017-02-23 17:59:58,907 DEBUG [http-bio-10.48.30.41-8443-exec-10][] cisco.cpm.posture.util.AgentUtil -::::- Increase MnT counter at CP:ClientProvisioning.ProvisionedResource.AC-44-Posture
In the next step, you can see the process of posture requirements selection. At the end of the step, a list of requirements is prepared and returned to the agent:
2017-02-23 18:00:00,372 DEBUG [http-bio-10.48.30.41-8443-exec-8][] cisco.cpm.posture.runtime.PostureHandlerImpl -:user1:::- About to query posture policy for user user1 with endpoint mac 00-0b-7f-d0-f8-f4
2017-02-23 18:00:00,423 DEBUG [http-bio-10.48.30.41-8443-exec-8][] cisco.cpm.posture.runtime.PostureManager -:user1:::- agentCMVersion=4.2.508.0, agentType=AnyConnect Posture Agent, groupName=OESIS_V4_Agents -> found agent group with displayName=4.x or later
2017-02-23 18:00:00,423 DEBUG [http-bio-10.48.30.41-8443-exec-8][] cisco.cpm.posture.runtime.PosturePolicyUtil -:user1:::- User user1 belongs to groups NAC Group:NAC:IdentityGroups:Endpoint Identity Groups:Profiled:Workstation,NAC Group:NAC:IdentityGroups:Any
2017-02-23 18:00:00,423 DEBUG [http-bio-10.48.30.41-8443-exec-8][] cisco.cpm.posture.runtime.PosturePolicyUtil -:user1:::- About to retrieve posture policy resources for os 7 Professional, agent group 4.x or later and identity groups [NAC Group:NAC:IdentityGroups:Endpoint Identity Groups:Profiled:Workstation, NAC Group:NAC:IdentityGroups:Any]
2017-02-23 18:00:00,432 DEBUG [http-bio-10.48.30.41-8443-exec-8][] cisco.cpm.posture.runtime.PosturePolicyUtil -:user1:::- Evaluate resourceId NAC Group:NAC:Posture:PosturePolicies:WinDefend by agent group with FQN NAC Group:NAC:AgentGroupRoot:ALL:OESIS_V4_Agents
2017-02-23 18:00:00,433 DEBUG [http-bio-10.48.30.41-8443-exec-8][] cisco.cpm.posture.runtime.PosturePolicyUtil -:user1:::- The evaluation result by agent group for resourceId NAC Group:NAC:Posture:PosturePolicies:WinDefend is Permit
2017-02-23 18:00:00,433 DEBUG [http-bio-10.48.30.41-8443-exec-8][] cisco.cpm.posture.runtime.PosturePolicyUtil -:user1:::- Evaluate resourceId NAC Group:NAC:Posture:PosturePolicies:WinDefend by OS group with FQN NAC Group:NAC:OsGroupRoot:ALL:WINDOWS_ALL:WINDOWS_7_ALL:WINDOWS_7_PROFESSIONAL_ALL
2017-02-23 18:00:00,438 DEBUG [http-bio-10.48.30.41-8443-exec-8][] cisco.cpm.posture.runtime.PosturePolicyUtil -:user1:::- stealth mode is 0
2017-02-23 18:00:00,438 DEBUG [http-bio-10.48.30.41-8443-exec-8][] cisco.cpm.posture.runtime.PosturePolicyUtil -:user1:::- The evaluation result by os group for resourceId NAC Group:NAC:Posture:PosturePolicies:WinDefend is Permit
2017-02-23 18:00:00,438 DEBUG [http-bio-10.48.30.41-8443-exec-8][] cisco.cpm.posture.runtime.PosturePolicyUtil -:user1:::- Evaluate resourceId NAC Group:NAC:Posture:PosturePolicies:WinDefend by Stealth mode NSF group with FQN NAC Group:NAC:StealthModeStandard
2017-02-23 18:00:00,439 DEBUG [http-bio-10.48.30.41-8443-exec-8][] cisco.cpm.posture.runtime.PosturePolicyUtil -:user1:::- Procesing obligation with posture policy resource with id NAC Group:NAC:Posture:PosturePolicies:WinDefend
2017-02-23 18:00:00,439 DEBUG [http-bio-10.48.30.41-8443-exec-8][] cisco.cpm.posture.runtime.PosturePolicyUtil -:user1:::- Found obligation id urn:cisco:cepm:3.3:xacml:response-qualifier for posture policy resource with id NAC Group:NAC:Posture:PosturePolicies:WinDefend
2017-02-23 18:00:00,439 DEBUG [http-bio-10.48.30.41-8443-exec-8][] cisco.cpm.posture.runtime.PosturePolicyUtil -:user1:::- Found obligation id PostureReqs for posture policy resource with id NAC Group:NAC:Posture:PosturePolicies:WinDefend
2017-02-23 18:00:00,439 DEBUG [http-bio-10.48.30.41-8443-exec-8][] cisco.cpm.posture.runtime.PosturePolicyUtil -:user1:::- Posture policy resource id WinDefend has following associated requirements []
2017-02-23 18:00:03,884 DEBUG [http-bio-10.48.30.41-8443-exec-8][] cpm.posture.runtime.agent.AgentXmlGenerator -:user1:::- policy enforcemnt is 0
2017-02-23 18:00:03,904 DEBUG [http-bio-10.48.30.41-8443-exec-8][] cpm.posture.runtime.agent.AgentXmlGenerator -:user1:::- simple condition: [Name=WinDefend, Descriptionnull, Service Name=WinDefend, Service Operator=Running, Operating Systems=[Windows All], Service Type=Daemon, Exit code=0]
2017-02-23 18:00:03,904 DEBUG [http-bio-10.48.30.41-8443-exec-8][] cpm.posture.runtime.agent.AgentXmlGenerator -:user1:::- check type is Service
2017-02-23 18:00:04,069 DEBUG [http-bio-10.48.30.41-8443-exec-8][] cisco.cpm.posture.runtime.PostureHandlerImpl -:user1:::- NAC agent xml <?xml version="1.0" encoding="UTF-8"?><cleanmachines>
 <version>ISE: 2.2.0.470</version>
 <encryption>0</encryption>
 <package>
 <id>10</id>
 <name>WinDefend</name>
 <description>Enable WinDefend</description>
 <version/>
 <type>3</type>
 <optional>0</optional>
 <action>3</action>
 <check>
 <id>WinDefend</id>
 <category>3</category>
 <type>301</type>
 <param>WinDefend</param>
 <operation>running</operation>
 </check>
 <criteria>(WinDefend)</criteria>
 </package>
</cleanmachines>
Later, you can see that the posture report was received by PSN:
2017-02-23 18:00:04,231 DEBUG [http-bio-10.48.30.41-8443-exec-8][] cisco.cpm.posture.runtime.PostureHandlerImpl -::::- UDID is 8afb76ad11e60531de1d3e7d2345dbba5f11a96d for end point 00-0b-7f-d0-f8-f4
2017-02-23 18:00:04,231 DEBUG [http-bio-10.48.30.41-8443-exec-8][] cisco.cpm.posture.runtime.PostureHandlerImpl -::::- Received posture request [parameters: reqtype=report, userip=10.62.145.44, clientmac=00-0b-7f-d0-f8-f4, os=WINDOWS, osVerison=1.2.1.6.1.48, architecture=9, provider=Device Filter, state=, userAgent=Mozilla/4.0 (compatible; WINDOWS; 1.2.1.6.1.48; AnyConnect Posture Agent v.4.4.00243), session_id=c0a801010009e00058af0f7b
At the end of the flow, ISE marks the endpoint as compliant and initiates COA:
2017-02-23 18:00:04,272 INFO [http-bio-10.48.30.41-8443-exec-8][] cisco.cpm.posture.runtime.PostureManager -:user1:::- Posture state is compliant for endpoint with mac 00-0b-7f-d0-f8-f4
2017-02-23 18:00:04,272 DEBUG [http-bio-10.48.30.41-8443-exec-8][] cisco.cpm.posture.runtime.PostureCoA -:user1:::- entering triggerPostureCoA for session c0a801010009e00058af0f7b
2017-02-23 18:00:04,272 DEBUG [http-bio-10.48.30.41-8443-exec-8][] cisco.cpm.posture.runtime.PostureCoA -:user1:::- Posture CoA is scheduled for session id [c0a801010009e00058af0f7b]
2017-02-23 18:00:04,272 DEBUG [http-bio-10.48.30.41-8443-exec-8][] cisco.cpm.posture.runtime.PostureCoA -:user1:::- Posture status for session id c0a801010009e00058af0f7b is Compliant
2017-02-23 18:00:04,273 DEBUG [http-bio-10.48.30.41-8443-exec-8][] cisco.cpm.posture.runtime.PostureCoA -:user1:::- Issue CoA on active session with sessionID c0a801010009e00058af0f7b
2017-02-23 18:00:04,273 DEBUG [http-bio-10.48.30.41-8443-exec-8][] cisco.cpm.posture.runtime.PostureCoA -:user1:::- Posture CoA is scheduled for session id [c0a801010009e00058af0f7b]